Another selection of creative and time-saving tricks for Yamaha's fully featured hard disk multitracker.
Last month I looked at some strategies for automating mixes with Yamaha's AW4416, as well as discussing the operation of the Waves Y56K effects board in this context. In this concluding part, I'll be examining some of the finer points of the multitracker's routing and editing functions, and demonstrating how they can help make the recording process easier and more creative.
Track Bouncing
Anyone who bought their AW4416 after the introduction of the labour-saving Quick Rec 2 page may well wonder why they should bother routing their signals to record tracks in any other way, but in the long run it's well worth learning your way around the Setup pages and getting to grips with the bussing structure so that you can get the most from the routing options. One situation where this is particularly important is when track bouncing, a process whereby you record a mix of several tracks onto a single track in order to free up the source tracks for recording extra parts. The procedure involves selecting the tracks to be combined, routing them to a common buss, and finally recording the result onto a separate track. Some recorders provide a special 'ping-pong buss' for this very purpose, but the AW4416 offers more than that by having a flexible eight-buss system.
In the following scenario, we have a mix with just one spare track requiring a three-part harmony vocal. The first thing to do is identify three tracks which do not need to be heard while overdubbing. I usually leave myself with the drums, the lead vocal (if it is relevant), and at least one key instrument to carry the melody. Whatever tracks are expendable for the purposes of monitoring are switched for virtual tracks which can be used for recording the backing vocals. The virtual tracks occupy the same monitoring channels as the ones they replace, and this means that they inherit the same insert patches, EQ, compression, and pan positions — all of which will probably need to be changed! Before doing so, make sure the setup is saved in a Scene so that you can recall the Monitor settings after you've completed the bounce.
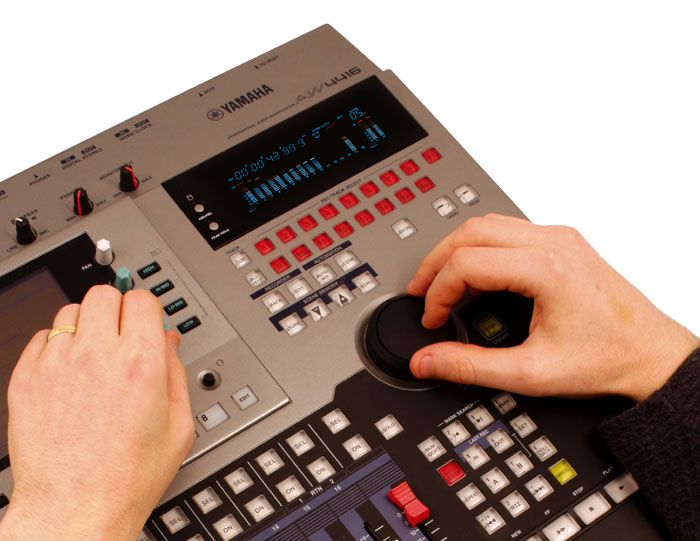
 Although you can record without ever tangling with the AW4416's internal group busses, you need to use them if you're going to do any track bouncing. You can find the internal mixer's channel routing switches via the front-panel Pan/Routing button — three tracks are routed to buss seven in this picture.
After that it's simply a matter of recording the three harmony parts to the virtual tracks. After recording, press the Pan/Routing button followed by the F3 key to bring up the monitor channels' Pan page. Here the buss routing and panning for all 16 monitor channels can be viewed together. For this example, engage buss number seven for each of the three harmony tracks, deselect the main stereo (ST) buss so that the same audio is not monitored twice during mixdown, and then ensure that the panning of all the parts is central.
The next task is to assign buss seven to the destination track, which, for the sake of this example, we'll make track 15. Press the Setup button to bring the patching pages to the screen and make sure that the Patch In page is displayed (hit the F1 key if necessary). The bottom section of the page has an informatively titled box labelled Recorder Track Input Assign, containing settings for all 16 tracks. Use the cursor keys or connected mouse to highlight track number 15 and rotate the data wheel to change its status to buss seven.
Finally, press the red Rec Track select button for track 15, so that it is flashing in record-ready mode. The balance of the three tracks can now be recorded onto track 15. I usually record my BVs using the Auto Punch facility, and use the same In and Out points for the bounce too. The Auto Punch is well worth using while setting up the correct mixdown balance, as it may take several passes to get things right. After the mix is finished, the virtual tracks can be swapped back, and all the monitor-channel changes can be undone by recalling the Scene you saved earlier. The same process works for any of the busses, or for any number of tracks, and more than one buss can be used at once, which is handy if a stereo mixdown to two tracks is required.
 Before starting track bouncing, it makes sense to save the pre-bounce setup to a spare mixer scene. That way, if you change your mind about the balance or processing of the bounced track later on you can come back to it and redo it.
Gating & Ducking From Aux Sends
In the main body of this article, I explain how it's possible to have the left-hand of two adjacent channels gating the right-hand one. However, there is another routing possibility which is particularly useful when working on a song where the interacting channels are not next to one another — it is available from the Key In Source box, which has two further routing options, one for Aux 1 and the other for Aux 2. In other words, when setting up the dynamics for a track which requires gating, either one of the first two Aux sends can be selected as the trigger. For this reason, I like to keep the first two aux busses free if at all possible.
For the sake of argument, let's say you have a synth pad which you want to gate in time with a song's rhythm, and the ideal trigger is a stereo snare and kick mix pre-recorded to tracks seven and eight. To create the patch, first make sure that the Monitor fader layer is selected by pressing the relevant Monitor button. For the synth part's Monitor channel, pick a gate processor from the channel's Dynamics Library, and select Aux 1 as the Key In Source. Next, press the Aux 1 Fader Mode button so that the hardware faders represent the send levels of each Monitor channel signal sent to Aux 1 buss. From here faders seven and eight can be raised to a decent level. Incidentally, the same thing can be done from the relevant Ch View page by selecting the on-screen aux-level fader, and then rotating the Data wheel. Having set the send level, the gate's Threshold, Attack, Release, Hold, and Range controls will need adjusting to obtain the desired effect.
It's also worth remembering that the AW has a ducking processor, which can be used with the same routing but for different effects. For example, when mixing it is often useful to lower the level of some mid-range or solo instruments — such as guitars — when the lead vocal is taking centre stage. In such a case, by making vocal track the Key In trigger, choosing a ducking processor (shown as DUK in the Dynamics Library) for the guitar tracks, and setting its Range to a few decibels, its possible ensure that the level of the guitar parts automatically dips whenever the vocalist starts up.
Effects Via Editing
Although the AW4416 has two internal effects processors, these are quickly used up in a complex mix, so it's useful to know that you can create nice chorus/detuning effects using the audio-editing functions, freeing up an effects processor at the expense of an audio track or two. If you create a copy of a track at a slightly later time position than the original, you can create a great 'static chorus' effect. This can be fine-tuned using the copy's channel Delay parameter.
First identify a bit of audio, perhaps guitar or vocal, which you want to apply such an effect to, and decide where its start and finish points are. Then head to the Edit menu, choose Part and from its submenu, and select Copy to copy it to a spare track. When specifying the To Start point, add on something like 30ms to the value that was input in the From Start box. This offset will separate the copy from the original, such that when they are mixed together this will create a chorusing effect. If you are unsure as to how much delay to apply, you can either experiment by trying a delay from the effects processor first, or you can dial in some Sample Delay from the relevant monitor channel's editing page — up to 59ms can be applied in this way, which should be more than enough.
To increase the impact of the effect, select the copied audio, return to the Edit menu and choose Pitch. This function reprocesses audio without altering its length, allowing for pitch adjustments in semitones and cents. To achieve a thickening sound rather than a harmony, it's only really necessary to pitch-shift by a few cents. After the pitch and delay edits, the part may still need a little attenuation, panning, and EQ in order to further separate it from the original audio, all of which can be done from the relevant monitor-channel editing page again. The delayed track can be enhanced using the Track Pitch function.
Creative Use Of The Oscillator
The AW4416 doesn't immediately appear to have too many creative 'sound warping' functions outside its effects section, but its facilities and routing options do offer a few creative possibilities to the more intrepid user. The first page in the Utility menu provides a small selection of oscillator types which can be freely routed to the eight busses, eight auxiliary channels, and main stereo buss. At first glance the 100Hz, 1kHz, and 10kHz sine waves and white noise don't promise much, and Yamaha only really included them for test purposes. However, with a little clever routing, they can be used as the basis of a variety of sound effects.
Select the Patch In page from the Setup menu and navigate to the Record Track Input Assign box at the bottom. Pick an empty track and select a spare buss for its input. From the same page, change one of the effects processors from its standard send setting to the Insert status by selecting it in the Effect Patch box and then turning the data wheel. Next, press the Ch View button and go to the monitor page relating to the spare track on which you are about to record. In the middle of the page is the Effect Insert Assign box, which allows you to set your choice of processor as the channel's insert effect.
Now go to the Oscillator page and engage the buss you previously assigned to the spare track, and make sure the stereo-buss routing is switched off. At this stage your routing allows you to record an oscillator tone to the spare track via the selected effects processor. With the track in question armed for recording, turn on the oscillator, pick the 100Hz tone, and find a comfortable listening volume using the oscillator's Level control and the channel fader. To route the oscillator through the effects, first go to its Utility page, switch it on, and assign it to a group buss using the routing switches.
To start with, select the Ring Mod effect by pressing the Aux 7 button and then following the F2 tab to the Library page. Now press F1 to move back to the Effect Edit screen and set the Depth to zero percent so that a constant tone can be heard. Then adjust the Osc Frequency control until the signal is in tune with whatever else is recorded. Once this has been achieved, the oscillator depth can be adjusted to taste, as can the FM Frequency control, which more or less allows the effect to be synced with a Song's tempo. Unfortunately, the tuning may not quite be fine enough to create a totally sync'ed effect, but it could be used as the foundation for a Song. Obviously a different sound is had by using the 1kHz and 10kHz tones, so experimentation is worthwhile. Setting a slow sweep and 100-percent depth, causes the sound to rise and fall over a huge range very gradually, whereas a fast FM sweep results in a more frantic effect. Detuning the oscillator frequency away from the Song's tuning can also work well. Next, this group buss can be routed to a recorder track via the Setup Patch In page...
Tremolo is the other useful effect found in the Yamaha onboard processor, which acts just as effectively on the white noise oscillator as it does on the sine waves. Set the tremolo frequency and pick a modulation waveform from the algorithm's oscillator menu. Sine and triangle are worth trying, but it's the square waveform which is most useful in the sound-effects department, as it cuts the signal more brutally, particularly when the depth of the Tremolo is at 100 percent. With these settings, selecting white noise on the oscillator will produce short bursts of noise that are very percussive.
Dolphins & Alarm Clocks?
The creative possibilities don't stop there though. For the following example, set the Oscillator level to -17dB and the tremolo's controls so that the frequency is at 7.85Hz, the depth is 100 percent, and the waveform is square. The mix balance of the effect should remain at 100 percent and the rest of the EQ controls at a neutral position. Now go to the channel view page for the monitor channel the effect is being monitored through, and select its dynamics processor. From the library, pick the gate (GAT) numbered 003, and apply the following settings for the white noise patch described above: Threshold -12dB; Decay, 23ms; Range, -70dB; Attack, 9ms; and Hold, 7.28ms. ...and one of the effects processors can be switched to act as an insert effect.
With the above setup you should be hearing a nice clear rhythmical effect which isn't too harsh. Increasing the threshold to -11dB makes the sound far softer, but taking it to -10dB should mute the effect altogether. Leave the patch at -10dB and move to the channel EQ page. Pick one of the mid controls and change its Q to the narrowest setting of 10. Then switch the EQ on and boost the mid-band by 18dB. Boosting at about 250Hz, the AW should be producing an interesting scratchy sound, not unlike someone shaking a tray of sand. The data wheel can then be used to rapidly sweep the band up and down, producing a variety of tonal effects. To make things more interesting, move to the other EQ mid-band, narrow its Q to 10, and this time cut by 14dB. Move the cut to somewhere around 1kHz and then try sweeping the boosted band up and down. The point where the two bands cross causes considerable cancellation, although either side there is a graduated filtering effect which is a little like the result of using a wah wah. Moving the cut to different locations shifts the articulation and changes the result in a variety of ways.
Keeping everything else the same, change the white noise to a 1kHz tone, but place the EQ cut at 1kHz. The threshold of the gate will also need to be shifted to -50dB. This time, the effect generated by sweeping the boosted EQ band is quite different, and, to me, sounds like a chirping dolphin, singing in time to an electronic alarm clock! With the relevant recorder track armed, the oscillator now runs through its associated monitor channel, into which the internal effect processor can be inserted.
Leaving the 'dolphin and alarm clock' chorus going for the time being, pick another buss and, from the Oscillator page, send the signal to the second buss as well. Find another spare track, patch the buss to it from the Record Input Assign part of the Patch In page, and then arm the track so that the oscillator can be heard. Now release the second effects processor from its send status and insert it into the new record track. The first thing to try is putting two tremolo effects together, and then slightly varying the frequency and depth. This works well, but Tremolo can also be paired with Ring Mod.
I set the Ring Mod Source to Osc, with an Osc Frequency of 8.9Hz, an FM Frequency setting of 0.05Hz, and a depth of 100 percent for some seriously long sweeping effects. It's also worth trying two ring modulators together, keeping the above setting for the first, but detuning the second to 8.7Hz, reducing the depth to 50 percent, and then moving the FM Frequency to 0.3Hz, so that the two sounds twist around each other. This patch worked equally well with the 100Hz oscillator as its input.
Vocal Comping
One further reason for editing between vocal lines in particular is that it can make the process of compiling a lead vocal from a number of takes much easier. I know that some AW4416 users export their vocals for editing on a software sequencer to make their life easier, and it's true that the AW4416 doesn't make editing as easy as it could do, but exporting audio requires a suitable software package and it's a pain to do, especially without USB transfer! The V.Tr Edit screen is great for comping vocals, as you can easily see when you've whittled multiple takes down to a single line.
When I'm gathering the best vocal lines from a number of takes on different virtual tracks, I edit each take into blocks of audio and, if I have enough virtual tracks, copy each one to another virtual track. I then decide which bits of which takes I do and don't want, and delete the weak parts. Doing this is made infinitely easier when the lines have already been cut into separate blocks, allowing some bits to be edited out by eye, and the start and end points of others to be easily found from the waveform display.
As soon as I am left with the optimum take for each line of the Song, I make my way to the V.Tr Edit page (by pressing Edit and then F2) so that I can see all the remaining audio. By this time, it should be clear to see from looking at the display which virtual track holds the chosen audio for each vocal line. I then copy the parts to a single master track.
Sometimes there are overlaps, where the start of the line from one virtual track begins before the previous one has finished, so it's not always possible to combine all the parts. I usually use the waveform display a lot to determine if there are any problems of this nature, and if so I return to my original takes and use an alternative combination.
Side-chain Trickery
The next trick is to use one channel to modulate another using the 100Hz oscillator. To do this, make sure the two channels are next to one another — say tracks 15 and 16. For this example keep the Ring Mod effect on monitor channel 16 with Oscillator Frequency at 8.9Hz, FM Frequency at 0.05Hz, and Depth at 100 percent. Change the effect inserted into monitor channel 15 back to Tremolo and set its Frequency to 4.05Hz, Depth to 100 percent and Wave to Square.
Now find the dynamics page for monitor channel 16, select patch 003 again, and make sure it is set up as follows: Decay, 23ms; Range, -70dB; Hold, 1.02ms; Attack, 0ms; Threshold, around -20dB. This time though, navigate to the Key Source box and select Left (Post EQ). Having done the above, the tremolo pulse will rhythmically chop the long sweep of the ring modulator, to great effect.
Practically speaking, some of the above examples as they are described here are nothing more than sound effects, however, it's possible to adapt the principles to a variety of musical situations. For example, the white noise can be fed through a noise gate which is set so that it opens according to the signal from the Key Source. If a drum track is used as the key, the white noise will become a percussive blast of noise, operating in perfect time with the Song's tempo. This would be an ideal way to add dirt to clean GM sounds, for example.
AW Inspiration
Hopefully this short series has provided some inspiration to those who are still getting to grips with the many features of the AW4416, and perhaps I've also managed to convince you that even the most straightforward of this machine's audio tools have hidden creative potential.
Useful Web Sites
- Yamaha AW4416 Home Page
The official site for the AW4416. This is where the latest software updates and third-party products are advertised. It has a Q&A section and a downloads page, as well as an up-to-date list of compatible hard disks and CD-RW drives.
- Social Entropy AW4416 Site
This is an unofficial user's site. However, it's more useful than the official one provided by Yamaha! Many users who have experienced crashes or software problems have posted their questions in the forums here, making quite interesting reading. The site has a most useful news page detailing the latest updates on some of the software applications written by users. This includes some shareware written for Windows by John Kimble, called AWExtract, currently at v2.66. The program is a utility for extracting WAV files from Yamaha AW4416 and AW2816 backups. All audio tracks, regions, and sample data can be extracted. 16-bit and 24-bit resolutions are supported at both 44.1kHz and 48kHz sample rates.
