Reverb and delay are vital tools for mixing. We explain how to get the best from Cubase's bundled plug-ins.
Reverberation is crucial to our perception of the spaces we inhabit. Close your eyes, and your ears will tell you plenty about the space around you; the sound might be bright or dark, washed in echoes or dry — or anywhere in between. When these clues are removed, as in a dead room or anechoic chamber, the results can be disconcerting. So, although we often record vocals or instruments dry to avoid capturing an undesirable room sound, we usually add ambience back in at the mixing stage using reverbs or delays. But although it is easy to slap a reverb on an individual track and make it sound nice, getting reverb to work in the context of a mix is another story. In this article, we'll look at Steinberg's bundled reverb and delay plug-ins, and how best to exploit them within the Cubase mixing environment.
Tools Of The Trade
Since SX3, Cubase users have had access, in the form of Roomworks and Roomworks SE (the latter is a cut-down version of the former), to much better quality reverb than previously. When you're first confronted with Roomworks, there appears to be a bewildering number of controls, but they're actually quite straightforward. The plug-in is helpfully divided into five sections, each with a descriptive title. The Input filters allow you to apply high or low shelving EQ to the signal coming into the reverb. It is often a good idea to filter out some of the lower frequencies, for the same reason that low-frequency instruments such as kick drums are rarely treated with much reverb other than a short ambience: to avoid your mix sounding muddy and clouded. The high shelving filter is similarly useful if, say, you have a particularly sibilant source sound: adding reverb can exacerbate sibilance problems, so cutting high frequencies can help to avoid out-of-control 'S' and 'T' sounds in a mix. As higher-frequency reflections tail off before those lower down the spectrum, rolling off the high end is also a good way of pushing the sound further 'back', to get a greater sense of depth.
 Since SX3, Cubase users have had, in Roomworks, a much better and more versatile reverb plug-in than previously.When we hear a sound, we perceive it as having three separate stages: the direct sound that reaches us before any reflections, the early reflections (the first few reflections coming back from nearby surfaces), and the reverb tail (the wash of sound made up of myriad complex reflections that have bounced off multiple surfaces before reaching our ears).
The five dials across the middle that make up Roomworks' Reverb Character section give you some control over the most crucial reverb parameters. Increasing the PreDelay value makes the space feel larger, as it mimics the effect of soundwaves travelling further before we hear the first reflections. A sufficiently long pre-delay can also help you separate out the source sound from the reverb sound, which helps to keep your mix clean. Another way to control the perceived size of a space is, unsurprisingly, to alter the Size control, which alters the spacing between the early reflections. The Time control is equally self-explanatory, adjusting the duration of the reverb tail (in milliseconds). Diffusion controls the extent to which the reflective and absorbent qualities of the surfaces within the simulated space disperse the sound. Finally, Width is used to set the stereo width of the reverb signal at anywhere between zero percent (mono) and 100 percent (full stereo).
The Reverb Character section includes some nice-to-have, though not essential, features. The Efficiency facility can reduce the strain on your computer, and if you ensure the Export button is lit, you'll still have the full quality of reverb on mixdown. If you're into creative sound design, the Hold control allows you infinite sustain of the reverb signal, which can yield some interesting sounds.
Moving on, the Damping section offers further control over the tonal character of the reverb. Increasing the level of damping at a particular frequency reduces the amount of time it takes that frequency band to decay, which allows you to mimic the effects of different materials within a space.
The Envelope section gives you a simple envelope (with attack and release controls, but not sustain or decay) which can be used to shape the reverb. So, for example, you could have your reverb fading in gradually after a percussive sound, which gives you an alternative to pre-delay for separating the source and reverb sounds, with the reverb building up, rather than hitting you head-on after the delay period. Should you be that way inclined, this control is also a candidate for some serious creative abuse!
Finally, the Output section allows you to adjust the wet/dry mix. The Send button overrides the Mix control and sets the mix to 100 percent wet, and the peak meter warns you if Roomworks' output is clipping.
Delays
I'll move on in a moment to some different ways in which you can use Roomworks in your mix, but first let me touch on delays. You probably already know that many of the famous 'reverbs' used in commercial tracks are actually not reverbs, but delays. This is particularly the case with electric guitars, but also a common technique for vocals and many other instruments. Why? Well, delay and reverb aren't a million miles apart — they both result in a delayed signal (or delayed signals) playing alongside the source sound. But whereas reverb produces a relatively indistinct wash of sound, delays typically produce individual, audible repeats which are more obviously related to the source signal. As a result, delays can often yield a more spacious, open sound than reverbs.
When it comes to delays, Cubase has more options than for reverb. There are four delay plug-ins in Cubase 4: MonoDelay, StereoDelay, ModDelay and PingPongDelay. The last two are more obviously useful for creating weird effects than as substitutes for reverb. For that, we need to keep things simple, which means using MonoDelay or StereoDelay. Both are very simple plug-ins which give you control over delay time, feedback (the amount of the output signal that is recirculated to the input, to create repeated delays) and wet/dry level, plus the ability to shape the sound using simple high and low shelving filters.
Now we've covered the tools and parameters, let's consider how you can put them to use in a mix.
Making Spaces
For those who've used nothing but Cubase or similar computer-based setups — that is, those who've grown up in blissful ignorance of hardware mixing consoles, processors and effects — the 'insert or send' question can be confusing. Reverbs and delays are almost always used as send effects, as this allows you to route different amounts of several different channels to the same effect, while having one fader available to control the overall level of the effect. Compared with using multiple reverbs as insert effects, this conserves CPU power and makes it easy to place multiple sources in the same virtual acoustic space. Just remember that send effects should be set to 100 percent wet. To set up a send effect in Cubase, insert a plug-in on an FX or Group Channel —preferably an FX Channel, as you're not able (without something like the Senderella plug-in described in December 2006's Cubase workshop) to send the signal from a Group Channel to another Group Channel that was created before it, whereas you can send the Group signal to any FX Channel.
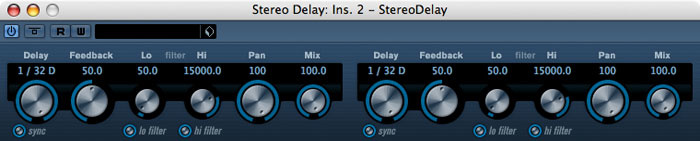
 Cubase contains plenty of options for delay, but sometimes it pays to keep things simple and use MonoDelay or StereoDelay.In general, I find that it helps to think of your stereo mix as a three-dimensional space, consisting of a left-to-right stereo field, which you can control though panning, a 'vertical' frequency spectrum, which you can control via EQ (and by writing suitable parts for suitable instruments!), and front-to-back depth, which is constructed mainly with reverb- and delay-based effects (often combined with a bit of EQ).
A useful starting point for a mix (which is worth creating as a Project template in Cubase) is to set up somewhere between three and six FX Channels, each for a different delay and/or reverb. For example, I have a template that includes six send effects channels. These include a short reverb providing mainly early reflections or 'ambience', a mid-length reverb and a longer reverb, and a parallel configuration for delays — one very short, with little or no feedback, one more noticeable, maybe with a touch of feedback, and another rather longer one, with feedback that I'll change from song to song as required. I might choose to use some further, 'special' reverbs and delays later, but this is often my basic starting point. I can use these FX Channels to place sounds at different points on the front-to-back axis, by sending varying amounts of the different channels to them. If you haven't tried this approach before, give it a go — it can be really effective and can save you a lot of time making parts work together.
When you use the sends to route a signal to an FX Channel, it defaults to sending the signal post-fader — that is to say, it's only the signal as it sounds following EQ, insert effects and the volume fader that goes to the effects. But you can opt to send the signal before any of the processing or volume settings, which means that you get the unprocessed signal going to the FX Channel. To do this, you just click the pre-fader button next to the send enable button in the Cubase mixer. This can be useful when you've had to compress the source signal to fit it in a particular place in the mix, but want to retain a livelier, more dynamic reverb on that signal.
As well as the amount of signal you send to which reverb or delay, don't forget that you can also use EQ to push things backwards or bring them up-front, as I mentioned when discussing the shelving facilities on the Roomworks plug-in: reducing high frequencies places things further back, while brighter sounds will feel more 'present'. On the delays, you can use the filter after the Feedback control so that each repeat seems progressively more distant.
A Question Of Time
Unless they're very short, I tend to keep my delays sync'ed to Project tempo. You don't have the option of tempo-sync'ing a reverb such as Roomworks, but once you have the project tempo set, and a strong rhythmic part (like a snare or hi-hat) going, it is easy enough to adjust the pre-delay and reverb times to get things working with the groove. For example, you can send the snare to the relevant FX Channel, solo the snare (so that only the snare and the FX Channel are playing) and then adjust the timing of the pre-delay so that the reverb is just distinct enough from the snare. Then tweak the reverb time so that the reverb tail dies off just before the next snare-hit. You'll have the big, long reverb sound you were after, but without the reverb tail getting in the way of the snare hit that triggered it, or the one that follows.
Digging Deeper
Timing and the front-to-back axis give you the basic tools to set up your spaces, and there's more control available thanks to the ability to pan your reverb and delay sends. If you haven't already investigated these routing options for send effects, which are rather well hidden, it is well worth doing so. To access them, you need to open the Channel Settings window for your source track and right-click (Control + click for Mac) on the grey background area. Choose Customise View and you get lots of options (as shown above). Select Send Routing and a new panel will be added to the Channel Settings Window, which (assuming your FX Channels are stereo channels) allows you to control the panning of the send separately from that of the source, and this feature is well worth playing with.
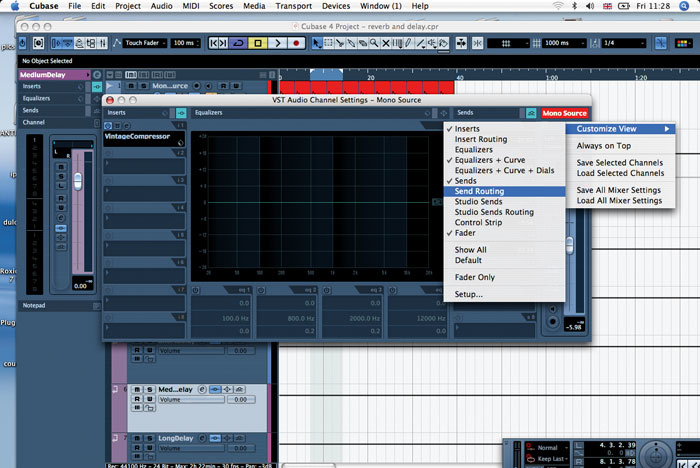
 Key to experimentation with reverb and delay is the Send Routing facility on each track's Channel Settings window. By default this is hidden but it is only a right-click away.(If you want to explore the FX Channel itself in more detail, you're unable to access this directly from the Channel Settings window of your source tracks — to do detailed tweaking of the FX Channel you have to open it via the Arrange or Mixer window.)
As with timing, one of the primary aims in panning the reverb is to achieve separation between the source sound and the reverb, so that you hear everything distinctly, with the source sound remaining focused, rather than being submerged in a wash of reverb. There are no rules as to where to pan reverbs (any more than there are rules about where to pan the source sounds), but I'd suggest that you try anything other than hard left, hard right, or the same position as the source. So, for example, take a mono acoustic guitar part that's panned somewhere left of centre, and change the panning of its Send Routing control slowly across from hard left to hard right. You'll find that the sound changes as you move things, and there'll usually be a spot or two that sounds better than others. Of course, doing this with the track soloed will help you understand the effect, but you really need to do it also in the context of the full mix, as everything else will interact with it.
You can do the same with delays, but there's plenty of scope for harder panning techniques here too. A very short delay on an electric guitar that's panned hard left, with the Send Routing panned hard right, can give you a big, spacious, sound. It can work even better if you slightly detune the delay by adding a pitch-shifting plug-in of some kind (there's none within Cubase but there's a useable freeware one by MDA, available from http://mda.smartelectronix.com/). This, in effect, gives you a very basic sort of Automatic Double Tracking. Use automation to modulate the detuning, or add some other subtle modulation effect after the delay, and you can make things sound richer still.
A further example of adding processing to the FX Channel track is to use compression or expansion: if you add a compressor after the reverb on the FX Channel, you can push the reverb down a little in relation to the source sound when the source gets louder, which has the effect of making the source sound more 'in your face' during loud passages of the track. If you've compressed the source sound, placing an expander before the reverb can (like the pre-fader send discussed earlier) give the sound back a bit of life, but still leave the source signal anchored where you want it in the mix. Another trick is to add a de-esser before or after your reverb, to make the reverb really bright without over-emphasising any sibilance.
Of course, for all that I've encouraged you to experiment, you should remember to take stock regularly and keep things in perspective — if you've achieved a great, distinctive sound, you may just get a better result by using it in moderation, automating the send control to bring it in at key points of the song. Happy reverbing!