Today's multitrack software packages give us endless flexibility to manipulate the audio we've recorded, but the possibilities can be confusing to begin with. We introduce the tools of the audio editor's trade...
The introduction of magnetic tape revolutionised the world of recording in more ways than one. Not only did it offer unprecedented audio fidelity, but for the first time, recorded sound became malleable. Once a performance had been captured to tape, it could be changed. Additional instruments could be overdubbed, the signal could be processed electronically, and, perhaps most radically, it became possible to modify the performance itself. By physically slicing the tape and joining sections together, a new 'performance' could be pieced together from fragments or multiple 'takes'.
Tape editing soon became a fact of life in almost every recording situation. There are web sites that catalogue in frightening detail the way in which the Beatles' records were assembled; it was, equally, commonplace for classical recordings to be cut together by taking the best sections from numerous separate performances. And those of a more experimental mind soon discovered more overtly creative applications for editing: short fragments of tape could be spliced together to make repeating loops, sound collages and so forth.
Fast forward to the present day, where most of us are now working with so‑called digital audio workstation software on computers. If tape made recorded sound plastic, the DAW positively liquifies it. The editing tools at our disposal in any audio recording program are vastly more flexible and powerful than the humble razor blade. The flip side of this is that because these new possibilities are available, we are expected to use them — sometimes to the detriment of the music. It's all too easy for DAW projects to degenerate into a mess of badly executed and poorly thought‑out edits that sound bad, slow the system down and sabotage the 'feel' of the performance.
In this article, then, I'll be looking at the 'why' and the 'how' of editing within a modern DAW system. I'll explain the terminology of audio editing, examine the reasons for doing it, and how to do it in ways that enhance rather than detract from your music. For those who are already au fait with the basics of audio editing in a multitrack DAW, meanwhile, the article on page 108 will look at specific, practical uses to which it can be put, from tidying up your projects to advanced and creative effects.
Mutually Assured Non‑destruction
Because tape is a physical medium, editing tape is a 'destructive' process. Once you've cut a piece of tape, it stays cut. And if you cut in the wrong place, you've got a problem. Editing audio in a digital audio workstation, by contrast, is usually a 'non‑destructive' process. In other words, false moves can be undone, and even if you screw something up beyond all recognition, the system should retain a copy of the original recording that you can revert to.
Different DAWs work in slightly different ways, but the principle is as follows. Audio files are recorded to your hard drive, and represented within in your software's main window as horizontal bars, usually with waveforms that allow you to visualise their audio content. Depending on which DAW you're using, these bars are typically referred to using expressions such as 'regions' (the term I'll use in this article), 'events' or 'objects', and they can be manipulated in a dizzying variety of ways, most of which we'll come to later.
The key point here is that when we use the available tools to do something to one of these regions, the original audio files on our hard drive remain unaffected. For example, when we make a region shorter, no audio is lost from the file to which that region refers; the edited region simply corresponds to a segment of that file, rather than to the whole thing. Likewise, if we decide to duplicate or split a region, we won't usually end up with two files on the hard drive, but two regions that refer back to the same original.
Other editing actions can actually alter the sound of a section of audio, for instance by changing its level or time‑stretching it. In these cases, again, the DAW does not modify the original file; instead, it either applies the processing in real time on playback, or creates a copy of the affected section and applies the changes to that, keeping the source audio sacrosanct in case we need to return to it.
Tape editing is, for the most part, an all‑or‑nothing affair: a tape edit either applies to the entire tape, or not at all. It is not usually possible to cut and splice individual tracks on a multitrack tape. It is, by contrast, eminently possible to edit individual regions, or groups of regions, within a DAW session.
The Uses Of Editing
There are numerous reasons why you might want to edit recorded audio in your digital workstation. All of the justifications for taking a razor blade to a reel of tape remain valid, and the advent of non‑destructive, multitrack editing opens up a whole new list of possibilities. Here are some examples of everyday editing scenarios that arise in modern music production:
- To make two master recordings flow seamlessly into one another, for instance to create a segue between two songs originally recorded independently.
- To remove unwanted noises or gaps from a recording, or isolate short sections of an audio recording for corrective or creative processing.
- To employ the same section of audio more than once within a project, perhaps in order to change the arrangement, or 'stack' multiple recordings of the same section for an ensemble effect.
- To create a rhythmic loop from a short section of recorded audio.
- To change the length of a sound to fit a specific gap.
- To change the structure of a song after it's recorded, for instance by removing a verse, shortening the introduction, duplicating a chorus or adding a new middle eight.
- To compile ('comp') the best parts from several recorded performances of the same material.
- To change a recorded performance to improve its timing, or quantise the timing of a freely recorded performance.
- To create unusual or interesting creative effects.
As you can see, the range of tasks that can be accomplished through editing is huge. Some are much more skilful and involved than others, but thankfully, all of them are based on just a few fundamental concepts and tools, which are easy to learn and adapt to new situations. This article will explain those concepts and tools, and we'll be looking in more detail at some of the tasks listed above in the other article in this issue.
Selected Highlights
Even if you've never used a DAW before, the chances are that many of the concepts involved in editing audio will be familiar from other classes of software, especially if you've used desktop publishing programs. The implementation does vary quite a bit from package to package, but the basic principles are usually the same.. Also shown are tool palettes from Cakewalk's Sonar 8, Propellerhead's Record, Apple's Logic and Steinberg's Cubase 5.") Most DAWs feature several mouse‑based editing tools, which can be chosen from a palette, and which are sometimes available in multiple forms, like the Pro Tools Grabber tool (left). Also shown are tool palettes from Cakewalk's Sonar 8, Propellerhead's Record, Apple's Logic and Steinberg's Cubase 5.
Most DAWs feature several mouse‑based editing tools, which can be chosen from a palette, and which are sometimes available in multiple forms, like the Pro Tools Grabber tool (left). Also shown are tool palettes from Cakewalk's Sonar 8, Propellerhead's Record, Apple's Logic and Steinberg's Cubase 5.![]()
![]()

![]()
As in a graphics package, the mouse pointer is central to much audio editing work. Typically, different editing tasks will require you to switch the pointer between a number of tools or modes of operation. For instance, Pro Tools has three basic editing tools, called the Trimmer, Selector and Grabber, while Cubase has a larger selection, of which the basic pointer and the Scissors are the most important and Reaper, unusually, has but a single mouse tool. Some mouse tools are 'smart' or context‑sensitive, meaning that they can take on different roles depending on where the mouse is placed relative to an audio region. The most obvious example is the Smart Tool in Pro Tools.
The first step towards making an audio edit is usually to make a selection within the DAW's edit or 'arrange' window. Most programs allow you to do this in two ways. First, existing regions can be selected by clicking on them or lassoing them with the mouse pointer, assuming that this is set to the appropriate tool (in Pro Tools, this would be the Grabber or 'hand' tool, while in Cubase, the pointer tool is used). It's usually possible to select multiple regions, and to add additional regions to an existing selection by Shift‑clicking them in turn.
The other way of making a selection, where this is supported by a DAW, involves highlighting an area within the edit window, using a different mouse tool, such as the Range Selection tool in Cubase or the Selector tool in Pro Tools. Such a selection will often cut across existing region boundaries, and may also include empty space.; in the lower screen, I've made a rectangular selection with the Range tool which is independent of region boundaries.") Two approaches to making selections within Cubase's Arrange window. In the top screen, I've got two separate regions selected (outlined in red); in the lower screen, I've made a rectangular selection with the Range tool which is independent of region boundaries.
Two approaches to making selections within Cubase's Arrange window. In the top screen, I've got two separate regions selected (outlined in red); in the lower screen, I've made a rectangular selection with the Range tool which is independent of region boundaries.
Finally, it's worth mentioning that all DAWs also have a cursor or locator that indicates the 'now' position and extends vertically across all tracks; sometimes editing actions make reference to this, too. In most DAWs, it's possible to make a selection in the timeline ruler that extends across all tracks.
On The Move
Perhaps the simplest variety of edit is moving an audio region to a new position within your project. Moving regions horizontally changes their relationship in time with the rest of the session, making them earlier or later, while moving them vertically allows you to put them on a different track. Most DAWs provide two ways of moving regions: they can be 'picked up' with the mouse and dragged to a new location on the same track or on a different track, or they can be 'nudged' small distances to the left or right by pressing keys.
Sometimes, it's useful to have other regions automatically move around to fill gaps or make space for the regions we're moving. Not all DAWs support this kind of 'shuffle' editing, which is a powerful but potentially dangerous tool; see the 'Shuffle Editing' box for more details.
Most DAWs also allow the user to choose constraints on how regions can be moved. For instance, it's frequently the case that when you want to move a region vertically to a new track, you want it to retain its precise horizontal position so that it doesn't slip out of time. This is usually achieved by holding down the Shift key as you drag.
Likewise, when you drag a region to a new horizontal position on a track, it's often the case that you want that position to be defined by reference to something else. Very often, for example, you'll want the start of the region to land precisely on the start of a musical bar or beat. Alternatively, you might want it to hit a particular frame within a video file. To make it easier to place regions, most DAWs offer a choice of 'grids' and the option to 'snap' regions to them..") All DAWs let you constrain the horizontal position of edits and region placement to your chosen grid setting (this screen is from MOTU's Digital Performer). Turn 'snap' off and the region will remain exactly where you drop it. Turn 'snap' on, and when you let go of the region, it will jump to line up with the nearest bar line, beat, frame or timecode division, depending on what grid setting you've chosen.
All DAWs let you constrain the horizontal position of edits and region placement to your chosen grid setting (this screen is from MOTU's Digital Performer). Turn 'snap' off and the region will remain exactly where you drop it. Turn 'snap' on, and when you let go of the region, it will jump to line up with the nearest bar line, beat, frame or timecode division, depending on what grid setting you've chosen.
Snapping doesn't have to apply to the start of a region, either. You can usually snap the end of a region too; and it's also possible to set a user‑defined 'sync' or 'Q' point within the region that is significant.. These can be placed at musically significant moments in the region.") Pro Tools regions with sync points (the small arrows along the lower edge). These can be placed at musically significant moments in the region. For example, let's suppose you have a crescendo timpani roll that you want to line up with the start of a bar. In this case, you could define a sync point that falls at the final, loudest beater stroke, and have that point snap to the bar line.
Pro Tools regions with sync points (the small arrows along the lower edge). These can be placed at musically significant moments in the region. For example, let's suppose you have a crescendo timpani roll that you want to line up with the start of a bar. In this case, you could define a sync point that falls at the final, loudest beater stroke, and have that point snap to the bar line.
Snap and grid settings also allow us to make useful selections that don't line up with existing region boundaries. For instance, you might want to select four bars' worth of material from the middle of a song, across multiple tracks. This can usually be achieved by setting the grid mode to bars and beats and using your DAW's equivalent of the Cubase Range Selection or Pro Tools Selector tool. The horizontal limits of a selection made by clicking and dragging with such a tool will automatically jump to the nearest grid points.
As well as moving regions around, you can also change their length by clicking and dragging at either end with the appropriate mouse tool (which may or may not be the same one that's used for moving regions about, depending on your DAW). Again, the new region boundaries will be governed by any snap to grid settings.
The First Cut
Three further fundamental editing tools are the universal Cut, Copy and Paste commands, which behave just like their counterparts in a word processor. In other words, once you have made your selection, Cut and Copy both place the selected material in the DAW's 'clipboard' — a kind of short‑term virtual pigeonhole. The contents of the clipboard will reflect what kind of selection was made, whether it's one or more complete regions, or a snapshot of an area of the edit window.
As well as placing this material on the clipboard, the Cut command also removes it from the edit window — again, leaving the original files intact on disk. It's also possible to remove material without copying it to the clipboard, usually by hitting the backspace key. The Paste command, meanwhile, dumps the contents of the clipboard back onto the edit window at your chosen position. Doing so doesn't wipe the clipboard, so you are free to paste the same material more than once in different places.
Every DAW also features some means of dividing audio regions into two. Some provide dedicated tools for doing so, such as the Scissor tool in Cubase; alternatively, once you've made a selection or placed the Selector tool within the edit area, there will usually be a Separate command to split any regions that cross this selection.
Most DAWs will also offer a Duplicate command, which is a kind of shortcut copy‑and‑paste action that will paste a copy of whatever is selected, immediately to its right within the edit area. This is very useful when, for instance, you wish to loop a short section of audio repeatedly: you simply place the first region where you want the loop to start, then hold down whatever key command is assigned to Duplicate. The Duplicate command in a DAW — in this case, Pro Tools — provides a simple way of looping a region.
Just as in a word processor, these editing commands are accessible via keyboard shortcuts as well as from an edit menu. It's good practice to do as much as possible using shortcuts rather than by choosing menu items with the mouse, and it's pretty much essential for basic editing functions such as these if you hope to achieve any fluency (and avoid repetitive strain injury).
Get A Better View
A fundamental requirement for successful editing is that you're able to see clearly what you are doing. It's thus vital to be clear about how your DAW's zoom functions work, and how to focus them on the relevant regions or area of the edit window.
Horizontal zooming in most DAWs is fairly straightforward. The lowest zoom setting should show you the entire project, while at the other extreme, you should be able to blow things up to the point where individual samples within your waveforms are identifiable. With such a colossal range of magnification available, it's essential to learn the most efficient ways of moving between different zoom settings. These vary from DAW to DAW, but usually include the ability to click and drag in the timeline or on a zoom slider, plus keyboard shortcuts that zoom in and out in steps, and further shortcuts that can be assigned to particular zoom settings for instant recall. There may also be a command that automatically zooms to fit whatever is selected.
Vertical zooming is a touch more complicated because, typically, the zoom level can be set on both a global and a track‑by‑track basis. What's more, it is usually possible to zoom the waveform display independently of the track height, or at least (as in Logic) to toggle between two levels of waveform zooming. This is useful, because it allows you to inspect quiet waveforms without filling up the entire screen with one or two tracks. Again, there are usually multiple ways of controlling vertical zoom levels. and large (right) waveform heights.") In order to inspect low‑level signals in detail, Logic lets you toggle between normal (left) and large (right) waveform heights.
In order to inspect low‑level signals in detail, Logic lets you toggle between normal (left) and large (right) waveform heights. 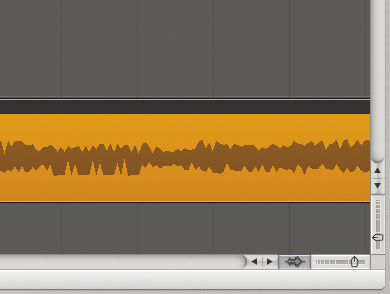
Which zoom settings are appropriate depends, of course, on what editing task you're doing. If you're moving an entire chorus to a different place in your song, you'll need to see pretty much the whole project at once. If you're trying to cut out a troublesome click in a single region, by contrast, you might want a millisecond's worth of audio magnified to fill the entire window. What's crucial is that you learn how to focus in quickly on what you need to see, and this is another area where time spent learning keyboard shortcuts will be richly repaid.
We should also mention scrubbing, which is to the ear as zooming is to the eye. Scrubbing mimics the way a tape machine can be rocked back and forth by hand while listening to the playhead, to provide a way of precisely pinpointing events within an audio region. It's usually done using a dedicated mouse tool that can be dragged quickly or slowly across an audio region. Scrubbing is a legacy of the tape‑based approach, and while many people find it useful, it's perfectly possible to do editing in a DAW without ever using it.
Fading Fast & Slow
In the days of tape editing, engineers swiftly realised that edits made by cutting tape vertically often sounded very abrupt and obvious. Cutting the tape at an angle instead made the transition between the two sections more natural. To draw an analogy, a vertical splice is akin to simultaneously muting one track on a mixer and unmuting another. A diagonal edit corresponds to smoothly pushing down the fader on the first channel while bringing up the second channel's fader. The shallower the angle at which the tape was cut, the slower the transition.
The same basic idea underlies the concept of a 'fade' in a digital editing system. Let's take a simple example. Suppose that on one track in our DAW, we have an audio region that presently ends in an abrupt stop. What we want it to do is gradually fade away from hearing instead. We could achieve this by moving that track's fader at mixdown, but this isn't always the ideal solution. Unless such a move is automated, we'll need to remember to do it each time we play back the track; and if we later decide to move the region to a different track, or to a different point in time, we may need to recreate that fader move all over again. A fade created using our DAW's mixer also means that the level change is only applied after the full signal has already passed through any channel inserts, EQ and pre‑fade sends.
The alternative is to apply a fade directly to the region, in such a way that it becomes part of the region. The fade in question will then follow that region around wherever we move it, and will be present in any copies of that region we later generate. (Again, though, it will not be applied destructively to the original audio recording, and can be removed or modified at any point.) Fades can usually be created by selecting the appropriate tool, clicking on a suitable point at or near the end of the region and dragging; there may be other ways to do it too, depending on your DAW. Most DAWs calculate fades in real time, on playback, but some — notably Pro Tools — still write them to disk as separate audio files with their own regions., fades are written to disk as new audio files with their own regions. Other DAWs, such as Sonar (above), apply fades in real time on playback, without writing any files to disk.") In Pro Tools (top), fades are written to disk as new audio files with their own regions. Other DAWs, such as Sonar (above), apply fades in real time on playback, without writing any files to disk.
In Pro Tools (top), fades are written to disk as new audio files with their own regions. Other DAWs, such as Sonar (above), apply fades in real time on playback, without writing any files to disk.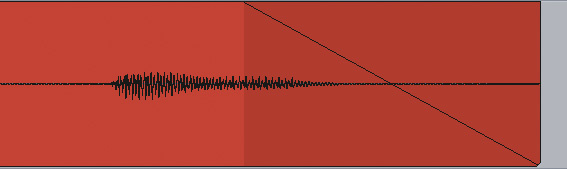
Sticking Plasters
In the example above, we've been considering a fade as something used deliberately for effect, bringing a sound smoothly into or out of our mix. Most often, though, fades are executed for the opposite reason: to mask or eliminate the audible effects of not fading!
At every point in our DAW project where a region begins or ends, we have the equivalent of a hard, vertical tape edit: a sudden transition between one piece of recorded audio and another, or between silence and recorded audio. And unlike a tape recording, a DAW session may well include hundreds or even thousands of separate regions, especially if intensive editing techniques such as timing correction have been applied.
In a digital system, jumping straight into the middle of a piece of recorded audio like this often creates a rude and unwanted click. Even if the boundaries of these regions are located outside wanted audio, the transition from silence to low‑level background noise can be audible and ugly. When hundreds of region boundaries are present in a multitrack session, you have a recipe for an unlistenable piece of music.
To be on the safe side, then, it should be a matter of routine to place a short fade (a few milliseconds in duration) wherever there's a region boundary in your track. This is not as onerous as it sounds, because most DAWs make it easy to apply fades en masse to multiple regions. In Cubase, for example, you can select as many regions as you like, and dragging the corner of one will create a fade on all selected regions.
At this point, you might be thinking: "Blimey. I've been chopping up regions for years and have never used a fade in my life, but I've never heard any clicks and pops. What's he on about?” If that's the case, the chances are that your DAW is attempting to save you off its own bat. It might be applying its own automatic fade settings in the background, so that whenever you divide a region, short fades automatically appear either side of the cut. Alternatively, like SADiE, it might invisibly apply short fades at region boundaries on playback. The other option is that your scissors tool might be set to snap to zero crossings. What this means is that whenever you apply a cut to a region, the DAW will automatically relocate it slightly to the nearest point where the waveform crosses the centre line (a so‑called 'zero crossing')., I can make any selection I like, but with it enabled (above), my selection is automatically shifted to the nearest points where the waveform crosses the centre line.") Cubase's Sample Editor: with Snap to Zero Crossing off (top), I can make any selection I like, but with it enabled (above), my selection is automatically shifted to the nearest points where the waveform crosses the centre line.
Cubase's Sample Editor: with Snap to Zero Crossing off (top), I can make any selection I like, but with it enabled (above), my selection is automatically shifted to the nearest points where the waveform crosses the centre line.
 This is not an infallible way of preventing clicks, but does usually prevent really bad ones from appearing. Not all DAWs support all of these options, but if present, they are usually configurable by the user, at least to some extent.
Crossing The Floor
In the previous section, we were considering fades as they apply to a transition between a region and a section of silence on a track. Very often, though, we want our edited audio to move smoothly between two regions, without any intervening silence. For instance, you might want to create a seamless segue between two complete pieces of music; alternatively, on a smaller scale, you might want to move a single bass note slightly to the right to put it in time with the rest of the song, without disrupting the performance.
In these and countless other situations, what you end up with is two regions that overlap, where you want one of them to fade in as the other is fading out. It would be possible to move each region to a separate track and apply two separate fades, but this would mean creating lots of otherwise unnecessary tracks, and attempting to line up two lots of fades could get fiddly. Thankfully, there is a better answer: the crossfade.
A crossfade between two overlapping regions on a track is directly analogous to the angled tape edit we considered earlier. As the DAW plays through the crossfade, the first region fades out, the second fades in, and a smooth transition is effected.
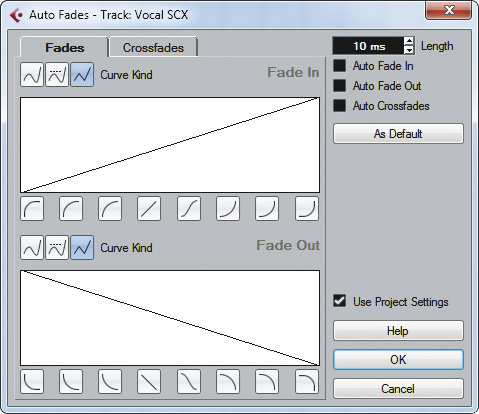
Applying a basic crossfade in most DAWs couldn't be easier. Select one or both of the overlapping regions to be crossfaded and choose 'Crossfade' from the appropriate menu, hit its assigned key command, or choose the dedicated fade tool from the tool palette, if there is one. The overlap, and hence the fade, can be as long or short as you prefer; and, once created, the crossfade can be modified simply by clicking and dragging at either end., Pro Tools and Cubase have dedicated crossfade editors, while Logic has a fade tool, with fade properties edited in the track inspector. In Reaper (right), fade properties 'belong' to each region and are edited in the Media Item Properties dialogue.") DAWs take varying approaches to crossfade creation and editing. DP (top), Pro Tools and Cubase have dedicated crossfade editors, while Logic has a fade tool, with fade properties edited in the track inspector. In Reaper (right), fade properties 'belong' to each region and are edited in the Media Item Properties dialogue.
DAWs take varying approaches to crossfade creation and editing. DP (top), Pro Tools and Cubase have dedicated crossfade editors, while Logic has a fade tool, with fade properties edited in the track inspector. In Reaper (right), fade properties 'belong' to each region and are edited in the Media Item Properties dialogue.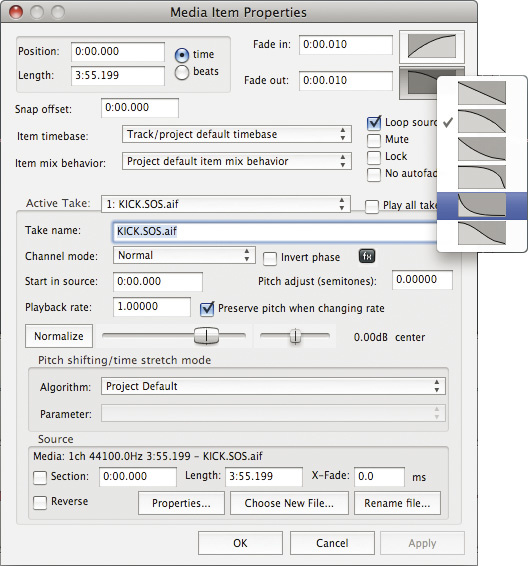


Fade Shapes
Investigate your DAW's fade options a little further, and you'll find that fades and crossfades can take on a variety of different shapes. There are a number of reasons for this, the most fundamental having to do with the non‑linear relationship between the amplitude of an audio recording and its loudness. A simple diagonal slope usually represents the so‑called 'equal gain' fade, which will probably be the default option in your DAW.
The snag is that our ears don't register loudness in a linear fashion. Perceived loudness has a closer (though not exact) correspondence with the power, rather than the amplitude, of an audio signal; and the power of an audio signal is proportional to the square of its amplitude.
The practical consequence of this is that when we apply an equal‑gain fade in isolation, the change in apparent loudness is not as smooth as it could be. This is very apparent when crossfading between two similar‑sounding regions: if you use an equal‑gain crossfade, the apparent loudness will drop significantly in the centre of the fade. As a result, all DAWs also offer 'equal power' fades and crossfades. These are usually visualised as upwardly bulging curves rather than straight diagonal lines, and are often the most natural‑sounding option where you want a crossfade to be inaudible.
Even so, there are plenty of situations in which neither a basic equal‑power or equal‑gain fade does the business. For example, when you're crossfading between two radically dissimilar regions of audio, the shape that fades out the first region naturally might be completely different from the shape that best fades in the second. Alternatively, you might want a fade‑out on a master recording to begin almost imperceptibly, but accelerate as it goes along.
For this reason, DAWs usually offer not only a variety of other useful preset fade shapes to choose from, but the ability to edit them and draw your own. The latter option is particularly useful where you need to create a non‑symmetrical crossfade with dissimilar fade shapes for the two curves.
Stacking Up
In most DAWs, there is no practical limit to the number of regions that an individual track can contain, and it's very common to end up with many overlapping regions on a single track. For example, when overdubbing vocals, one would often use the DAW's 'loop' or 'cycle' record mode to capture numerous takes one after the other, which then 'stack' on a single track. There is usually the option to view all of these stacked regions arranged top‑to‑bottom on their own 'lanes' or 'playlists' within the track. When that track is played back, only the last‑recorded region will sound, unless we delete or mute it — in which case we'll here the last‑but‑one take, and so forth. Most DAWs now feature specialised tools for 'comping' the best parts of each take on a track to a new lane or playlist, piecing together the best possible 'performance'.
Most DAWs also provide some way of grouping tracks or regions together so that multiple regions can be edited en bloc. You can, of course, do this by simply selecting all the regions you want to edit, but the grouping approach is safer and quicker. When editing multitrack drum parts, for example, you could be making hundreds of cuts and crossfades across 12 or more tracks; lassoing them all with the mouse each time you want to make an edit gets old very fast. If the tracks or regions are grouped, by contrast, the DAW treats them as one for editing purposes, so they can be selected with a single click, and there is no risk of accidentally leaving any regions out of an edit.
Automatic Editing Tools
Some editing tasks, such as timing correction and comping, require us to divide source regions into hundreds of small fragments. Doing this manually can be tedious, but the bulk of the process can often be automated. Your DAW may well include a tool that can either search for the transients within an audio region and divide it up automatically at those points — perfect for drum tracks — or a so‑called 'strip silence' tool that can automatically chop a region up into sections that contain wanted audio and those that just contain silence or background noise. It may also be possible to set up 'macros' that allow you to perform complex actions with a single key command.
Armed & Ready
In a world where we're all dazzled by the possibilities of plug‑in effects and virtual instruments, it has become easy to overlook the importance and the power of the basic editing tools that every DAW possesses. But as, I hope, we'll see in the editing masterclass on page 100, learning to use these simple tools opens up a world of possibility. You can spend as much money on plug‑ins as you like, and still a bass part that's out of time will never sound anything but sloppy. Spend a little time with the editing functions that come free with your DAW, on the other hand, and you can hope for truly professional results.
Separate Editor Windows
In this article, I describe audio editing as something that takes place within the main 'edit' or 'arrange' window. This is how Pro Tools has always operated, and over the years, most of the other leading DAWs have moved towards this model. However, some of them still expect certain audio editing tasks to be performed by opening individual regions or groups of regions within a separate editor window. For example, double‑clicking an audio event in the Cubase Project window will open that event in the Sample Editor, which is the only window that allows you to do things like draw your own waveforms into an audio file.
Shuffle Editing
Shuffle editing is available in some DAWs, notably Pro Tools. It's a powerful tool in certain situations, but also one that offers plenty of potential for pitfalls. When Shuffle mode is switched off, cutting audio regions and moving them around can create both gaps and overlaps, as described in the main text. In Shuffle mode, by contrast, the DAW does its best to prevent this from happening. When you cut a region, everything to its right will be moved along to close the gap; and when you paste a region or drop one onto a track with the mouse, existing regions will 'shuffle' out of the way to create a suitably sized gap. In broadcast circles, the two modes are sometimes referred to as TV and radio modes: when editing audio for TV, you don't want usually want things to shuffle around, because they will end up out of sync with the pictures. By contrast, shuffle editing really comes into its own in radio and other situations when you're working on dialogue and other spoken‑word material that's not sync'ed to film, as it allows you to remove all those pesky coughs, rustling scripts and fluffed lines without having to manually close up the gaps that are created. It does have its uses in a music context, but be warned that it is perilously easy to screw things up, especially when you forget to turn Shuffle mode off after having made an edit!
Edits, CPU & Disk Performance
Introducing lots of audio edits into a session can drastically slow down your system. The more region boundaries you create, the more the head of your hard disk has to jump around in search of data; while if your DAW calculates fades and crossfades in real time, it needs to devote CPU cycles to doing so. As a result, once you've completed a heavy editing process such as comping a vocal or time‑correcting a multitrack drum performance, it's often worth reclaiming these system resources by 'consolidating' or 'bouncing' the results to a single, new audio file per track. This is easily done in most DAWs, but be sure to save a version of the project with all the original edits first, in case you need to go back and tweak something later.
How Tape Editing Works
 Editing on a reel‑to‑reel machine: here, the tape is about to be sliced at the marked point using the 60‑degree slot.
Long before computer digital audio workstations were even a twinkle in some IT nerd's eye, audio was routinely edited by physically cutting and splicing magnetic tape. Broadcasters used to hack up quarter‑inch tape in extraordinary amounts daily, and it is astonishing how fast and accurately it can be done by a skilled technician. Cutting two‑inch multitrack tape to move the chorus around or remove a verse was also done quite commonly, although I suspect that most people would find such an idea very odd today, given the cost of the tape and the destructive finality of the process!
The tape editing process is actually very simple, but it is highly skilled and requires a lot of practice to be able to locate the edit point accurately and quickly, and perform flawless edits that not only sound right but don't fall apart after the second play‑through and don't result in blood or body parts being scattered around the edit suite!
Locating the desired audio edit points is normally performed by pulling the tape across the replay head while listening to the machine's output. This is normally done by rocking the tape back and forth by hand, one hand rotating each tape reel in the required direction to maintain tape tension. This works best if the edit point is an obvious transition in sound, such as the start of a snare or kick-drum beat, or the start of a strong speech syllable. Most tape editing machines have a dedicated editing mode that powers up the replay electronics but disables the motor servos to allow this manual tape manipulation.
Once the first edit point is found, the tape is marked on its backing where it aligns with the replay-head gap (since that is where the magnetic recording is replayed) using a wax (chinagraph) pencil. Then, depending on the distance between the two edit points, the process is either repeated to find the other edit point (if only a small amount of tape is to be removed), or the first cut made, prior to playing through the remaining tape to locate the next edit point.
In either case, the section of tape around the first edit point is pulled out from the machine's heads and placed into a 'splicing block'. This is an aluminium (non‑ferrous) block with a bevelled groove to match the tape width. Pressing the tape down into the groove locates it securely, although it can be slid fairly easily along the block as required. Typically, the block will have three milled slots crossing the tape path, at angles of 89, 60 and 45 degrees — the angle of the slope determines the crossfade time between outgoing and incoming audio across the edit. The 45‑degree slope provides the smoothest crossfade, of course, but in a two‑track or stereo tape, one side of the image will start to crossfade noticeably earlier than the other side, leading to a distracting stereo image shift as the edit goes through (known as a 'flashing edit'). For that reason, and assuming 15ips tape speeds, the 60‑degree slot is more commonly used (providing something like a 20ms crossfade), with the 89‑degree slot being used to edit out individual clicks with minimal disruption to the surrounding audio.
With the first edit point aligned in the block above the appropriate slot, the second edit point is also laid into the block on top of the first and a single‑sided razor blade run through both layers of tape along the guide slot. The unwanted section of tape can be slid out of the block and discarded, while the ends of the wanted material are aligned neatly in the groove away from the slots. A short strip of special adhesive tape, fractionally narrower than the width of the recording tape, is placed on the tape backing to hold the two sides of the edit together — trickier to achieve than it sounds! The completed assembly is then eased out of the splicing block, re‑laced onto the tape machine and played to check that the edit works.
In the case where the edit points are separated by a considerable amount of tape, the first edit point would be identified and the tape cut, leaving the outgoing audio in the splicing block while the unwanted portion of tape was spooled off. When the incoming edit point is located, that tape is loaded into the block above the outgoing tape, the tape cut using the same angled slot, and the two sections joined together as before.
If, for some reason, the edit didn't work, it is possible to disassemble and remake the edit, but it is both extremely fiddly and time‑consuming, and relies on still having access to the missing bit of audio — which can be tricky if it fell on the floor and has been trampled on! For these reasons, tape editors tend to learn to get it right first time, every time — as DAW editors would if the Undo button was removed!
Popular variations on the editing theme include the use of (non‑ferrous) brass scissors instead of the single‑sided razor blade (which, being made of steel, can become magnetised and result in an audible 'thump' at the edit point). Skilful editors often preferred to use brass scissors to cut a 'V' in the outgoing audio tape instead of a simple diagonal cut, along with a corresponding fish‑tail notch in the incoming tape (that was always the tricky bit for me!) so that both sides of a stereo edit crossfade together, instead of one side before the other. This is a perfectionist's approach, though; most parts of the BBC rarely bothered with such niceties... and I doubt many people noticed. Hugh Robjohns