 CubicPack: using the theming engine in conjunction with custom toolbars to bring the Reaper user interface much closer to that of the ‘target’ DAW, Cubase.
What you don’t like about Reaper, you can probably change!
Back in SOS March 2016 (http://sosm.ag/reaper-0316), we created some custom Reaper Actions and assigned keyboard shortcuts to them, but Actions can also be assigned to menus and toolbars. This feature allows you to tweak Reaper’s user interface subtly so that it better suits your existing workflow, but it can also radically alter Reaper’s layout and functionality. This is what we’ll be exploring this month and, as in the earlier article, you’ll need the free SWS/S&M extension (www.sws-extension.org) if you wish to follow all the examples.
In case you missed the March workshop, I’ll briefly recap what Actions are all about. Actions already lie at the heart of your own interaction with Reaper — for example, when you hit the space bar to start and stop playback of your timeline, you’re triggering an Action named ‘Transport: Play/stop’. The Actions list comprises several thousand commands, each of which can be assigned to various different input triggers. They lie beneath many default controls, including toolbar buttons, dropdown and contextual menus, and even fundamental commands like loading and saving projects.
Menu Mods
All Reaper’s drop-down menus, context menus, and toobars link back to Action items. To get started, from the main window, go to the Options menu, then select ‘Customise menus/toolbars...’ to bring up the appropriate window. The drop-down selector, found top-left, allows you to choose which elements you’ll customise. We’ll start with the File menu from Reaper’s primary menu bar.
 The Customise menus/toolbars window.
Select ‘Main File’, which should be at the top of the list, and you’ll be presented with two columns of commands. The right column always shows the default configuration, and the left displays your customised version; as we’ve made no changes yet, both columns should appear identical.
Now let’s make a very simple edit to demonstrate the functionality. Say, for instance, we want to add the ‘Save item as audio file’ command to the File menu. First click on the Add button (bottom left of the ‘Customise menus/toolbars’ window) and select Action from the drop-down. This brings up a searchable list of Actions (including any you’ve created yourself). Find and select ‘Xenakios/SWS: Save item as audio file...’ then click on ‘Select/close’. That Action should now be added to the list on the left-hand side, and you can click and drag it up and down the list to the desired position. Once you’re done, close and save when prompted. Your new command should now exist in the File menu.
 The author’s custom toolbar, with the Customise window sitting below.
You may also notice at the very bottom of the menu you can now see a new item named ‘Default Menu: Main File’. This contains the entire non-modified version of the menu, so you can always access the standard layout if necessary. (You can toggle this item on and off using a tick box in the ‘Customise menus/toolbars’ window.) As well as Actions, you can also add labels, separators, and submenus to keep your menus organised.
Toolbars
Toolbar editing takes place in the same window and is achieved in much the same way, so let’s add a button to the main toolbar. From the dropdown on the top left, select ‘Main toolbar’. Both columns should now show the contents of the default toolbar. You’ll also see a preview of the toolbar’s appearance at the bottom of the window. Click the Add button, and select the Action you’d like assigned. In this instance let’s use ‘Insert new subproject...’. Find and select the Action, then press ‘Select/close’. You should see the new Action on the left, and a new button in your toolbar preview. Reaper’s default context menu.
By default, your new button will be a small square with a text label that’s automatically generated from the name of the Action, but don’t be put off, as you can change this in a few ways. You can edit the label by right-clicking on the Action in the left column and selecting ‘Text Icon...’. A dialogue box will pop up with a text field you can edit. You can also elect to make your button double-width, which creates space for a slightly more meaningful label. Click OK, and your edits will be reflected in the toolbar preview window.
Alternatively, right-click on the Action in the left column, and select ‘change icon’ to bring up a window containing the available graphical icons. Click on one to select it, close the window and it should update in your preview.
When you’re done, hit Save (near the bottom right of the window) and your toolbar will update in Reaper.
Roll Your Own
You’re not limited to editing existing toolbars — you can create your own, which can either float in their own window or be docked. To start, go to the drop-down box located to the top left of the ‘Customise menus/toolbars’ window and select ‘Floating toolbar 1’. Each new toolbar starts with a sample button named ‘Edit me’. Right-click on the ‘Edit me’ entry in the left column and select ‘Remove’, and you’ll be able to add new buttons by following the steps above. To view your new toolbars in Reaper, close the Customise window and return to your main timeline window. Go to the View menu and select Toolbar Docker (or just hit ‘F’). The toolbar docker shows all your custom toolbars in a tabbed window. You can click and drag the tabs to break each toolbar out into its own window, or right-click and use the ‘Position toolbar’ menu to dock it to the top of the main window, in place of the main toolbar, among various other options.
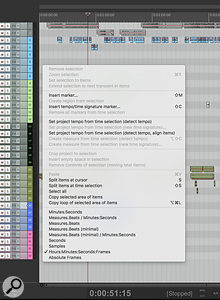
That’s the process in a nutshell, and hopefully it’s enough to whet your appetite, but if you’d like to explore every nook and cranny of Reaper’s customisation features, check out Geoffrey Francis’ Reaper Reference Manual, a free download from the Reaper web site. The context menu after applying the ReaMenus mod.
What You Need
We’ve seen how it all works, so let’s now look at what we might actually achieve using customisation. One of the simplest applications for custom menus and toolbars is to get your regularly used functions positioned where you can access them easily. My music-for-picture work has me using a few slightly more esoteric features frequently, so I’ve set up a small toolbar which sits atop the main timeline with buttons for those regularly used items.
You might also wish to remove menu items you never use: Reaper’s feature set has grown massively over the years, and the menus have inevitably swelled enough that they can seem very daunting to newcomers — in fact, even a Reaper v1 veteran like me sometimes has to hunt around for a command! Menu customisation allows you to clear out the clutter, sort lesser-used commands into subfolders, or even remove them altogether. This can really streamline your interaction with Reaper, and you can always access the default menu if you need it, so nothing’s lost forever.
If you find the default configuration a bit overwhelming but don’t feel confident (or can’t be bothered) tackling a complete redesign, a third-party mod called ReaMenus is worth a look. This takes Reaper’s labyrinthine set of commands and organises them into a more logical set of submenus. It’s really handy, but do be aware that at the time of this writing, the last ReaMenus update was in late 2015, and so it doesn’t (yet) include any commands pertaining to features released after that date, for example SubFolders or the Score Editor. It’s still a solid starting point for your own modifications though.
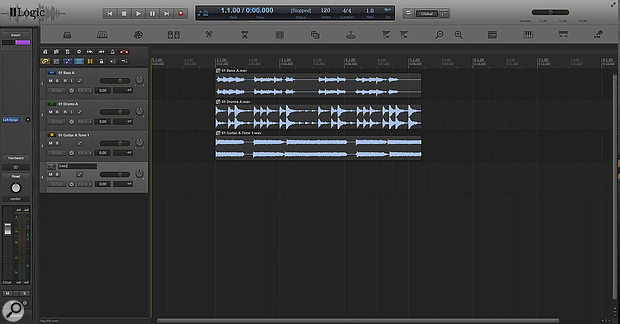
 I Logic: the kind of customisation discussed in this article lies beneath some of the third-party themes, such as this one which mimics Logic.
Copycat
Barry Watson toured through a few of the more popular Reaper themes that can be downloaded back in SOS June 2013 (http://sosm.ag/reaper0613), some of which are really attractive. But custom menus and toolbars allow for a whole new level of Theme tweakability.
Some very impressive projects have arisen in the Reaper community which bring the aesthetic, and some of the workflow, of other DAW software to Reaper. CubicPack and I Logic, are two such ventures, doing very passable impressions of Cubase and Logic respectively. Both use the theming engine in conjunction with custom toolbars to bring the user interface much closer to that of their ‘target’ DAW than could be achieved with a simple graphics change.
Links
Reaper reference manual download: www.reaperaudio.com/userguide.php
ReaMenus discussion thread with download links: http://forum.cockos.com/showthread.php?t=58672
CubicPack Theme & toolbar sets by forum user ‘cubic13’: http://forum.cockos.com/showthread.php?t=170237
I Logic theme and toolbar sets by forum user ‘Blankfiles’: http://forum.cockos.com/showthread.php?t=163579
