Despite having a generally well-balanced mix, James Michael felt that his track wasn't sounding quite right, so contacted Mix Rescue for some mastering pointers.
This month's Mix Rescue is a little different, because James Michael sent me a perfectly good mix of his song, 'Do Ya Luv Me', but was of the opinion that the end result lacked punch. The song is a dance treatment of a soul song he wrote some years back, started in Steinberg Cubase and finished in Apple Logic. James has also done covers for artists to be used as demos, and is currently writing for TV.

For this particular track, the bass guitar was recorded via a TL Audio Ivory preamp and compressed using a Waves compressor plug-in, while the sub-bass synth comes from a Roland JV-series synth. The funky guitar was DI'd straight into a Yamaha Promix going into a Creamware A16 Ultra A/D into a Pulsar soundcard, while the vocals (Yvonne John-Lewis) were recorded using an AKG Solidtube, again compressed using Waves plug-ins. The drums parts were created from layered loops and drum-hit samples, where the plug-ins, including reverbs, were a mixture of Waves, Logic, and Lexicon processes.
After listening to the track, I felt that most of James's concerns could be addressed at the mastering stage, and because so many of our readers are interested in the mastering process, I thought that it would be a good exercise to invite James up to my studio and go through the process with him.
Editing A 'Radio Version'
'Do Ya Luv Me' is essentially a pop/dance/funk track with some very nice female vocals and polished guitar and bass performances from James himself. The version of the track he brought with him was a full-length mix of over five minutes in duration, and he felt that he needed a more compact 'radio friendly' version, so what started out as a mastering session also diversified into extensive editing as well. When editing a track like this one, life is so much easier if you can enter the exact tempo of the track into your sequencer or editing program, then line up the beats with the bar lines to allow you to edit to your software's own tempo grid. Fortunately, James had stored the tempo of the song in his mobile phone's organiser — this was just as well, as he'd timed the song to match some obscure rhythm loop he'd used, and the tempo worked out at 125.7305bpm!
Working in my own Apple Logic system, most of the edit points were chosen using pure instinct. It can be helpful not to look at the computer monitor when you're evaluating the feel of a piece of music, as seeing a waveform going by can detract from critical listening, and tends to distort your sense of perceived elapsed time. The song started fine, but after a few bars, it was quite evident that something new needed to happen, so I set up Logic 's 'skip' feature to miss out a section so that we could see what that sounded like prior to committing to an edit. Once we were happy with the edit, we made the edit properly and moved on to the next section — in the screenshots with the article I've coloured sections blue where they were shortened in this way to tighten up the arrangement.
With this style of dance track, it's difficult to resist the old cliché of chopping up and repeating short sections to create a rhythmical stutter effect — so I didn't! There's nothing to lose by trying out these simple cut and copy techniques, as it's immediately evident whether they work or not. A common trick is to use four slices to the bar for a section, then follow this up with an 'eight slices to the bar' section. We used this on a couple of occasions, and I coloured these sections orange for the screenshots.
Rescued This Month...
 The vocals on this month's Mix Rescue track were performed by Yvonne John-Lewis.This month's track was produced by James Michael, and features a vocal performance by Yvonne John-Lewis, who has appeared for people like Basement Jaxx and does backing-vocal work for people like Sugababes and Charlotte Church. The idea for this track came from a soul record James wrote for somebody a few years ago. Wanting to update it and turn it into a dance tune, he got rid of the original loop, but kept some of the original guitar rhythm and riffs. Further electric bass and special effects were added until James and his engineer felt the mix was sounding great, and figured it was time to get a vocalist involved. When the vocal was in place, there needed only to be a bit of chopping and changing ad libs to fit the track before everything fell into place, with the main hook being the chorus vocals.
Automated Filtering
James had done a really sweet mix of the song, but for the drop-down section, I decided to try using a variable frequency high-cut filter controlled via the sequencer's automation. For most of the song this was set to its maximum frequency, and so had no effect, but in the drop-down section I closed the filter right down to 1.2kHz, which gave the section a distant and obviously filtered feel. This use of filtering as an effect is very common in dance-music production, and closing the filter also suppresses any high-frequency noise present in the mix. Having now heard the song a few times, I can't imagine it not having the filter effect at that point!
 In addition to shortening the original five-minute mix down to a more 'radio friendly' length, Paul also experimented with some more creative editing to produce rhythmic stuttering effects. James liked the sound, so they stayed in!
The only thing you have to be careful of when doing this is to design the automation curve so that it opens and closes the filter in a way that sounds artistically correct. All you can do is keep tweaking and listening until you're happy with the result. I used the same filter trick to tidy up the end of the song, but tried to match the closing rate to that of the final note decay, in order to kill any residual noise without making the final fade seem unnatural.
As it turned out, we felt that the final note was actually a bit of an anticlimax, so we found a textural sound on Native Instruments' Absynth software synth, and overlaid this on the last beat so that it overhung the end of the song as it decayed. My final bit of outside interference was to find a suitable kick-drum sound in Spectrasonics Stylus RMX, and to use this to underpin a couple of sections where I thought a bit of extra punch was needed. This was quite subtle, but gave the song the desired lift at the correct moments.

Mastering Processes
 The High Cut filter plug-in in Logic was automated for creative purposes during a drop section in the track, and was also pressed into service to tidy up residual noise at the end of the track.
Now all that was needed was to add the final polish. I used dynamic EQ to add some low-end punch to James's mix, so that I could do it without turning everything to mud, first of all trying the TC Electronic Powercore's dynamic equaliser. This worked well, as did the dynamic equaliser in my Drawmer DC2476 Masterflow box, and the trick is to set the plug-in such that it boosts the low end only when the signal exceeds a threshold which you set. In this case I set a dynamic boost of around 4dB at around 90Hz to fatten up the kick-drum sound, then adjusted the threshold so that this effect only came in on the beats where the kick drum was present. With 'four on the floor' music of this kind, that isn't too difficult. This added the necessary weight without clouding the overall sound of the mix.
To add density I used three-band compression, again from my Drawmer Masterflow, using low ratios and low thresholds. The precise settings were ratios of 1.2:1 in the low band, 1.1:1 in the mid-band, and 1.1:1 in the high band, with thresholds of -40dB in all cases. I used the three-band tube simulation in the Masterflow to fatten up the low end and to add impact to the highs by treating the low band (below 120Hz) and the high band (above 5kHz), but leaving the mid-band pretty much alone. Aside from putting the TC Electronic Powercore's Brickwall Limiter at the end of the chain to catch any overshoots, and to trim around 2dB off the peaks, this was pretty much all that was needed, though I did experiment with some alternative treatments.
 A kick drum sound from Spectrasonics Stylus RMX was sequenced alongside the main audio track to underpin a couple of sections which needed a bit more weight.
I appreciate that not everyone has a Drawmer Masterflow, so I tried to get the same result using the TC Electronic dynamic EQ followed by the PSP Audioware Vintage Warmer plug-in. Getting the required bass boost from the TC Electronic plug-in was actually easier than using the hardware, because of its excellent display, which shows exactly where and when boost is being applied. One of the benefits of Vintage Warmer is that it combines tape/tube-style saturation with two-band EQ, compression, and limiting. Furthermore, it can be used in full-band or multi-band mode, and in multi-band mode you can go to the extra controls page and adjust the amount of saturation effect applied to the different frequency bands, much as I did in the Drawmer box.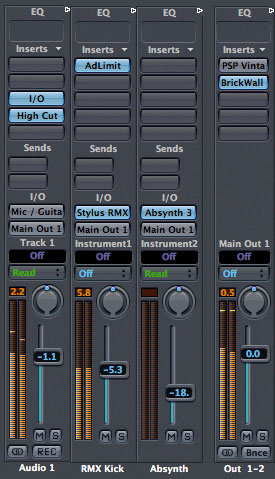
There's also a Mix control that allows the processed sound to be mixed (with sample accuracy of course) with the unprocessed sound, so if you feel your setup is too heavy handed, you can back off all your processes using one knob. Provided that you don't take the saturation knob further than around +4dB, and use the compression knob very close to its anticlockwise extreme, you can get some very nice results out of this plug-in. I couldn't quite match the clarity and separation between sounds that the Drawmer Masterflow delivers, but I still managed to get good-sounding mixes that had, if anything, a slightly more analogue character.
I've included extracts from both the Drawmer-mastered version and an alternative using the TC Electronic dynamic EQ plus Vintage Warmer. There's also a full-length version of the Masterflow file so that you can hear how the various edits work together.Logic users who have no additional plug-ins could use the built-in Multipressor plug-in to set up multi-band compression, and if this is followed by one of Logic 's limiters, good results are still possible. However, the Logic armoury of plug-ins doesn't have a true dynamic equaliser or a multi-band saturation processor, so it isn't practical to replicate all of the processes I used on this job. When it comes down to it, knowing what you are trying to achieve is often more important than the precise tools you use to do the job, and you don't need to spend a fortune on third-party plug-ins to pull in a good end result. Having a few carefully chosen plug-ins is often enough, especially for Logic Pro users who are fortunate in getting a really good plug-in bundle as standard.
 Here you can see the software mixer setup Paul created for processing the main audio track through his Drawmer DC2476 using Logic's I/O plug-in, and for mixing in extra parts from Stylus RMX and Absynth. A Brickwall Limiter plug-in running on the TC Powercore provided a final safety net to stop any signal peaks which might have caused digital clipping.
Lessons Learned
This turned out to be a really interesting project, and James got all kinds of ideas that he wanted to try back home to refine the mix even further. The effect of mastering was to add density, loudness, and low-end weight, but, as you can tell from the example files, it was still fairly subtle in subjective terms. It is also worth reiterating that when you're mastering a track to go on an album, it doesn't make sense to do so in isolation, as part of the job is to make the tracks sit comfortably together. I was pleased with the dynamic created by the 'stutter' edits, even though the concept is hardly original, and also with the heavy top-cut filtering in the drop-down section.
Something that soon becomes evident when you work on this kind of mix is that you have to be careful not to apply too much limiting. If you look at the waveforms of the different mixes, you'll notice that I've avoided leaving them looking like a freshly mown lawn. Some mastering engineers limit very heavily, but I feel it makes the mixes sound fatiguing.
After listening to the mixes back at home, James came to the conclusion that the original settings I'd come up with using the Drawmer Masterflow gave the most musical result, so now he's working on some more edits before mastering the song again with the same settings.
Remix Reactions

James Michael: "Despite being happy with the mix of this track, I couldn't get it to have the 'final' sound that I wanted, which was why I wrote in to SOS for help. Paul and I went through a few different processes, using both hardware processors and software plug-ins, and in the end I felt that Paul's Drawmer DC2476 unit gave the sound I was after. The track didn't need much processing, but what Paul did so easily with that unit gave me what I needed. Paul is one of the coolest, most polite guys I've met in such a cut-throat industry, and I was even more impressed by his professionalism. It was an honour meeting him having being a reader of the mag for so long!
"Since Paul mastered the track, I've now had interest from a publisher — although it appears they want it to be more poppy! I also have plans to put out the mix on vinyl, as I've had other interest from a lot of good DJs. Brandon Block also played it at Space Ibiza for me and said it was 'bang on'."
Hear The Differences For Yourself!
As usual, you can hear the effects of my interventions by listening to the following audio examples available for download at www.soundonsound.com/sos/may06:
- /audio/
 originalmix-0506.mp3
James's original stereo mix before mastering.
- /audio/ masterflowmix.mp3
This is a full-length version of the song after being processed using the Drawmer DC2476 Masterflow, so that you can hear all the edits in context.
- /audio/ masterflowmixshort.mp3
The latter half of the song as processed via the Drawmer DC2476 Masterflow, so you can hear the effect of the processing.
- /audio/ pspmix.mp3
The latter half of the song as processed via the TC Electronic Dynamic EQ and PSP Audioware Vintage Warmer, so you can hear the effect of the processing.
- /audio/ vocalstutteredit.mp3
A short section of the song where I used copy and paste editing to create a vocal stuttering effect.
- /audio/ vocalrepeatedit.mp3
Using copy and paste editing to create a more subtle vocal repeat effect.
Need Help With Your Mix?
If you're having trouble with a mix, then you can submit your track for the Mix Rescue treatment. Contact us via the email address below. Please include a daytime contact telephone number/email, some information about how you recorded and mixed your version of the track, and your views about what aspects of your mix are causing you most concern.