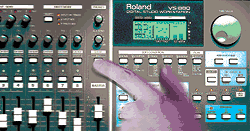
Handy tricks and tips for getting the best out of Roland's VS880 and VS1680 workstations.
 At the time I was first looking for a home recording system, the VS880 seemed like a gift from the gods — it was the first all-digital system with recorder, mixing and effects to be remotely affordable. It's testament to the design of this unit that it's still at the centre of my recording rig today. While it's not the easiest of machines to use, it does have hidden depths; so much so that, even when I eventually upgrade my system, I'm not ever likely to sell the VS.
The success of the VS880 prompted Roland to expand the range with the VS840, VS880EX, VS1680, VSR880, VS890, VS1880, and VS2480. In combination with the prevailing digital multitracker price war, this expansion of Roland's range has driven down secondhand VS prices in the UK to ridiculous levels, which now makes a secondhand VS one of the cheapest ways to get into digital recording hardware. So what better time for a power-user workshop on the VS machines?
Though I'll be working mostly from the VS880 perspective here, all the pre-VS2480 machines are closely based on the model of their progenitor, so many of the techniques I'll be covering will also apply for those using the VS1680/VS1880. Furthermore, VS1680-owner Matt Bell has added some special tips for anyone with the larger machine.
Editing Tips
One of the reasons I like my VS880 so much is because of its editing, which I find really quick to use. For a start, I'm a great fan of the type of scrubbing used in the VS recorders — it repeats a small piece of audio, rather than responding like tape. What some VS users may not realise is that you can choose whether the repeated area of audio is before or after the current time location, by simply pressing the Preview To or Preview From buttons respectively.
 You can also change the length of the looped section of audio while you're in Scrub mode: hold Shift and press Scrub to access the Scrub Length parameter.You can also change the length of the looped section of audio while you're in Scrub mode: hold Shift and press Scrub to access the Scrub Length parameter, and do it again to return to the time display. I find that the default setting of 45mS is sensible for most tasks, though occasionally you need to reduce it for really fine edits.
The way I do most of my editing is to work in Scrub mode and use Locator points to store the Start, End, From and To points. Although there are shortcut key combinations for entering the current time position directly into the editing screens, I still prefer to define Locators for each one. Once the locators are set (and I set them in the order which is printed below the first four marker buttons), it's just as quick to enter the times one after another in the edit pages. The advantage of this method is that you can easily check and modify the points you used if the results aren't quite right. Having said all this, the direct edit-point input shortcuts are a faster way to work on the VS1680.
Before I leave the subject of editing, there's one other little trick which some of you might find handy if, like me, you do most of your work in the uncompressed MAS recording mode. Though you can only play and record to a reduced number of tracks, you can actually store the same number of virtual tracks. All you have to do is use the Track Exchange function to shift material on a playable virtual track to one that isn't playable.
Automation Stations
 Another seriously useful feature of the VS series is the provision of onboard level automation, but there are a number of things that you have to bear in mind if you're going get the most out of it. The first thing to say is that you should make the effort to get your mix as complete as you can before you start automating, not only in terms of fader levels, but also in terms of effects. Once you're ready to get automating, you should save all your effects settings as user patches. This is because the automation system recalls effects patches, not effects parameters, so if you're mixing using an edited version of one of the ROM presets, the automation will restore the original ROM parameter settings when it calls the patch. Similarly, once you've started automating you'll need to remember to save any effects tweaks as you go, otherwise the automation system will revert to your previously saved settings.
The next thing to say is that you should save your rough fader settings to a marker point at the very start of your track the moment you enable the Automix mode. That way, even if you arse things up later you can always refer to that balance as you go by returning to zero and then disengaging the automation.
Now, if you want my advice about automation, I'd suggest you push all the faders down and leave them well alone. I know that some of you will throw your hands up in horror at the suggestion that you should set automation points simply using the data wheel. However, I do a lot of automation and I actually find this more efficient than wrestling with the faders and creating slews of marker points, especially as densely packed automation will often confuse the system so that it doesn't reliably play back your moves. Using the scrubbing and Locator points I can quickly ascertain the exact point at which a given element of the mix is out of balance, and then place a single marker there to remedy the situation. If I get the value wrong, I can quickly and easily change it. Furthermore, I don't need to even consider how the physical faders match the 'virtual' ones, because I leave the faders alone.
That's not to say that there aren't occasions where it is more sensible to reach for a fader, especially where you're performing a long gradual fade. However, using the faders for quick movements quickly reveals a limitation of the system, namely that the automation events must be at least a fifth of a second apart. If you do a quick fade during Automix, it'll play back as a series of steps five frames apart. Out of Automix mode, the fader responds far quicker than this, so a workaround would be to bounce the track you wish to fade, manipulating the fader as required during the bounce, and then to use that faded track instead of the original for your otherwise automated mixdown.
One thing the VS automation is magical for is lead vocals. You can place automation points exactly, using Scrub mode, so that you can level out the performance dynamics without the result seeming compressed — it makes it sound like the singer was simply regulating his or her own level naturally. This means that you can then compress for a particular sound, rather than having to compress for level control. The only proviso is that the automation takes a finite time to respond, and that this time appears to increase the further the fader value has to jump, so you need to place automation events a frame or two early in some cases.
VS Panning
Whenever you want to export or bounce a mono track, for example to capture some insert effects on disk, you'll often have to assign it to some kind of stereo buss. In such cases, you should remember to pan hard to whichever side of the stereo buss you're recording. If you pan the mono track centrally to the stereo buss, you'll lose 3dB of level because of the way the pan control works. Mike Senior
Effects Tricks
The VS series effects boards are a real plus point. One of the reasons why they're so useful is because of the flexibility with which you can assign them. The InsertL and InsertR configurations allow you to insert the two sides of a processor on different channels, and this is fun to do with the dual compressor/limiter algorithm — limit a synth track according to the level of a drum track, and you get the pad bubbling up nicely into the gaps of the rhythm, for example.
The InsertS assignment is also handy for imitating soft-knee compression. For this you need to use the dual compressor/limiter effect with the Link switch off. Set up the first compressor for gentle compression (a ratio of, say, 1.5:1) with a comparatively low threshold, and set up the second for harder compression (say, 4:1) with a higher threshold. This gives a transition from soft compression to harder compression, which can be more musical-sounding in some cases.
Most people will have tried out the microphone simulator algorithm, just to see how well it works, if nothing else, and you can certainly get some interesting tonal changes out of it if you're prepared to 'suck it and see'. However, I've found that there's more tonal mileage to be had from the Amp Simulator. Try switching off the noise suppression and speaker simulator, and then selecting the Clean Twin amp model with the following settings: Volume = 45, Master = 100, Gain = Low. Now experiment with the EQ controls with audio running through — it's much more sonically creative than normal EQ, as subtle distortion is added when you boost. This lets you can warm up digital synth sounds without making them sound obviously distorted, and you can use the Treble and Presence controls to enhance sounds which you want to cut through the mix.
And while we're on the subject, remember that the Speaker Simulator can also be used independently for another whole range of sonic colours, though these all inevitably dull the top end. I find these handy for bass and lead synth parts, though they can also give a nice muffled quality to lo-fi drum loops.
Printing Effects On The VS1680/VS1880
When my four-track tape-based Portastudio was my only multitrack recorder, I had to run all my effects treatments live at the mixdown stage. And I hated it. I'd come back to tracks after a couple of weeks to have another crack at that mix I hadn't got quite right (which seemed to happen an awful lot) and find that nothing sounded the same because I'd tweaked my effects units' settings in the interim. What's more, I longed to use more of my Zoom 9030's great-sounding effects (OK, OK... this was the mid-'90s, alright?), but as my Zoom pre-dated the era of affordable multitimbral multi-effects, I was stuck with using, say, one reverb on one track, or the prospect of bouncing endlessly and losing whatever not-particularly-high fidelity my recordings could muster in the first place. I longed for more tracks so I could print my effects to tape.
This longing remained with me until I bought my Roland VS1680 some years later, so that one of the first things I did when I moved over to the Roland was start printing my effects to separate tracks. Even the VS1680 or VS1880 can only operate a maximum of four different internal stereo effects patches at once, and that's if both effects boards are installed, but if you print your effects to disk then you can free up effects processing to do something else (and of course, this also goes for any external effects units or processors you have connected). It also no longer matters if you change your effects patches at a later date and then want to have another go at a mix, because the effects sound you used before will still be immutably recorded to your hard disk.
Most people know how to pass their tracks through the VS1680 onboard effects, but I'm surprised at how few bother to print them to disk. If you're familiar with the Input/Track routing screen (the one which appears on holding down the Track Status button, showing which input is routed to which track), it's simplicity itself.
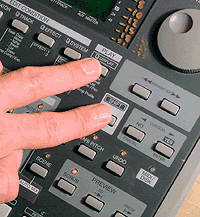
- Select the Track mixer for the track or tracks you want to effect, and switch the effects unit on for this track using the switch in the appropriate 'EFX' box at the bottom of the screen (each of the EFX boxes represents one of the Roland's effects processors). The switch is set to 'Off' in the default position; set it instead to 'Pst' (post-fader) — this way the effects will be driven harder or softer depending on where you set the track fader. If you set it to 'Pre', the track fader won't have any influence on the level sent to the effects processor.
- That's got the track passing through the effects processor you want it to. Now hold down the Status button for the track you want to record the effects to, and select the appropriate Effects Return input from the buttons at the top right of the VS's control panel (see picture above). That track will now receive audio processed via the appropriate onboard effects unit.
- Record the processed track. If the processing you're using is an insert effect such as a compressor, gate or limiter, and you're happy with the result, you can in theory discard the unprocessed audio at this point, which frees up another track. If you're using an effect such as reverb or delay, the original track provides your dry signal and the processed track your 100 percent wet. If you need to free up track space, balance the respective levels of the two tracks so that the overall balance of dry to wet sounds good to you and then record the results to a third track. If you're sure you're happy with the results, you can delete the original source tracks. The only downside with keeping only this bounced version, of course, is that it deprives you of the ability to change the wet/dry balance if you change your mind about it at a later date. Matt Bell
VS880 Metering
When you're working with any digital recorder, it's important to know where you stand in terms of headroom, and this is especially the case on the 16-bit VS880. If you record or mix at too low a level, you won't get the best from the limited recording resolution, yet if you record at too high a level, you risk nasty-sounding digital clipping.
The only way to assess headroom is by using the onboard metering and, fortunately, the fact that the VS880's meters are each made up of 16 discrete segments makes it possible to calibrate them quite accurately. Using an oscillator and a digital meter, I've calibrated mine as follows, from top to bottom in dBFS: -1, -2, -3, -4, -6, -8, -10, -12, -15, -18, -21, -24, -28, -32, -36, -48. The preamp Peak LED comes on at -6dBFS.
Notice that there is no 0dBFS indicator, and neither is there a segment to signal a digital overload. When recording, this might not be a problem if you're sensible enough to use an external A-D converter with its own metering, but if you have to use the VS880's onboard analogue inputs, you'll effectively have to treat the -1dBFS segment as an overload indicator and put up with the small waste of headroom. When mixing, I suggest setting the master fader level to 92 (about 2dB under the unity gain value of 100), ensuring that the top segment of each of the master buss LCD meters remains unused. Once you've completed the mix, put the master fader level back up to 100 to generate a full-scale, clip-free output. Mike Senior
Which VS880 Mixer Mode Should I Use?
If you have a VS880, rather than a VS1680, you'll have a choice of mixer modes. Whenever you create a new song you are in the simpler one of these (where there's one mixer channel per recorded track) and that is where many users stay. It's well suited to tracking, because effects can be routed to the auxiliary busses for monitoring purposes. However, it makes track bouncing and the recording of effects a chore, as well as being much less flexible when you want to monitor the outputs of MIDI sound modules alongside your recorded tracks.
 The other mode effectively gives you an in-line mixer configuration such as you get on the VS1680, and this means that you can mix all your physical inputs with all your recorded tracks, as well as being easily able to route anything to a track for bouncing. The one thing that puts people off, though, is that it can initially be confusing trying to set things up. To start with, I found myself frequently scratching my head and wondering why I wasn't hearing anything. However, it is worth persevering with it, and there is a facility which makes it easy to troubleshoot. If you hold shift and hit the Play/Display key, you'll cycle through different display modes, including pre-fade and post-fade metering.
If you're trying to record one of your inputs to a track, but you're not getting any sound arriving at the main mix buss, here's what to do to find the source of the problem. First, press the Mixer Mode button to select Input Mix, and then select pre-fade metering. If you can't see anything, you've got a faulty connection or the input gain needs adjusting. If you see something, then switch to post-fade metering. If the meter goes dead now, then you need to check the Buss Switch and Buss Level, as well as the level settings for any inserted effects.
If you're still getting a meter reading this far, then switch to Track Mix mode and go back to pre-fade metering. If there is no meter reading for the track you want to record to, then check that it's record enabled. If this doesn't help you need to switch back to Input Mix mode and check the input channel's routing destination (the Buss Sel parameter) and its pan position. Once you've got a pre-fade meter reading in Track Mix mode, check the post-fade reading and adjust the Buss Switch, Buss Level and insert effects level settings. You should now have a post-fade meter reading, and all you have to do if the mix buss meters aren't registering is check that the channel is routed correctly (Buss Sel parameter again) and that the master fader is up. If you're getting a post-fade mix buss meter reading, but no sound, you'll want to double-check that the master fader's Master Mode is set to Mix before you start looking too suspiciously at your monitoring hardware... Mike Senior
Fixing Vocal Tuning
The VS series Vocal Transformer isn't just a gender-bending gimmick. Because you can easily control it over MIDI, it's great for correcting duff vocal tuning under sequencer control. Here's how you go about it. First, insert the Vocal Transformer into the relevant channel, and then set the insert return level to 127 — you need to do this to compensate for the fact that the effect itself inexplicably reduces the signal level.
Once this is done, head for the effects pages, and make sure that the Voice Transformer and MIDI blocks are activated, and the Reverb and Fader Edit blocks are switched off. Set up the Vocal Transformer block's pitch and
formant shift parameters all to zero, switch off Robot mode, and set the Mix Balance to 100 percent. In the MIDI block, switch off portamento and set the pitch-bend to one — most tuning tasks only require about a semitone of correction either way.
Now you can send MIDI Pitch-bend messages to the recorder from your master keyboard's pitch-bend wheel, via your sequencer. The only downside is that, occasionally, the Voice Transformer gets confused and creates a 'gurgling' sort of digital glitch. For this reason, I suggest creating a copy of your source vocal on a another VS track, and then setting up the mixer routing so that you can bounce only the sections that require (and tolerate) adjustment over it.
Because the Vocal Transformer's glitching can sometimes make it unusable on some notes, it's worth knowing that there's a workaround you can pull off using the time-stretch editing function. If you switch the Pitch Mode to Vari, any time-stretch will also vary the pitch. Obviously, this won't help in cases where the exact timing needs to be retained, but in many cases a subtle change in timing won't cause any problem.
If you want to try out this method of pitch-shifting, then you should find out first how many cents you need to shift, using one of the pitch-shifting algorithms. Then you need to isolate the audio to be tuned, and work out its length in sub-frames. Now, for every 10 cents you wish to shift the pitch, you should multiply this figure by 1.0057929 for upwards shift, or by 0.9942404 for downwards shift and use this to work out the To value. Yes, you'll need to have a calculator and a pad of paper to hand. And, yes, it would probably be best to transfer the track to a proper software sample editor for this type of work. However, this little dodge has helped me out of a jam before now, so it's worth knowing about nonetheless...
VS Reviews In SOS
- VS880 Digital Multitracker & VS8F1 Effects Board: March 1996
- VS880 V-Xpanded Digital Multitracker: May 1997
- VS880 S2: CD-writing Upgrade: January 1998
- VS840 Digital Multitracker: May 1998
- VS1680 Digital Multitracker: June 1998
- VS1880 Digital Multitracker: July 2000
- VS2480 Digital Multitracker: September 2001
Living Without The Expensive Roland SCSI CD-RW Drive
Let's face it — Roland's VS-specific SCSI CD-RW drive was simply too expensive for many VS owners. Some went for cheaper 'unbadged' drives instead, but many others chose to buy a cheap stand-alone CD-writer, such as the Philips CDR870, for mastering and backing up their tracks instead.
It's quite simple to master from the VS to a stand-alone CD-writer, as you can just stream your stereo mix from the Roland's S/PDIF output to the CD-writer's S/PDIF input. In fact, even if you bit the bullet and bought a SCSI CD-RW drive for use with your VS, there is still reason to use the S/PDIF transfer method — for checking purposes, quickly burning tracks to disk like this is actually quicker than bouncing the whole mix to stereo, waiting for the image file to be prepared (which seems to take about as long as the mix would take to play through in real time), and waiting for the CD-RW Drive to do its thing. With a stand-alone CD-writer, you can do a quick rough mix of an entire multitrack song to the CD in real time, assuming you don't make a complete hash of mixing it on the fly. Of course, you can take some of the uncertainty out of this procedure by recording automation to get the mix the way you want it.
It's also possible (though a little involved) to use a stand-alone CD-writer for backup purposes, by saving track pairs out in various passes with the tracks in the pair panned hard left and right to ensure complete separation. Placing a short, sharp sound at the beginning of all your songs across all tracks (you can mix this out later) gives you a reference point which enables you to resync the track pairs when you reimport the audio from your CD-writer. An advantage of this is that you can restore your audio to multitrack machines from any other manufacturer, as long as they have a digital input. Bear in mind, though, that the editing in the VS machines is not fine enough to ensure that tracks imported on separate passes are completely phase-coherent, so any stereo track pairs should be exported and imported together to avoid phasing.
The digital output provided on most stand-alone CD-writers also makes them useful in another way. You can plumb this output directly into the VS mixer, which lets you easily reference your mix against commercial CD releases. Matt Bell & Mike Senior