This month, a look at how some of DP 's features can be used to co-ordinate multiple finished tracks prior to burning an album or EP.
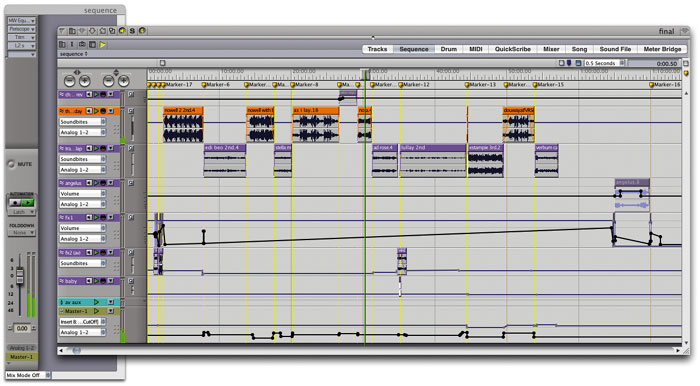
This is a 'mastering sequence' in DP for a classical/folk crossover CD I recorded last year. CD track starts are defined using markers, and overlapping musical numbers are placed on alternating audio tracks, or completely separate tracks, to allow precise control over signal processing, fade-ins and fade-outs. Track automation takes care of dynamic mix elements such as level changes and plug-in settings.
There are some great audio editing features in Digital Performer, but like most of its main rivals in the 'native' Digital Audio Workstation world, it doesn't offer integrated CD-burning facilities. So if you've got some mixes finished in their separate DP projects, what's the next step towards turning them into a finished album?
DP As Mastering Tool
Co-ordinating the many tracks that eventually form a finished CD is just as important a part of the mastering process as wheeling out all those esoteric limiter and dither plug-ins; perhaps even more important. It's at this stage you have to consider all the following:
- The relative overall level, dynamic range and tonal balance of the individual tracks.
- The exact length of pauses between tracks, or the way 'overlapping' tracks interact.
- The way beginnings and ends of tracks make the transition to and from 'digital silence'.
- Exactly where CD track starts occur relative to your audio.
- Dithering to CD's 16-bit resolution, if your audio is at 24-bit.
Some people perform these tasks with dedicated two-track editing software such as BIAS Peak or DSP Quattro X: they simply import their mixes into the application's playlist and use the timing, plug-ins and fade tools it offers. This is a perfectly good approach, and well suited to simpler compilation-type tasks. DP is arguably much better for precision work, however, and also when your requirements are more demanding. Amongst other advantages, DP 's multitrack mixing environment makes it easier and more intuitive to overlap and layer tracks. You can use mix and plug-in automation, fades are easy to apply and control, and you have access to all your favourite MAS plug-ins. All that, and not a PQ code in sight!
If all this CD mastering stuff sounds a bit daunting, don't worry — it all makes sense in practice. In DP, the main steps are:
1. Creating a new sequence and importing into it all the individual stereo mixes that will eventually become separate CD tracks.
2. Placing those mixes in the correct order in the sequence's timeline, adjusting them relative to each other so that inter-track timings and pauses are correct, and applying fades where necessary
3. Equalising tone and level.
4. Using markers to determine CD track start and end timings.
5. Applying any final 'mastering' adjustments, and dither if necessary.
6. Bouncing to disk track-length audio segments of your master, ready for CD burning in a separate application.
To illustrate this process, I'll talk you through the six steps above in more detail. We'll 'produce' an example EP that can be burned (with suitable software, of which more in a moment) as an audio CD. I have some specific requirements for my example EP: the audio that will become CD track one needs to be boosted in level, EQ'd and have a fade-out applied to it, tracks two and three need to overlap, and I want track four to become one of those 'surprise' tracks, preceded by about five minutes of silence after track three. In this description there's room for confusion between the meanings of the word track, so I'll be consistent in referring to either a 'CD track' or a DP 'audio track'. Here goes:
1. Importing The Audio
 Step 1: Importing the audio into DP.
 Step 2: Placing the songs on separate DP tracks where required, and adjusting the timing between songs.
I've already bounced (at 24-bit resolution) the separate songs that are going to form my EP, so first I need to get them into DP to make my 'master'. In a new, empty project, I create three stereo audio tracks and a Master fader (we'll see why in a minute). Now, after switching to the Sequence Editor (Shift-S), I can simply drag and drop my stereo song bounces from OS X's Finder into any of the audio tracks in DP. Exact placement isn't important at this stage. Alternatively, I can use the File menu's Import Audio command (Apple-F1) to navigate to and load the audio files using a standard file browser. Once all the files have been loaded into the Soundbites window, they can be dragged into the audio tracks as before.
2. Ordering, Timing & Fades
My first task is to drag the songs into the right order, placing the first on the first audio track, the second on the next audio track, and songs three and four on the third audio track (see screenshot, bottom). There are a number of reasons why I do this. First, song one needs some level boost and EQ, so the necessary plug-ins can be instantiated on just that one audio track. Second, I want full flexibility in overlapping songs two and three, and putting each on their own track is quicker and more intuitive than trying to overlap them on one and using a crossfade. No overlapping is required for the fourth song — in fact, I want a big gap before it — so this can go on the same track as the third song.
To help with exact placement of the songs, I bring up the Time Formats window (Apple-Alt-T, or from the Setup menu) and switch the sequence's time ruler to 'Real time'. Then begins the process of carefully listening, adjusting, and listening again, until the basic inter-song timings are correct.
I also need to think about fades at this point. Track one needs a 15-second fade out, the overlapping tracks need some dovetailing, and I also consider brief fades at the beginning and end of all tracks to make the transition to and from digital silence less abrupt. I can apply fades in DP by dragging the red fade handles at the top left-hand and right-hand corners of soundbites. However, I can access more options by dragging over the region where the fade is needed with the I-Beam tool (for which the keyboard shortcut is simply the letter 'I') and then hitting control-F to bring up the Fades dialogue box. Whichever way they're applied, to gauge these fades properly I use headphones, so that I can really focus on the low-level detail.
3. Tone & Level
 Step 3: Fine-tuning level and tonal balance between songs.This step is arguably where the art and the science of the mastering process begin to combine. I'm aiming for a consistent 'sound' over the course of the EP, and I need to make sure that the relative volume of each song is appropriate. This is also my opportunity to fix the lower level and tonal balance of my first song, which needs a bit more 'warmth' to match the others. In this case, these tasks are not too difficult to accomplish: some boost with the Trim plug-in and a touch of Masterworks EQ on the first song does the trick, and I use the faders in the Mixing Board to subtly tweak the levels of the other songs. In more tricky circumstances, I might end up using volume automation for individual audio tracks, to vary level, pan or even plug-in settings over the course of a song. At this stage I'm not trying to get levels 'hot' — just consistent.
4. Markers & Track Boundaries
 Step 4: Setting markers at track starts and also at the end of the final track.With the putative EP starting to sound more polished, I now turn my attention to what will eventually become CD track timings. As we'll see in step six, I use DP 's markers to help with this. I need to place a marker wherever I want a CD track to begin, and another one at the end of the final CD track. As in step two, I do this using a combination of listening and looking at waveform displays and meters, and I place a marker by hitting control-M, either while DP is in playback or stopped. If I need to change the position of a marker while working in the Sequence Editor, I drag it in the Conductor Track (rather than the Marker Strip), and for the finest control I disable DP 's edit grid by deselecting the blue tick-box at the top right of the window. In the Preferences window, enabling 'Show marker grid lines' in the Graphic Editors pane causes a yellow vertical line to extend downwards from each marker, through my songs' soundbites, making precision placement that much easier.
5. Final Adjustments & Dither
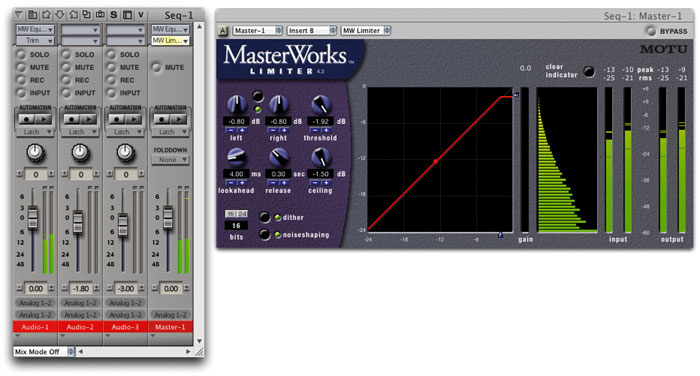 Step 5: 'Final' processing across all the tracks destined for the EP, in this case using the Masterworks EQ and Limiter. Dithering down to 16-bit is the last process.
It's now time to configure any 'final' processing on the Master fader — multi-band compression, level-boosting limiting, EQ 'sweetening' and dither to CD's 16-bit resolution. These changes will affect all the songs on my CD and, as I discussed in May 2007's Performer workshop on dithering, there are plenty of considerations to be borne in mind. In this case, I choose the Masterworks EQ and Limiter to carry out all my sweetening, levelling and dithering needs by placing them in the Master fader's insert slots. Since the MW Limiter is carrying out the dithering, it needs to be in the lower slot of the two. Finally, I make sure the Master fader is set to its 0dB unity-gain position, so that no 'post-dither' level change takes place.
6. Exporting For CD Burning
 Step 6: Using the markers set earlier for easy Bouncing To Disk of each track.
 The EP files are imported into DSP Quattro's Playlist ready for CD burning.
Now comes the clever bit. The reason for using markers to define CD track boundaries in step four above is so that I can make use of a special DP time-region selection technique. Working in the Sequence Editor, if I click on the first marker in the thin 'marker strip' (just below the time ruler) I actually make a selection in all visible tracks, up until the next marker. This selection exactly represents CD track one, so now I can choose Bounce To Disk from the Audio menu (or hit control-J) to begin the process of exporting the 'master mix' of CD track one.
The Bounce To Disk dialogue box allows various audio file formats to be generated, but for now I'll choose DP 's 'Standard Format (SDII)' Sound Designer II format. I want my audio to be ready for CD burning, so I choose 16-bit resolution. Next, I choose 'Do not Import', because I'm not intending to do any more work on this bounce in Digital Performer. I set Source to my main pair of hardware audio outputs — the same pair chosen for the master fader in my sequence. For File Name, I type 'Track 1', and then choose a folder for the bounced files.
After the bounce completes, I go back to my sequence and this time click on my second marker, to select my CD track two material. I bounce once more, naming the bounced file 'Track 2'. Then I click the third marker, which selects both CD track three and my 'surprise' fourth track. Another bounce, and that's it.
Digital Performer News: An Important Update
 and Project (current project) bit-depth settings are now hidden away in the Preferences Audio Options pane. It might be just as well to make this a regular stop before you begin recording, to ensure you're recording at the bit depth you want.") Default (new project) and Project (current project) bit-depth settings are now hidden away in the Preferences Audio Options pane. It might be just as well to make this a regular stop before you begin recording, to ensure you're recording at the bit depth you want. In May, MOTU released an 'incremental' upgrade for DP, version 5.12. One of the biggest changes — Japanese localisation — will inevitably have no bearing on most European or US-based users, but must be great if you're Japanese! Another development, DAE Intel support, will only affect you if you're using DP as the front end for Digidesign hardware on the latest Macs. And many users may never notice the nice new fonts used on buttons in the Consolidated Window and elsewhere.
Default (new project) and Project (current project) bit-depth settings are now hidden away in the Preferences Audio Options pane. It might be just as well to make this a regular stop before you begin recording, to ensure you're recording at the bit depth you want. In May, MOTU released an 'incremental' upgrade for DP, version 5.12. One of the biggest changes — Japanese localisation — will inevitably have no bearing on most European or US-based users, but must be great if you're Japanese! Another development, DAE Intel support, will only affect you if you're using DP as the front end for Digidesign hardware on the latest Macs. And many users may never notice the nice new fonts used on buttons in the Consolidated Window and elsewhere.
However, v5.12 brings one huge enhancement: simultaneous playback of 16-bit and 24-bit audio. You can now mix and match sample formats within a sequence, and no longer need to convert, say, an imported 16-bit drum loop when all the rest of your audio is at 24-bit. To reflect these new capabilities, there have been operational and cosmetic changes. Gone is the 16-/24-bit pop-up menu in the Control Panel's Audio pane, along with the Sample Format dialogue box in Setup menu / Configure Audio System. In the Soundbite window's mini-menu, Convert Sample Format has disappeared, to be replaced by the new Convert Sample Rate and Format. This new dialogue box still allows you to force a change of sample format, though, in case you should need to change bit depth of a soundbite prior to exporting it, for example. Finally, the Automatic Conversions pane of DP 's Preferences window has lost all its bit-depth conversion options, as they're no longer needed.
While multiple bit-depth support is great, there's one down side. Previously, if you kept the Control Panel's Audio pane open while you worked, the bit-depth pop-up menu would sit there, confirming that any new recordings you made were at your intended bit depth. Now, while DP still records at either 16-bit or 24-bit, the setting is tucked away in the Audio Options pane of Preferences. If 24-bit resolution is as important for your projects as it is for mine, I'd suggest that a quick visit to this pane needs to become a part of your workflow at the start of a session. Incidentally, Default Sample Format determines the bit depth for new projects, while Project Sample Format is the bit depth for the current project.
If you've already downloaded DP 5.12, you'll know that MOTU have changed their web site, www.motu.com, so that certain software downloads are only available to users who've registered the serial number of their MOTU products. In the case of DP, that's not the keycode that you used to authorise DP after installation, but the string of 10 alphanumeric characters that is printed on the first page of your paper manual. If you have trouble locating this, drop a line to MOTU or Musictrack (www.musictrack.co.uk) and they'll try to sort it out.
The Final Step: Burning
Now I have a set of audio files ready for burning as an audio CD, and it's time to pass them over to a dedicated audio CD-burning application. If your CD is destined for replication or duplication of any kind, the burning application needs to be capable of operating in so-called Disc-At-Once (DAO) mode. Apple's iTunes only works in Track-At-Once mode, so you may need one of the following to help you out:
- i3 DSP Quattro X (www.i3net.it): Capable of much more than CD burning, and with something of an 'alternative' flavour, DSP Quattro X is a deservedly respected two-track editor for OS X. It's compatible with DP 's native Sound Designer II file format.
- BIAS Peak Pro XT/Pro/LE (www.bias-inc.com): A long-established heavyweight two-track editor. The most affordable version, LE, lacks some key audio editing features, but has integrated CD burning. Also compatible with Sound Designer II.
- Roxio Toast/Jam (www.roxio.co.uk): Latest versions of Toast and Jam support Disc-At-Once burning. Watch out, though: the audio-specific Jam is now discontinued and doesn't run natively on Intel Macs. Toast is very capable and is also set up for video and data burning. Latest versions can work with the SDII format, but only at 16-bit.
- Simply Burns (http://simplyburns.berlios.de): Basic it might be, but this donationware open-source burning application does include DAO burning. So long as you do all your track preparation in DP, in the absence of anything more flashy it's all you need! Not compatible with dual-mono (split-stereo) SDII format, but easily handles other DP export formats, such as AIFF and WAV.
Using DSP Quattro X as an example, the files created in step six are imported into the playlist window. Because I'm confident that I fixed all the inter-track timings in Digital Performer, and because of the seamless follow-on from track two into track three, I set all the track pauses to zero seconds, to ensure that no additional periods of silence are inserted between tracks. Note, though, that a pause of two seconds before track one is necessary to satisfy the Red Book Audio CD-burning standard that most CD duplication companies adhere to. All that remains is for me to actually burn the disc, preferably on to a high quality CD-R medium, get it off for manufacturing, and then wait for the royalties to flood in...
Going Further
This description of mastering and burning a four-track EP illustrates (I hope) the general principles of using DP for mastering and preparing a longer album. But of course it's just one scenario: every mastering job is different, and the suggestions I've made are just waiting to be modified according to your specific needs.
Next month I'll be looking at a slightly different but no less useful approach to CD burning, which is especially suitable for dealing with live recordings and other types of 'continuous' audio.