What do you get when you cross a recording musician with a photographer? A nice-looking studio that serves a dual purpose, that's what...
 The control‑room end of Jason's hybrid studio was brought under control with acoustic foam placed at the familiar 'mirror points', to the sides and above the listening position, as well as directly behind the speakers.
Jason Firth approached us with a Studio SOS request that was a little different from the norm, because he was in the process of setting up a dual‑purpose studio that could be used both for photography and music recording. He was fortunate in being able to rent an outbuilding right next door to his home, and he soon set about dividing up the available space and lining the somewhat rough walls with polystyrene‑backed plasterboard, supported on battens. He also created a flat ceiling, again using plasterboard.
It was at this point that Jason contacted us to see if we could help turn the space into something acoustically suitable for music recording and mixing, and also help him set up his recording system in the best way for his needs. Given a clean slate, I'd actually have suggested doubling up on the plasterboard walls, which would have improved the bass absorption, but as he'd already plastered and decorated, we had to work with what was there.
Before
 Jason used heavy doors to separate the music and photography areas of his studio, and supported their weight with large rubber wheels.
The original building had an internal size of roughly 20 x 17 feet, and Jason decided to partition this into two main areas along the length of the building, to create an 8 x 20 foot control room and photography space, with a 9 x 20 foot performance space alongside. A separate room was created at one end of the wider space to use as a drum room, with a window looking into the control room and another into the main live area. Jason built his own floating floor for the booth, based on designs we've covered before, specifically using four-inch thick, high-density Rockwool to support plywood boards. However, he'd only put down one layer of plywood, so we suggested he adds a further layer of chipboard, glued and screwed to the ply to make the whole thing more rigid. Floors made in this way should not be allowed to touch the walls as that allows vibrations to enter the wall structure, so neoprene or felt buffers should be used around the edge. He'd also installed a single-skin door to the drum room with flexible seals on the top and sides but nothing at the bottom, so there was noticeable sound leakage around the edge of the door. Again, I recommended he attend to this, as even the heaviest door will only present a serious barrier to sound if absolutely airtight when closed.
Inspired Separation
To make the most of the space, Jason hit upon the ingenious idea of building two very wide, substantial doors (around five feet each) to separate the back of his long control room area from the adjacent performance space, and to support the not-inconsiderable weight he fixed large rubber‑tyred wheels to the front and rear sides of the bottoms of the doors furthest from the hinges. This didn't make it easy to seal the bottom of the doors, so Jason decided that brush seals, fixed to the doors and making contact with the floor, would be his best bet.
The idea behind installing these big doors was that they could be opened wide to provide him with a relatively large space for his photographic work; he has a fabric backdrop roll fixed up on one of the side walls at the rear of the control-room area, as well as a storage area for his reflectors, flash systems, lighting and other accessories. A pair of heavy drapes split the long room into two, giving the control‑room section more of a visual identity, and also helping damp out reflections from the 'photographic' end of the room (although the various items stored could also serve to provide some useful diffusion).
When I arrived, I found that Jason had already painted the walls, fitted the doors and built some very nice control‑room style windows linking the rooms, using a large air gap and non‑parallel glass panes set into resilient seals. Again, these followed principles that we've covered many times in the pages of SOS. However, there was no acoustic treatment at all, so the rooms were predictably very reflective, and consequently sounded noticeably coloured.
Picturesque Panels
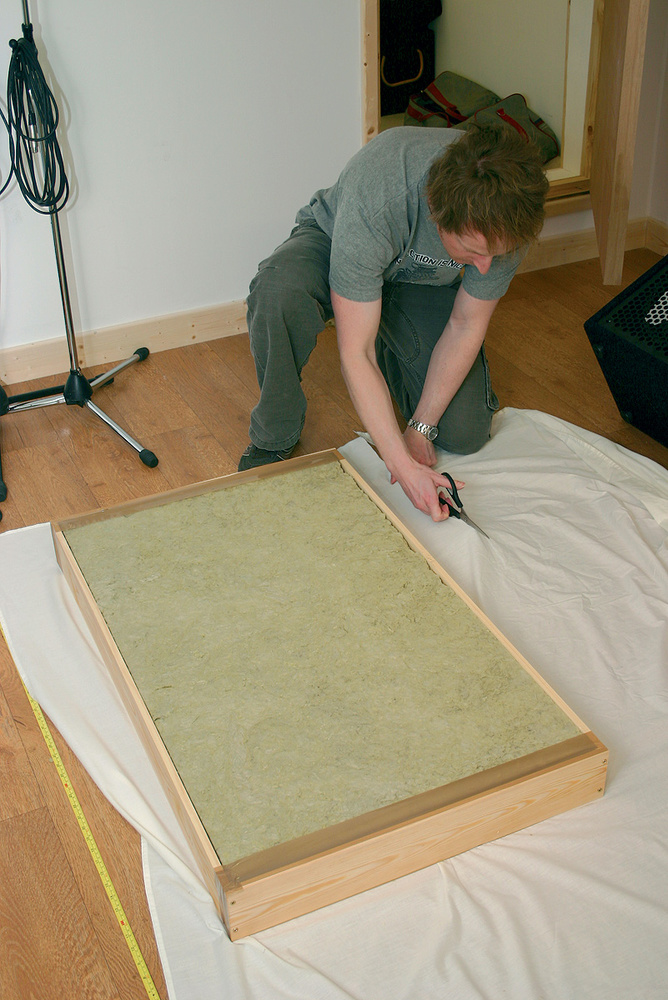
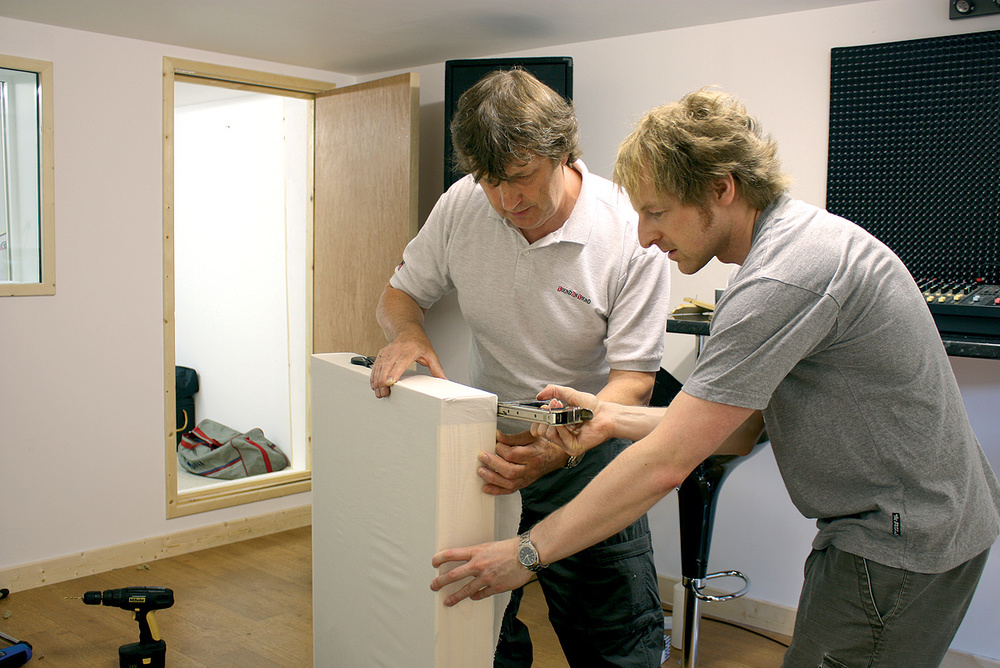
 Constructing your own acoustic absorbers using Rockwool in a wooden frame is a simple but effective bit of DIY that can save you a lot of money. In the first picture, Jason is constructing the wooden frame; in the second, the acoustically transparent fabric is cut to size, using the frame as a template; and in the last, Paul puts the fabric under tension, while Jason staples it in place, to ensure that the panel works aesthetically too.
As Jason is no stranger to DIY, I'd asked him to get in some wooden strips prior to our arrival, so that we could make up frames to hold some of the spare 600 x 1200mm x 100mm thick Rockwool slabs that he had left over from the construction work. Our plan was to cover these with thin cotton fabric, and then hang them 'picture style' on the walls where needed, using a single plasterboard fixing and screw. We assembled a number of these frames, which proved very straightforward to make — but there's certainly a knack to stretching the fabric and folding neat corners, so that everything looks good once the fabric has been stapled in place. The secret is to apply gentle, but not excessive tension, and to start out by fixing one of the long edges, followed by the second long edge. The corners can be folded prior to stapling the ends — and, again, a little tension needs to be applied, so it's best done by two people; one person to stretch the fabric, and the other to operate the staple gun. Jason ironed all the cloth before we fitted it... but for some reason declined to have his photograph taken while doing it!
Being a photographer, Jason also had the idea of getting one of his images printed onto fabric so that he could use it to cover a large 6-foot x 4-foot trap he was planning to build for the back wall of the drum room. He found someone offering this printing service on the Internet, and it turned out to be surprisingly cost-effective, but as he hadn't had the fabric made up at the time of our visit, we didn't fit that particular trap.
Treatment
After looking around the studio (while munching chocolate Hob Nobs and drinking freshly brewed coffee), we decided to start with the control‑room area, as it sounded very live. One of the DIY Rockwool traps at each side of the listening position, augmented by Auralex panels behind the monitors and another one on the back of the access door, addressed the worst of the side reflections, while a further panel stuck directly to the ceiling above the mixing position (actually above the engineer's knees) cut down on high‑frequency reflections from that quarter. We put Auralex MoPads under Jason's Mackie HRM624 monitors (brought in to replace some rather small Edirol desktop speakers he'd been using), and we used the MoPads 'back‑to‑front', so that the speakers angled up slightly without the need for the additional foam wedges. This produced exactly the right angle to get the tweeters aiming at the mix engineer's head, and also helped to decouple the monitors from the desk.
We hung three more of Jason's Rockwool panels, this time covered with cream fabric taken from a king-size cotton/polyester bed sheet, on the side walls of the drum room, leaving the rear wall free for his forthcoming mural/absorber. Because the floating floor reduced the headroom, any overhead drum mics were going to end up very close to the ceiling, so we fitted two further Auralex panels directly above the drum kit. Even without the large mural/absorber, the difference was dramatic: the room now sounded much less 'ringy' and more focused, but without being overly dead.
Time was rather pressing, so I left Jason to make the holes in the wall for the cables, and also to make up further Rockwool panels to hang in the main part of the live room — where at least two of them would be needed on the back of the large doors and three or four more on the other walls. We also suggested using one of the traps and a spare piece of acoustic foam for treating one corner of the live room, for use when recording vocals, so that the singer could stand with their back to a non‑reflective surface. This, in conjunction with an SE Electronics Reflexion Filter (kindly provided by Sonic Distribution), should ensure clean, tight vocals, without the need to build a separate vocal booth. Where the ceiling is fairly low, as is the case here, it's also wise to fix some acoustic foam to the ceiling above both the singer and the microphone, to kill early reflections from the ceiling.
System Setup
With the acoustics much improved, we set up the recording system itself, which comprises a Mac Pro running Apple's Logic Pro, the aforementioned Mackie HRM624 active monitors and a TC Electronic Konnekt 48 Firewire audio interface, along with a Behringer ADA8000 expander to add eight more mic and line inputs, and eight more line outputs. The best way to use the ADA8000 with a compatible audio interface seems to be to connect both its ADAT optical Ins and Outs, then set the ADA8000 to external sync mode, so that it locks to the main audio interface. The two units were set up at the side of the desktop, where they wouldn't obstruct the monitors, and the Konnekt 48 was patched into the back of the Mac using a Firewire 400 cable. After installing the Konnekt 48 support software, and selecting the Konnekt 48 as the audio interface within Logic's Audio Preferences, we were up and running.
The Konnekt 48 comes with a desktop remote control that can be used to control volume, and this meant that Jason didn't need to budget for a separate monitor controller. The remote also includes a talkback mic and talkback button, as well as hardware button shortcuts to the device's most frequently used features.
Jason had already bought a couple of ready made eight‑way male‑to‑female XLR cable snakes for the microphone feeds, so these could be patched into the interfaces and then passed through a hole in the partition wall into the drum room, with one of them going on through to the main live area. As long as the holes are bunged up with plastic foam after the cables have been fitted, this shouldn't cause excessive noise‑leakage problems.
The Konnekt 48 can generate two separate headphone mixes, and Jason planned to route one of these directly to the drum booth (using off‑the‑shelf headphone extension cables), and to use the other to feed his Samson C-Que 8 headphone distribution amplifier in the main live room. This seemed like a sensible option, so all I had to do was set up a default song in Logic Pro that would make using these facilities as straightforward as possible.
Logic Templates
On opening the Audio preferences in Logic, the first task was to tick the check box for 24‑bit recording, and also the one labelled 'Independent Monitor Levels'. Once you've selected independent monitor levels, the channel faders essentially remember two positions: one for playback, and the other when Record is armed. This means that you can turn the track monitor level down (or even off) while you're recording, but have the normal playback level resume as soon as you untick the record button.
The next step was to sort out the input and output (I/O) names, because when you have any system with as much potential I/O as the Konnekt 48, things can get very confusing very quickly if all you can see is a list of numbers! To improve this, we selected I/O labels via Logic's Options/Audio menu and ticked all the buttons for both the mono and stereo inputs and outputs, so that in future, the correct I/O description corresponding to the Konnekt 48 and ADA8000 (S/PDIF, phones, ADAT 1, and so on) would be displayed.
As we had the hardware configured, the interfaces would support a maximum of 12 microphone inputs, plus four additional line inputs on balanced jacks, and of course the line inputs could be used to connect keyboards, additional mic preamps, or perhaps a small mixer. In the default Logic Arrange page we set up the 12 available mic inputs to feed default drum, bass, guitar and vocal tracks, complete with graphic icons, and also configured two pre‑fade sends per channel to act as headphone monitor feeds, with a third, post‑fade send feeding a Space Designer reverb with a general‑purpose Plate effect loaded.
Jason had two large flat‑screen computer monitors, but neither of these was set at its best screen resolution, so we adjusted that via the Mac's Display Preferences — and were rewarded with a much sharper, non‑stretched display that made the most of the available screen area. To make the most of this, we created a screen set, with the Arrange page on one monitor and the Mixer page plus the MIDI Event List and a large SMPTE display on the other.
When we were happy with our default song, it was saved as a template so that Jason could use it as a starting point for each new song, and it will be easy to add new audio or instrument tracks as they become necessary. The final step was to hook up Jason's M‑Audio controller keyboard. He'd been planning to patch this into the MIDI socket of the Konnekt 48, but as it also had a direct USB connection option, we used that instead, plugging it directly into his system's USB hub, where it worked right away without fuss.
Studio Sorted?
By the end of the day, there was still work to do, but we'd tackled the main issues in Jason's recording space: he had a workable monitoring environment, a much better-sounding drum room, and all the recording gear up and running, with some useful time‑saving templates and screen sets set up in Logic. Jason still had some traps to finish for the live room and some holes to make in the walls for his cable snakes, but at least his studio was working!
Reader Reaction
 Jason Firth.
Jason Firth: "After an initial look at the studio, Paul suggested making up some bass‑trap panels. I made these about 2x4 feet and have a large panel to make for the drum booth, which will be 4x6 feet, with a photograph printed via a dye‑sublimation process, so as to allow sound to pass through it, rather than the ink clogging up the fabric.
"I've found the sound when monitoring to be vastly improved, and I've been inspired to get on and write a second album in the new studio. I feel like a kid with a new toy, albeit a very expensive toy that's taken a lot of time and effort. I'll have to try hard to drag myself away from the desk to do some photography from time to time, so I don't forget how to use my camera!
"A big, big thanks to Paul and SOS for all of the help and advice. ”