Recording drums and guitars is the task in this month's studio troubleshooting visit.
 Before even touching the mics, Paul was able to make a large difference to the recorded sound of Jon's kick drum by simply whipping off the front head and inserting a blanket for damping. The snare wires were also causing trouble, because they were connected with string rather than the correct plastic tape, so it was suggested that this be fixed to improve the snare sound.Jon Marsh's Herefordshire-based studio is housed in a wooden outbuilding approximately 16 feet square, which has been partitioned into two to provide a control room and a live room. Both have been lined using layers of plasterboard with heavy rubber sheet between the layers, and everything has been neatly plastered and painted. Jon has his Logic-based studio set up so that his Alesis Monitor One MkII monitors fire down the long axis of the room, but at the time he called us in there was no acoustic treatment in the room at all. This being the case, the room didn't sound nearly as bad as it might have done, but the strong reflections from the walls were diluting the stereo imaging quite noticeably. In addition to improving his monitoring acoustics, Jon also needed some help getting better rock drum and guitar sounds, as he was planning to work with a rock band in the near future.
Layout & Acoustics
The only changes we made to the studio layout were very minor: we brought the monitor stands forwards by about four inches to keep the desk shelf out of the way of the tweeters, and also changed the angle of the equipment rack on the left of the listening position to avoid it reflecting sound from the monitors directly back to the monitoring position. Jon had his monitor speakers set up on solid stands with resilient pads beneath the cabinets, so no further action was needed in that area.

The acoustic treatment we applied was fairly basic and straightforward, comprising Auralex sheet foam fixed directly to the walls and ceiling. The right-hand wall piece we fixed with Velcro so that it could be removed when tracking to give Jon a clear view of the control room window he'd built between the rooms. Self-adhesive Velcro doesn't stick very securely to acoustic foam, but if you apply a thin spray of Auralex adhesive to the foam first and let it dry for a couple of minutes, the Velcro sticks quite firmly. We used one sheet either side of the monitoring position at the 'mirror' points, one on the ceiling above the desk, two panels on the rear wall, and two half panels behind the monitors. Where space permits, spacing the foam off the wall makes it effective to a lower frequency, but space really was at a premium here.
Once the Auralex foam was in place, it took the lively ring out of the room and improved the stereo imaging significantly. There were no serious low-end problems, though we did discover that the plasterboard inner wall at the rear of the studio resonated at around 100Hz or so if thumped. We suggested that Jon explore means of damping this — a simple option might be to build a six-inch-deep frame, fill it with Rockwool slab, and fix it over the centre of the rear wall to act as a bass trap. This could be covered with fabric to blend in with the decor.
Drum Recording & Processing Tips
Jon played us a mix that he'd been working on, and pretty much everything sounded fine except for the kick drum and the snare drum. He'd been miking the kick drum from in front of the front head using a Shure PG52 mic, but had ended up with a very ill-defined sound with no real punch or attack. There was also a lot of crosstalk from the other drums and backline. He'd also recorded a second track from a Tandy PZM mic placed inside the drum, but this just sounded thin and dreadful, so we muted it. I spent some time experimenting with compression, EQ, and enhancer plug-ins, and got the kick sound to the stage where it sounded quite usable when added in with the signal from the overheads, but it was still far from perfect, so we decided to try to find a better way of miking the drum.
 After trying a couple of different mics, the BLUE Ball ended up giving the most suitable sound, but it needed careful positioning to get the best results.The front head of the kick drum had a hole cut in it as usual, but this wasn't big enough to get a mic and boom arm through, so we decided simply to remove the entire front head and rim. A folded blanket at the bottom of the shell damped the drum, which is fine, so we started out with the mic half way into the shell and about half way between the edge and the centre. Although our test recording had more than enough low-end weight to it, the definition still wasn't there so we tried an Audio-Technica AT Pro 25 mic, which gave slightly better results, then a BLUE Ball mic, which sounded better still.
However, without radical EQ the tone was still duller than we wanted, so we taped Jon's plastic Student Union card to the batter head where the beater hits and tried again. The improvement was again audible, but still not enough to fix the problem, so I retuned the kick drum down to make it more slappy and less resonant. This made quite a big difference and meant we could get a punchy rock sound using much less EQ — mainly 4kHz boost and a little cut at around 200Hz. Compression and gating helped even up the sound while reducing spill from the rest of the kit, so the lesson here is that a good kick drum sound depends on several things: the choice of mic, the position of the mic, the tuning of the drum, the type of heads, and the beater material, and of course the way in which the player uses the kick pedal. It can take a little experimentation to get the best out of any particular setup, and in this case, we ended up with the BLUE Ball just inside shell, close to the centre. In other cases where the resulting sound has been all definition, but no bottom, moving the mic out towards the edge of the shell has made a big difference, so there's no one ideal mic position.
The house kit's snare didn't sound great, and my feeling is that the type of plain head fitted to it really wasn't doing it any favours, as Jon wanted a deeper rock sound. What we were hearing was quite ringy, with a very rattly snare and no real depth. The snare spring unit itself was in good condition, but was tied on with nylon cord instead of the flat plastic tape suggested by the slots in the end. It seems that the thickness of the cord was keeping the snare from pressing firmly on the head, so it was rattling instead of producing a crisp snap. With new heads and a properly fixed snare, there was no reason why the drum shouldn't tune up perfectly, but as an experiment we used Logic 's Exciter plug-in to add crispness to the snare part of the track they'd already recorded (which I believe used a different snare drum anyway). At this point the project was turning into a bit of a Mix Rescue session, but it is always interesting to explore ways of improving what people have already recorded, so we played around for about half an hour while Jon plied us with coffee and copious quantities of chocolate Hobnobs!
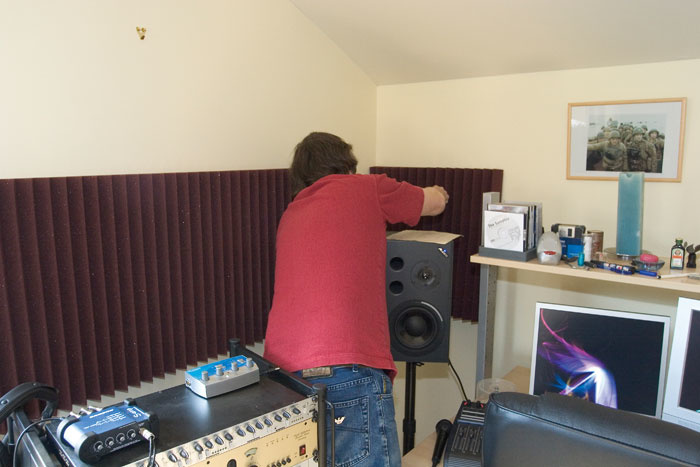
 Acoustic foam was used to tighten up the monitoring environment in Jon's room, and where this could not be glued permanently to the wall, Velcro pads were used a temporary fixing.By rolling off some low end from the drum overhead mics below 200Hz or so and adding some gentle boost up in the 10kHz region, we were able to get the drum kit sounding far tighter and brighter. Jon had already edited out any parts of the tom tracks where the toms weren't being played, so those sounded nice and clean too. What the kit needed now was just a hint of reverb ambience to give it a sense of space and perspective, and a 0.6s drum room from Logic 's Space Designer convolution reverb (with the low end rolled out below 200Hz) did the job perfectly. Jon had also recorded a mono ambience mic further back in the room, which helped knit the sound together when added at a relatively low level to the final drum mix. We added the reverb to the overheads, the snare and the ambience mic so that the kit sounded live without sounding obviously reverberant.
Because the kick drum had been recorded with the mic outside the front head, the amount of spill from the rest of the kit was significant. We managed to gate most of this out using the side-chain filters on the gate to reduce false triggering from high-frequency sounds, but future recordings made with the mic inside the kick drum should be much easier to deal with in this respect. When gating drums using gate plug-ins, use the look-ahead feature if there is one to allow the gate to open one or two milliseconds before the sound arrives, as this preserves the attack of the drum more accurately.
When you're miking drums, the close mics aren't affected too much by the room sound, because the ratio of direct and reflected sound is weighted very heavily in favour of the drums. However, the overheads are much further from the kit, so in a small live room like this one it is generally best to try to dry up the sound as much as possible using absorbers, which means that you can then add something back using a reverb unit or plug-in of some kind. As I tend to roll out the low end from the overheads, the acoustic treatment needs only to be really effective in the mid-range and high end, so fabric-covered Rockwool insulation slabs will do nicely if you can't afford foam. Absorbers on the walls nearest the kit as well as on the ceiling above should improve the clarity of the sound quite significantly.
Mixing Tweaks
Jon had recorded a clean funk guitar part that was DI'd on one track and miked on another. All that needed was some compression to even up the sound and a hint of the drum-room reverb to give it a sense of being played in a real space. We panned the two versions partly left and right to give something of a stereo image. There were no problems with the bass part, which was miked rather than DI'd, but we did add some compression to even up the levels where the picking style changed.
 While listening to some of Jon's previous production work, Paul passed on some of his own mixing tips.At this point Jon confided that he'd been struggling with the vocal track, which had been recorded using an AKG C1000S that the singer had taken off the stand and was holding in his hand. This brought in rather a lot of proximity bass boost, but there was also some low mid-range coloration from the room itself that needed taking care of using EQ cut. In future, the best way to record vocals in the otherwise untreated live room would be to use the old duvet trick, where a large duvet is used to create a 'V'-shaped screen directly behind the singer. In a room this lively, one of the SE Reflexion Filters (a curved acoustic screen) in front of the mic could also be of benefit in keeping room tone out of the microphone. Furthermore, you really have to choose a mic to suit the singer, and as the singer on this session had a very warm voice with limited high end, a brighter mic than the C1000S could have been used to advantage.
As the vocal part was quite strong, and verged on rap in places, I suggested we try the free download SSL talkback-compressor plug-in rather than Logic 's more polite compressor to give us a grittier sound. This 'down and dirty' plug-in worked rather well and really nailed the level of the vocal part as well as giving it a radio-friendly earthiness. I tweaked the two reverbs Jon had set up (one longer and one quite short) by choosing shorter options for both. By having a bright ambience on send one and a plate-like reverb on send two with a slower attack, we were able to create a nicely upfront sound that still sat believably within the track.
A female harmony vocal (recorded using a Rode NT1000 and a pop shield) was compressed more conventionally and then given similar reverb treatments. Even so the vocal levels of both parts could still have used some subtle automation to get the levels spot on, so Jon said he'd pursue this after we'd gone.
Guitar Miking Tests
Having proved that it was possible get a workable drum sound using the studio kit and the existing microphones, we turned our attention to the electric guitar. Jon had a monstrous Marshall stack in the room, but it's often better to use a smaller combo amp with a single speaker. If you mic a 4 x 12 cab in a small room, you end up with the mic in front of one of the speakers, leaving the other three speakers to fill the studio with noise for no real purpose.
 Placing a mic close to the cabinet when recording electric guitar gave too much low-end proximity boost, so Hugh slowly backed the mic off until there was a more suitable tonal balance in the recording.
A more manageable Marshall MG50 1 x 12 combo was brought out of the amp corner, and we set up some rock overdrive sounds using it, then set about looking for a means to mic the amp in a way that would produce a similar sound in the control room to the one the player was hearing in the live room. The standard combo miking position tends to be with the mic close to the grille cloth and positioned between the centre and edge of the speaker cone, depending on where gives the best tone. We tried this with an SM57 and got a usable sound, but with way too much proximity bass boost. A few test recordings revealed that if we pulled the mic back to around 12 inches from the grill and aimed it at a point about an inch in from the edge of the speaker cone, we got a sound very close to the original, though still with a bit too much low-end cabinet resonance. Using EQ to locate and dip out this resonance (around 150Hz) gave us a far more controllable sound, but still with plenty of punch.
One of my hobby horses is that guitar players often use too much distortion in the studio, which can fill up the audio spectrum and make it difficult for other instruments to be heard. Using a little less distortion, then adding compression to beef up the energy and sustain is one way around it, but the other is simply to choose a tonality that focuses the sound into a more restricted part of the audio spectrum. Probably the worst sound to cope with in a mix is the classic 'scooped' rock sound, as it sprays energy right across the audio spectrum. The only way you can deal with this is to arrange the guitar parts and playing style to leave spaces — for example, by playing staccato parts rather than endlessly sustained fuzzed chords that simply run into one another. My nightmare mix scenario is the band with two guitarists, both using humbucking pickups through more or less identical heavily overdriven, scooped-sounding amps and playing non-stop sustained power chords throughout the song!
As a final experiment, we tried to get a usable electric guitar sound using Logic 's Guitar Amp Pro plug-in, as Jon said he hadn't had a lot of luck with it. In fact we were able to get very close to the sound of the Marshall amp, but without the cabinet boom, using a combination of Guitar Amp Pro and simple compression. You have to experiment with combinations of amp type, EQ type, and speaker cabinet model, and it can sometimes help to use Logic 's Overdrive plug-in before Guitar Amp Pro if you want a more overdriven rock sound. Usually you can get close to what you need in just a few minutes, and you can always save the plug-in settings for next time you need them. Even when miking an amp, it can make life easier at the mixing stage if you also record a clean DI feed from the guitar, so that if the player has used a sound that is too distorted or tonally inappropriate, you can either replace his sound using an amp-modelling plug-in, or combine the miked and processed DI sounds. Most DAWs now offer some kind of amp modelling as standard, and it is surprising just how good these plug-ins can sound if you have the patience to edit the parameters rather than trying to find a preset that will work as it is.