Dave Wraight had been having trouble with his mixes, despite twice upgrading his speaker system, so the SOS team set about diagnosing and treating his monitoring problems.
 Dave Wraight is a telecommunications engineer working on high-voltage switching systems on the railways, but he has used much of his spare time (and cash) to build a very respectable recording studio in a spare bedroom in his home in Biggin Hill. Although writing and recording some of his own material in the studio, Dave admits to being more an engineer than a musician and enjoys using the studio (and adjoining rooms) to record bands. The name, Lizard Point Studio is apparently based on the famous Compass Point studios in Montserrat, but duly altered to compliment his wife, Liz!
Dave must have read all our previous Studio SOS articles, because no sooner had we arrived than the coffee and chocolate biscuits appeared! As Dave had explained in his email to us, the main problem he was struggling with was a radically uneven bass response, which he felt might have been due to the way his Genelec 1029A monitors and 1091 subwoofer were set up. Clearly a pragmatic man, Dave had even set aside some funds so that he could implement whatever advice we came up with.
Diagnosing The Problem
When we arrived Dave showed us his studio and the Genelec monitoring. It was set up with the 1029A speakers placed on top of Yamaha NS10Ms, either side of a pair of large CRT computer monitors on a wide shelf above a cascaded pair of Ramsa DA7 digital mixing consoles. The 1091 subwoofer had been installed underneath the desk in the 'knee hole' between the two racks, which put it exactly in the centre of the front wall. Placing subs in the middle of walls is not a good idea, as this is where a pressure minimum naturally occurs, making it very hard for the sub to do its job.
 SCV's Steve Fisher turns Dave's Genelec monitors to face more towards the monitoring position.
Playing a few well-known commercial CDs over the system soon confirmed to us that there was indeed a real problem with the bass end. With so many variables involved, this kind of issue can be difficult to track down, so we were very fortunate in being able to call upon the services of Steve Fisher from the UK's Genelec distributor SCV. Customers buying the larger Genelec systems from SCV (essentially those involving three-way main speakers such as the S30D and its larger siblings) benefit from a free calibration service, but as a special favour Steve offered to bring his test equipment (and experience) along to help identify Dave's problem and find a solution.
As we devoured our biscuits in the control room, Dave described the modifications he had made to the room, which was originally a ground-floor bedroom. Very roughly, the room was about 10 feet wide, 12.5 feet from front to back, with an eight-foot ceiling. A large window dominated the right hand wall and the entrance door was at the rear of the left hand wall. A small built-in cupboard to the right of the back wall housed the noisy computer hardware, which was cooled with wall vents and an extraction fan on the outside.
In order to tame the reflective walls, Dave had lined the room with hardboard sheets fixed to wooden battens (enclosing an empty air gap behind), and then covered the hardboard with thin carpet. This isn't actually the best approach, as the carpet only absorbs sound above around 1kHz, and to compound the uncertainties the hardboard sheets will tend to resonate above the air gap formed by the battens, in effect forming a crude narrow-band absorber. He had also fitted wooden panelling to the ceiling, providing a very reflective surface. Fortunately, the amount of exposed wall was limited due to the window (covered by a blind), the door, the rear cupboard door, and a large sofa at the back of the room, so his treatment was actually causing less acoustic damage than it might otherwise have done. Equipment and racking also obscured a significant area of the front wall.
Meeting Melissa
 Steve's primary measurement tool (apart from a large tape measure used to check room dimensions!) was a specialised audio measuring system using MLSSA (pronounced 'Melissa') techniques.Steve's primary measurement tool (apart from a large tape measure used to check room dimensions!) was a specialised audio measuring system using MLSSA (pronounced 'Melissa') techniques. MLSSA stands for 'Maximum Length Sequence Spectral Analysis' where a short burst of a pseudo-random noise sequence is generated, replayed over a loudspeaker system, and the resulting sound captured with a measurement microphone. The MLSSA program then performs Fourier transforms on the captured sound to calculate the frequency response (amongst other possibilities). It has become a very common technique in this kind of application and provides accurate results if set up correctly, although a good understanding of acoustics and plenty of experience is required to be able to interpret the results.
The hardware comprised a Sony Vaio laptop fitted with a Digigram VXPocket PCMCIA sound card, and a small Neutrik measurement microphone. The MLSSA processing was provided by a program called WinMLS (check out the web site www.winmls.com) This equipment is now standard kit for all Genelec distributors, and the software has been fully tested, configured and optimised by Genelec's own product support engineers.
 Audio analysis was carried out using Steve's Sony Vaio laptop running WinMLS.Hooking the system up to Dave's 1029As and 1091 was simple enough: the mic was placed in the listening position and its height set to match the measurement axis of the 1029A speakers (roughly midway between the two drivers). There is actually an ITU (International Telecommunication Union) standardised height for the measurement microphone, which is 1.4m. The figure was chosen as being roughly midway between the height of the ears for sitting and standing engineers and is ideal since, when mixing, most engineers stand and lean over the console, putting their ears about 1.4m above the floor.
The output from the computer soundcard was plugged into the first loudspeaker to be tested, which automatically routed the low frequencies (below 85Hz) to the 1091 subwoofer. When measuring monitoring systems in this way, each side is tested individually (but with the shared sub in situations like Dave's), and then the results for each side are compared to check for correct stereo matching.
|


Testing, Testing...
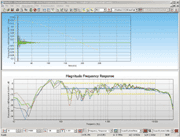
The initial test was simply to obtain a reference plot of the system as originally configured by Dave, just so we would be able to quantify whatever improvements had been made afterwards. We started testing with the left-hand speaker, and the plot showed a range of problems which aligned well with what our ears had already told us. Ideally, the frequency response of a full-range monitor system should lie within a ±2.5dB tolerance window between about 50Hz and 18kHz. Looking at the initial plot we could see some significant frequency dips around 150Hz and 550Hz, with a lack of energy in the upper bass region and a huge hump at about 60Hz.
It's easy to see irregularities in the frequency response plot, but the trick is in being able to translate what is shown into practical action to improve the situation. The first thing Steve suggested was to realign the angle of the speakers, since they were aiming towards the back of the room. Just turning the speakers inwards, adjusting their aiming point to face the listening position directly, improved the general smoothness of the response considerably. In part, this was probably due to reducing reflections from a tall cupboard on the left-hand wall, but also because the waveguide around the tweeter in Genelec speakers provides the most even sound dispersion if the tweeter is aimed directly at the listening position, fulfilling the classic 60 degree equilateral triangle arrangement.
However, after this correction there were still a number of smaller dips in the response, most of which were caused by sound bouncing off surfaces close to the speakers. Essentially what happens is that the reflected sound mixes in space with the direct sound and partial cancellation occurs at specific frequencies depending on the difference in path length between direct and reflected sounds. The likely culprits in this case were the shelf on which the speakers were sitting, and the edges of the CRT monitors. Steve recommended replacing the monitors with LCD screens as these could be placed behind the speakers close to the wall, instead of extending in front of them. He also suggested either cutting the shelf back to reduce the amount of reflective surface close to the speakers, or covering it in absorptive foam to reduce the amount of reflected energy.
The final tweak was to tame the extreme treble above 15kHz, which showed a distinct rise above the mid-range frequencies. The solution here was to select the HF cut DIP switch option on the rear of the 1029As, which brought the treble region into smooth alignment with the rest of the response. Steve explained that this adjustment is important to avoid listening fatigue when mixing for extended periods.
Big Bottom!
 Here's Hugh investigating where best to place the subwoofer by initially placing it in the listening position, and then listening for the place where the bass is best balanced. Although the subwoofer had been initially placed under the desk, no suitable position could be found there, because of the acoustic effects of the desk and racks.Having sorted out the upper frequency response, the next stage was to sort out the lumpy bottom end, which Steve was confident meant finding a better position for the subwoofer. He suggested that a really good technique to find the best place for a subwoofer is to start off by putting it in the monitoring position, and then crawling around the floor near the walls listening for the place where the bass frequencies sound most even and balanced. Ideally you should listen for a position on the wall behind and between the main speakers, as this has the least detrimental effect on stereo imaging.
It may look bizarre (we tried it, and it certainly does), but it is remarkable just how obvious the peaks and troughs in bass energy become as you move your head around, and moving just a foot can change the situation completely. We tried this trick with Dave's system, pulling the sub out to the normal mixing position and then crawling under the desk to see what it sounded like where the subwoofer had previously been. Not surprisingly, we found there was very little energy in the middle of the wall, although the bass seemed to become better balanced as we moved about a foot to the left. So we replaced the subwoofer in the side of the footwell instead of the centre, and ran the MLSSA test again.
 Once the idea of placing the subwoofer centrally had been abandoned, further listening tests confirmed that the most suitable place for the speaker was to the left of the listening position.We were expecting a big change, but the MLSSA plot showed very little difference. This was a disappointment, and Steve suggested that it was possibly because the area under the desk, being closed on each side by equipment racks, above by the desk and below by the floor, was effectively acting as a kind of horn, influencing the distribution of the bass wave-fronts much more than the physical position of the subwoofer itself. We tried pulling the sub to the front of the footwell to remove the horn effect, but in this position the subwoofer lost the benefit of the LF reinforcement normally created when the speaker is placed near to a back wall, and there was also a significant notch caused by a cancellation between the direct sound and a reflection from the back wall.
The only solution was to place the subwoofer elsewhere in the room, and after a little more crawling around we decided on a spot along the left wall, just in front of the desk. The MLSSA showed this position provided a much broader, smoother contribution at the bottom end, although we had to set the subwoofer sensitivity DIP switch to -8dB to obtain the smoothest integration with the 1029As. We were now left with a distinct lower mid-range or upper bass 'suck-out' taking the response down to the -5dB tolerance. Steve resolved this by pushing the 1029A speakers closer to the back wall (they had previously been close to the front of the shelf). The closer proximity to the wall helped to reinforce the upper-bass region, filling in the suck-out very nicely.
The 1029A speakers have another DIP switch to control the lower mid-range region with a -2dB shelf, and a few more tests showed that the smoothest response was obtained with it switched in. Steve recommended opting for a slightly lean bass end when setting up a monitoring system for mixing, since this tends to make for more reliable mixes. Conversely, if setting up a system as a hi-fi, Steve would tune it with a slightly fuller bass, as that sounds more flattering.
So, after relocating the subwoofer, pushing the satellites closer to the wall, angling them more directly towards the listening position, and optimising the DIP switch settings on 1029As and the 1091, we ran a final MLSSA test. The results were rather pleasing, with a very smooth response above 1kHz, well within the required ±2.5dB window. There were a few mild peaks and dips below that, but all were kept just within ±5dB all the way down to 40Hz, which is a very impressive result, especially given the cost of the 1029/1091 combination. The result was genuine full-range monitoring for remarkably modest outlay.
The last task was to replicate the positioning and switch settings for the right-hand 1029A and repeat the MLSSA test, both to check for response anomalies due to positioning and to confirm the stereo matching of the complete system. It was pleasing to see the two traces for left and right virtually over-laying one another, with just a small difference at 250Hz, again probably caused by a reflection (there was a third CRT monitor near the right-hand speaker).
For completeness we also ran MLSSA tests with the door to the studio open and closed, as an open door will often change the low-frequency response quite dramatically by allowing energy to escape instead of building up standing waves. In this case, though, there was no noticeable change at the monitoring position, probably due to the lightweight door allowing most of the bass energy to pass through anyway. The final test was to play some familiar music once again, and we were all impressed with how much smoother the system was now sounding. Dave professed himself very pleased with the improvement and was soon loading up previous mixes from his Cubase SX system to see how they sounded with the revised monitoring.
As we packed the test gear away Dave admitted to thinking the solution might involve upgrading his monitoring system or having to install a lot of expensive room treatment. So he was rather pleased that the application of a little acoustic foam was all that was required, along with swapping the bulky CRTs for a couple of LCD screens, something he had been looking for a good excuse to do anyway!
Thanks to Steve Fisher and SCV for their help with this article.
| Dave's Comments On The Session | ||
 The 'patient': Dave Wraight.I've been working with local bands for several years now, and I have always had bass problems. I could get quantity on some notes, but not the definition I was after. Although mixing sessions would seem to go alright, I'd need to remix several times to get the amount of bass right — there always seemed to be either too much or not enough. Initially I thought it was the fault of the speakers, so I upgraded from small JBLs to small Tannoys. In the end, though, I bit the bullet, pawned my wife Liz and the cats, and went for the Genelecs. However, these didn't sound as good at home as they did in the shop. The 'patient': Dave Wraight.I've been working with local bands for several years now, and I have always had bass problems. I could get quantity on some notes, but not the definition I was after. Although mixing sessions would seem to go alright, I'd need to remix several times to get the amount of bass right — there always seemed to be either too much or not enough. Initially I thought it was the fault of the speakers, so I upgraded from small JBLs to small Tannoys. In the end, though, I bit the bullet, pawned my wife Liz and the cats, and went for the Genelecs. However, these didn't sound as good at home as they did in the shop.I started to think that maybe I'd have to upgrade the monitors again, and that's when I contacted SOS and Paul, Hugh and Steve agreed to come over. After some hours of room analysis, repositioning the subwoofer and adjustment of switches, we arrived at an acceptable frequency response. Paul and Hugh said that further improvements could be made by installing additional damping to improve imaging and by replacing my old computer monitors with sexy TFT flat-screen types. As I'd saved some cash to upgrade the monitors, which was now unnecessary, I did just that. And what do you know? They were right! It's like they're experts or something... |