Steinberg turn the dial up to 11 with a stonking new version of Cubase.
While death and taxes may still be the trump cards in the game of certainty, the inevitability of a tempting upgrade to your favourite music production software can’t come far behind. For many years, Steinberg have been very consistent on this front, with annual upgrades to Cubase released towards the year end. Cubase 11 — in Pro, Artist and Elements versions — is therefore now with us.
These regular annual upgrade cycles bring out different responses in users. Those happy with their current version can, of course, choose to stick but, when presented with a long list of improvements and new features, the temptation to twist can be high. So, just what are Steinberg adding in Cubase 11 that might entice existing users to upgrade, or tempt potential new users to take the plunge?
On The Shoulders Of Giants
The current DAW/sequencer marketplace includes many excellent choices, and Cubase is undoubtedly one of the ‘giants’ amongst this product group, with a long history, a large user base, and a comprehensive feature set. While v11 brings all sorts of worthwhile new developments, if you are part of that large user‑base and Cubase helps put food on your table, you can breathe easy; moving from any recent (10 or 10.5, for example) version to Cubase 11 is a smooth and painless transition.
That said, on paper, for users of the Pro version, the list of ‘new and improved’ in this upgrade is impressive. And while not all of these new features trickle down to the Artist and Elements versions, in both cases, there are some nice surprises. For example, Elements now includes side‑chaining options and Artist now includes support for VariAudio 3, ARA2 and unlimited audio, MIDI or instrument tracks. So, what’s new? Let’s dig in...
My Superpower Is...
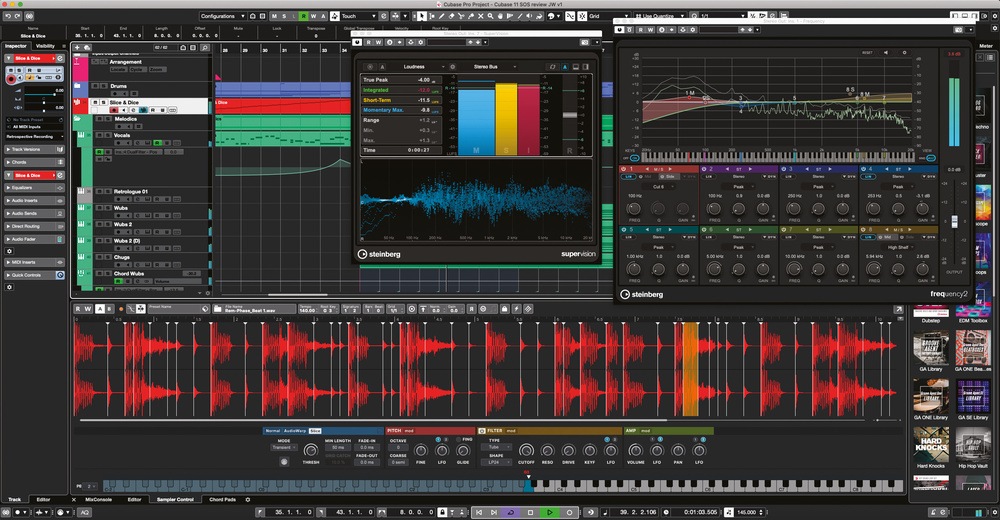
While there is truth in the old adage that if it sounds right, it is right, a visual representation of your audio can offer all sorts of helpful insights. Acquiring top‑notch audio visualisation skills might, therefore, come a close second to ‘golden ears’ on your list of desirable superpowers as a budding mixing or mastering superhero. Cubase 11’s new SuperVision plug‑in provides an excellent starting point in that regard.
, Chromograph (top right) and Multipanorama (bottom left) amongst many others.") SuperVision provides a powerful and flexible suite of visualisation modules including Loudness (top left), Chromograph (top right) and Multipanorama (bottom left) amongst many others.
SuperVision provides a powerful and flexible suite of visualisation modules including Loudness (top left), Chromograph (top right) and Multipanorama (bottom left) amongst many others.
SuperVision is a single plug‑in, which can be placed as an insert anywhere it’s required to visualise your audio signals, but is actually an assemblage of modules that the user can configure and customise. The 18 available modules fall into a number of categories: Signal, Spectral Domain, Phase, Spatial Domain, Waveform and Other. Many of these are relatively straightforward, such as the Level module within the Signal category, or the Spectrum Bar (a frequency‑based histogram) within the Spectral Domain category. However, the range of options is impressive and a few of the modules are worth further comment.
For example, the Signal category includes a well‑featured Loudness module that follows the EBU R128 reference. The module displays true peak, integrated loudness, short‑term loudness, momentary maximum and loudness range and, amongst other configurable options, is switchable between LU or LUFS units. In the post‑loudness‑wars world of streaming, whatever your specific loudness target, SuperVision’s Loudness module will assist you in hitting it.
Alongside the very useful, but fairly conventional, Spectrum Curve (which, interestingly, does offer a masking feature that can compare a main signal with that of a side‑chain input) and Spectrum Bar, the Spectral Domain modules also include Spectrum Intensity, Spectrogram and Chromograph options. The latter provides an intriguing display which shows the energy of your audio based upon the 12 half‑steps of the equal‑tempered scale.
The Phase modules provide various ways to visualise the correlation between the left and right sides of a stereo signal. The Phasescope, Panorama and Correlation modules are familiar, but I particularly liked the Multipanorama module. This is frequency‑based and particularly useful for checking out just how ‘stereo’ your low end is. It could make a good companion to the new spatial imaging plug‑in described below. The Spatial Domain modules — Surround and Ambisonics — offer useful level and channel correlation visualisation for those working in multichannel formats also.
With the ability to fully customise the choice, position and size of up to nine modules within a single instance of SuperVision, and to save your own layout presets, this is a powerful and flexible visualisation system. While they do differ in many details, an obvious comparison would be with iZotope’s powerful Insight 2, which also provides a modular visualisation system. Purchased individually, Insight is priced at $199. SuperVision now provides a very credible alternative for Cubase Pro and Artist users, who’ll get it with the Cubase 11 upgrade.
Squeeze, Spread, Squash
Cubase 11 delivers three notable plug‑in developments. For Pro users only, Frequency, the most powerful of the stock EQ plug‑ins, has been enhanced to Frequency 2. New to both Pro and Artist is Imager, a multiband stereo imaging plug‑in. And new to Pro, Artist and Elements is Squasher, a three‑band dynamics processor that combines both downwards compression of peaks and upwards compression of quieter parts of your signal.
 Frequency 2 adds dynamic EQ and multiple side‑chain support to Cubase Pro’s flagship EQ plug‑in.
Frequency 2 adds dynamic EQ capability to an already powerful feature set and also provides support for multiple side‑chain inputs (a capability that’s part of the VST3 specification). For any of the eight bands set to low shelf, high shelf or peak filter types, dynamic mode can be engaged, with a full suite of controls to configure how the EQ band responds to the dynamics of the audio input within that frequency range. The dynamic EQ options are available whether an EQ band is in standard stereo mode or being used in Mid/Sides or left/right modes, in which case you get separate sets of controls for both channels.
The new multi‑side‑chain support opens up all sorts of interesting possibilities. For example, if you have a group track acting as a bus for all your guitars or synths, you could duck the low frequencies of this from a bass or kick‑drum side‑chain input, while simultaneously ducking a dB or three somewhere in the midrange based upon a side‑chain from your vocals. If side‑chaining is part of your toolset to ensure key rhythmic or melodic elements remain present and intelligible within a busy mix, Frequency 2 will be a powerful addition. An obvious point of comparison is FabFilter’s highly regarded Pro‑Q3 plug‑in, and while the two do have their differences, Frequency 2 provides much of the same functionality and workflow for Cubase Pro users.
 Frequency 2 includes a single‑band view for more detailed control and access to the side‑chain options.
Squasher provides up to three bands of dynamic control, offering both conventional downwards compression (to control loud signal levels above a threshold) and upwards compression (to increase the volume of quieter portions of the audio signal below a second threshold). Allowing you to control the amount of compression in both directions, this is a very flexible tool for managing the dynamics of any audio signal.
 Squasher provides both downwards and upwards compression across three frequency bands and with support for multiple side‑chain inputs.Steinberg suggest Squasher is aimed primarily at EDM producers and, with each bands each having variable drive and a side‑chain input, it’s easy to see how you could push a contemporary electronic dance mix to within an inch of its dynamic life should you so wish. However, I think that might undersell its utility. For example, used in single‑band configuration, the combination of upward and downward compression is similar in principle to the MV2 plug‑in from Waves. This is a great tool for quickly evening out the dynamics of a vocal or bass and Squasher can now fulfil the same role for users of all Cubase versions.
It also works well to bring out lower‑level details in a sound such as ghost notes on a snare mic or rhythmical muted strums within a guitar part. In short, this is a very useful addition to the Cubase plug‑in suite, but I’d qualify that with a warning that you can just as easily destroy a mix as enhance it; use with suitable restraint!
Unmixing Magic
Steinberg have recently released a major upgrade to SpectraLayers Pro (a full review of SLP7 will appear in SOS soon) but, for Pro and Artist users, Cubase 11 bundles SpectraLayers One, a compact version of the powerful spectral editor. And thanks to the ARA2 Extension system, these spectral audio editing capabilities can be opened for a selected audio clip available directly within the lower zone of the Cubase Project window.
SL One offers a more modest feature set than the SL Pro and SL Elements versions. However, perhaps the most eye‑catching SLP7 feature included in SL One is a streamlined version of the almost magical AI‑based stem unmixing. As in SL Elements, One is limited to the Unmix Vocal option, taking a fully mixed audio track and separating it into two layers: ‘vocal’ and ‘everything else’. But for those looking to do remixes or mashups, that’s exactly what’s needed. It requires just a couple of mouse clicks to work its magic and the results are, well, remarkable. When played back together, the two layers sum to the original audio, but you can also choose to solo or mute one to get either just the vocal or just the instrumental bed. The latter pretty much always sounds very (very!) good, and if you need to simply rebalance the vocal against the instrumental bed by a dB or two, SL One will do that in a very transparent fashion.
The quality of the soloed vocal will vary depending upon factors such as how busy the original mix is, the amount of reverb/delay applied to the original vocal and the presence of prominent backing/harmony vocals. However, if you have ever tried to extract a vocal from a full mix by any other means, you will appreciate just how good a job SpectraLayers is doing. And if you do need to clean things up further, significantly, SL One includes the new Cut To Layer Below option so, as you refine the separation by cutting unwanted elements from the vocal layer, they can automatically be preserved on a further layer (or layers) to ensure the process remains fully non‑destructive.
 SpectraLayers One adds the magic of vocal unmixing for Pro and Artist users.
A Slice Of Something Nice
Available in all Cubase editions, Sample Track 2 retains the easy‑to‑use workflow of the original but adds some creative new features. The highlight amongst these are the slicing options; although loop‑slicing is a well‑trodden path in most mainstream DAWs, having the capability embedded directly within the Sample Track provides a very welcome creative and workflow boost.
Rather than just allowing you to toggle AudioWarp mode on or off, the Playback panel (now with a blue header strip) now includes three sub‑panels: Normal, AudioWarp and Slice. AudioWarp works as before, allowing you to maintain a playback speed while shifting the pitch of the sample playback across the MIDI note range. However, the new Normal sub‑panel now allows you to select between different playback qualities, depending upon just how pristine you want your sample playback to be. This includes a cool Vintage option to simulate old‑school sampler technology by reducing the bit depth or the turntable speed.
As might be expected, Slice mode divides your sample into slices using automatic transient detection, manual slicing, slice to a grid or some combination of these. The slices are mapped across the MIDI keyboard. Using the small MIDI connector icon, you can drag into the Sample Track a MIDI clip that will replay the sample slices in sequence to recreate the original loop. This can, of course, then be edited to create variations of the original loop or entirely new loops. Like all loop‑slicing tools, the process is designed with drum loops in mind but it works well with any material that contains obvious transients; classic EDM vocal chops, for example, are a breeze.
The Sampler Track functionality now also includes two LFOs. These can be used to modulate key parameters in Pitch, Filter and Amp panels, while clicking on the Mod button for any of these panels to open its envelope editing also displays the various LFO controls. While it’s perhaps not a match for the modulation options found in many of Cubase’s virtual instruments, it does provide some very creative sound‑shifting possibilities.
The Mono button on the Sample Track’s toolbar strip — which forces sample playback to one note at a time — now has its own dedicated Legato button. Once engaged, if you play a second note while holding the first, the pitch alters but sample and envelope playback continue without retriggering. You can combine this with the Glide option and the new Fing button (short for Finger, this forces a pitch glide only when you play legato) in the Pitch panel. You can create some very cool retro synth‑bass or melody lines with suitable sample starting points.
Oh, and if you want some fresh audio ammunition to explore the new Sample Track 2 features, Cubase 11 also offers six new sound sets: Bloom, Noir, Night Call Synthwave, Hard Knocks, Lofi Dreams and Dance Floor Tech House. These are included for all Cubase versions.
Theoretical Advice
There is lots to be excited about in the new features already described but, if your piano keyboard skills are modest (like mine), or you have yet to pass Music Theory 101 (cough!), then the new Scale Assistant within the MIDI Key Editor — present in Pro, Artist and Elements — may well be the absolute highlight of the v11 release. The concept is simple: if you ask nicely, Cubase will pitch‑correct your MIDI note data to fit the chosen key/scale combination of your project. It can do this to existing MIDI parts or to ‘live’ MIDI input. It can follow a scale or some combination of the scale and associated Chord Track. And, when you edit MIDI data, it can snap to notes within the scale or chord. In short, no more duff notes!
At a practical level, it is worth noting that the Scale Assistant is only active within the Key Editor. You therefore have to have an existing MIDI clip (with notes you already recorded or an empty clip you have created) selected and open within the Key Editor window. From here, you can then open the new Scale Assistant tab in the Key Editor’s Inspector panel. When using the Scale Assistant, it is also useful to select the Scale/Chords option from the Event Colours entry on the Key Editor’s toolbar. Notes will then be colour‑coded to indicate whether they lie in or out of the chosen key/scale.
The Scale Assistant panel includes a number of options. You can choose to use either the scale specified within the panel or any scale specified in the Chord Track (sensibly, this is an either/or selection). If you opt for Use Editor Scale, you can then select a key/scale combination from a well‑populated menu, with the option to add your own. If you have an existing set of notes within the clip, but are unsure of the key/scale combination, the Scale Assistant can also offer you some suggestions based on all the notes or just a selection, although if your notes just happen to be an assemblage of randomness, it is possible to get ‘zero’ suggestions.
The three tick boxes define the level of music theory support then offered. Show Scale Note Guides adjusts the pattern of light and dark grey horizontal bands that run across the MIDI note area from the default white‑note/black‑note pattern to an in‑key/out‑of‑key pattern to provide a visual guide for note selection. Snap Pitch Editing takes the help a step further so that, when you edit MIDI notes, they snap to pitches within the correct key/scale. Finally — and this is the best bit for those with limited keyboard skills — Snap Live Input will pitch‑correct your MIDI note entry as you play. This works well, but do note that as the Scale Assistant is a Key Editor process only, you need to engage the Record In Editor button (far left of the Key Editor toolbar) to make this active. Finally, Quantize Pitches can be used to correct any notes that lie outside the key/scale in existing MIDI.
I can see this new feature finding a lot of friends amongst non‑keyboard players, although it perhaps takes a little experimentation to find your ideal workflow. In my own experimentation, entering chords from the Chord Pads and then applying some Scale Assistant‑based editing of the MIDI data made it very easy to explore different chord voicings or note tensions, while keeping everything in key. Used for melodic or bass lines, however, the Scale Assistant is impressive on its own; simply record a suitable take (with or without live pitch‑correction) and then cycle playback while you fine‑tune the melody with Snap Pitch Editing activated.
Finally, it’s worth noting that if you select a melodic line and shift a copy of it by a specific musical interval using the first note of the melody as a guide, with Snap Pitch Editing engaged, the notes move intelligently rather than all just moving the same interval (for example, three semitones). Music theory skills or not, this will be an absolute boon when creating harmony lines for things like string parts.
Round The Bend
While on the subject of the Key Editor, Cubase’s MIDI editing gets further refinements with new CC drawing options added. As has been the case for some time with automation data on audio tracks, you now have options for creating smooth curves between two MIDI CC data nodes. This works with any MIDI CC lane within the standard MIDI editors. One further nice touch is that, when editing pitch‑bend data, you also get the option to snap the data to a semitone‑based grid. While some might argue this feature is a long‑overdue addition, it’s great to see and it’s available in Pro, Artist and Elements.
Export Ecstasy
Whether for personal archive needs, to send to a mix engineer, or to give a client maximum flexibility down the line, exporting more than just a final stereo mix from a project is often a necessity. However, when that might consist of bus‑based stems and full suites of audio and instrument tracks (both with and without any included channel‑based effects), it can also be a chore that requires patience and concentration. For Cubase Pro users, this is already made somewhat easier by the more comprehensive Export Audio Mixdown dialogue in the Pro version. It remains, however, a somewhat tedious task, and mistakes can easily be made.
 Synchronisation of track selections between the Project window and the Export Audio Mixdown, and the new Export Queue system, make organising complex export tasks much easier in Cubase Pro 11.However, Cubase Pro 11 introduces further key additions to the Export Audio Mixdown dialogue that can make the process considerably easier to manage, no matter how complex the export specifications. First, there’s a new Sync Selection To Channel/Track Selection button. Engage this, and tracks selected within the Project window will be automatically selected for audio export when the Export Audio Mixdown dialogue is opened. Second, multiple different export jobs can now be queued so that they are automatically carried out one after the other. Once one selection has been made and added to the new Export Queue list, you can then make further selections and create additional jobs as required. You can also open an existing job within the queue and update its contents by adding more selected tracks or deleting some that are already included.
This is both a powerful and flexible system. Separate jobs can focus on different elements, so you might create a job to export just the main stereo output (your final mix), a job for an MP3 version of the same mix, a job containing all your group tracks (submix busses) and a job that exports all the individual audio and instrument tracks as audio (perhaps for an external mix engineer or as a future‑proof backup). What’s more, each track selection can be configured with different elements of their respective processing chain included. So, if you want to export all your audio tracks both with, and then without, their channel and insert effects processing, for example, that’s easy to configure into two separate jobs.
Queuing jobs in this way allows you to check you have everything organised before starting to actually export the required files. Usefully, the jobs queue is saved with your project so you can build the list of jobs over multiple sessions if needed. Once your jobs are ready, you simply press the Start Queue Export button and, if there is a lot of stuff in the queue, you then let Cubase do its thing while you make a hot beverage of your choice... although the first few times you use the queue feature, it’s simply a joy to watch while wearing a big smile. Oh, and if you still discover that you have missed something, you can simply make the necessary changes or additions to the jobs within the queue and execute the process again.
A further useful detail is that all exported files can be placed within a dedicated Mixdown folder within the Project folder rather than the Project’s Audio folder. This is a sensible option, keeping your exported audio separate from the project’s original audio recordings, and makes managing your various audio media much more straightforward. However, it would be even better if you had the option to put exported files into their own sub‑folder within this Mixdown folder based upon the job number. You could do this manually when configuring each job, but an automatic option would be a further nice addition at some stage. Even so, job‑based batch export is a great addition for Pro users with complex export requirements.
Compose Yourself
 The display of Global tracks within the Key Editor will be very helpful for composers when synchronising musical content to specific visual events in their film or TV project.
The new export options will undoubtedly appeal to media composers required to deliver multiple stems for a film or TV project, and there are a couple of other ‘new in 11’ options that will also particularly appeal to that part of the Cubase user base.
First, if you regularly float the Key Editor to make it larger than the lower zone might allow, you now have the option to toggle on/off the display of key global tracks within your project — Markers, Chord Track, Ruler, Arranger and (yay!) Video — at the top of the Key Editor. This can be done from the new Global Tracks tab that appears in the Key Editor’s Inspector panel when it is floated. The system is simple to use and very effective. The ability to see markers (showing musical hitpoints), timecode and a video thumbnail while undertaking precise MIDI editing will be a big help to anyone synchronising their musical compositions to picture.
Second, Steinberg have also made some refinements within the Score Editor for Pro users. For example, as the Score Editor now supports the SMuFL font format, some of the more attractive fonts available in Dorico (such as Bravura) are now available in Cubase. To speed workflow, there is now also a new Properties tab (available in the left panel of the Score Editor) that is context‑sensitive; you get appropriate options displayed within the tab as you select particular elements within the score. Finally, there is now a new note‑editing overlay panel that can be toggled on or off and allows you to refine your editing choices within the actual score. You can, of course, edit note length, velocities and pitch here, and the changes are automatically applied to the underlying MIDI data. However, if you wish simply to improve the intelligibility of the score for sight reading, you can adjust note lengths within the score but without changing the MIDI note length. These changes are obviously useful for those who need to generate printed scores for musicians, and might mean that some smaller scoring jobs can be done within Cubase itself, with no need to resort to a full‑blown scoring package such as Dorico.
 The Score Editor has a new context‑sensitive Properties panel and a new note‑editing overlay.
In Heaven With Eleven?
Given just how mature the DAW/sequencer marketplace now is, it’s difficult to see how any major DAW update might be thought of as revolutionary rather than evolutionary. Indeed, for loyal users of a particular DAW/sequencer, the ideal combination might be a new feature or two that give a nod to revolution, mixed with a good dollop of smooth evolution. Existing users get to keep their well‑established workflows intact (with some useful new possibilities) and the expanded feature base, with a few highlights, can tempt potential new users. So, does the Cubase Pro 11 update achieve that ideal balance of mini‑revolution and solid evolution? And does the upgrade price for existing Pro users deliver value for money?
As a long‑standing Cubase Pro user — and having witnessed many iterations of the annual upgrade cycle — I think this upgrade is one of the most impressive I’ve seen.
Let’s start with the second of these questions. The new features add up to a serious collection of additions and significant refinements, and I think it’s difficult not to be impressed by the value for money on offer. Even if you consider just the combination of SuperVision, Imager, Frequency 2 and Squasher, there is plenty of value in these new or revised plug‑ins to more than justify the price of the upgrade. You are, as I mentioned earlier, getting functionality that compares with premium third‑party plug‑ins such as iZotope’s Insight 2 and Imager, FabFilter’s Q3 and Waves’ MV2; and these are, of course, only part of what you get when moving up to Pro 11. With the possible exception of the Score Editor improvements, I think the majority of the new and enhanced features fall into the mainstream, and a large proportion of the user base is likely to see a benefit. I’d suggest this is a very impressive deal for existing users.
Is there anything revolutionary? Well, there are elements that revolutionise the way particular tasks can be approached. For example, with Frequency 2, Imager and Squasher now added to the existing multiband processing options provided by the Multiband Compressor, Multiband EnvelopeShaper, Multiband Expander and Quadrafuzz 2, and with the new SuperVision providing sophisticated visual analysis and loudness monitoring, Cubase Pro 11 has a very powerful set of tools for audio mastering. Yes, if I’m doing DIY mastering on a collection of tracks, I’d prefer the Audio Montage environment offered by Wavelab but, if you are mastering a track or two for your latest single before it hits all the streaming services, Cubase Pro 11 has all the tools you need, provided you have the skills to use them.
There is a similar ‘workflow revolution’ for media composers in terms of the new job‑queuing feature within the Export Audio Mixdown dialogue and the Global Track display within the MIDI editors. These are evolutionary changes that have the potential to revolutionise the workflow for these specific tasks. Equally, if your piano keyboard skills suck, the evolution of the Key Editor with the new Scale Assistant may well revolutionise your ability to create harmonically correct MIDI parts.
Cubase Pro 10.5 was already a massively powerful and feature‑rich musical production environment; it therefore provided some pretty broad shoulders upon which the new features of version 11 can stand. However, as a long‑standing Cubase Pro user — and one who has witnessed many iterations of the annual upgrade cycle — I think this upgrade is one of the most impressive I’ve seen. It delivers a broad sweep of genuinely useful new and enhanced features that will appeal to a large number of existing users and, along the way, delivers some very appealing mini revolutions to workflow in specific areas. This is a truly polished upgrade that delivers exceptional value for money.
Pros
- Frequency 2 and SuperVision justify the cost of the upgrade on their own.
- An extensive selection of new and enhanced features that will have very broad appeal.
- Impressive new audio export options.
- Scale Assistant is an absolute boon for non‑keyboard players.
Cons
- No new virtual instruments to get excited about.
- Er... nope, can’t think of anything else.
Summary
Cubase Pro 11 delivers an impressive array of new and enhanced features that will have a very broad appeal. Tremendous value for those upgrading.
Information
Cubase Pro 11 £497; upgrades from £85; Artist 11 £282; Elements 11 £85. Prices include VAT.
Cubase Pro 11 $552; upgrades from $99.99; Artist 11 $302; Elements 11 $99.99.
Test Spec
- Cubase Pro 11.0.0.
- Apple iMac running OS 10.15.7, 3.5 GHz Intel Core i7, 32GB RAM.