The latest plug-in for the TC Powercore card allows you to extract frequency responses from commercial tracks and apply them to your own mixes.
 I've always been a little wary of programs that claim to offer speaker modelling, microphone modelling or, as in this case, mix modelling, so I was interested to try TC's new Assimilator to determine what it can really do. Programs of this type are known generically as 'fingerprint equalisers' and have been available for some time, the basic principle being that you can analyse the frequency spectrum of a mix or single instrument or voice that you like, then apply it to your own music.
This involves analysing both the reference sound and your own recording, as the necessary EQ curve is derived by interpolating between the two, and for a system like this to have any hope of success, it needs to work over a huge number of frequency bands — typically more than 1000. The equalisers used in Assimilator, which is powered by the TC Powercore DSP card, are phase-linear so as to eliminate artifacts caused by phase distortion, meaning that what you hear is purely a change in spectral content. Because high levels of boost in certain frequency bands presents a risk of clipping, Assimilator also includes a limiter, but interestingly, while the equalisation side of Assimilator runs on the Powercore card, the limiter runs on the native processor. As the limiter takes negligible processing power compared with the equaliser, this is not an issue and I'm sure the designers did things this way for a very good technical reason.
Basics
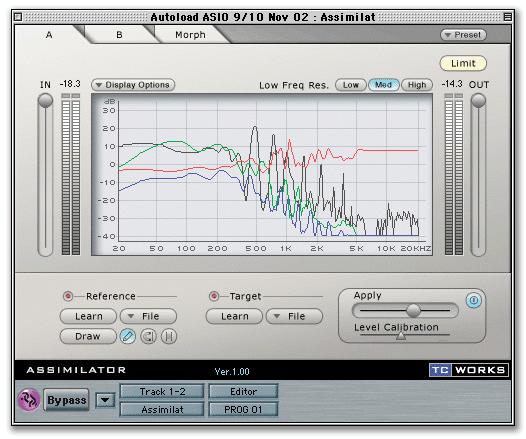
The methodology behind Assimilator is that the plug-in 'learns' the frequency curve of a piece of reference audio, which may be mono or stereo, and then applies it to another audio file which is known as the target. This is achieved by analysing both the reference and your own target mix over a period of time, which may be a whole song or just a section. Assimilator then works out the necessary correction curve to make the spectrum of your music match that of the reference — providing enough of the necessary frequencies are present in the first place. Clearly, this makes sense only if the target and reference material are similar to start with: applying a banjo frequency curve to a heavy metal mix would produce a meaningless result with no bottom end at all. To provide the user with further control, there are tools to modify the reference frequency curve and there's also a slider that can vary the depth of the correction curve applied. The display show four traces: the reference and target curves plus the applied correction curve and the target's actual frequency curve after adjustment of the Apply fader.
The applications of this process are numerous providing you don't expect too much of it, and include modifying live recordings to match the character of studio tracks, or tweaking your own mixes to make them sound more like a commercial track you like the sound of. You can also use it to homogenise the sound of different tracks recorded at different times yet which are destined to go onto the same album. Similarly, individual instruments and voices can be treated in the same way, but remember that you're only matching spectral content, not the other elements that define the way something sounds. You may be able to make one distorted electric guitar sound somewhat like another, but any attempt, say, to make Bob Dylan sound like Charlotte Church is doomed to end in disappointment. In the context of mixes, you also need to appreciate that the dynamic processing used on the reference track will not be replicated. Once these limitations are appreciated, however, Assimilator offers a powerful means of changing the timbre of a sound or mix that is way beyond the means of even the best conventional equaliser.
|
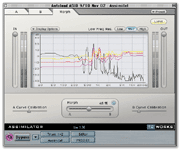
Assimilator also has another trick up its virtual sleeve: morphing. Here you can create correction curves based on two different reference mixes, then either fade between them at different points in your song or use a 'morphed' version by using the Morph fader position to determine the contribution of each. While this is no guarantee of success, it can yield interesting and useful results. The analysis curve is in effect an integration of the spectral characteristics of a mix or sound over a period of time and both analysis and target curves can be stored for later use.
|
The Interface
Assimilator handles presets slightly differently from other plug-ins only insomuch as it can either store individual target and reference curves or it can save everything to do with the plug-in — the settings and all related curves. The global preset is saved under the Preset menu with curves saved separately and you can arrange presets and analysis curves into different sub-folders.
Assimilator's interface comprises three tabbed pages, of which the A and B screens are identical. For basic use, only one of these windows is required, but they must be used together to set up the two different 'Apply' correction curves when morphing. The third window contains the morphing fader and a similar curve display. In the A and B windows, there are Learn buttons for the reference and target audio files plus a display on which the various frequency curves, including the final applied curve are shown superimposed, the latter in red. As the Apply fader is moved up, the red curve will change to indicate the EQ being applied to the target file. The curve display is different in the Morph view as it shows the composite curve created by the morph fader. Display Options allow you to hide any of the curves.
Input and output meters with clip indicators and level controls are also provided, as EQ can cause dramatic gain changes in some situations. The limiter can be switched in or out and works well for taming peaks. There are also controls to set the resolution of the filtering and analysis where low resolution corresponds to 2048 Points, medium resolution to 4096 Points and high to 8192 Points. Unless you change the default value, medium resolution is selected. High resolution is recommended where the most accurate analysis of the bass frequencies is required, something that might be an advantage when working with a full mix. Low is generally used for individual instruments or voices. A calibration tool makes it possible to match processed and bypass levels for accurate comparison and the limiter is provided to make sure that the output of the plug-in never goes into digital clipping. The limiter button turns from orange to red (which could be clearer) when limiting is taking place.
It can be useful in some circumstances to be able to edit the reference curve, and this is possible using the pencil tool, which you can use to take out excessive peaks or to add more gain in particular areas of the spectrum if you feel that would be useful. Similarly, the Magnet tool enables you to make part of your reference curve follow your target curve so that the selected area of the frequency spectrum won't be changed. This is very handy if you're using a mix for reference that has a great bass and, but you don't want to mess up your existing top end. A Range tool is also provided, and allows you to easily 'rubber band' an area of the curve, then move it up or down in level relative to the rest of the curve. Best of all, these tools can be used while the audio is playing so that you can hear the effect of your changes.
More Phings!
Morph simply blends between the A and B page curves, which can be based on completely different reference and target settings if you like. Often you'd use the same target track (ie. the mix you're working on), then combine reference curves from two different existing mixes or sections of a mix to apply to your own mix. Not only can the Morph fader be used to find the best blend between two curves, but it can also be automated, where the host application permits, to allow you to change the applied EQ for different points in a song. This is one instance where having different target curves could help, as one may be derived from your mix's verse and one from its chorus, for example.
In this view, a yellow curve indicates the A EQ curve and purple the B curve. The morph curve is shown in red while the real-time analysis of the signal after processing appears in black. There's independent gain adjustment of the A and B curves so that morphing doesn't cause unwanted level changes.
Practical Assimilation
Assimilator is deployed as a conventional insert effect, initially on the track that contains the reference mix. On the Target section of the interface, select Learn, then play back as much of your track as you want to analyse. Pressing Learn again ends the Learn process, after which you can save the curve if you think you might need it again. Next, set the track to play back your target file (I simply place the reference audio after the end of the track I'm working on) and go through the learn procedure again in the Target section of the window. Once you've done this, restarting the audio will cause the correction EQ curve to be applied where you can adjust the depth of EQ using the Apply fader. Check the levels and either make adjustments or activate the limiter as required. Once you have a sound you like, you can bounce the processed mix to disk as a new audio file. If you want to edit the reference curve, use the editing tools described earlier — it's really very intuitive.
The results achieved using Assimilator can be extremely interesting and useful in a number of ways. During my tests, I revisited an old album I'd recorded of acoustic guitar and violin featuring two very well known musicians in their field. Because of the way the album was originally produced, I always felt the guitar sounded somewhat thin. As an experiment, I ran one of the same guitarist's later studio albums using a track where I felt the guitar sound was pretty good, then applied the correction to the old album. This sorted out the thin sound but also clouded the top end somewhat so I used the edit tools to restrict the changes to frequencies below 700Hz or so, and also juggled the Apply slider setting to around 60 percent. This simple technique produced a very satisfying sound that would have been impossible to achieve using ordinary EQ.
 Assimilator's Morph control allows you to create hybrid EQ curves from two different reference mixes.
I did a similar thing with some archive songs recorded with my own band in the '70s — on a TEAC four-track open-reel machine no less. Picking a reference track with similar instrumentation and of a similar style, I settled on the Who's 'Won't Get Fooled Again' and found that the sound of my mixes got much bigger, though again the top end suffered so I used the Magnet tool to force the reference curve to match the target curve from around 1kHz upwards. I also used the 'select and drag' tool to match the levels of the curves at the upper and lower ends of the spectrum so that I got the right subjective bass/treble balance. Within five minutes I'd got such a powerful and solid sound that I think I might just reprocess the entire double album!
On a somewhat different tack, I miked my Marshall guitar amplifier, then used the resulting recording as a reference. Next, I took the DI output from the back of the amplifier and recorded that. Naturally it sounded like a bee in a jar because there's no speaker simulation, but after applying the correction curve, I got pretty close to the original sound. Once again I needed to gently tweak the high/low balance, but there's no doubt that you can get some useful guitar sounds this way.
The other great thing about Assimilator is the information you can glean simply by looking at the Apply curve. In the case of the guitar, it gives you a good idea of the frequency characteristics of a guitar speaker, but you can also compare original mixes with mastered versions to see what the mastering engineer did. Even if you don't use Assimilator to process your mixes, you can use it to compare them with commercial mixes where the resulting curves will tell you what parts of the spectrum need more energy and which are too hot. The information you can extract in this way is immensely useful, so the applications of Assimilator are definitely not restricted to quick mix fixes.
Conclusions
While you have to use Assimilator and any similar product wisely to get good results from it, it is able to shape tracks and mixes in a useful and generally musically satisfying way based on the analysis of suitable reference material. Expect to use the curve-editing tools to fine-tune the results, but there's nothing difficult about using Assimilator providing you listen to what it's doing and don't just watch the screen. As I said at the outset, the huge number of filter bands means that you can achieve things that no conventional equaliser can, and in addition to mix and track matching, you can use its displays to help learn why your mixes sound different from commercial mixes and even use it to build your own speaker simulators for DI'ing electric guitar. If you have a Powercore card and you process your own mixes, then I think you're going to have a hard time keeping your credit card in your pocket!
£179 including VAT.
TC Electronic UK +44 (0)800 917 8926.
Test Spec
- Apple Mac G4 800MHz with 768MB RAM, running Mac OS 9.2.2.
- TC Powercore software v1.6.1.
- Tested with: Emagic Logic Audio Platinum v5.5.