 The controls may look unfamiliar, but there’s good visual feedback and you soon get your bearings.
There’s more to this fresh take on dynamics processing than a groovy GUI!
Playfair Audio’s Dynamic Grading is a powerful one‑stop plug‑in for shaping the dynamics of an audio signal — it allows you to access compression, expansion and transient shaping in a rather different way from usual — and those familiar with the previous version will find that v2 constitutes a dynamic (see what I did there?) leap forward. In fact, it’s fair to say that after taking advice from users of v1, Playfair have created something unique. As well as its completely redesigned graphical user interface, there’s support for multi‑channel formats up to 9.1.6, a magic eye spectral display, and some helpful factory presets that can be adjusted and stored as desired. And if you’re already a registered user of v1, you get to enjoy all this for free.
Dynamic Grading 2.0 supports 64‑bit AU, VST3 and AAX plug‑in formats for hosts running on macOS (10.13 or later) or Windows (10 or later), it’s compatible with Apple Silicon and Intel Macs, and authorisation is by serial number. For the purpose of this review, I used an Intel i7 Mac Mini, and installation was pain free.
Overview
A quick first glance at the GUI is not met with the familiar controls and labels that you’d expect to find on any dynamics processor — there’s no obvious threshold, ratio, or attack controls, for example. Instead, you have controls labelled Punch, Body and Floor, but don’t worry, as it quickly becomes apparent what’s going on.
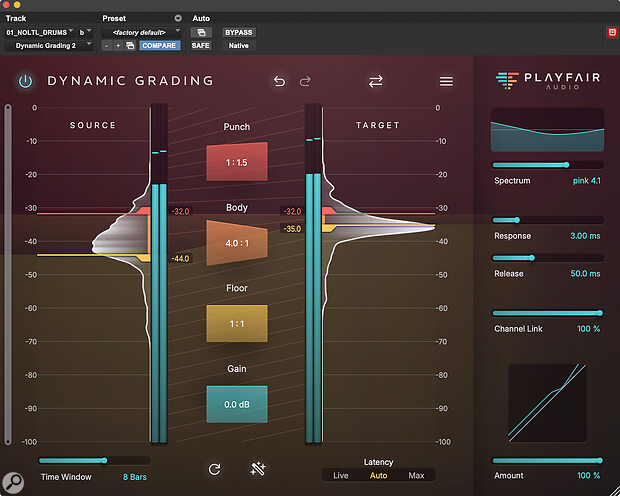
The plug‑in opens to display two dynamic histograms, giving a real‑time visualisation of dynamics at the input (Source) and output (Target). Between these histograms are those three key controls (Punch, Body and Floor), and these are used to shape the incoming signal to match the desired output, as shown in the Target display. On closer inspection, you’ll realise that these three controls are in fact separate ratios for each of the three parameters — so we’re back in more familiar territory. Along the left‑hand side, a scroll bar allows you to zoom in on the histograms for more detailed information. The time slider below the input histogram can be adjusted in bars (the default, following the DAW session tempo) or changed to seconds in the settings menu, offering a longer time scale and a smoother display.
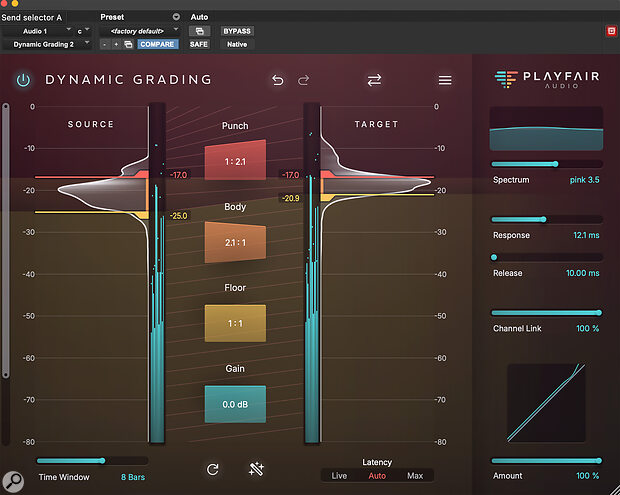
As shown in the second screenshot, when a signal is detected at the input during playback, you’ll see a white area on the display. The outline shows the average loudness of the audio, while the area within the lines lights up to indicate the short‑term loudness. If you’re not accustomed to interpreting histogram graphs, you might initially find yourself wishing for a simple gain reduction meter I suppose, but it’s actually pretty straightforward, and once you get your head around it you’ll find that you can glean lots of useful information very quickly.
 An instance of Dynamic Grading inserted on a stereo drum bus, with a compression ratio of 4:1 acting on the Body, and a little 1:1.5 expansion ratio for the Punch, giving the effect of pushing up the transients.
The input signal is split into three sections, corresponding to the aforementioned Punch, Body and Floor controls, and the histogram makes it pretty easy to determine where the splits between them will be most useful. At the bottom of the GUI, though, you’ll find a ‘magic wand’ button that engages a source learn function, and this cleverly sets the markers for you, based on an analysis of the signal. Generally, I found that this worked well, providing sensible starting points. The Body of the sound is the part where the source histogram shows the most energy. The area shown above that, which is what Playfair call the Punch, is typically where the attack is found. And the area below it, they call Floor, which is where you’ll find most of the low‑level details, such as reverb tails and background noise.
You can adjust the splits manually (whether or not you use the source learn ‘wand’), by dragging the red and orange source markers: everything above the red marker is Punch, everything below orange is Floor, and the Body lies in between. Once you’ve determined where the Body of your sound is, compression or expansion of each of the three areas can be adjusted in two ways: you can tweak the ratio controls in the centre of the display (drag down on the right side for more compression, drag up for more expansion); and you can grab and move the threshold markers in the target histogram.
Often, a good place to start is with compression of the Body range, in much the same way you might normally apply broadband compression to a signal. Then, if you feel that you’re losing some of the transients as a result, you might look to expand the Punch a little. Alternatively, if you feel that the compression is bringing up too much background noise, ambience or reverb, you might expand the Floor. You can do this subtly, to shape a sound, or you can, for example, assertively expand the floor on a drum bus for an instant gated drum sound. Along with adding a little Punch, this approach could be useful for parallel processing drums, to inject a greater sense of detail and clarity in a dense mix — and this is made convenient by an Amount control (at the bottom right of the GUI) that allows blending of the processed and unaffected signals.
 A 7.1.4 multi‑channel instance of the plug‑in.
Further controls are found along the right‑hand side, and first off you’ll find the new Magic Eye spectrum display with a single horizontal slider beneath. A curve represents the frequency spectrum of the signal that’s triggering the level control, and you could think of this broadly as being a side‑chain control. Playfair Audio advise tweaking the spectrum slider to show more or less a horizontal line, so that the audio is processed evenly across all frequencies: to do that, you simply drag the spectrum slider to the left if your source audio is more treble‑based, or to the right if your material is more bass‑heavy. There are also sliders for Response (attack) and Release, as well as a channel link slider: at 100 the plug‑in affects all channels together; at 0 it operates as independent multi‑mono channels across the signal. Finally, a curve display at the bottom right provides a visual representation of how your adjustments are affecting the level.
I approached this plug‑in with a healthy dollop of scepticism... But once I began to examine Dynamic Grading in more depth, I quickly changed my opinion.
Grade A?
I have to admit that I approached this plug‑in with a healthy dollop of scepticism because judging it on first appearances it struck me as being little more than a fancy‑looking compressor/expander. I have plenty of those already, of course, so I didn’t initially see the point... But once I began to examine Dynamic Grading in more depth, I quickly changed my opinion and began to appreciate the benefits it offers.
Dynamic Grading is way more detailed than a standard compressor, and neither should it be confused with a multiband compressor. Playfair Audio aren’t reinventing the idea of dynamic shaping exactly, but they are certainly enabling us to think about it in a different way. Being able to control the main body of the sound either without affecting the transients, or while separately enhancing them, is incredibly useful. And at the same time, you’re able to reduce the noise floor, while keeping the body of the sound intact.
It might not be the tool for every dynamics job. For example, this isn’t a colourful‑sounding processor, and the dynamic manipulation sounds smooth. But we have countless options for colour today, so that’s a good thing in my book. Personally, I’d prefer that some kind of more standard gain‑reduction meter were included as an option, alongside the current histograms. And when used on multi‑channel sources, I felt that the individual channel level meters could be made clearer. But that’s to some extent a question of personal preferences, and none of that inhibits the functioning of the plug‑in in any way.
Just yesterday, I found it useful on a mix to process a DI’ed plucked acoustic guitar part, taming the transients without affecting the body of the sound, and I reckon this could well become the tool I reach for from now on to breathe new life into the over‑compressed audio files I sometimes receive for mixing. Having it available in multi‑channel formats up to 9.1.6 is an added bonus for those, like me, who work in immersive audio. Recommended.
Summary
A different and clever approach to dynamics processing that allows you more control, not least to mitigate some of the unwanted side‑effects of traditional compression and expansion.
Information
£141 including VAT. Upgrade from v1 is free.
£141 including VAT (about $150 at current exchange rates when going to press). Upgrades from v1.x are free.
