Spruce up your soundstage with DP8's new Ensemble Chorus and Spatial Maximizer plug-ins.
The new plug-ins that DP8 introduced are notably sophisticated and versatile, so — following the last DP workshop's look at Precision Delay and Dynamic Equalizer — we turn our attention this month to the two new stereo-related processors. DP8 introduced two very different but powerful stereo processing tools: Ensemble Chorus and Spatial Maximizer.
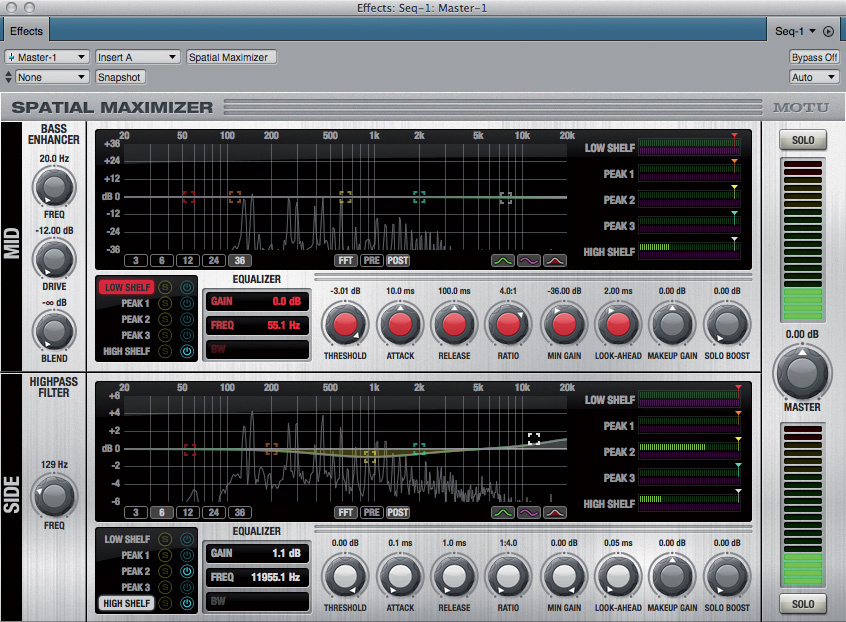
A Chorus Line
Ensemble Chorus opens with a very cool and purposeful look but doesn't, it has to be said, go out of its way to be user-friendly. There are algebra symbols in places (hmm...), a multitude of knobs (aah...) and absolutely no presets (urghh...). The DP Plug-Ins Guide is not very helpful either, and even suggests that Ensemble Chorus's main role is to provide modulation for MOTU's convolution reverb, ProVerb (more of that in a minute). I'd suggest that Ensemble Chorus is quite worthy of stand-alone use, for two common production needs in particular: vocal doubling, and the thickening and broadening of synth pads, strings and even sustained guitar textures.
So what is Ensemble Chorus? It's actually three separate delays, called Left, Right and Center. All have LFOs (which explains all those Width, Rate, Symmetry and Phase knobs) and these cause pitch variations in the delay 'copies'. Where it differs from a more standard plug-in such as DP's long-established Delay is that the delay lines have no feedback — so this is not a tool for making repeating echoes. But use it on a mono vocal, for example, and you can produce up to three additional, subtly varied copies of the signal being generated, which is perfect for creating those Automatic Double Tracking effects.
Rather than tediously describe working up Ensemble Chorus settings from scratch, I've put together some presets for the plug-in, which you can download from /sos/sep13/articles/dpworkshop-media.htm. Mac OS users should place the .motupreset files in [home folder]/Library/Audio/Presets/MOTU/Ensemble Chorus. On Windows, they go in C:/My Documents/MAS Presets/MOTU/Ensemble Chorus. I'll discuss the presets briefly here, to demonstrate what sort of thing is possible.
The first thing to note, in learning to use Ensemble Chorus, is that while it has separate mono>stereo and stereo>stereo versions, they look exactly the same. So when you instantiate Ensemble Chorus on a mono audio track, for example, you still see the Left and Right delays at the top. In this case, both will be fed by the mono input.
Thereafter, much of the trick for making Ensemble Chorus do what you want is in figuring out how best to control the levels and pan positions of the dry and delayed signals, using the knobs at bottom left and right.
Try using Ensemble Chorus on a mono vocal or instrument track, choosing the preset SOS_1.motupreset, which produces subtle mono double-tracking. The first thing to notice is that the Center delay has its gain turned right down, so it's making no contribution at all — we can forget about it here. Then check out the Left and Right delays. They're producing a short (approximately 30ms) delay with a bit of slow, random pitch-wobble courtesy of the Width and Rate knobs and the Random modulation shape. The settings are, in fact, identical, because their parameters have been coupled with the central blue Link buttons. Move one, and its neighbour moves as well. Note that there are no Symmetry and Phase knobs, as those concepts don't apply to the non-repeating Random modulation shape. Finally, the mono nature of this preset is determined by the Pan and Gain settings at the bottom. The outermost knobs (labelled X) are for the dry signal, and with both turned up and panned centre, the dry input passes through unchanged. However, the output from the Left delay (the second set of pans and gains) is also turned up, and panned to the centre. That's the slightly decoupled, varying-pitch version of the input, and it's producing the double-tracking effect. If you want to increase the intensity, turn up its gain, or go to top left and turn up any of the delay section knobs. Delay makes the dry and delayed signals even more decoupled. Width and Rate increase the amount and speed of the pitch-shift effect. The second of my presets is a ready-rolled example. Its splashiness is also heightened by the use of a regular sine-shaped pitch modulation, rather than the more meandering Random shape. When you select the Random modulation shape you get fewer knobs to play with: there's no need for Symmetry and Phase parameters with this non-repeating shape.
Of course, there's no need to keep things centre-panned. In preset 3, the dry signal is panned hard left and the delayed signals hard right. The result is an exaggerated stereo that you might employ just to treat one or two phrases or sections in a song, or to layer behind a conventional mono vocal. It's a nice way to add spaciousness to a mono source, although you should be aware that some settings could cause flanger-like comb filtering on mono playback systems. Create a Master Fader and use its Folddown (to mono) feature in the Mixing Board if you want to check this on conventional stereo monitors.
Full Fat
To really fatten and widen a mono signal with Ensemble Chorus, you can do two things. First, add in the Center delay with different delay and modulation characteristics. Despite the name, incidentally, Center doesn't always emerge from the centre of the stereo image, and is subject to the delay pan settings (the inner pan knobs). Second, use the Left/Right delays in tandem, but modulate them in 'mirror image', as it were, by setting their phase knobs in opposition. Exactly these things are done in preset 4, where the three left-panned delays and right-panned dry signal create a really thick, artificial effect. You might also choose to spread out the pans across the stereo field, which is what the quad chorus-like preset 5 does. All the delays also have independent times and random modulation.
All the same concepts can be brought to bear on stereo signals, of course. The pad-widening preset 6 once more pans the dry signal to one side of the stereo field, and the Left/Right delays to the other, to produce a spacious wash effect. Preset 7 merely sets the Left/Right delay modulations out of phase, to add in some extra swirl and movement. Both are great on synth pads and strings, and can do lovely things in conjunction with reverbs, too. Try adding Ensemble Chorus in an insert slot after DP's ProVerb or Plate and using the reverb-broadening preset 8. This adds a slow, subtle, pitch-modulated copy of the reverb tail that can sound really nice.
Spatial Relationship
Middle and Side (or M/S) is a well known stereo miking technique, highly regarded for its flexibility and unsurpassed mono compatibility. But the basic ideas behind the technique can also be applied to various types of stereo signal processing. Rather than treating the left and right signals as two distinct entities, you treat the audio material that is common to each channel (the Middle) separately from that which is different (the Side). Mastering engineers traditionally employed M/S processing to prepare tracks for vinyl cutting, for example, when large amounts of low-frequency energy have to be kept out of the side signals.
Spatial Maximiser is DP's new M/S processor, and at first sight it's a little intimidating. It actually has the equivalent of a Dynamic Equalizer plug-in (which you may remember from the last DP workshop column) on each channel — so that's separate EQ plus multi-band dynamics for the Mid and Side channels. However, you don't have to be a hugely experienced, lathe-toting mastering engineer to make use of this plug-in, as it can help with more common mixing tasks too.
After instantiating Spatial Maximizer on a stereo track, or a Master Fader in the Mixing Board for an entire mix, try enabling the High Shelf EQ band in the Side channel. There's a 'power' button for it at bottom left, and then you drag the white handle just like any other graphical EQ. If you're playing your sequence, you should hear a brightening that's confined more to reverb tails and 'spatial' elements of the sound, but is not so evident on narrower, middle-panned material such as vocals and bass. It can add a likeable sparkle without messing up the fundamental mix balance. You might also try a mid-band cut to remove prominent acoustic resonances, and turn up the Side channel High-pass Filter knob to gradually remove more and more bass from the stereo component of the sound. It's amazing how much EQ the Side band can take, and some mixes really respond well to having low-end 'mud' removed. Others sound little different, but a bit of bass roll-off can still help with subsequent encoding to compressed audio formats, as you're essentially removing redundant complexity from your mix.
There's one more easy thing you can try, too. Both the Mid and Side channels have global Makeup Gain knobs that are essentially like channel volume controls. That lets you very easily control the relative levels of mono and stereo content, and while great results are by no means guaranteed here, you can try turning up the Side Makeup Gain to heighten the impression of stereo width, and turning it down to narrow it. There's no equivalent anywhere else in DP, so it's handy to keep this one up your sleeve.