Often overlooked, EXS24 is a very valuable feature of Logic. So why and how should we be using it?
When Logic 9 introduced the facility to create an EXS24 instrument out of a drum loop in one move, the buzz of excitement turned into disappointment for those who didn't notice the small print. Yes, this 'Convert Regions to New Sampler Track' feature is brilliant, but you have to understand how to use it effectively. This is what we'll explore later on in this month's workshop — but let's first look at why we'd want to use EXS24 at all in 2013.
The Road To EXS
Many newer Logic users are dismissive of EXS24, immediately investing in popular third-party samplers to build their sample library. Granted, sampler plug-ins introduced since the EXS have surpassed it in drag-and-drop design simplicity and other conveniences, but the true value of EXS24 has not changed. It's still your most essential instrument in Logic, and with Apple's acquisition of editing-software developer Redmatica last year, substantial enhancements to the Logic sample player are probably ahead.
EXS24 was one of the pioneering virtual samplers on the market over a decade ago, the EXS name being an acronym for Extreme Sampler and '24' referring to 24-bit resolution. Pretty impressive in the year 2000, when the competitors were hardware samplers like the 16-bit MPC2000! Today EXS24 ships with a massive library of over 1300 sampled instruments. But none of this is why for years it's been called the workhouse of Logic, or why it should be a central part of any Logic user's sample-based arsenal.
Reasons To Be Cheerful
1. EXS24 is extremely CPU-efficient and stable. You can use literally dozens without creating system overloads. Part of its efficiency is that the EXS24 sample editor is Logic's own audio editor and not a separate engine, so the integration is tight.
2. EXS instruments and their associated samples automatically save to your Logic project folder, so you will never show up at a session without your favourite kick, snare or string samples. With a third-party sampler, you need to remember to bring your folders of associated samples, so avoiding extra housekeeping is another good reason to use EXS24.
It's worth noting that the 'Include Assets' subfolder must be ticked when you save your Logic project. Be sure that both the EXS sampler instruments and the sample assets are checked off inside the project folder.
3. The front end of EXS has a sophisticated synth engine including Logic's classic filter, well known for its warmth and resonance. It also has a powerful Modulation Matrix that offers interesting synthesis options. Sound-design examples in this column explain how to reinforce a beat with pulsating, tempo-locked LFO and rich EXS24 textures.
One Easy Step
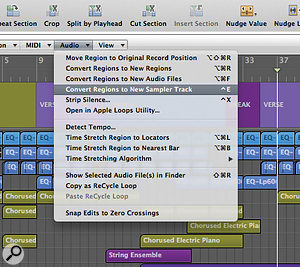
Logic 9's Convert Regions to New Sampler Track creates an EXS24 sampler instrument in, technically, only one move. However, if you only perform this one step in the local Audio menu, you may not like your results. There are adjustments to make in the Sample Editor first, which will improve your results dramatically and, fortunately, won't take a lot of time once you understand the method.
First, though, let's take a look at that one move. Try it with a drum loop, ideally one or two bars in length, then experiment with a vocal or guitar recording, or any audio file you like. In the local Audio menu in the Arrange Window, select Convert Regions to New Sampler Tracks with an audio region highlighted. Logic's Convert Regions to New Sample Track feature is brilliant, but there are one or two simple tricks that will help you get the best from it.
The caveat with this feature is that Logic takes all the detected transients and turns the areas between these transients into individual EXS24 zones. There is no musical intelligence to the selection process. This means that a tiny noise in the audio file may get assigned to a zone in your new drum kit, taking prime real-estate on your keyboard, drum pads or whatever controller you use. Or maybe the kick was hit twice in a row in the drum-loop of the source audio file. Both kick hits will become zones and you'll end up with the same drum sound assigned to two consecutive notes on your keyboard.
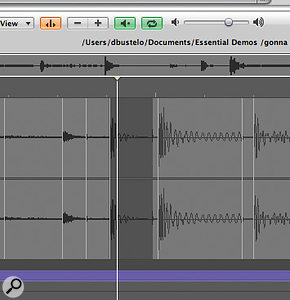
There's an easy fix. To create a useful EXS24 sampler instrument with the Convert Regions to New Sampler feature, first clean up which transients are detected in the Sample Editor:
- Open the Sample Editor view of your source audio file.
- Select Audio File/Detect Transients.
- Click the +/- buttons in the local menu bar, next to the speaker icon, to adjust the number of detected transients.
- To preview between two transients, highlight the area then click on the speaker icon (labelled 'Prelisten' when you hover the mouse over the icon).
- Alternatively, preview by changing the Command-click tool to Solo in the Sample Editor, then highlight between two transients while holding the Command key.
- This is the critical step. Double-click to remove any unwanted detected transients.
- Drag to change a transient's position or use the Pencil tool to draw new transients.
- After you're satisfied with the clean-up, return to the Arrange window.
- From the local Audio menu, select Convert Regions to New Sampler Track. You should now have a useful EXS24 instrument created from your source audio file.
After programming your track with this new EXS kit, reinforce your beat with a massive pad using the tempo-sync'ed groove features of the EXS24 synth interface.  It's important to do some tidying up, which will affect which transients are detected in the Sample Editor. After selecting Detect Transients, you can then solo areas of your track by highlighting an area and clicking on the speaker icon labelled 'Prelisten'.
Love The LFO
The main EXS24 interface looks like a virtual analogue synth with envelope generators, a resonant filter with distortion and two LFOs for modulation effects. The LFOs can both be sync'ed to Logic's tempo for classic pulsing analogue effects. Unlike a synthesizer, the sound source in EXS24 is not an oscillator but a sample-based 'instrument'. But, like any classic synth, it has LFO controls that are creative, deep and powerful.
It's vital to understand LFOs and to experiment with them, in order to do any effective sound design. LFO stands for low-frequency oscillator and refers to an oscillator that is not directly audible. It cycles at a frequency below 20Hz, so is useful to create modulating effects on the primary sound source or oscillators that result in musically pleasing rhythmic pulses. LFOs were one of the fundamental building blocks of modular synths in the '70s and '80s. Like standard oscillator circuits that generate sound in a synthesizer, the LFOs may be one of a number of waveforms, such as sine, square or sawtooth, for example, and are selectable in EXS24's main interface.
Here are some easy steps that will help you to start experimenting with the LFO. Begin with a sustained synth pad, then apply the same technique to any sustained instrument or vocal:
Power Tip: Try LFO 1!
Perform the same steps as above using LFO 1 instead of LFO 2 for a sophisticated — almost live — experience of the pulse. This oscillator has an additional knob to the left of the Rate knob, labelled EG, for envelope generator. Turn it slowly to the left and then to the right and you'll hear the distinct but subtle change. Turn it to the right to delay the start of the pulse, so the sound is smooth at first and then begins pulsing in time with the track. Turn it to the left and you'll experience the reverse: the pulse starts, then as the sound decays, so does the pulsing effect.
I'd never suggest that other virtual samplers shouldn't be added to the Logic user's sound-design palette. I just want to emphasise that EXS24 should be embraced by any Logic user as an essential instrument for beats, melody and musical layering. And there could be even more to look forward to soon, because sample manipulation in Logic may be headed toward a major revamp with the Redmatica developer team now in the Apple fold.
- Choose New Track/Load software instrument.
- Click-hold on I/O Input insert on a new channel strip to select EXS24 from the Instrument menu.
- Select EXS24 in Stereo.
- In the Library, go to the EXS folder and then to Synthesizers/Synth Pads/Basic Pad.
- Play or record slow, sustained pad notes, either single notes or chords.
- Go to Enable Filter Cutoff in the centre of the interface and turn the button on. A green halo will appear around the button. Don't forget this step!
- Assign LFO 2 Rate to 1/8 in the bottom row of the interface, by dragging on the LFO knob down to about the eight o'clock position, or double-clicking on the value beneath the knob.
- In the Modulation Matrix above, assign one router's Destination to Filter Cutoff and the Source to LFO 2. Adjust the spacing between the up and down triangles next to the matrix routing until you start to hear the tempo-sync'ed pulse.
- Experiment with the LFO 2 Rate. Listen to the pulse speed up and slow down in time with your Logic project.
- To test the LFO sync against a rhythm, turn on the metronome and add an Apple Loop or a beat you have programmed. The pad's pulse should be in perfect time.
 You can create pulsing effects with LFO 2 and the Modulation Matrix.
