When a mix project takes you out of your comfort zone, it’s vital to know that you can trust what you’re hearing.
This column frequently involves me working in a familiar and finely tuned mixing environment, but this month I’d like to tell you about a different situation, one in which I found myself mixing under circumstances that were rather more challenging...
Every year the Audio Engineering Society’s student body organises a Central European Student Summit, the most recent of which was held last September at Moscow’s Gnessin Russian Academy Of Music. As part of the three-day networking and training event, talented Russian pop/rock band Bruks were invited into the Academy’s Sound Engineering department to have their song ‘Kak tvoi dela, Vova?’ produced from scratch in front of an audience of more than 80 AES student delegates. Leading the workshop was renowned producer Haydn Bendall and I was also invited to lend a hand, the idea being that we’d work together for the recording stage, then each decamp to a separate room for mixing, thereby giving the students the benefit of observing two different mixdown approaches at once.
 In Mix Rescue this month: Russian pop/rock band Bruks, recorded at the AES’s Central European Student Summit.
 The arrangement comprised drums, bass, two guitars, two keyboards, lead vocals and backing vocals, and the recordings had all the pre-requisites for a straightforward mix: a well-drilled band, a clearly defined arrangement, an inspired live full-band performance, with only a couple of additional overdubs, a glut of Neumann mics, courtesy of a local sponsor, and the technical skills of a long-time Abbey Road Chief Engineer! What complicated matters, though, was that Haydn and I were both deliberately kept in the dark about the department’s equipment and acoustics prior to the event, so that the students could observe our decision-making process, a stipulation that necessitated some workarounds come mixdown time.
One thing that worked in our favour was that time was limited: we had about six hours timetabled to set up the band and record the complete arrangement from a standing start. This meant that the mic techniques Haydn chose were deliberately fairly ‘safe’, and we also avoided processing on the way in. As such, our approach was to concentrate on making sure the instruments themselves sounded good together acoustically, and then trust that such high-quality mics would capture the result pretty faithfully — which they did. The last thing you want to do when you’re unfamiliar with a control room’s monitoring system is start cranking knobs, because you’re inevitably flying blind to some extent.
The most important tactic I used at mixdown to compensate for the monitoring uncertainty was to nail down some kind of frame of reference for my sonic decisions at the earliest opportunity. This was partly because I know that the sound and balance on many chart records aren’t that natural, but also because I was conscious that the production’s tonality might easily have drifted askew during the course of the tracking day — the ear adapts extremely quickly to even quite unnatural tonal balances, and can easily mislead you that something sounds well-balanced when it isn’t. Fortunately, the event’s sponsors had provided Neumann’s excellent KH310D monitors for us to use, and I’d taken the precaution of listening to some reference CDs through them prior to the session in an attempt to calibrate my ears somewhat, so I was hopeful that any such damage would be limited. We could have hedged our bets even further by taking regular breaks to listen to other music during the tracking session, but in the event we chose not to because of the overriding imperative to hit Record while the musicians were eager to perform. You can EQ unwanted tonal colorations out of a good take, but no processing will save a performance that sounds bored!
An Initial Balance
To begin with, though, I had to build up a basic balance of the tracks within my Reaper mixing system, focusing on the most climactic section of the song, the final chorus. This mostly involved setting fader levels and pan positions, but I took some precautions to avoid being misled by what I was hearing.
, the drum kit had close mics on every drum: an SM57 on the snare; Neumann TLM102 condensers on the toms; an AKG D112 on the kick; and another TLM103 positioned alongside the snare.") In addition to a main Neumann TLM103 overhead pair (not shown), the drum kit had close mics on every drum: an SM57 on the snare; Neumann TLM102 condensers on the toms; an AKG D112 on the kick; and another TLM103 positioned alongside the snare.
In addition to a main Neumann TLM103 overhead pair (not shown), the drum kit had close mics on every drum: an SM57 on the snare; Neumann TLM102 condensers on the toms; an AKG D112 on the kick; and another TLM103 positioned alongside the snare.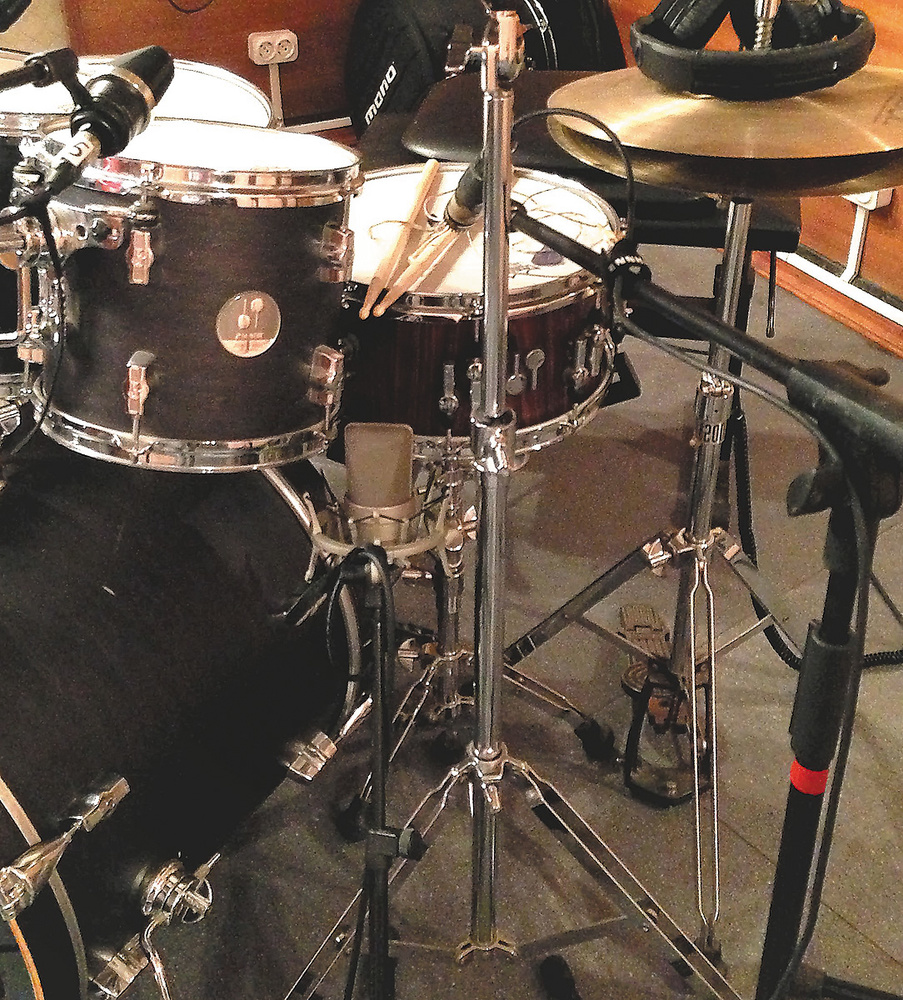 One difficulty was that the room was significantly more reflective than my normal mix environment, so I deliberately narrowed the spacing of the Neumann monitors to allow me to work more in the nearfield, increasing the dry/wet ratio at the engineer’s position.
The biggest hurdle was that the room was fairly solid, rectangular, and had little low-frequency acoustic treatment, so the bass response varied a great deal at different locations around the room on account of uncontrolled room modes — the low frequencies were rather too ‘hot’ in the stereo sweet spot in particular. One way I coped with this was by frequently switching to monitoring in mono via a single Avantone Mixcube I’d specifically requested for the session. Because this is effectively a single-point source and has very little low-frequency extension, it interacts very little with a room’s LF resonances. It thus gave me a truer impression of the mix’s fundamental balance. When using the nearfields, I also cross-checked my impressions from different positions in the room, particularly where kick and bass levels were in contention.
In addition to basic level/pan work, I made a point of experimenting with channel polarity switches too. There was enough leakage between the band mics that comb-filtering between mic signals was unavoidable, so here my goal was merely to arrive at the best subjective phase-relationship I could. By the same token, I also checked the polarity relationship between the left and right channels of any stereo signals, and the polarity of the bass DI feed relative to the mics on its amplifier cab. Finally, I applied a bit of compression on the drums bus and did some preliminary vocal processing: a high-pass filter at 110Hz; and a fast 4:1 compression from Stillwell Audio’s The Rocket compressor, but with a hefty 11kHz EQ peak in its side-chain feed to tackle a touch of sibilance.
Moment Of Truth
And now, the moment of truth: it was time to compare a bounce-down of my initial balance with some commercial releases. Because Haydn and I had entered the production process knowing very little about the music in advance, we weren’t supplied with any specific reference tracks, so in my case I chose three songs from my own personal reference collection to provide some benchmarks for Bruk’s pop/rock sonics: Maroon Five’s ‘Harder To Breathe’, Rage Against The Machine’s ‘Fistful Of Steel’, and Stereophonics’ ‘Roll Up And Shine’.
I wasn’t too concerned that none of these tracks was directly comparable with the Bruks song in terms of instrument line-up or sub-genre; the main point of referencing is not to photocopy someone else’s mix, but simply to avoid your mix sounding out of place in playlists of broadly similar material. Besides, my experience of small-studio mixing projects is that having closely matched reference tracks is actually the exception rather than the rule. (It’s usually more like, “We want the vibe of ’60s-era soul with a modern electro-pop slant, our soprano vocalist loves Tom Waits, and the guitarist needs to sound a bit like a horn section.”) So I think you need to be able to navigate your way sensibly without external input if required, the best allies in that eventuality being reference productions in related genres that you’re extremely familiar with. In this sense, all of the aforementioned trio fitted the bill, as I’ve been using them as references for years and have therefore compared them with hundreds of mixes on dozens of different listening systems.
 I imported my preliminary mix bounce into a fresh Reaper project with the references alongside it on different tracks, using the faders to level-match the unmastered and mastered tracks against each other. There’s no sense in trying to compare mixes without compensating for loudness differences between them, otherwise you’ll almost always prefer the louder one whether it’s better or not.
Bitter experience has taught me how easy it is to fool myself about a mix when I’ve been listening to it out of context for any length of time, so I always approach the first referencing session of any mix with a certain trepidation. Upping the stakes here, of course, was the added frisson of potentially flunking out in front of a room full of budding audiophiles, so I was relieved to discover that fate had not been too unkind on this occasion! As I’d expected, though, the overall mix tone was a little wonky, so I busied myself straightaway with an EQ plug-in to address this, before bothering with any finer comparisons. My biggest concern was that the 200 to 500 Hz region was significantly more powerful than any of the references, so I cut around 4dB in that region. I also felt the low end was underplayed, perhaps on account of that sweet spot bass emphasis, and added about 3dB below 90Hz in response. Finally, I boosted the ‘air’ frequencies by 4dB with an 18kHz shelf — not because our recordings were dull, but because chart-oriented productions typically hype this spectral range.
A Catalogue Of Shortcomings
The true shortcomings of our initial mix balance now began to present themselves more clearly:
- The kick drum sounded too rounded and ambient.
- The kick and bass guitar were underpowered and a little inconsistent in level.
- The hi-hat was too loud, unacceptably masking the vocals.
- I’d panned the guitars too conservatively by instinct, and generally the mix felt a bit narrow.
- The guitars and keyboards needed to be louder, clearer, and more timbrally distinct from each other.
- The vocals required more mid-range, even less proximity effect, and further reduction in the upper-mid-range masking effects from the band.
- Despite my EQ work there was still an overall sense of muddiness to the mix.
This list might seem quite simple, but I’d like to stress that none of the items were by any means snap decisions, and it took me at least 20 minutes to settle on them in discussion with the students. There was lots of experimentation with my ReaEQ plug-in during the process, as well as frequent fader tweaks to the different mixes to refine their loudness match depending on what element of the production it was that we were concentrating on — matching the subjective vocal levels when assessing those, for example. I also took advantage of a spectrum analyser and a stereo vectorscope to help corroborate what we were hearing, given that both the low end and the stereo spread were being called into question by the control room’s acoustic environment, and continued to switch between two monitoring systems as well. During the comparison process, it became clear that the Rage Against The Machine reference wasn’t going to be that useful in terms of what Bruks were aiming for, so we relegated that to a marginal role, but in many cases there was much deliberation over which (if either) of the two remaining references was more relevant to our goals. The two tracks had very different kick presentations, for instance, so we had to decide how far to approach, or set ourselves apart from, each.
 Because the bass guitar had been recorded through both a DI box and two microphones, it was important to check for the best phase relationship between these while building an initial mix balance.Scribbled list in hand, I returned to the mix project, first transplanting the EQ settings from the referencing project into my mix bus. I reduced the strength of the 87Hz shelf, though, applying individually tailored boosts to the kick and bass channels instead, and also compressing both those instruments to solidify their balance. Some transient processing gave the kick drum more attack, and a selection of high-pass filters across other tracks (especially the overheads and room mics) helped tighten the drum sound and reduce unwanted mix mud. A gate on one of the close kit mics brought the hi-hat under control, while a set of upper-spectrum EQ cuts across the drum, guitar, and keyboard channels won me an increase in vocal clarity.
Adding character to the guitars was a question of careful ‘suck it and see’ work with emulated analogue EQ plug-ins. Given that the keyboards played a less consistent arrangement role, I made a conscious decision to fit them around the guitars, such that the mix’s overall texture wouldn’t feel bereft whenever the keys were absent. The way I did this was to temporarily fade the keyboard parts up a little too far, and then rebalance them by removing their less useful spectral regions with EQ — a trick I often find useful. Finally, I did a couple of panning adjustments and a touch of M/S widening on the acoustic piano overdub to push the stereo boundaries outwards.
Rinse & Repeat
Bouncing out the mix section for a second time, I re-opened the comparison project to ratify the changes so far against our references. Thankfully, we’d made some good progress, but the kick still needed more low-end welly, the bass wasn’t coming through well enough on the Avantone, and the cymbals were sounding too edgy — all these problems required straightforward EQ fixes. This meant that the most pressing issue now was the lack of any mix effects on our production.
An inherent advantage of one-room full-band recording methods is that the spill between mics will usually provide a good sense of mix ‘glue’, as indeed it did here. Less desirable, however, was the constricted acoustic signature of the Academy’s comparatively small live room, which I decided to counteract by adding artificial reverb to suggest a larger and more ‘expensive-sounding’ space. I used a convolution engine for this, adapting a promising impulse-response with decay-time, pre-delay and stereo-width adjustments, and then feeding it from the drum channels as well as from the bleedless main keyboard part (DI’d during tracking) and overdubbed vocal channels.
 The Sound Engineering Department’s control room as set up for Mike’s mixing workshop. Notice the close spacing of the Neumann KH310D monitors, a response to the room’s rather reflective acoustic environment. Above the console meterbridge can be seen an Avantone Mix Cube, which provided single-driver mono mid-range monitoring — a vital balance tool under the circumstances.Another bounce, more referencing, and a dawning realisation that the guitars demanded further EQ to bring out their mid-range, as well as some effect (in the event, a touch of tempo-sync’ed delay with its left and right output channels swapped) to lend sustain and additional width. More in-depth vocal effects were also added at this point: a heavily de-essed quarter-note delay for sustain, and some Harmonizer-style stereo widening, both of which had the welcome side-effect of binding the overdubbed singing a little better with the backing instruments. Yet another bounce-out revealed that the guitars still didn’t poke through enough (a touch more EQ contouring required), but otherwise the balance finally felt quite dependable. Returning to the mix, I therefore turned my attention to applying a little master-bus compression, triggering 2-3dB of gain reduction using a medium attack and fast release. Bus compression of one type or another is pretty much standard-issue in chart pop/rock styles, but it does impact on the musical balance of any mix, so I wanted to get it running before delving any further into level intricacies with fader automation.
 An audience of AES student delegates look on as the mixing process begins...At this point we were interrupted by our scheduled (and very welcome!) lunch break. After more than three hours of mixing and discussion, not to mention five bounce-downs, we’d come within spitting distance of a competitive sound for the 16-bar section we’d been working on. Many of the students were surprised how seriously I took this iterative referencing and re-referencing process but, gruelling and dispiriting as it can frequently be, it’s simply one of the most powerful means of improving your mix under any circumstances — and when the monitoring is unfamiliar, it’s nothing short of a lifeline.
Although some small reservations about the sonics still remained, I decided we should ignore them for the sake of demonstration, because I wanted to use the second half of the workshop to explore the rest of the mixing workflow, in particular the role of automation in finishing off a mix. I’ve talked about this process in Mix Rescue on many previous occasions (check out the SOS August and October 2009 columns, for instance), so I won’t recap that here. Instead, let’s stick with the topic of monitoring workarounds and fast-forward a couple of months...
All’s Well That Ends Well
Because the purpose of the CESS event was to talk about workflow and technique, neither Haydn nor I were expecting to complete our mixes. At the best of times, I’d budget at least a day and a half’s work for even a straightforward chart-style mix, whereas we only had about a third of that time available during the mixing workshop. While this by no means undermined the usefulness of the event from the students’ perspective, I did feel a little bad for the band, who’d worked their guts out for us during the recording sessions but ended up with no finished product to show for it. So I agreed to finish my mix for them, partly as a way of thanking them for their sterling work, but also because completing the mix in my own studio would allow me to evaluate the efficacy of my Moscow monitoring workarounds within the context of a final full mix.
 Referencing a basic initial balance of the raw recordings against some commercial releases revealed that the overall tonality had drifted awry during the tracking session, so some processing from Reaper’s ReaEQ was inserted into the main mix bus to redress this. In addition, an instance of Variety Of Sound’s Baxter EQ was used to add a more pop-friendly high-end sheen.
 Unfortunately other commitments prevented me returning to the mix until Christmas time, but at least that meant I could come back to it with fresh ears! The good news was that our conscientiousness on the session had paid off in terms of the basic balance. In other words, the levels and channel processing used for the third chorus remained virtually unchanged into the final mix — the only real alteration being that the bus compression I’d added after our final bout of referencing during the workshop had recessed the overall kick and snare levels in the mix, so those both benefited from a small compensatory level hike.
The workshop mix’s sonics still felt a little lacking in terms of blend and sustain, though — the reflectivity of the Moscow control room had concealed this but it became apparent enough in a more controlled environment. A workaround that could have alerted us to this problem would have been referencing the mix carefully on headphones as well, effectively removing the control room acoustics from the equation. I’d actually had some decent headphones with me, as it happened, but figured that watching someone bopping along silently on headphones wouldn’t have been the most thrilling spectator experience!
 Here you can see Mike’s referencing project as it looked towards the end of the mixing workshop. The red tracks are the four different bounce-outs from his mix project; the green tracks are the three commercial releases he used for comparison purposes; and the blue track is simply an A/B switcher to allow easy comparisons between the red and green track groups. Notice how the fader levels of the mastered commercial tracks have been reduced to avoid loudness bias.
 Following the workshop session, two further effects were added to improve the sense of blend and sustain: an early reflections patch from an impulse response of the Eventide H3000, running in Christian Knufinke’s SIR2 convolution engine; and a gated algorithmic snare reverb from Stillwell Audio’s Verbiage plug-in.Fortunately, it was no big deal to sort out. The main addition was an early reflections patch to which I fed those instruments that still felt a bit stranded: the lead vocal, the snare, and the guitars. A further gated algorithmic reverb increased the density and width of the snare tail a fraction, and I also sneaked in a surreptitious double-tracked guitar layer following the chord sequence of the choruses to increase the harmonic sustain of the guitar texture without becoming audible in its own right. Finally, I introduced a simple overdriven Hammond organ pad to warm up the solo section as well, allowing that to continue at a lower level from then on to lend the rest of the song a touch more expansiveness.
 I made one other change to the overall tonality of the mix too. Following the workshop, I’d given the band’s frontman, Vladimir Dimov, a copy of my unfinished workshop mix and he’d sent me back a version of it he’d mastered for a more mid-scooped overall tonality. Taking this preference on board, I applied a similar tonal profile to my first-draft full mix before sending it off to him for feedback. And it seemed to do the trick, because the band’s only revision request then was to increase the piano level during the introduction. Job done!
Results Against The Odds
Every engineer finds themselves having to mix in less-than-ideal circumstances from time to time, and for recording musicians on a budget it may even be a day-to-day reality. I firmly believe that this needn’t stop you doing good work, as long as you’re willing to put extra time and effort into the workarounds I’ve suggested this month. In discussing this, however, I’m aware that I’ve deviated somewhat from this column’s normal format of ‘I applied 7dB Thrust from Obstruse Technology’s Squengelizer plug-in’. If you’d like more detail about the specific plug-ins and settings I used for this remix, check out the SOS web site’s media page associated with this article (see box): alongside my final mix and a range of other audio examples, it also includes a link to my full Reaper mix project, which can be freely scrutinised on Mac or PC using the DAW’s downloadable trial version.
Mix Rescue: May 2015 Media Files
The following audio resources accompany the Mix Rescue column for SOS, featuring the song ‘Kak tvoi dela, Vova?’ by the band Bruks. As discussed in the article, the foundations for this mix were laid during a mixing workshop for the Audio Engineering Society’s 2014 Central European Student Summit at the Gnessin Russian Academy of Music in Moscow. For the first half of this workshop I focused on building a balance of the song’s climactic final chorus within Cockos Reaper, an iterative process that involved bouncing out five different versions of the mix. In addition to these audio files, you can also download both the raw multitrack files and the Reaper mix project for my final mix from the ‘Mixing Secrets’ Free Multitrack Download Library at http://www.cambridge-mt.com/ms-mtk.htm#Bruks.
- Bounce1_InitialBalance
The first bounce-out was a basic balance of the recorded tracks, involving primarily fader, pan and polarity settings for each channel. The only other processing was a little compression on the drums bus from Cytomic’s The Glue plug-in and some preliminary vocal treatment: a high-pass filter from Reaper’s built-in ReaEQ plug-in, some fast 4:1 compression from Stillwell Audio’s The Rocket, and an HF emphasis in the compressor’s side-chain to combat sibilance. No send effects were used at all — any ambience you hear is a result of the live ‘band in one room’ recording process used.
- Bounce2_After1stReferencing
Comparing Bounce1 against some commercial reference tracks first led me to EQ the entire mix: with Reaper’s ReaEQ peaking filters I cut 3.6dB at 250Hz (Q=0.5) and 0.8dB at 450Hz (Q=0.7), and used a low shelf to boost 1dB at 87Hz, while Variety Of Sound’s Baxter EQ applied a 4dB shelving boost at 18kHz. Per-channel processing followed, including: ReaEQ on kick and bass for more low weight without excessive low mid-range; Reaper’s ReaComp compressor plug-in on both kick and bass for better level consistency; 6dB of Attack from Stillwell Audio’s Transient Monster on the kick; an instance of Reaper’s ReaGate on one of the snare mics to reduce hi-hat spill; high-frequency cuts on the drum, guitar, and keyboard channels to combat vocal masking; ReaEQ and Stillwell Audio 1973 EQ plug-ins to cut proximity effect and boost midrange on the lead vocal; Stillwell Audio Vibe EQ plug-ins to add character to the guitar parts; ReaEQ frequency contouring to fit the keyboard parts around the guitars; wider panning of the guitars; a Sides-signal increase using Voxengo MSED to widen the main stereo keyboard part; and ReaEQ high-pass filtering to many tracks to improve low-spectrum clarity in the mix overall. To best hear the effects of all these changes, compare this audio example directly with the Bounce1 file.
- Bounce3_After2ndReferencing
Referencing the Bounce2 mix yielded another ‘to do’ list. Some were simple ReaEQ adjustments: more low end on the kick; a 650Hz boost on the bass to bring it forward on smaller speakers; and a wide 4dB peaking cut at 11kHz on the overheads to combat edginess. But mostly the mix needed a more expansive sense of acoustic space around it, which I added using a freeware impulse response in Christian Knufinke’s SIR2 convolution plug-in, shortened and widened slightly, and with a few milliseconds of pre-delay. Compare this example with the Bounce2 audio file to hear the impact of these changes.
- Bounce4_After3rdReferencing
The Bounce3 mix was again brought back into the referencing project, which revealed that the guitars demanded further communal ReaEQ contouring (a 1.5dB shelving cut at 300Hz plus a wide 1.5dB boost at 1.3kHz) to bring out their mid-range, as well as a touch of tempo-delay to lend sustain and additional width — the latter achieved by opposition-panning the delay returns. Some basic vocal effects were also added at this point: a heavily de-essed quarter-note delay for sustain, and some Harmonizer-style stereo widening. You can hear the effects of these changes by comparing this audio example with the Bounce3 file.
- Bounce5_EndOfWorkshop
Referencing the Bounce4 mix prompted me to apply a bit more EQ to the guitars with Stillwell Audio’s Vibe EQ, dipping a couple of decibels of low mids and boosting 1.5dB at 2.5kHz. Other than that, though, the balance finally felt reasonably dependable, so I dialled in a little mix-bus compression from Cytomic’s The Glue, using the following settings to achieve 2-4dB of gain reduction: ratio 4:1; attack time 3ms; release time 100ms; side-chain high-pass filter at 48Hz. Although I bounced out this updated version of the mix during the workshop, we ran out of time to reference it again, and you can hear how the bus-compression has recessed the kick and snare levels in the balance — something I remedied by boosting them slightly in my final mix.
- Bounce6_FinalMix
Here’s the same final-chorus section of my final mix, which I completed a couple of months later. The basic balance is little changed compared with the Bounce5 file, although I did fade up the kick and snare levels slightly in response to the bus-compression side-effects mentioned in the previous audio caption. The mix’s overall tone has also been altered in response to post-workshop input from the band regarding their tonal preferences, using a 20Hz high-pass filter from FabFilter’s Pro-Q and the following EQ curve from TRacks Linear Phase EQ: +3.6dB low shelving boost at 63Hz; -2dB peaking cuts at 270Hz and 1kHz; and a 4dB high shelving boost at 5.9kHz. The main changes I made, though, were to add blend and sustain, the lack of which wasn’t clearly audible within the reflective control room environment used for the workshops: a short early reflections patch applied to the vocals, guitars, and keyboards and covert added layers of guitar powerchords and distorted Hammond organ.
- Remix
Here’s my final, full mix of the Bruks song ‘Kak tvoi dela, Vova?’ (which roughly translates as ‘How are you, Vova?’), carried out in Cockos Reaper with the help of third-party plug-ins from Stillwell Audio, Melda Productions, Variety Of Sound, Cytomic, Voxengo, Christian Knufinke, ToneBoosters, Softtube, FabFilter, and IK Multimedia.
Online Resources
Several audio examples, including the final mix, and the full Reaper session are available on the SOS web site.
Remix Reactions
Vladimir Dimov: “I’ve never had so much fun recording my music as I had with Mike — it was amazing! Everything was done to the highest level and the mix is excellent. I’m proud of what we’ve achieved and look forward to working with Mike again in the future!”