No matter how thick and heavy the walls of a studio, it will still leak sound if the doors and windows are not up to scratch. Paul White explains how you can uprate them without breaking the bank. This is the second article in a four‑part series.
Last month, in the introduction of this new series on soundproofing, I stressed that although you can make significant improvements using DIY techniques, you shouldn't expect the impossible. Unless you already have a very solid building with massive walls, you shouldn't expect to be able to contain the sound of a drum kit or a serious studio monitor system turned up full without doing major structural work. What you can expect is a useful reduction in the level of sound leaking into and out of your studio.
Most of the sound leakage that occurs in a typical home studio does so via floors, ceilings, windows and doors. Lightweight partition walls are also less than ideal sound isolators, though a properly constructed one may be reasonably effective. The greatest improvement can usually be made by uprating doors and windows, so I'm going to tackle those first.
Windows
If you don't have double glazing, your windows will almost certainly be the biggest cause of sound leakage. Even double‑glazed units are of limited use, and will leak far more sound than the surrounding walls, so additional internal glazing behind the original windows is still strongly recommended. If, on the other hand, you are working in a room with regular single‑glazed windows, secondary double‑glazing should be considered essential unless you're prepared to block up the window aperture altogether, using a shutter or sandbags. DIY secondary double‑glazing kits are fairly cost effective, and because the space between the original window and the secondary glazing is quite large, you'll generally find that the amount of sound reduction is better than from conventional double glazing alone. It also helps to use the thickest glass you can find for the internal glazing, as more mass translates into less leakage.
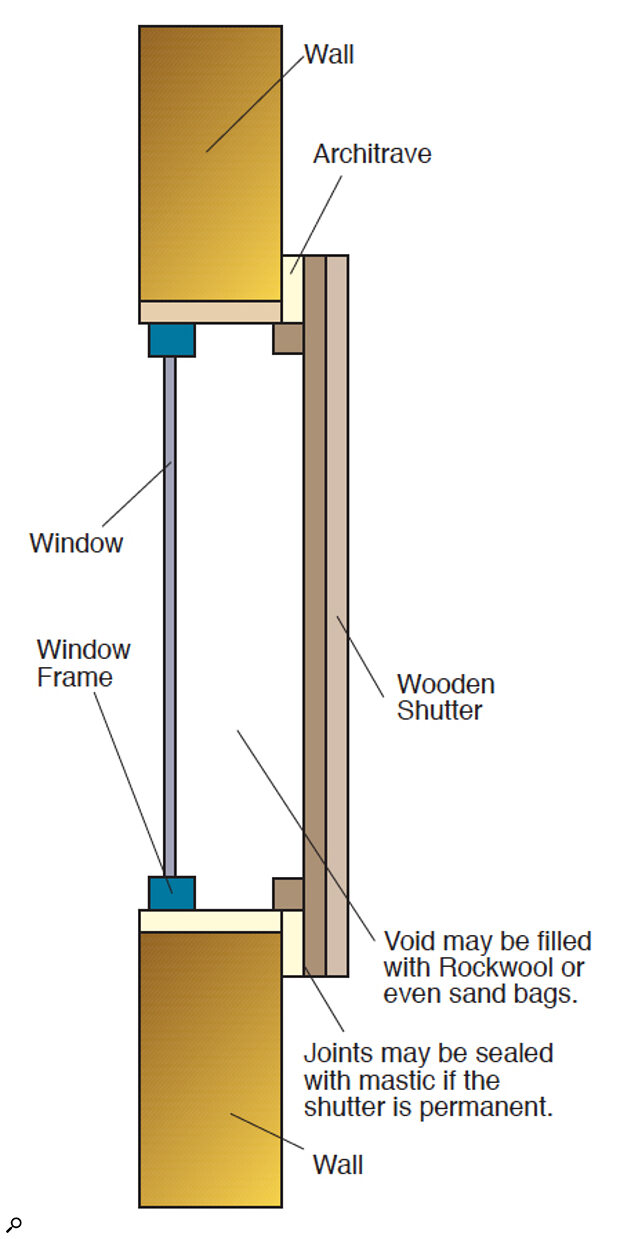
If you can forego the luxury of daylight, the cheap and cheerful solution is to block off the window using a heavy wood or MDF shutter screwed over the window opening, as shown in Figure 1. Fasteners can be used if you need to take the shutter down between sessions, but if you don't need to remove the shutter, stuffing the void between the window and the shutter with Rockwool insulation will also help. Any gaps can be sealed with acrylic frame sealant, applied with a mastic gun. Heavy curtains hung over the shutter or internal glazing will also make a small improvement.
Doors
 Figure 3: Uprated door with seals.
As explained last month, a typical lightweight internal door, with plywood skins and a cardboard honeycomb filling, probably provides around 15dB of sound isolation, at best. If there's a gap under or around the door, the figure may be even worse, so if you have this type of door in your studio room the very minimum you should do is fit a heavier door. Even the heaviest door will provide far less attenuation than a solid wall, but you should be able to improve on 15dB! Using a solid timber door and then gluing on an extra layer of three‑quarter‑inch ply can work well.
You can, of course, build your own doors, from two layers of thick ply or chipboard, leaving a gap between the two layers of ply and using Rockwool or fibreglass to fill it. This will help to deaden any vibration of the panels and also absorb a proportion of the sound trying to radiate from one panel to the other. If you use chipboard, which is not a structurally strong material, you'll need to add hardwood insets to take the hinges. Plywood is much stronger, and though it's more expensive it makes the job a lot easier. Figure 2 should give you the general idea.
It's also vital to make the door airtight, so use heavy‑duty seals around the edges, not forgetting the threshold below the door. If you can afford it, fit a compression latch (similar to those fitted to industrial freezers), so that the door is squeezed more tightly shut as you pull the handle down. These are mechanically simple latches that work by running up a tapered plastic wedge screwed to the door frame, so that the door is forced harder against the seal as the handle is closed.
Figure 3 shows how door seals are fitted. The seal material is available from most good studio materials suppliers; the simplest type is a foam neoprene strip with a semi‑circular cross section, and it can be stuck in place with a contact adhesive such as Evo Stik or Bostik. The best way to fit the seals is to hang the door in the frame first, then stick the seals to the wooden closing strips before you nail them in place. With the door closed, pin the strips in place one at a time, so that the seal is just touching the surface of the door — if you try to make the seal compress more than a little, you'll have great difficulty in closing the door, especially if you don't have a compression latch. Once you're sure the door is fitting correctly, you can screw the closing strips permanently in place.
No matter what you do to a single door, it will never be as effective as a double door in situations where a lot of isolation is needed. In most rooms it's possible to fit doors to either side of the wall, leaving an air gap the thickness of the walls between them. This arrangement is shown in Figure 4. Both doors should be fitted with seals, but only one needs to have a pressure latch — the outer door can have a spring closer. In professional studios, the inside of the door frame may contain elaborate sound traps, but for most DIY purposes, sticking a layer of inch‑thick fireproof furniture foam around the inside of the inter‑door space should be enough.
It's best, where possible, to use separate doorframes, rather than one wide one, when building a double door, but this may only be practical when building from scratch. Separate door frames prevent vibration travelling from the first door, along the frame and directly to the second door. To this end, frames are often isolated from the surrounding brickwork, and from each other, using Neoprene sheeting. This might be a little extreme for home use, but is worthwhile if you're building a studio from scratch or converting a garage. Gaps may be filled using expanding foam filler or mastic.
Patio Doors
 Figure 4: Double‑door construction.
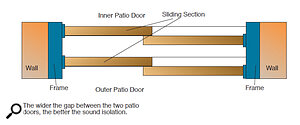
Commercial patio doors are a convenient means of dividing the studio's playing area and control room, because they double as both viewing window and door. However, to achieve adequate sound isolation, two sets of double‑glazed patio doors with an air gap between them are required. Ideally, the air gap should be 12 inches or more, otherwise low‑frequency isolation will be compromised. Larger gaps also help compensate for deficiencies in the door seals.
The walls within the cavity formed by the two sets of doors should be lined with Rockwool or acoustic foam. Figure 5 shows a practical example of patio doors used to divide live and control room areas.
Summary
Ultimately, the amount of soundproofing you do will be tied to your budget and to the available space, but I hope this part of the series will have given you a realistic idea of what is possible. To summarise the rules:
- Doors need to be as heavy as possible and airtight. A double‑door assembly will always out‑perform a single door.
- Sound travels well through solid materials, so Neoprene sheet can be used to isolate structures such as door frames, studding wall frames, and so on, from the main structure.
- Rockwool stuffed into air gaps will help, and aerosol polyurethane foam is useful for filling small gaps. Mastic or frame sealer can be used for filling smaller gaps.
- For windows, double or triple glazing is invariably the best answer, unless you can afford to block the windows entirely, and in any event the window frames must be airtight.
- The glass panes should be isolated from their respective frames, using Neoprene or foam‑rubber glass‑mounting strip for the best isolation — though, even when all these steps have been taken, the sound leakage through doors and windows is still likely to be greater than that through the walls. At low frequencies, simple mass forms the only really effective barrier.
Magic Carpet?
When it comes to sound leakage through ceilings and floors, the best low‑cost measure is to fit thick hair underfelt in your studio room and, if possible, also beneath the carpet in the room above. The combined weight and thickness of the carpet and underfelt provides both absorption and damping, so buy the heaviest grade possible. Foam underlay isn't nearly as good as the matted hair type, from an acoustic viewpoint.


