Get the most from Roland's flagship recording workstation with our power user tips.
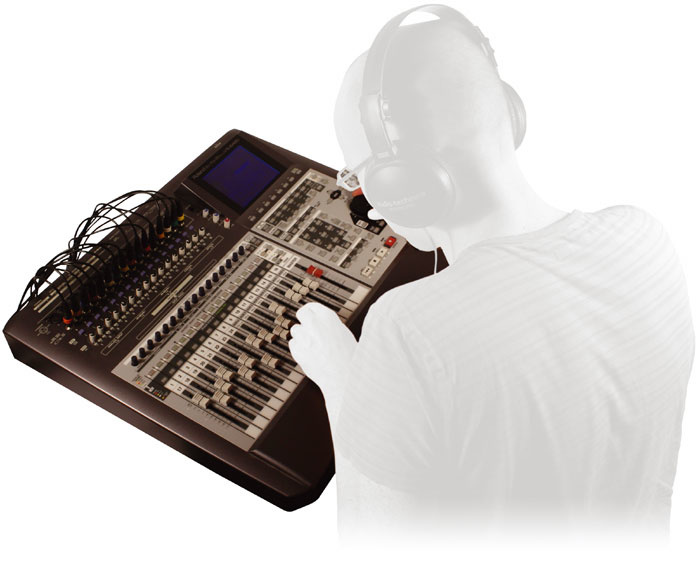
The VS2480 is the flagship of Roland's successful VS multitracker range, offering much of the functionality of a complete recording studio from a single unit. Inevitably, however, when you shoe-horn a multitrack recorder, an automated digital mixer, flexible onboard multi-effects, and a CD burner into one box, the result is going to present something of a learning curve. So I'm going to follow on from the VS880/VS1680 masterclass in SOS March 2002 by sharing some of the techniques I've developed for getting the best out of the VS2480 in practice. Although my advice will be aimed primarily at VS2480 owners, the VS2400 and VS2000 have much in common functionally with their larger sibling, so much of what I'll be discussing will apply to the more recent machines as well.
Getting The Best From The Channel Equaliser
One of the things that really set the VS2480 apart from its VS-series predecessors was its redesigned mixer section. Not only was the processing resolution doubled to 56-bit, but the channel processing facilities were also dramatically improved, adding an extra EQ band, a separate filter section, and a dynamics processor with (joy of joys!) gain-reduction metering.

, and in low-pass mode to create something akin to enhancement (right).") The filter section within the channel equaliser can be used in band-eliminate mode to create phaser-like effects (left), and in low-pass mode to create something akin to enhancement (right).The improved equaliser is much more usable for mixing purposes than the equalisers in the previous VS multitrackers. However, the thing I like most about it is that it can be automated. As a result, rogue bass resonances can be tamed surgically only when it's needed, for example. Or, at the other end of the frequency spectrum, you can automate an EQ band to de-ess over-sibilant vocal tracks. There are several advantages to de-essing this way: you save on insert effects processing; the automated EQ approach tends to sound more transparent than any of the VS8F2's de-essers; and you won't get de-essing occurring accidentally where you don't want it to. Of course, automating the EQ is much more time-consuming, but I wouldn't do anything else for lead vocals now, to be honest.
The filter section within the channel equaliser can be used in band-eliminate mode to create phaser-like effects (left), and in low-pass mode to create something akin to enhancement (right).The improved equaliser is much more usable for mixing purposes than the equalisers in the previous VS multitrackers. However, the thing I like most about it is that it can be automated. As a result, rogue bass resonances can be tamed surgically only when it's needed, for example. Or, at the other end of the frequency spectrum, you can automate an EQ band to de-ess over-sibilant vocal tracks. There are several advantages to de-essing this way: you save on insert effects processing; the automated EQ approach tends to sound more transparent than any of the VS8F2's de-essers; and you won't get de-essing occurring accidentally where you don't want it to. Of course, automating the EQ is much more time-consuming, but I wouldn't do anything else for lead vocals now, to be honest.
Despite the improvements to the channel EQ, though, I've still found that I get the best sounds by EQ'ing sources with dedicated outboard on the way into the machine. By doing this you're only really asking the VS2480's EQ to deal with mix-balance problems, rather than relying on it to effect dramatic tonal changes, so you can usually keep the channel EQ settings fairly gentle. If you're worried about processing something wrong on the way in, record an unprocessed version of the same audio onto another virtual track at the same time, so that you can return to it if necessary at the mix.
Another thing that I've found works well for most chart-style material, and something that was mentioned in the interview with Mark 'Spike' Stent back in SOS January 1999, is to use your best outboard EQ across the VS2480's main outputs to add a broad global high-frequency boost while you mix. A shelf with a frequency of about 15kHz should be about right, but the exact frequency and the amount of boost should be varied to suit what you're working on. The most important thing about this approach is that it avoids a lot of high-frequency boost on individual channels, something that budget digital EQ is never really all that good at, and it should therefore help improve the overall sound. What I would say, however, is that you should record versions of the mix both with and without this buss EQ, just to keep your options open at the mastering stage.
Is It Worth Getting A Screen?
One of the things that Roland seem to have placed great emphasis on is the VS2480's ability to offer a colour screen display if you add a computer monitor to your setup. However, having tried working with a spare monitor display connected, I now prefer to work without it, using the extra desk space in other ways. And I certainly wouldn't choose to invest cash in a new screen for the purpose.

How did I come to this opinion? Well, firstly I think that driving a hardware machine via a mouse and on-screen menus is a little ridiculous — why emulate an element of computer workstations which computer users try to avoid? Besides, I find the buttons quicker to use and less of a strain on the wrist than using a mouse. And why drag a fader on the screen when you can just grab the one on the front panel?
The great thing about the VS2480's assignable controls is that you shouldn't have to adjust software parameters in this way very often. The main areas where I think using a mouse is great is where you have to set up the patchbay, or where you're doing certain editing procedures, and it's perfectly easy to carry out these activities via the backlit LCD. I'd thought that maybe the visual feedback from lots of channels available via the extra screen would be useful when mixing, but to be honest I didn't really find I used it then either. I wouldn't really be seduced by the waveform displays either — they redraw so slowly that I found them next to useless.
So my overall advice is this: save any money you might have thought of spending on an extra monitor and use it to buy yourself more useful things, such as more internal effects boards. That said, however, don't let me put you off getting a mouse and QWERTY keyboard, both of which do make life a lot easier on occasion, and neither of which should break the bank.
Filtering & Compression Tricks
The EQ's multi-mode filter section has several nice little tricks up its sleeve. First off, you can easily create wah-wah effects, for which the BPF (band-pass filter) shape is probably the best choice. You can sweep the filter manually using the User Knob/Fader Assign mode (which I'll be looking at in more detail next month) — here a rotary control is the better bet, as you can easily get 'stepping' of the filter using a fader. Once you've decided on the sweeps you want to do, record them into the Automix system so that they play back the same every time. The filter section also provides a subtle phasing effect via the BEF (band-eliminate filter) shape, which can again be swept under the control of the automation.
 Reducing the compressor's Attack and Release times to zero lets you create a variety of creative distortion sounds.The other way that I find the filter can come in very handy is where you want to add a bit of high-end sizzle to a sound, in particular to a lead vocal. Set the filter to its LPF (low-pass filter) shape, moving the cutoff frequency to 20kHz, and then adjust the resonance control to taste — you don't need to go much over a value off 1.00 to get a useful change. This is a really handy effect for bringing sounds forward in the mix without apparently changing their basic timbre, and as such you might use it in the same situations as you would an enhancer.
The channel compressor has one weird little feature which can be used creatively: its Attack and Release parameters both go down to zero. If you set both of them to this value, the compressor reacts so fast that it tracks the individual waveform crests rather than their amplitude envelope. This results in the shapes of the waveforms being changed, rather than just their envelope, which means you get distortion rather than just gain-reduction. The threshold and ratio controls will adjust the harshness of the distortion sound, and there's actually quite a range of flavours to be had. If you're after something very subtle, then you might want to increase the Attack or Release parameter by a single increment to get a mellower range of timbres.
Creating Alternate Mixes
It's usually good practice to create various different versions of your final mix, in order that you're less likely to have to do a remix. Probably the most common example of such an alternate mix is the 'vocal up', where the level of the lead vocal is a decibel or so higher than in the main mix. The 'vocal up' version can then be used if you later decide after hearing your track on many different systems that the lyrics are not intelligible enough, say.
 Setting all the channel Att controls to -6dB gives you the headroom to boost individual tracks even after you've finished the main mix — for example if you want to print a 'vocal up' mix.One problem with doing a 'vocal up' mix on the VS2480 is that raising the vocal channel level has the potential to cause clipping if you've already maximised the peak level of your mix, so make sure that you have a little headroom to spare. You also have to bear in mind that you need to change the vocal level somewhere in the signal chain after any of the channel dynamics or insert effects — a change in level can interfere with any dynamics threshold settings, and will change the tone of effects such as amp modelling.
You could use the channel fader to increase the vocal level, but if this is automated you'll have to offset the automation using the Automix editing procedures, so that leaves only the Att level control. However, if this is already set at 0dB you could easily clip the channel equaliser which follows it, especially if the vocal recording peaks near the digital maximum of 0dBFS.
The solution to the conundrum is to start your mix by turning down all the channel and input Att controls by the same offset amount — a few decibels should do the job. This leaves you the EQ headroom to create whatever alternate mixes you like once you've finished the main mix. It also has the beneficial side-effect that it normally results in the channel faders being closer to their unity-gain positions, their area of greatest control resolution.
Quantity Versus Quality
The question of audio quality is something that has always hovered around the VS-series multitrackers — I have certainly heard a number of mastering engineers saying that they could spot a VS-series mix just from what they judged as the deficiencies in the sound of the data compression. Roland certainly seem to encourage you to use the data-compressed recording modes to maximise the number of tracks you can use and to make better use of available hard-disk space, but I've always tended to stick with uncompressed recording modes. Although compressed audio on the VS2480 doesn't sound much different from uncompressed audio in the raw, I've found that compressed audio doesn't respond as well to processing and bouncing as uncompressed. Yes, uncompressed audio uses hard disk space quicker, but all the drives shipped with the VS2480 are fairly capacious, so this may not concern you very much. And, yes, working with uncompressed audio restricts you to 16 tracks, but I still find that's not very restrictive, given that you can still run sound sources live alongside your recorded audio, using the input mixer.
The other quality consideration is to do with the effects boards. Although the VS2480's mixer works at 56-bit resolution to cope properly with 24-bit audio, the VS8F2 processors are still only 24-bit — a result of their VS1680 heritage. This is important to realise if you're after the highest possible audio quality from your VS2480, and you're working with uncompressed 24-bit audio. Buss processing of the full mix using the internal effects is a particularly bad idea from this perspective, as your entire sound can potentially suffer. This is the reason why I prefer to port digital audio out to an external mastering processor for the buss equalisation trick I mentioned in the main text, and I also do the same when compressing the mix buss. Some might also look askance at the use of insert effects on important tracks, as well, and I do generally try to avoid inserted VS8F2 effects on lead vocals if possible — not too difficult given the capabilities of the 56-bit channel dynamics. In the end it's a question of deciding for yourself how much all these things matter within the context of your own productions, but it's as well to be aware that these questions about the VS-series sound quality exist.
Managing A Complicated Automix
I like the VS2480's Automix facilities a great deal, and I've recently used them for some pop-style tracks. Most styles of music, especially those you hear in the charts, are now quite demanding of an automation system, so I thought I'd pass on some of the the working methods which I've developed for getting the best from the VS2480's Automix when the going gets tough.

 While editing automation data, if you make sure to select the track number you're working on in the Home screen, then that'll always be the default selection in the Automix Edit and Micro Edit screens.When approaching a complex automated mix, I've found that it's sensible to set up a basic balance for each individual song section first, before chaining these balances together to create a rough outline for the whole track. Finally, I concentrate on the fine-tuning: individual fader rides, detailed parameter automation, and special effects. My normal mixing 'rhythm' is to spend the morning doing the basic balances. After a lunch break, I set about chaining the basic balances together, before working on the fine-tuning for the rest of the day. I usually find it good practice then to come back to the mix the next day before printing it to my mastering recorder, as there always seem to be a few little tweaks that present themselves when you listen again with fresh ears.
For the first step of this whole process, I work on the mix with the Automix mode switched off, using the Scene memories to store the basic balance for each section. For example, a pop song structure might have Scenes for verse one, verse two, chorus one, verse three, chorus two, the middle section, verse four, and the final Choruses. I find it best to work on these sections in order of importance (in other words, I usually work on the choruses before the verses), so that I can make sure I don't over-egg a part that isn't that important. Similarly, I try to balance later sections before earlier sections (in other words, I do chorus three before chorus two). If you mix from the beginning, there's a danger that the energy of the mix will peak too early, and you'll have nowhere left to go in the final choruses.
I won't get into specific balancing techniques here, as there are plenty of SOS articles on the subject, although as a basic rule of thumb I try to add tracks to the balance in order of importance. That way, I end up processing the rhythm guitar to fit the vocal, rather than the other way around. Another general point I ought also to mention is that it's worth spending enough time on the most important section balances. These form the backbone of the mix, so if you don't get them right at the outset you'll make yourself a lot more work later on. For example, if you muck up the balance for your final choruses, and then base the earlier choruses on that balance, you'll have to change all of the chorus Scenes to sort out the problem, rather than just one.
Roland VS-series reviews in SOS
- VS880 Digital Multitracker & VS8F1 Effects Board: March 1996
www.soundonsound.com/sos/1996_articles/mar96/rolandvs880.html
- VS880 V-Xpanded Digital Multitracker: May 1997
www.soundonsound.com/sos/1997_articles/may97/rolandvs880.html
- VS880 S2: CD-writing Upgrade: January 1998
www.soundonsound.com/sos/jan98/articles/rolandvs880.htm
- VS840 Digital Multitracker: May 1998
www.soundonsound.com/sos/may98/articles/RolandVS840.html
- VS1680 Digital Multitracker: June 1998
www.soundonsound.com/sos/jun98/articles/vs1680.html
- VS1880 Digital Multitracker: July 2000
www.soundonsound.com/sos/jul00/articles/rolandvs1880.htm
- VS2480 Digital Multitracker: September 2001
www.soundonsound.com/sos/Sep01/articles/rolandvs2480.asp
- VS2480 v2 Digital Multitracker: August 2002
www.soundonsound.com/sos/Aug02/articles/vs2480v2.asp
- VS2400 Digital Multitracker: May 2003
www.soundonsound.com/sos/may03/articles/rolandvs2400.asp
- VS2000 Digital Multitracker: June 2004
Transferring Scene Data To Automix Data
Once you've created Scenes for all the main sections of your mix, you need to transfer these to the Automix engine. The thing to bear in mind here is that Scenes store information which an Automix doesn't. There is no Automix function for controlling the channel dynamics, signal routing, or stereo linking, so any such changes you make while creating the Scenes have to be kept in place for the Automix to sound right. gives you a useful idea of the peak 'energy level' of the song, and then the preceding choruses can be variants on that balance. The verses are approached similarly, again usually starting with the final one. Finally, the balance of the intro, outro, and middle section can be made knowing where each section is going to or coming from. Obviously every mix is different, but the same kinds of principles can still be applied.") When you're setting up basic mix balances for the different sections of a song, it makes sense to pay attention to what order you do them in. This diagram shows an example of how I might proceed for a basic pop-song structure. Mixing the climax of the song (usually the final choruses) gives you a useful idea of the peak 'energy level' of the song, and then the preceding choruses can be variants on that balance. The verses are approached similarly, again usually starting with the final one. Finally, the balance of the intro, outro, and middle section can be made knowing where each section is going to or coming from. Obviously every mix is different, but the same kinds of principles can still be applied.
When you're setting up basic mix balances for the different sections of a song, it makes sense to pay attention to what order you do them in. This diagram shows an example of how I might proceed for a basic pop-song structure. Mixing the climax of the song (usually the final choruses) gives you a useful idea of the peak 'energy level' of the song, and then the preceding choruses can be variants on that balance. The verses are approached similarly, again usually starting with the final one. Finally, the balance of the intro, outro, and middle section can be made knowing where each section is going to or coming from. Obviously every mix is different, but the same kinds of principles can still be applied.
Let's say, for example, that you have already created the mix Scenes for your song's choruses, but you then decide you want to set up a flanger on a spare auxiliary send for the verse. The change in the input assignment of the flanger's effects-return channel won't be carried out by the Automix, so you have to make a note of it and make sure that it's properly set up before you switch to Automix mode. You could do this on a scrap of paper, as there aren't usually many such changes, but I just use another spare Scene memory (I usually choose Scene number zero) to store the final routing which I require at Automix, updating it as and when any routing changes are made for any of the other Scenes. That way, before I go into Automix mode I can just switch to Scene zero to avoid the sound of any of the song sections changing when they are chained together by the automation.

, and the stereo linking of busses (top right). This means that you have to keep a note of any such changes you make as you go along so that you reinstate the most up-to-date settings before you begin the Automix. Scene zero can make a handy location to store the final pre-Automix setup.") There are some parameter changes you might make while setting up Scenes of your basic section balances which can't be captured by the Automix engine — these include adjustments to the channel dynamics processors, the assignment of busses to send effects (top left), and the stereo linking of busses (top right). This means that you have to keep a note of any such changes you make as you go along so that you reinstate the most up-to-date settings before you begin the Automix. Scene zero can make a handy location to store the final pre-Automix setup.Transferring the Scene data into Automix data is simplest if you want the settings for all the mixer channels and busses to change simultaneously at exact section boundaries. Switch on Automix mode by pressing the Automix button — it'll light up. Arm for automation all the channels and busses that you have adjusted when creating your Scenes. You can do this quickly by holding the Automix button and pressing Ch Edit buttons until they turn red. (You will probably have to repeat this process for the four different banks of fader assignments.)
There are some parameter changes you might make while setting up Scenes of your basic section balances which can't be captured by the Automix engine — these include adjustments to the channel dynamics processors, the assignment of busses to send effects (top left), and the stereo linking of busses (top right). This means that you have to keep a note of any such changes you make as you go along so that you reinstate the most up-to-date settings before you begin the Automix. Scene zero can make a handy location to store the final pre-Automix setup.Transferring the Scene data into Automix data is simplest if you want the settings for all the mixer channels and busses to change simultaneously at exact section boundaries. Switch on Automix mode by pressing the Automix button — it'll light up. Arm for automation all the channels and busses that you have adjusted when creating your Scenes. You can do this quickly by holding the Automix button and pressing Ch Edit buttons until they turn red. (You will probably have to repeat this process for the four different banks of fader assignments.)
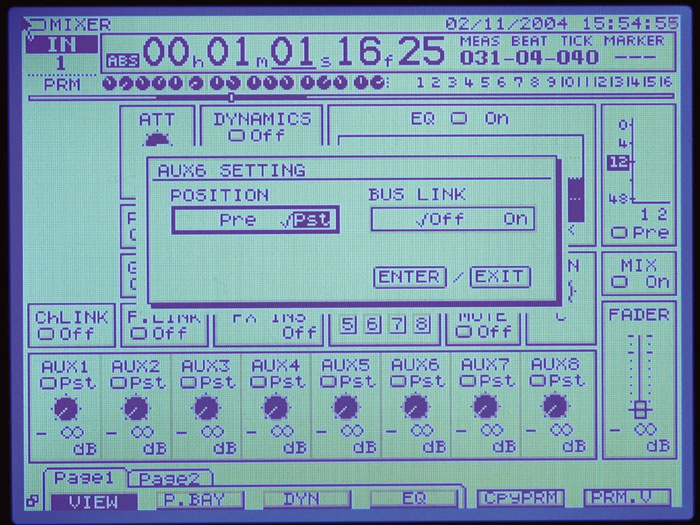
Next hold Shift and press Automix to get directly to the main Automix page in the Utility menu. Quickly double-check that all the correct channels and busses have been armed, and then choose the parameters you want to record. You'll probably want Level, Pan/Bal, Mute, and Aux Send enabled for most mixes. I'd only bother enabling EQ or InsFXLvl if you've altered them between scenes, otherwise you'll have to edit or overwrite the automation data to change their settings once Automix is switched on, rather than just being able to grab a control. EQ automation has often caught me out while mixing on the VS2480 — forgetting that I've set up automation for a channel's EQ, I'll tweak the controls while the track is playing, only to find that the curve reverts to its stored Automix settings when I stop the transport!
If you're planning on automating effects algorithm changes, I'd leave that until after you've done everything else, so leave the Effect buttons at the bottom left-hand corner of the screen set to Manual status for the moment.
For the next stage of the process the order is vital — if you do things out of order you'll find that your Scene settings won't transfer into the Automix properly:
- Hold the Automix button and press Record. This starts the Automix recording, and 'Automix Rec' flashes at the top of the LCD. Move the current time location to the beginning of a song section. You can do this by almost any means, as long as you don't use the Play or Stop buttons: using the Shuttle collar around the data dial; using the data dial itself if you move back to the Home screen and place the cursor on one of the fields of the main time display; or using the Locator buttons or the Previous and Next buttons if you've already got Markers set up. I like to have a Locator point set up for each main section of the song, the Locator numbers corresponding to the Scene numbers I'm using for those sections.
 Holding the Automix button and pressing Ch Edit is useful for quickly setting the Automix status of individual mixer channels. You can also use this technique to 'punch in' on recorded automation, but in practice the VS2480 responds a little too sluggishly when you try to do this.
- Select the relevant Scene for the section you've moved to the start of. Hold down the Automix button and press Tap. This records the Scene's parameters as an Automix snapshot. Repeat the previous three steps for all the song sections you've created Scenes for. After storing the final Scene's parameters, hit Play and then quickly Stop. This will exit Automix recording while also retaining the last snapshot you stored. If you just press Stop, without pressing Play beforehand, all but the last snapshot will be saved.
Things get a bit more complicated if, say, an instrument has a pickup to the Chorus that overlaps the ending to the previous verse. The thing to do in this case is to go through the Scene-transfer process for groups of tracks which have their song boundaries in the same places, which takes a little longer. Once you've transferred the Scene settings for each set of channels, change their Automix status to Read by holding the Automix button and pressing the Ch Edit button until it turns amber. If you're planning to automate any effects-algorithm changes, it's also best to do these on a separate pass — that way you can stagger the algorithm changes with regards to the song-section boundaries in order to avoid problems such as delay or reverb tails being cut off unnaturally.
VS2480 Tips

 It's easy to leave a track muted without realising, as you only get a small alert message at the top of the LCD. If you see the alert flashing at you, then hold Clear and press Mute to unmute all channels.You'll probably already have noticed that the VS2480's cursor buttons act to alter the zoom resolution when the Shift key is held down. However, it's worth remembering that this function also works when you're in the Automix Edit and Automix Micro Edit screens.
Because you don't get dedicated mute/solo buttons on the VS2480, it's possible for you to have tracks muted or soloed without realising it — the moment you leave the Mute or Solo mode, the only indication that anything is still muted/soloed is a small and easily overlooked 'Mute' or 'Solo' flashing at the top of the LCD. So if you're not hearing something that you should be, check the top of the LCD! You can quickly clear all mute/solo-button settings by holding Clear (by the Locator buttons) and pressing Mute/Solo.
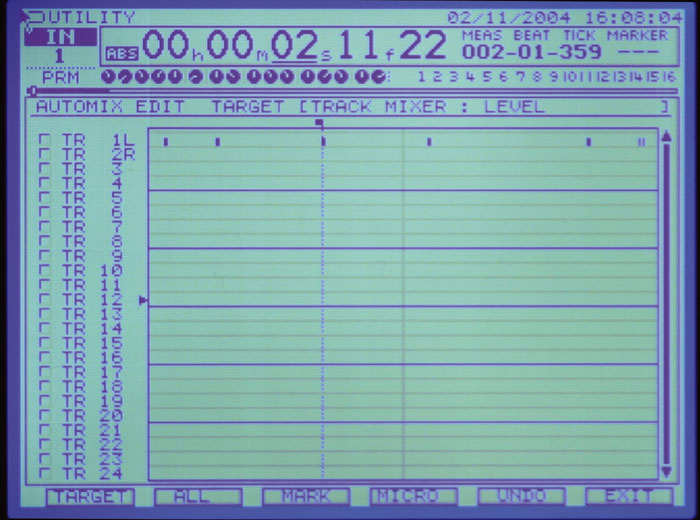
When you're working on the automation data for a specific track, you'll probably find yourself dotting in and out of the Automix Edit Screen. However, this screen doesn't remember which track was last selected; it follows the main track selection on the Home screen. This means that if track six is selected on the Home screen, then track six (or input/aux/return six depending on what automation data you've targeted) will always be selected when you enter the Automix Edit and Micro Edit screens. Once you realise this, you can save yourself and awful lot of scrolling around in the Automix screens by selecting the appropriate track in the Home screen.
In Mute/Solo mode, or when the Phrase Sequencing mode is switched on, the Ch Edit buttons stop performing their normal function of accessing channel mixer parameters. In such cases, you need to hold Shift and press Ch Edit instead.
If you're planning to synchronise the internal clock of any digital equipment from the VS2480's S/PDIF connectors, be aware that the VS2480 interrupts its stream of data whenever you save your project. If you save frequently (as anyone with any sense should!), this means that the rest of your digital equipment will regularly lose synchronisation, and you'll probably get a nasty click/pop coming through your monitors at you. One of my digital processors also seems not to like losing clock so regularly, and has had to be repaired twice already. The only solution to this is to clock everything to an external word-clock generator, which is a better idea anyway, as it will probably improve the audio quality and will also allow you to take advantage of both the VS2480's digital inputs.
Fine-tuning Your Automated Mix
 The facility to create very detailed automation envelopes in the Automix Micro Edit screen has a lot of creative uses. Here I've programmed a series of very short gain 'spikes' to emphasise drum transients — this creates an effect similar to that of SPL's Transient Designer. Although it takes a little time to create such automation envelopes, you can then easily copy them to where they're needed.One of the missed opportunities of the automation system in the VS2480 is that you can't use its controls to 'trim' existing automation data in the way you can on more advanced automation systems. This is a shame, because it means that it's rarely practical to do anything but the first automation pass using the faders. The 'punch-in' facility is also a bit of a kludge given that the VS2480 doesn't have touch-sensitive faders: firstly, you need to hold Automix and press the Ch Edit button at the same time, which is a bit of a juggle when you're also wanting to move a fader; and, secondly, the fader motor is sluggish in letting go of the fader, so it tends to fight you for the first second or so. I've even tried to use the Utility menu's Marker Stop to accurately re-record sections of the Automix data, but to no avail — the Marker Stop function seems to fool the system somehow so the fader moves aren't recorded.
For me, the upshot of these Automix limitations is that I end up approaching the automation process much as I did back on my old VS880, which means that I create most of my small-scale automation adjustments by a series of snapshots, adjusting parameters from the rotary encoders or the data wheel for the sake of accuracy. A side-effect of this is that things therefore stay simple enough in the Automix Micro Edit screen for it to be useful.
The automation editing commands on the VS2480 are also a great help, especially for doing the kind of level trimming that isn't possible via the hardware controls — let's say I've not de-essed enough via an automated channel EQ, it's a simple job to just increase the relevant EQ cut settings for the whole track.
 You're probably already aware that holding Shift and pressing any of the cursor keys activates horizontal and vertical zoom functions in the main track display window. However, this also works in the Waveform Display, Automix Edit, and Automix Micro Edit screens.A nifty thing that the automation editing also lets you create is effects which closely resemble dynamics processing. For example, I've managed to give drum sounds extra attack by creating an SPL Transient Designer-style gain spike for the first few milliseconds of each drum hit — this might seem an incredibly tedious task, but the automation Copy command makes it fairly manageable if you have a regular drum pattern.
A related technique also lets you re-balance mixed drum tracks, which I've found incredibly handy on occasion, and this is especially easy to do if you're working with a loop. Set a stepped pattern of fader automation data to adjust the loudness of the different hits, and then copy it to each instance of the loop. In fact, you could even automate the EQ as well if you have a serious 'remixing' job to do. When you get down to automating on a small scale, it's incredible what kinds of creative effects you can achieve: tremolo, auto-panning, and de-essing are just some of the simpler possibilities.
V-Studio Wizardry
That's enough to be getting on with for now, but look out for Part 2 of these VS2480 tips, next month, where I'll be taking a close look at the some of the weird and wonderful things you can do with the onboard VS8F2 effects boards, as well as passing on some editing and routing tricks.