Reason's flexible routing makes scintillating sampling simple...
 Reason 5's expanded and redesigned Hardware Interface device lets you access the inputs on your audio hardware, which you can record by connecting them to the Sampling Input. The optional Big Meter can accurately display levels for any input or output pair; rotate its Channel knob to change its 'focus'.
Reason 5 has something that no other version before it offered: audio inputs. These are an essential part of Live Sampling (also new), which lets you record drum hits, vocal phrases and anything else you like directly into Kong, Redrum, NN19 and NNXT.
I looked briefly at Live Sampling when I wrote about the new Kong Drum Designer in the February and March Reason columns, and how you'd sample a hit from a microphone input into one of its pads. This sort of straightforward sampling is fantastically useful, but other possibilities exist too. So this month we'll cover all the fundamentals, and a few other things besides, to really dig into this brilliant new feature.
In Theory

First, a quick recap on how it all works: Reason 5 has a 'sampling input' on the rear of the Hardware Interface. Next to it are sockets representing physical inputs on your audio hardware. Want to sample from a mono mic plugged into input 1 of your audio interface? Then drag a cable from Audio Input 1 to Sampling Input L. For stereo sources, just drag two cables, to inputs L and R. Meters on the front of the Hardware Interface help you set your input levels, and a Monitor button (plus associated level control) lets you hear what's coming into the sampling inputs.
The next step, of course, is to actually start sampling, and the easiest way to do that is by clicking the 'squiggle' buttons on the sample‑based devices I mentioned above. Here's a run‑down of where to look, and how it works:
Redrum: Each of the 10 drum channels has its own sampling button. The resulting sample is loaded into that channel.

Kong: Select a pad or Drum Assignment button to call up the drum channel of your choice and then use the sampling button in the control panel. You can also sample direct to NN‑Nano hits or layers.
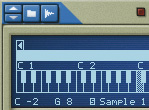
NN19: Samples load into the currently selected keygroup, replacing anything that was there before.
NNXT: If a zone is selected a new live sample will be loaded into it, replacing any sample assigned to it before. If no zone is selected, a new one is created.

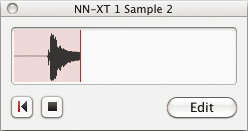
Regardless of the device you're using, starting the sampling process brings up the same little 'progress' window, with buttons to restart sampling, end it (and pass the sample directly to your device), or to Edit it in a dedicated dialoguebox. This is a little streamlined audio editor where you can adjust sample start and end points, switch on forward or forward‑back looping (and adjust loop points), and apply a range of destructive actions such as crop, normalise, reverse, fade-in and fade-out. This is also where you set the Root Key, the MIDI note reference at which the sample will play back at its original pitch and speed.
In Practice
As a real‑world example, here's how you'd put it all together to sample a sung 'lah' and create a sustained vocal pad sound in NN19 — heavenly!
1. Assuming that your mic is set up and the sampling input connections made, create an NN19, right‑click an empty part of its front panel and 'Initialize Patch'.
2. Click NN19's squiggly Start Sampling button and then sing your sweetest 'lah' for a few seconds; the sampling window's waveform should confirm that something is happening.

3. Click the Edit button to pass this new sample on to the Edit Sample window. When it appears, click Play to hear your sample.
4. You want this sample to loop, so click the forward or forward‑backward loop button in the window's header area. Also check the Crossfade Loop option to take all the pressure off producing a glitch‑free effect. Now, in the waveform display, you can drag the 'S' marker to set the sample start point (although Reason will have made a good stab at it already), and the L and R markers to set the loop boundaries. Another approach is to click and drag in the waveform display to make a selection, then use the Set Sample Start/End or Set Loop buttons to snap markers to that region.
5. When your sample is perfected, you can name it, then click Save to load it into NN19, and start playing it.
Sampling Through Effects
Live Sampling opens up a new universe of creative possibilities all by itself. But I promised to go beyond that and suggest some more left‑field techniques, so let's look at something a little more exotic...
You can easily discover interesting sounds and textures by playing around with effects processors in real time, especially delays and filters. Thanks to the audio inputs, it's now possible to do this in Reason, and sample the results. How? Easy: just re‑wire your sampling input so that there's an effect processor (or a Combinator containing a whole cocktail of treatments) in the signal path. You'll need to turn Live Sampling monitoring on using the button on the Hardware Interface to hear what's happening, and you might want to lower your audio buffer size in Preferences to minimise latency.
Sampling Devices
 This looks a touch scary, but is actually really simple. Thor and a mic input from an audio interface drive the vocoder; the vocoder's patched directly into the Sampling Input; and NN19 is ready and waiting to capture any good results.
Who says you can only sample from stuff plugged into your audio interface? You can just as easily connect other Reason instruments to the Sampling Input.
You could try, for example, taking the output from a Thor into the L and R sampling inputs. Create an NN19, initialise its patch and, with Thor selected in the sequencer track list (so it has a MIDI input), start sampling on the NN19. Now anything you play on Thor will be sampled.
But why on earth should you do this? There are a few reasons. You could sample and loop a multi‑oscillator pad played as a stack of octaves and fifths. When replayed as a chord or another octave stack on the NN19, it could create an absolutely colossal, dense wall of sound. Or if you're feeling glitchy, you might choose to sample a note or texture and deliberately loop it badly.
Vocoding
 The dedicated Song Sample pane of the Tool Window keeps you in control of what samples are being used where. Here, my single 'Lah' vocal sample is being used in an NN19, while a Redrum reveals its factory sample allocation.
Reason has a great asset in the shape of the BV512 Digital Vocoder, and it's crying out to be used with an audio input and then sampled (or even used live). The screenshot below shows how you might connect this up. The audio input (probably from a mic) goes to the BV512's Modulator Input. For the Carrier Input, I'm using a buzzy pulse-wave patch from Thor. The BV512 output goes straight to the Sampling Inputs, so that I can capture any nice textures and phrases into an NN19. I just need to make sure Thor is selected in the sequencer track list, ensuring that it's receiving MIDI and I can play it, and that I've got a sampling device visible, so I can click its Start Sampling button when the muse takes me.
Sample Management
Reason 5 gets a new Song Samples pane in the Tool window, and it's there that you manage your own (and other) samples. Samples currently in use are called 'Assigned Samples' and are listed in association with the device they're loaded into. After you select a sample in the list the buttons at the bottom of the Tool window become active. Clicking Edit, for example, recalls the Edit Sample window, so this is the way to further tweak samples gathered using Live Sampling.