As well as tackling monitoring issues, this month’s Studio SOS visit sees the team making extensive modifications to a leaky vocal booth...
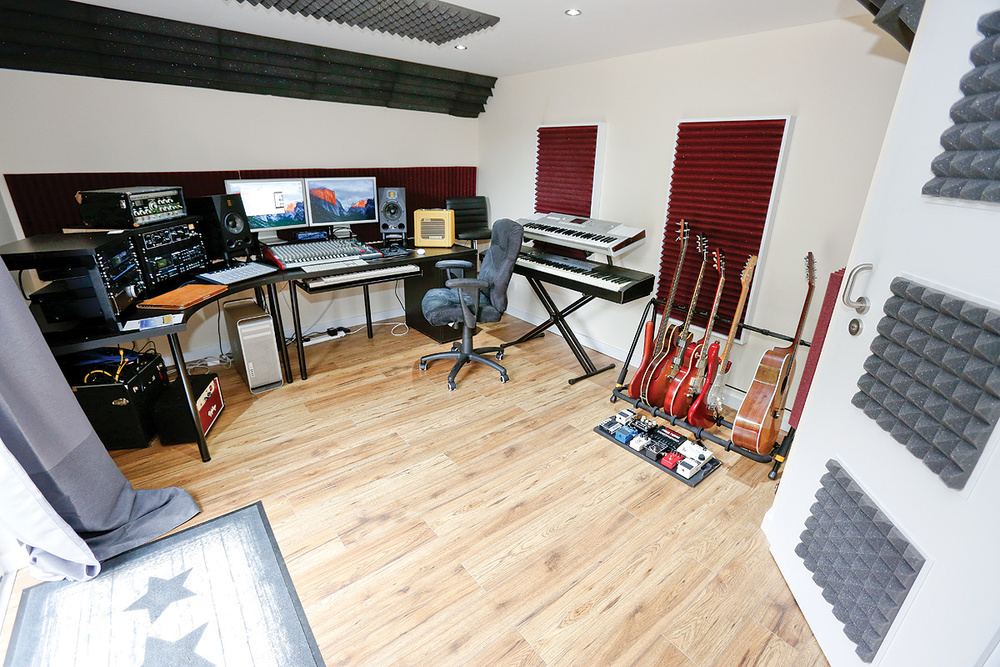
In between his busy gigging schedule Ollie Gray indulges his passion for recording and mixing, and has recently had a purpose-built 5x3-metre outbuilding erected at the bottom of his West Midlands garden, allowing him space to set up his gear and work without disturbing his young family. Ollie has had a home studio for around 14 years, ever since his college days, starting out in the box-room at his parent’s house, then in the third bedroom of his current house — until his little boy Jackson came along.
Alongside his main job as lead guitarist in the long-running rock & roll show That’ll Be The Day, (www.thatllbetheday.com) Ollie mixes all of the show’s live CD/DVD releases each year, and also does all of the audio pre-production work for this and other touring shows. Because of the tight deadlines such jobs entail, Ollie needs to be able to work extended hours without disturbing others, and to trust what he’s hearing when mixing.
His core system comprises Pro Tools running on either a Mac Pro or MacBook Pro, and he prefers to mix using an Allen & Heath Zed R16 mixer connected by Firewire — although he also has a Euphonix Artist control surface. His main monitors are Adam A7Xs, and vocals are recorded using an sE Gemini II through a Universal Audio LA610 MkII preamp/compressor combo. He also runs UAD plug-ins on a Duo PCI card, and occasionally fires up an original Roland RE-201 Space Echo.
 The door to the vocal booth was rather lightweight, the seal wasn’t tight all the way around, and there was a gap underneath the door... Clearly there was work to be done!The new studio building is a purpose-designed wooden structure looking rather like some garden offices, with double-skin walls and lots of sound-absorbing material in the gaps, and a nice solid concrete floor fitted with a laminate floor covering. The ceiling is built with a slight slope, highest on the side of the double-glazed patio doors, which provide access from the garden. In the rear corner of the room, on the opposite side to the door, Ollie had a vocal booth built with small windows on both walls facing into the room. However, Ollie wasn’t sure of the best way to treat the room or the vocal booth, which is why he asked for our help.
Gray’s Anatomy
As it wasn’t too far for us to travel to see Ollie’s studio, we were able to enjoy the luxury of a planning visit just after the building work was finished. At that time, no acoustic treatment had been fitted either to the room or the booth, but Ollie had modified an Ikea desk to support his equipment and had this facing down the long axis of the room. He had also salvaged quite a lot of foam panels from his previous studio builds, and these were being stored in the new room.
Something we immediately noticed as a potential problem was that the booth had been furnished with a fairly lightweight door and, in addition to the fitted domestic door seals not making contact with the door all the way around, there was also a gap beneath the door. Consequently, the degree of sound isolation was almost negligible — maybe just three or four decibels — which would obviously render the booth rather less useful than intended.
 Paul White constructs the frames for the absorptive wall panels...So, the aim of this Studio SOS job was to sort out the acoustics of the main room and optimise the monitoring arrangements, as well as to improve the booth isolation as much as possible and then sort out the booth’s internal acoustics. Ollie was also unsure of the best way to get cables in and out of the booth, so we needed a solution for that as well.
Ollie had some left-over grey Universal Acoustics foam bass traps and some salvaged burgundy Auralex Studiofoam Wedges from when his studio was in the house. The used bass traps and wall foam had CDs glued to the back of them as Ollie had used our non-destructive mounting methods in the house, but for the new studio the old CDs would be peeled off and the traps glued in place. He also had a complete box of unused two-inch Studiofoam wedge panels (also in Burgundy) and we brought along some additional grey Universal Acoustics 50mm-and 100mm-thick panels to treat the vocal booth.
 ...into which Hugh Robjohns places the high-density mineral wool, prior to gluing on the acoustic foam.After viewing the studio and chatting with Ollie (and thanks to his wife Jo for the bacon sandwiches, endless coffee, chocolate biscuits, and trips to the shops to find critical hardware for us!), we formulated a strategy. As this involved a lot of DIY, Ollie enrolled his dad — another home studio owner and avid SOS reader — to give us an extra pair of hands.
We planned to reuse Ollie’s existing foam bass traps, putting them across the front wall/ceiling corner to cover the full width of the room, and to augment the Auralex foam wall panels we decided to construct some deeper broadband traps comprising 30mm high-density Rockwool with the foam panels fixed on top. These would be deployed to cover the ‘mirror’ points (to prevent reflections from the speakers being bounced back to the listening position), as well as the rear of the room. Additional foam panels would also be glued directly to the wall and ceiling as needed.
Live And Let DIY
The DIY plan was to build one ‘double’ and three ‘single’ wooden frames — the size being designed to envelop one or two mineral-wool slabs, with either two or four foam panels covering the slabs. So that meant constructing three 1200 x 600 mm panels — two to be used on the right-hand side wall and one on the left-hand wall just forward of the patio door — and a fourth double-sized panel of 1200 x 1200 mm (plus the width of an extra vertical timber divider) to be fixed to the rear wall.
In advance of starting the work we gave Ollie a shopping list for all the timber (69 x 20 mm for the panel sides), 30mm rigid mineral-wool slabs (often sold as ‘acoustic insulation slabs’), and all the fixing hardware we’d need. However, his first shopping trip saw him coming back with a pack of 50mm medium-density Rockwool, which isn’t rigid enough to keep its shape inside the frames we planned to build. He went back out and sourced a pack of five sheets of the 30mm high-density stuff we needed, but rather than try to return a partially opened pack of Rockwool we suggested he keep it and use it to stuff the sofa he planned to put at the back of the room, where it would provide additional — and invisible — bass trapping.
On the big build day, we started by cutting the timber to size using a mitre saw, and then painted it with a quick-drying multi-surface paint. When dry, the timber was pinned together using a pneumatic nail gun, and then the mineral-wool slab was placed inside to keep the frames square before fitting corner plates using short wood screws. This is the quickest and easiest way of ensuring the frame is square and strong, while the corner plates also provide a convenient and invisible way of mounting the frames on the wall. We used the type of metal plasterboard fixings that screw directly into the plasterboard, and then a smaller screw threads into the middle of the fixing through the corner-plates. We’ve used these before and they seem to be the best option for fitting relatively light structures like these panels to plasterboard walls.
With the mineral-wool slabs removed, the frames were very light and easy to fit to the wall in the appropriate places, after which the slabs were wedged inside again and then foam tiles glued in place on top using the usual spray adhesive. This extra depth of absorbing material provides more effective absorption at lower frequencies than foam fixed directly to the wall — and it’s a design I used in my own studio.
 Once the four panels were fitted to the walls we added a row of Ollie’s own tiles across the front of the room at monitor height, with others on the front face of the vocal booth wall and also on a bare side wall at the rear of the room, opposite the booth. Two tiles of Universal Acoustics’ Pyramid foam were then fitted above the listening position at the ceiling mirror point, taking care to ensure they were straight and parallel with the front wall.
Booth Ache
 Ollie planned to use the vocal booth for recording guitar amps as well, so the aim was to make it sound reasonably dead but tonally well-balanced — there’s nothing worse than damping out all the high and mid frequencies with too much foam, while the low end rattles around inside the room making it sound very boomy and boxy. We decided to fix three thick 100mm foam tiles at around head height to the two longer walls of the booth, so they would be behind a standing vocalist where they would prevent sound bouncing back into the front of the mic over the vocalist’s shoulders. We also fixed some of the 50mm tiles alongside, below, and also on the two short walls above and below the windows. Ollie also had some thinner white melamine acoustic foam sheets taken down from his previous studio, so we cut these to size to treat part of the ceiling of the booth.
 Battens were fitted to the sides of the door frame to improve the seal, while a strip of hardwood was screwed in at the bottom to close the gap. Finally, some plasterboard panels were glued into the recesses of the door to add mass, and some foam glued on top to provide a little absorption while also helping the aesthetics.Overall, we covered about 50 percent of the room’s walls and ceiling area in acoustic tiles, leaving the other 50 percent as exposed reflective surfaces (including the two small windows and much of the door), so as not to over-deaden the space. When we were finished we were pleased with the well-controlled but not oppressively dead acoustic. Ollie also has two sE Reflexion Filters so could use one of those in the booth if further control is deemed necessary.
Of course, making the booth sound good was important, but of little use unless we could achieve a good level of acoustic isolation from the main studio space — which was a major problem we had already identified. Almost all of the blame was assigned to the door, which was quite a lightweight design, and made worse by having three thin decorative panels, which were probably plastic-coated 6mm MDF set in square recesses. There was also the problem of completely ineffective door seals around the sides and a large gap at the bottom. Sound waves are very good at finding gaps through which they can move from one space to another!
Our solution for the door panels was to glue plasterboard into both sides of the recesses to add mass, and then glue some spare pyramid-pattern foam tiles (cut to size) onto the plasterboard to add some absorption and to improve the cosmetics. The neatest way to cut acoustic foam is with a band-saw, but an electric carving knife will also do a decent job. These extra plasterboard and foam panels worked very well acoustically, but unfortunately the door handles brushed over the middle foam panel when used, which would be guaranteed to quickly wear away the foam, making it look shabby. So Hugh had the idea of removing and refitting the door handles at 90 degrees, which solved the problem completely and still worked perfectly well as a door handle.
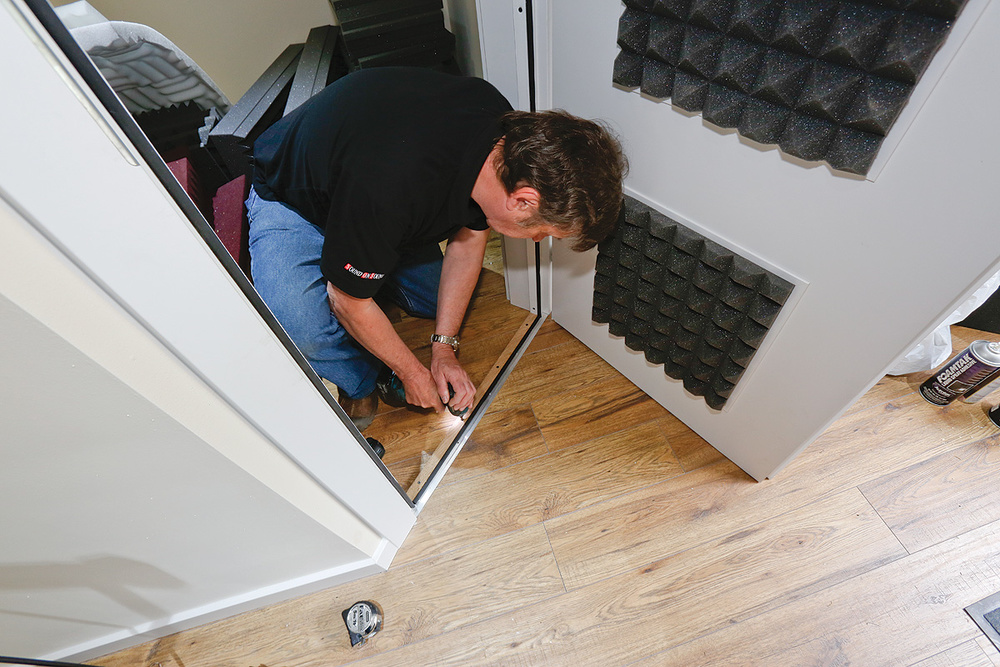
To address the leaky seals issue, we cut some 15 x 300 mm wooden battens with the mitre saw to fit along the sides and top of the door frame, and painted them with more multi-surface paint. When that was dry, we drilled some countersunk holes on the wide sides (so that we could screw them in place quickly and easily), and then cut and fixed some hollow 12mm D-section self-adhesive neoprene seal to the narrow edges of the battens. These three battens were then fitted to the inside of the door frame so that the neoprene seals just touched the closed door all the way around.
It is important to fit these strips with the door closed so that you can ensure an effective seal all the way around while taking care not to press the seals so hard against the door that it won’t close easily. This is particularly important for the vertical seal on the side closest to the door handle, as making this too tight can make the door really awkward to close. The idea is that the seals compress almost imperceptibly when the door latches closed, forming an airtight — and sound-tight — seal, and they should squash just enough to hold a business card between the door and seal with the door closed.
Of course, we also needed to seal the gap at the bottom of the door, and for that we made a hardwood threshold strip and fitted that with more neoprene seal. There are better solutions, such as self-lifting door-bottom seals, but for these to be of significant benefit the door would have needed to be a lot heavier. Nevertheless, by the time we’d finished, the degree of sound isolation had improved quite dramatically and was certainly adequate for recording vocals without worrying about sound from the studio monitors getting back into the mic.
Angle Delight
Ollie initially had his Adam AX7 monitors set up on foam wedges on top of small equipment racks positioned either side of his computer screens, but this placed them rather too high for mixing in his usual seated position. We had brought a pair of IsoAcoustics platforms to use, but even with the short tubes fitted and the spacers set for maximum tilt we couldn’t get the tweeter angled down enough. The more practical solution was to move both equipment racks to the left of the mixing desk and then to use the IsoAcoustics stands directly on the desktop, either side of the mixer and angled in slightly towards the listening position.
 Hugh and Paul test the wall-boxes going into and out of the vocal booth.While I was gluing foam to the walls and ceiling, and setting up the monitoring speakers, Hugh had been quietly beavering away with the booth wall-boxes. This involved drilling a 20mm hole right through the booth wall to take an eight-way multi-pair cable, and then fitting eight-way Studiospares wall-boxes on each side over the hole/cable. A short-ish loop of cable was left in the wall so that the wall-boxes could be opened for maintenance, and also to minimise the risk of mechanical sound transmission along the cable.
Ollie wanted four XLR connectors for mics, and four balanced TRS jacks for guitar cables and/or headphones, so Hugh had to bolt the appropriate connectors into the two boxes and then wire them up in situ, which was a fiddly and awkward job!
Ideally, the metalwork of studio wall-boxes should be permanently grounded to the studio’s ‘technical earth’, but that wasn’t practical in this situation. So, on the assumption that at least one microphone would always be in use in the booth, Hugh connected the box metalwork to only the first XLR connector in each box to avoid ground-loop issues — and the wall-boxes would therefore be grounded via the connected preamp. We explained to Ollie that when plugging up mic connections, XLR 1 should always be used first.
Once the installation was complete we checked each connection using a cable tester and known-good XLR and TRS cables. There was no significant sound leakage through the cable hole as the ends were effectively sealed with the wall-boxes anyway, and the mineral wool inside the booth walls also made a decent seal around the cable.
 Prior to the visit, the equipment racks were sited on either side of the computer monitors, with the Adam speakers on top. However, this aimed the tweeters rather higher than was ideal, so eventually the racks were moved off to one side, and the speakers placed on IsoAcoustics stands directly on the desk.
Hearing Is Believing
So, given that we had quite a lot to do in one day, how did it all work out? We expected the combination of acoustic treatment in the studio and the IsoAcoustics platforms to sharpen the stereo image and to firm up the bass, which they did admirably, with a nicely focussed and solid centre image and a well-defined sense of stereo panorama that almost seemed to extend beyond the speakers. Both Ollie and his dad seemed pleased with the result.
Hugh’s test CD also confirmed that there were no serious bass problems when we ran our semitone steps sequence, although the monitoring did seem slightly over-generous at the low end. A quick check of the speakers’ rear-panel EQ switch settings revealed that Ollie had set them to boost the bass (in an effort to counteract a weak bass balance in his previous room), and putting the switches back to neutral gave us a much more natural balance. After that, Hugh’s reference tracks sounded very good indeed.
Reader Response
 Ollie Gray in his newly treated studio.Ollie Gray: “I am more than delighted with what the SOS team have done with my new studio. After years of working in acoustically compromised situations it is so exciting to finally have a professional-sounding space that I can trust. I was already looking forward to having the new space itself but Paul and Hugh have really taken it to another level that I wasn’t expecting to achieve, and aside from being really nice chaps they sure know their stuff and are also extremely handy with power tools and a soldering iron!
“It was really interesting to see how the acoustics of the new room were completely changed by the treatment. Not only do the panels and traps look great, but the room and booth are now really controlled and I am very much looking forward to not using guesswork to make constant mix revisions when out on the road. When the guys left, my dad and I cranked up the amps in the booth and repeatedly opened and closed the door while playing, enjoying the new level of isolation provided by the door seal.
“Big thanks to the SOS team for their hard work and a really fun day!”
The Studio SOS Book
 Using case studies to illustrate common problems, this 306-page book brings together a wide range of real solutions that are both affordable and easy to implement.
Written by Paul White, Hugh Robjohns and Dave Lockwood, the SOS team impart easy-to-understand, organised troubleshooting advice on a range of topics. Learn how to rid yourself of monitoring problems so you can accurately hear what you’re mixing, how to enhance the sound of your recording space, and how to perfect your instrumental and vocal recordings. Spend less time re-recording and mixing, simply by improving your room with advice from the guys who have seen it all when it comes to make-do small studios.
Get your copy from: www.soundonsound.com/shop/books/studio-sos-book