If you do much work with surround or immersive formats, upmixing and downmixing are a fact of life. With Penteo, good results needn’t cost the Earth.
Penteo is an upmix/downmix plug‑in that started life way back in 2012 as a stereo to 5.1 upmixer. It quickly became something of a standard in the world of film and TV audio, and has since expanded to include many more channels and features to make it just as useful in today’s multi‑format immersive‑sound universe.
Penteo is available in three versions: Penteo 360 ($299) offers 5.1 upmixing and downmixing to 13 audio formats; Penteo Pro ($499) provides 16 channels of upmixing and downmixing to 43 audio formats, so can be used for Dolby Atmos formats up to 9.1.6; and, finally, Penteo Pro+ ($799) allows you to work with up to 64 channels of upmixing and downmixing to an impressive 62 audio formats, and is the version I was sent for review. (There’s a helpful comparison table for the three versions on Perfect Sound’s web store.) Formats are divided into Stereo (stereo LFE. LtRt), Surround (3.0, 3.1 through to 7.1), Atmos (2.1.2 to 9.1.6), Immersive (Auro 9.1 to 13.1 and DTS:X 11.1), 360 Audio (Sony 5.0.2+2B to Sony 7.0.7+2B and Cube 0.0.4+4B) and Ambisonics (AmbiX first‑, second‑ and third‑order, FuMa first‑, second‑ and third‑order, and UHJ 2, 3 and 4 formats). All the plug‑ins support macOS (running on Intel or Silicon processors) and Windows 10 and 11. They’re available as AAX, AU for Logic (up to 7.1.4) and VST3.
Getting Started
A pretty self‑explanatory GUI makes it simple to get going fast, but there are some ‘beneath the hood’ options and some things you might need to configure, so it’s definitely worth reading the manual or watching some of Penteo’s helpful YouTube tutorials (www.perfectsurround.com/videos). For example, on first inserting an instance of Penteo on a stereo track, I noticed a shift of signal to the left. That didn’t seem correct, but on further investigation I discovered that in the settings pane you must select the in and out channel order to suit your DAW workflow. By default, it’s set to ITU (L, R, C, LFE, Ls, Rs, Lr, Rr, Lw, Rw, Ltf, Rtf, Lts, Rts, Ltr Rtr) but Pro Tools, which I usually use, uses the Film layout (L, C, R, etc). In and out channel order can easily be changed and stored as a new default, so it’s something you need do only once, but it serves as a good reminder to look over the manual!
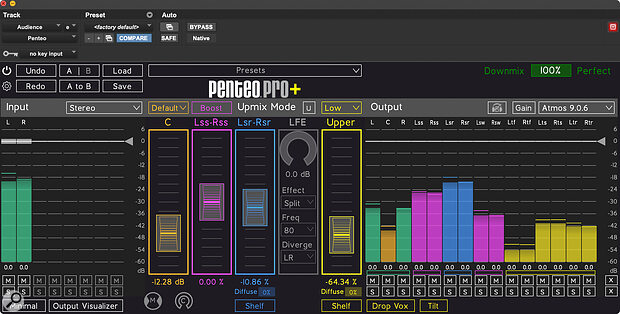
The main controls are shown in the centre, with the input channels displayed on the left and output channels on the right. Audio always flows from left to right whether you’re upmixing or downmixing, which in my opinion is the logical way to approach it. Controls are available to adjust Centre, Lss‑Rss, Lsr‑Rsr, LFE, and Upper. Each set of controls is colour‑coded, and the colours can be changed in the settings pane if they’re not to your liking. Each control has a few options or parameters that can be adjusted, helpfully displayed in the same colours. So it’s pretty simple to see what’s going on.
Input gains can be adjusted individually by dragging the thick fader‑like line at the top of each channel. The channels also feature a level meter, keeping the GUI concise and clutter‑free. Grabbing the triangle icon to the right of the input level display allows you to adjust all the input channels together. The input section also allows soloing and muting of each input channel as well as a digital value display at the bottom.
On the output side things look very similar. One difference is as default here, all the levels are ganged together. This is deliberate. One advantage of Penteo when upmixing is that it guarantees ITU downmix compatibility (more about that later). Obviously, that’s going to fall apart if you start changing the levels of the individual output channels but, if desired, selecting the gain button above the output section will allow you to tweak the individual channels in the same way that the input side is set up.
Input and output meters are again colour‑coded to match the central controls (Screen 1), and various channels can be ganged together (eg. Lss and Rss, or the Upper channels), making muting and soloing these zones easier.
 Screen 1: The meters are colour‑coded to match the corresponding controls.
Operating the plug‑in is as simple as finding your way around. Select your input format from the drop‑down menu in the input section on the left, and your output format from the output drop‑down on the right, and you’re good to go.
Three upmix modes are available though a drop‑down menu. In Normal Upmix mode, the input channels are distributed around the surround array according to the input signal format. Stem Upmix mode takes the information completely out of the L and R channels, and allows the new upmixed audio in the surround channels to be blended in with the original signal. Finally, Stem Passthrough mode does the same, but puts the unaffected original signal back into the L and R channels for you. Further tweaking of these modes can be made with the fader controls in the centre section of the plug‑in.
The centre fader changes the level of the centre channel by redistributing energy to other channels rather than simple attenuation.
Centre Fader
The Centre fader changes the level of the centre channel by redistributing energy to other channels rather than simple attenuation, so that reducing the centre channel never alters the overall signal level. This is how Penteo maintains that 100‑percent ITU downmix compatibility I mentioned above.
Just above the Centre fader is a four‑mode drop‑down menu, which affects how the centre channel operates. The default mode is pretty standard: the centre channel partly replaces the phantom centre from the input channels. In Discrete mode, a discrete centre channel is created and any phantom centre info is eliminated when the faders are set at unity. Pulling back the Centre fader in this mode will start to bring back some of that phantom centre information, while increasing it above unity gain results in a slightly out‑of‑phase phantom centre that you perceive as a narrowing effect. Composite mode is a gentler affair, in which the Centre fader is linked to the side surround fader. Finally, there’s Phantom mode, which does away with the centre channel completely.
Tops, Back & Sides
The Lss‑Rss, Lsr‑Rsr, and Upper faders operate in a similar fashion. Lss‑Rss distributes more or less energy to the side surrounds, while Lsr‑Rsr affects the rears, and Upper obviously the top channels. Again, rather than add or subtract level in the traditional way, these faders rebalance energy across the channels. For instance, reducing the Rear Surround fader does reduce the sound in the rears, but increases it in other channels.
The side surrounds have a useful Boost feature, which automatically takes some of the energy from the rears and adds it to the sides, while the Surround and Upper channels each have a single‑band shelving EQ. By the way, note that while the surround shelf EQ’s colour‑coding indicates it’s for the Rear Surround, it also gets applied to the side channels. Not a big deal, but definitely worth knowing.
A drop‑down menu above the Upper fader accesses a further four modes, similar to those for the centre channel, and these affect how the signal is upmixed to the upper channels. Low and Raise modes throw more of the off‑phase energy into the Upper channels, keeping the in‑phase energy in the horizontal plain, while Max mode sends the more in‑phase energy to the upper channels. Penteo say Low mode is best used to create subtle vertical effects, and is excellent when used on high‑frequency, transient sounds. Raise mode is useful when the user wants to create a greater size of the overall 360‑degree sound field around the listener, and Max Lift is best used when a strong, more intense emphasis to the overhead channels is needed. Finally, Mute mode mutes all the upper channels.
The Upper section also has a Tilt option, which subtly shifts the upper information towards the front upper channels and, finally, a Drop Vox option basically takes the centre channel energy out of the upper channels. That’s potentially a very useful function, especially in the film world where a stereo music track needs some gentle upmixing (due to an immersive or multi‑channel version being unavailable); this would ensure centre information like the lead vocal doesn’t ‘come at you’ from above.
LFE
The final parameter in the centre section is the LFE, which is adjusted using a knob/switch control rather than a fader, and has a drop‑down menu to select the crossover frequency (63, 80, 100, 125, 160 or 200 Hz, or full range). Another drop‑down, Effect, offers a few options. When set to off, the LF section is switched out and has no effect. The Boost option adds LF content without changing the main channels, whereas when Split mode is selected the LFE channel will share the workload of the main channels. Essentially, this means in Split mode with LFE set to max, the main channels get high‑pass filtered, as the LF energy is distributed between the LFE and main channels. Reducing the LFE setting will result in more of that LF content being added back into the main channels. When using Penteo with Sony 360 applications, a Bottom fader is introduced, so that energy can be distributed around this format’s three planes.
A Diffuse parameter can be set (in percent) individually for the Rear, Upper and Bottom channels. It obviously tends to smear the signal a little, but if used sparingly it can be just the right thing for some jobs.
Tweaking the Diffuse parameters, or Surround and Upper shelving parameters in the Rear and Upper channels, obviously changes the sound of the signal rather than just moving the energy around the soundscape, so it will have an effect on how it all folds down too. That may not matter to you, but there’s a very helpful Downmix Compatibility Monitor section (top right of the GUI) that warns you when this happens. Again, it’s displayed in percent, making it easy to tell how far away you are from perfect ITU downmix compatibility.
Perfect Upmixing?
OK, that’s how it works, but what are the results like in the real world? The demo version arrived just as I was mixing a live track in Atmos, and I immediately inserted is across a stereo stem I’d been sent of the recorded room ambience. I was easily able to spread the room sound around the immersive sound field, favouring it towards the back and sides but with a hint in the Upper channels too. Penteo performed this function perfectly: I could hear no phasing artefacts (unlike with other upmixing plug‑ins I’d tried!), and the fold‑down to stereo and binaural formats worked really well.
Inserting another instance across a keyboard pad spread it around the room subtly, and the side surrounds’ Boost brought it nicely to the sides while still maintaining that sense of it ‘being around you’. These first impressions were just reinforced by subsequent experiments with other sources, which were similarly successful.
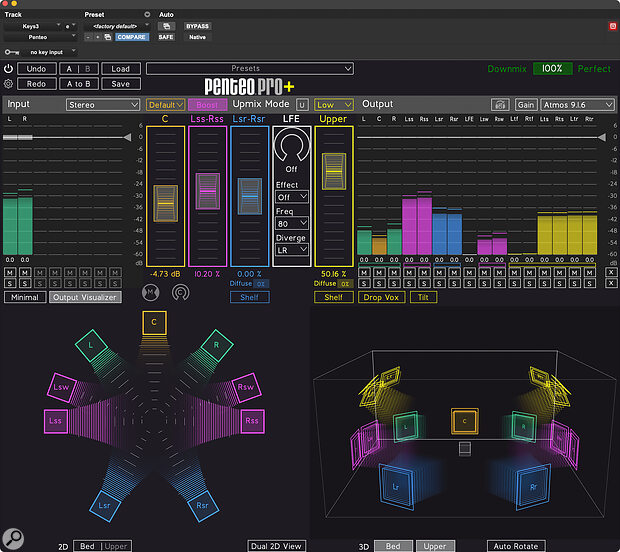
 Screen 2: The Output Visualiser, with a 2D view on the left and a 3D one, which can automatically rotate, on the right.
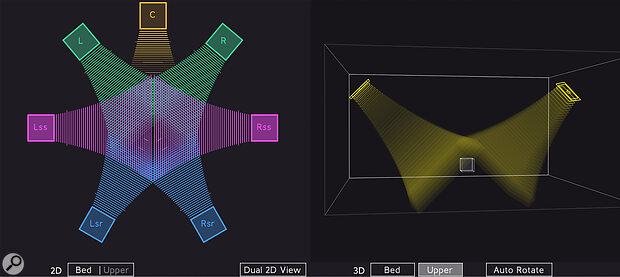
A final point to mention is that the Output Visualiser (see Screens 2 and 3) provides a fantastic visual representation of what’s going on at all times, from all angles. There’s a 2D view on the left and a 3D view on the right, which can auto rotate if that’s your thing. (It is mine.) There are options here to show all speakers, or horizontal or upper planes, keeping things visually pleasing and impressing all the clients that come in the studio.
 Screen 3: The Output Visualiser also allows selective views of different planes.
All in all, then, I really can’t fault Penteo: it does what its developers claim, and does it well. In fact, I’d go as far as to say that there’s nothing to dislike about this plug in! I’ve tried a few upmixing tools at the more affordable end of the market and have never been happy with the result. A better point of comparison for Penteo would be the combination of NUGEN Audio’s excellent Halo Upmix and Downmix plug‑ins, and I can’t really recommend one option over the other: both are simple and intuitive to use, laid out well, and sound excellent, with little to no audible phase artefacts (depending, of course, on the material and amount of upmixing required), and they are clearly the ones to beat.
One advantage Penteo may have over NUGEN’s offering, though, is that it upmixes, downmixes and works in the 3D audio environment. Halo Upmix upmixes only to 7.1 unless you pay extra for their 3D Immersive Extension licence (which still only takes you up to 7.1.4 channel widths) and for downmixing you must use the separate Halo Downmix. Penteo’s mid‑priced option puts all this functionality in one place, and is significantly more affordable. Oh, and Penteo also includes a binaural renderer. What’s not to like? If you’re still not sure, then a 14‑day fee trial is available from the Perfect Surround website.
Pros
- Upmixes and downmixes so you don’t need two plug‑ins
- Excellent sound quality
- Full ITU downmix compatibility
- Built in binaural renderer
- Options to suit budgets from $299.
Cons
- None.
Summary
Unlike cheaper tools, Penteo upmixes and downmixes with a minimum of artefacts — it stands up well in comparison with NUGEN’s Halo Upmix and Downmix plug‑ins.
Information
Penteo 360 $299, Penteo Pro $499, Penteo Pro+ $799.
Penteo 360 $299, Penteo Pro $499, Penteo Pro+ $799.

