
Drum recording problems face the team this month, as they sort out two Bristol studios at once!
This month we visited Simon Kusnierek in Bristol, a guitar-playing studio owner who writes and produces music with keyboard player Jon Kent. The session turned out to be quite a challenge, because not only did we need to improve the acoustics of a small control room and help get a good recorded sound from a drum kit, but we were also asked to advise on a second larger control room, a vocal booth, and a further drum/instrument room.
In Simon's small control room he had a pair of KEF hi-fi monitors set up on top of piled concrete blocks using pieces of foam packing as isolation beneath the speakers. His system comprised Steinberg Cubase SX 2 running on a PC and mixed via an old but much-loved Allen & Heath GS3V analogue console. He rents the studio premises with fellow-musicians Nate Lewis and Dan Edney (who record and produce in a second control room), and they all share the use of the live rooms. The main advantage, of course, of there being effectively two studios in the one location was that we got Hob Nobs from one team and Jaffa Cakes from the other!
Setting Up For Drum Recording
We started off by having a look at the studio's acoustics, as we always tend to do on these sessions, and there were certainly a few things to be sorted out — see the 'Small Control Room Blues' box for details. However, we then got on to the main task of the day, which was helping the guys to get a decent recorded drum sound. Conscripted drummer for the day, Jess, brought in a nice Rogers kit and set it up on a rug in the largest live room, which had no real acoustic treatment. There were some office divider screens available, so I set these up around the kit to try to keep some of the more obvious room reflections out of the microphones.
We let Nate and Dan choose and set up the microphones as they normally would, so that we could see if they were doing anything that might cause problems. They chose to close-mike each drum, as well as putting up a coincident pair of Rode NT5s as overheads. Dan said they'd also tried using spaced NT5s, and that they got the widest stereo sound by inverting the phase of one of them. While this does indeed give a spacious sound, Hugh explained that it also destroys mono compatibility, as any sounds originating midway between the two mics will be cancelled out for the mono listener. It can also give a rather unpleasant phasey sensation when listening in stereo, so it's not to be recommended. For the snare and rack tom, Nate and Dan chose Shure SM57s, with a Sennheiser MD421 on the floor tom and an AKG D112 on the kick. The kick drum had its front head removed and the two lightweight cushions were evicted and replaced by a folded blanket.

 The kick mic was originally set up by SOS readers Nate and Dan as shown in the top photograph, with the diaphragm close up to the batter head. However, this gave a sound which lacked depth, so Paul and Hugh moved the mic more towards the side of the drum, and also added extra beater 'click' by taping a student ID card to the point at which the beater was hitting the drum.Once the kit was tuned up, we made some test recordings on their Mac-based system running MOTU Digital Performer in the second control room, using the channel direct outs of an old Soundtracs PC-series console to feed a MOTU interface. The mic signals were quite usable, but we needed quite a lot of EQ on the snare drum and kick drum to get them sounding right. The kick drum in particular lacked depth, even though they were using a D112 kick mic on a boom arm inside the drum shell (near the centre), and the snare sound was felt to be too high and 'pingy'. We gated the kick and snare to clean up as much spill as possible and also compressed the kick drum to add a bit of density.
The problem with miking a drum kit in a fairly small room like this one is that the overhead mics tend to pick up a lot of room coloration, while the close mics sound quite dry and lacking in spatial identity. The screens definitely helped reduce coloration in the overhead mics, but we felt it might also be advantageous at some stage to add absorbing panels to the ceiling above where the drum kit is normally set up, to reduce the amount of bounce from the ceiling and hence clean up the sound getting into the overheads. These absorbers could be acoustic foam or Rockwool slabs covered in fabric.
If I've learned anything about recording drum kits it is that the way the kit sounds in the room is 90 percent of the sound you capture. If the drums are badly tuned or they rattle, then that's what you'll get on tape — EQ or dynamic processing can only make a limited amount of difference. It's also important that the drums are hit properly — not a problem we had on this occasion!
The recorded tracks were looped in Digital Performer so that we could fiddle around with them indefinitely, and after experimenting with compressors, gates, and EQ to see what we could get out of the test recording we'd made, Hugh and I went back to the drum room to do a little tweaking. Miking a drum kit is always a compromise, as you need to place the mics where they are not in the drummer's way. Where possible, I like to angle the snare and tom mics so that they are facing towards the centre of the drum, rather than straight down at the edge of the head. Other than that, I usually stick with the 'two inches up, two inches in' approach, and angle the mics away from nearby sound sources such as cymbals where possible. To get a deeper kick sound, we pulled the mic a little further from the beater and moved it more towards the side of the shell. It's a bit like recording a guitar speaker in this respect: you get a harder, brighter sound near the centre and a warmer sound nearer the edges. We also taped a plastic Student Union ID card to the batter head where the beater struck it, to give a clickier, sharper sound.
Frequency-conscious Gating
A frequency-conscious gate utilises an adjustable filter section, usually variable-frequency high- and low-cut filters, between the input and the side-chain part of the gate that 'listens' to the sound. The ability to adjust these filters allows the user to decide which part of the audio spectrum the gate should trigger from, the idea being to use the filter to home in on the sound you're working on while excluding as far as is possible sounds in other parts of the spectrum. The threshold is then set in the usual way so that signals exceeding the threshold cause the gate to open.
In the example of a kick drum, you can filter some high end out of the side-chain signal to make the gate less likely to open in the presence of spill from bright cymbal, hi-hat, and snare sounds. It is important not to remove all the high end, though, as this might affect the ability of the gate to open quickly enough to let the initial transient through. In the case of gating a snare, you can remove some of the low end so that it is less likely to open erroneously on kick-drum beats.
It is important to understand that these filters don't affect the audio passing through the gate when it is open, just the sounds the gate responds to. As Digital Performer was the sequencer of choice in this control room, we used the included Masterworks gate plug-in, which has both adjustable high- and low-cut side-chain filters and a key-listen function that lets you hear the filtered signal to which the gate is responding. The decay time was set so that the gate closed quickly, but not so quickly as to cut the kick hit short. The attack time was set as fast as possible to avoid losing anything from the start of the hit.
Optimising Mic Positions
The overheads were changed to a spaced pair, with the mics over the outside edge of the kit but angled inward so that they faced the centre. Most importantly, we retuned the toms and snare drum, putting the rack tom up in pitch and adjusting the bottom head to get a more even tone, evening up the tension on the floor tom, and tuning the snare drum down. The guys wanted a deeper, more punchy snare sound, but this can't be achieved by EQ alone, as drums are essentially mechanical resonators with narrow and well-defined resonant peaks. You can use EQ to bring out the stick noise, snares, and any harmonics in the sound, but you can't use EQ to bring up much in the way of low end below the fundamental frequency to which the drum is tuned, as there's very little going on down there.
After making these simple adjustments, we made another test recording. It was immediately obvious that the kick drum had more depth and the snare more weight. The toms, which had sounded OK before, now sounded particularly good and well rounded due to being retuned, and though we used very little damping, which gave the impression of them being quite ringy in the room, they sounded just right when everything else was playing. Some engineers get paranoid about damping the drums and killing every little rattle, but this can result in a very dead drum sound. Double-headed toms do tend to resonate whenever the kick drum is hit, and though that wasn't a significant problem in this case, it is sometimes useful to gate the toms.
Drum Ambience

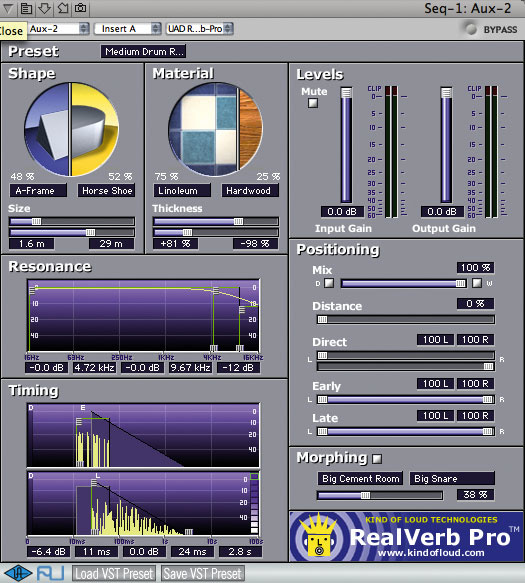 Top studios often have access to great-sounding drum rooms, which really add to the character of a drum kit. In smaller or less flattering rooms, such as the one we were faced with here, the pragmatic option is to exclude as much of the room sound as possible using screens and absorbers, then introduce a room character of your own using a suitable digital reverb. The new breed of convolution reverbs really score here, as they often include presets based on measurements made in great-sounding studio drum rooms, but the best we had available on the day was artificial reverb in the form of the Universal Audio UAD1 card's plug-ins and a Lexicon MX200. For convenience, and because it is easier to show the settings, I opted to use the UAD1 reverbs, as the Lexicon's USB side had not been plumbed in to allow us to see its settings on screen.
There's often confusion as to whether reverb should be used on kick drums or not. There's an artistic element to this, of course, but medium or long reverbs applied to kick drums can make the mix sound very messy and rob the kick of impact. On the other hand, short room ambiences can actually enhance the impact of a kick drum, as well as making it sound as though it is being played in a real space. During the course of our experiments on this particular session, we set up two reverbs using the UAD1 plug-ins, where Realverb Pro was used to generate a short, bright reverb and Dreamverb was used to set up a credible room ambience of around 200ms duration. By applying the short ambience to the whole kit, including the kick, the drum sound took on an identity that it had previously lacked, but it still didn't sound obviously reverberant. The longer reverb was then applied sparingly to the overheads and snare drum, which gave the kit a more lively feel.
However, the type and amount of 'obvious' reverb added really depends on the type of music you're producing. Today's drum sounds are in general much drier than they used to be in the '70s and '80s, so short ambiences are often more appropriate that long plates. If you have a convolution-based reverb, it is worth trying the drum kit in a variety of small rooms and studio spaces to see what works best. Don't dismiss the less obvious patches such as stairwells and multistorey car parks, as sometimes these work really well. If you feel at any time that adding reverb is confusing the low end, you can filter out some low end from the reverb (say below 200Hz), usually by means of filters in the plug-in itself.
EQ, Gating & Compression
To hype up the kick drum, it was EQ'd as shown in the screenshot to bring up the 60Hz and 2kHz regions, adding weight and definition without making the sound too clicky at the top. We also cut at around 180Hz to stop the effect of the bass boost spilling over into the lower mid-range. With a little compression from the UAD1's LA2A compressor emulation, the resulting sound was really meaty. We left the gate in place at the start of the chain to reduce the amount of spill between kick hits, but eventually set the range to around 12dB, as this tends to produce a more natural result while still dropping the level of spill adequately.

 The overhead mics had originally been set up as an X-Y pair, with extra stereo width added by putting one of these mics out of phase with the other — an unorthodox approach which would have resulted in mono-compatibility problems. Hugh and Paul therefore decided that a better approach was to keep the mics in phase with each other, but to go for a spaced-pair miking configuration in order to provide the wide stereo spread.As they were using Digital Performer in this control room, we used the included Masterworks gate plug-in, as its adjustable high and low side-chain filters gave us more control over the gating action — for more on this see the 'Frequency-conscious Gating' box. The decay time was set so that the gate closed quickly, but not so quickly as to cut the kick hit short, while the attack time was set as fast as possible to avoid losing anything from the start of the hit.
Whenever you gate a close-miked snare or kick drum it tends to sound a little messy, as some sounds from adjacent drums may still trigger the gate between hits, but when the overheads are added in this messiness tends to disappear. One tip here is that if the overheads are being used mainly for cymbals, and the close mics form the main body of the sound, it can help to EQ out some low end from the overheads to prevent the partial phase-cancellation of some of the lower drum frequencies. This often leads to a cleaner sound that is easier to mix. However, where the overheads form the main part of the sound, it's best not to EQ the low end unless your ears tell you that it is necessary.
As a very general rule, rock and pop drum sounds — unless recorded in great-sounding rooms — tend to rely a lot on the close-mic signals, whereas if you want the kit to sound more acoustic or jazzy, then the ambience mics are invariably used to make a greater contribution to the overall sound. Applying a little broad boost up at around 10kHz or so to the overhead mics can also add sparkle to the cymbals. Clearly the more overheads signal you add in, the more of the room character you get in your final drum sound, so the quality and suitability of the room are important factors to take into account when you come to balance your close-mic tracks with your overheads.
On this session, we didn't use a second mic under the snare or a separate hi-hat mic, though both these miking arrangements are commonly used in commercial sessions. The extra mics give you more flexibility when it comes to balancing the kit sounds, but the more mics you have open, the more phase problems and spill you tend to suffer, so each case has to be judged on its merits.

Adding Reverb
To put back the sense of space lost by close-miking, we picked a suitable short room-ambience reverb setting, as explained in the 'Drum Ambience' box. More conventional reverb may then be added via a second aux send as required according to the musical style. Without added reverb of some kind, the drums tend to sound very dry and exposed.
 To give a more 'hyped up' kick-drum sound, Paul applied a little compression using Universal Audio's LA2A emulation plug-in, and used EQ boost at about 60Hz and 2kHz. An EQ cut around 180Hz was also used to stop the effects of the bass boost spilling over into the mid-range.As it turned out, Nate and Dan hadn't had much experience with plug-in reverbs and were unsure of how best to use them in a software environment. As with a hardware mixer, the most efficient way is to set up post-fade sends on the channels to feed a buss channel into which the desired reverb plug-in is inserted. The effect must be set to 100 percent wet, as the dry signal comes via the mixer channels in the usual way. If you need a second reverb available at the same time, this can be set up in a similar way on a second send. I know that a lot of people who have less experience with effects tend to deploy everything via channel insert points, but reverb can be very CPU hungry, and if you work this way on a busy mix you may find you run out of CPU power.
I also suggested hooking up the studio's Lexicon MX200 via the S/PDIF sockets on the back of the MOTU interface so that it could be inserted into Digital Performer 's virtual mixer in a similar way that a plug-in can. The MX200 also has the benefit of a software interface accessible as a plug-in so that settings can be saved with the song. Running a signal out to an external unit will always involve a small degree of latency or delay, but the S/PDIF interface has a much lower delay than the analogue converters. In the case of external reverb, though, a little extra delay (and we are only talking about a millisecond or three at most) won't make any difference at all. Think of it as some free pre-delay!
Once the conversation had turned to digital matters, Nate asked whether it was best to clock the MOTU internally or from his Tascam DA30 DAT machine. While it would be necessary to clock from the DAT machine when replaying DAT tapes through the MOTU 828 via its digital input, it is generally best to use the device with the input converters (in this case the MOTU 828) to clock the rest of the system during normal recording, so leaving the MOTU 828 set to internal sync would be the best option. We were also asked about options for adding more inputs to the system, and as the ADAT I/O on the rear of the MOTU 828 was unused we suggested one of the several eight-channel mic preamps on the market that connect via integral ADAT interfaces. Where the preamp has ADAT output only, then it would need to become the clock source for the system, whereas if it has both ADAT input and output, as in the case of my own Behringer ADA8000, you can use either device as the master, provided that both ADAT lightpipes are connected.
Small Control-Room Blues
Simon's control room was very close to being cube shaped, with almost equal-length walls and only a slightly lesser floor-to-ceiling measurement. The ceiling was sloped slightly, and the space was untreated, except for a few polystyrene panels hanging on the walls. Simon and his friends had been led to believe that slabs of expanded polystyrene would work as sound absorbers, so they'd built lots of neat frames and hung panels of polystyrene around their main live room and in Simon's control room. In reality, polystyrene reflects a lot of energy back into the room — acoustic foam is porous and absorbs sound through frictional losses, whereas expanded polystyrene has a sealed surface. They had also used thin carpet to cover many walls, thinking it would act as a sound absorber, but it only does this at the highest of frequencies. The result was a very coloured, dull, and boxy-sounding room.
 By good fortune, the room had two doors, an outside window, and a control-room window, as well as one plasterboard and studding wall, so the low-end problems weren't as disastrous as they could have been. Some proper bass trapping was advised, starting with the corner between the front wall and ceiling, and we dealt with the first reflections from the monitors in the time we had available by using six four-inch Auralex panels. Aside from the obvious boominess of the small control room, listening to a reference CD over the KEF speakers quickly revealed that the stereo imaging was very poor, and switching to mono made almost no difference to the resulting image width — a case of serious side reflections interfering with the imaging.
We ended up using all six pieces of foam to treat Simon's room, three of which went on the side-wall and ceiling mirror points — the points at which, if you placed a mirror flat against the wall or ceiling, you'd be able to see the reflection of the monitor speakers from your mixing position. Two further panels were used at the rear of the room, one on the door and one on the wall beneath a window. That left one panel spare, which we cut in half and then used on the rear sections of the side walls to further reduce side-to-side reflections. Where space permits, foam panels are effective to a lower frequency if you space them off the wall by a few inches, but in this particular installation we fixed the foam directly to the walls, as there was very little spare space.
To deal with the room modes, Simon planned to do the recommended bass trapping himself. There was space where the ceiling met the front wall for a long, triangular bass trap, and Simon felt this was within his DIY skills. Playing Hugh's BBC test record after fixing the acoustic foam showed no obviously hot or dead bass notes at the listening position, although the level of bass varied significantly around the edges of the room. The stereo imaging had improved beyond recognition, although Hugh wasn't happy with the lack of positional definition when panning a mono source from side to side. However, this could have been a 'feature' of the unfamiliar hi-fi speakers, which both Hugh and I felt should be replaced with something more accurate as soon as finances allowed. Fortunately, Simon was already planning to upgrade to some Mackie HR824s in the near future, and hopefully this imaging issue will improve with the new monitors.
Previously, just speaking in the room made it painfully obvious that the room was untreated, but now it felt quite comfortable. What's more, the expected dead spot in the exact centre of the room was far less pronounced than we'd feared it might be.
Control-Room Overhaul Advice
Although we didn't have time to physically treat all the rooms, we did make some recommendations and also carried out some practical tests using the Auralex foam we'd brought with us, finally gluing it up in Simon's control room. The large control room, fitted out with the MOTU system and a pair of Hafler TRM 8.1 monitors was roughly twice the size of the one Simon was working in, and had no acoustic treatment other than a few polystyrene panels (which had little effect) and a front wall entirely covered in thin carpet. There was also one lonely Ikea cylindrical foam cushion propped up in a corner hoping to be a bass trap when it grew up! A second smaller live room had been done out entirely in carpet, as had a vocal booth in one corner of the main live room, but, as we've pointed out before, carpet stuck directly onto walls isn't very effective as an acoustic treatment, as it absorbs only high frequencies, leaving the bass end and the mid-range completely untreated. The usual result is a dry, boxy sound — and that was amply demonstrated by the vocal booth on this occasion!

 The original snare-drum sound that Nate and Dan had been getting was felt to be too high and 'pingy', so Paul and Hugh decided to tackle this problem at source by getting the drummer to tune the snare drum down in pitch. In addition to this, the recording was EQ'd to emphasise the weight and attack of the sound.To the left of the mixing seat in the large control room was a shelving system holding vinyl records, and as this was some distance away from the mixing chair, we felt it wouldn't do any harm to leave it as it was and hope that the irregular surfaces would provide some useful scattering or diffusion. Having said that, a foam or Rockwool panel on the right-hand wall wouldn't go amiss, as this was otherwise bare plaster. A standard foam panel could be useful on the ceiling just forward of the listening position to kill early reflections from that source. The speakers were set up against the long wall of the room, so the close proximity of the rear wall to the back of the engineer's chair was more of a concern.
 The upstairs control room had a huge hollow MDF door which offered an opportunity for modification into a bass trap. Large holes could be cut in its inside face and the space inside the door filled entirely with Rockwool slab, the holes then being covered with acoustic foam or porous carpet to stop Rockwool fibres escaping.Directly behind the mixing seat was a small wall-mounted shelving unit that in a larger room might have added some useful diffusion, but in this particular situation we recommended moving it to one of the side walls and treating the middle couple of metres of the rear wall with absorbers centred at (seated) head height. Thick acoustic foam on spacers would do the trick nicely, but a cheaper option is to use one or two layers of Rockwool cavity-wall insulation slab over an air gap of two or three inches and then cover the structure with porous fabric. The guys felt that this was within their DIY capacity and said they'd give it a shot. I also suggested a similar construction fixed diagonally across the front wall/ceiling corner running the full width of the room to provide bass trapping. This triangular structure would need a wooden frame to support it, and the space behind the Rockwool slab could be filled with pieces of open-cell packing foam or loose Rockwool to make it more effective.
The room featured a huge hollow MDF door to the rest of the complex which was compromised because it didn't seal properly around the edges. Studio doors need a good seal on all four sides, and a simple way to create this is to use half-round neoprene foam strip (from studio hardware suppliers such as Siderise) fixed to wooden threshold strips arranged so that the neoprene just touches the face of the door on all four sides in its closed position. A compression door latch from the same supplier would also ensure that the door was firmly closed against the seal. Looking more closely at this door, it also occurred to me that it could contribute to the bass trapping of the studio if several large circular holes were cut in its inside face and the space inside the door filled entirely with Rockwool slab. Acoustic foam or porous carpet could be used to cover the door so as to improve the look and keep any Rockwool fibres from escaping.
Live-Room Tips
Next we turned our attention to the small, carpet-clad live room. Predictably this sounded pretty bad, but we felt the situation could be redeemed by adding some reflective surfaces back onto the walls, and by converting an unused alcove and a very thick studding wall into bass traps. The alcove could simply be faced with two layers of Rockwool slab, leaving an air gap behind with more porous carpet, fabric, or acoustic foam providing a cosmetically acceptable front surface. The studding wall was around eight inches thick and, depending on the amount of studding inside it, it could either be treated in the same way as the studio door (big holes and dense Rockwool stuffing) or it could be completely redesigned to accommodate a limp membrane trap. A limp membrane trap utilises a heavy curtain of non-rigid material such as mineral-loaded barrier matt to absorb low-frequency energy, while a porous material such as Rockwool or foam over the front absorbs mid-range and high frequencies.
A cheap and cheerful alternative to barrier matt that has been used successfully in some budget installations is to hang two or three curtains of heavy carpet in the available space — some six to eight inches depth in this case. There was already a folded drape in front of this wall, so a crude carpet trap wouldn't spoil the looks of the room. Fitting one layer of Rockwool slab to the face of the trap, in front of the hanging carpet, would increase the trap's efficiency without costing much in the way of cash or space.
That left the issue of high-frequency reflectivity to sort out. Earlier we'd noticed some spare stacks of laminate floor material, which makes an ideal high-frequency reflector. These could be cut into slices approximately two to three feet long by three inches wide, and could then be arranged vertically around the room at shoulder height, spaced by four inches or so. They are simple to fix using spray carpet adhesive, and tests during fixing should make it possible to determine when enough liveness has been returned to the room. If conversation sounds natural in the room, then you know it's not too far out in the mid-range and high frequencies. We also relocated a huge 6 x 4-foot polystyrene panel from the large live-room store into the smaller room to act as a reflector. It helped, but the laminate flooring strips would be better and would look more attractive.
 The vocal booth had all its surfaces carpeted, resulting in a very boxy sound. Experiments with positioning a large free-hanging rug demonstrated that some bass trapping would be a more appropriate replacement for the on-wall carpeting.
Vocal Booth Remedial Work
That left the vocal booth, which sounded horrendously boxy due to the use of carpet on all the internal wall surfaces. Hugh and I conducted a couple of ad hoc experiments by folding up rugs and hanging them on mic stands, and concluded that a similar multi-layer hanging carpet trap with a Rockwool face would be good for the rear wall, opposite the door. Barrier matt would be more effective, but this project has a tight budget! Around two thirds of the adjacent wall could be covered with four-inch foam or Rockwool slab, on spacers if there were room, and similar foam or Rockwool could be used on the ceiling, which was currently untreated.
The glass window and the reflective inner face of the door would bounce some high end back, though partially covering the inside of the door with simple foam absorber might also be worthwhile. Using a cardioid mic and having the singer stand with their back to where the two walls intersect should give the best results, and a foam 'butterfly' clipped behind the mic might help reduce the effect of reflections from the glass. Even our tests using folded carpet and bits of foam propped against the walls showed a huge improvement, so there's no reason why this space couldn't be turned into a usable vocal booth very cheaply.
Monitor EQ
The larger upstairs control room was equipped with Hafler TRM 8.1 two-way active monitors, which didn't sound quite right in a hard-to-define way when we first auditioned them using Hugh's now familiar BBC test CD. All the EQ switches on the rear of the speakers were set flat, but an Alesis DEQ230D was patched in to equalise the monitoring signal. Apparently Nate had spent some time setting this unit up after measuring the in-room response at his seat position using an NT5 microphone and tweaking the EQ to give a nominally flat response. This was a misguided effort on a two counts. Firstly, room measurement should only be done with an omni mic (the NT5 is a cardioid), so that it takes account of room reflections from all directions equally. Also, the bottom couple of octaves of a cardioid mic are never as flat or extended as those of an omni, which can give very misleading results.
 Looking at the settings he had arrived at on the EQ (you can see these in the photo), it became obvious where the main room modes were, because he had dialled in dips at 80Hz and 160Hz, with a small lift at 315Hz — note that these frequencies are all harmonics of 80Hz, and that would fit quite nicely with the roughly 4m front-back dimension. More worrying were a fairly sharp peak dialled at 2.0-2.5kHz, and a gentle high-frequency rise from 8kHz. The latter was probably to compensate for the purely high-frequency absorption of the carpeted front wall, and I suspect the 2kHz peak was actually a misinterpretation of the measured response caused by a phase cancellation effect — probably between direct sound and a reflection off the console.
Bypassing the EQ made the monitors sound a lot more natural and less phasey, but they did seem a little dull at the top end. Hugh clambered around the back and experimented with the speaker's own high-frequency lift control, trying both the +4dB and +2dB settings before settling on the +2dB lift as the best overall compromise. As a rule, equalising monitors as a means of countering room problems is to be avoided, as room problems occur in both the time and frequency domains, whereas equalisers can only fix frequency-domain effects. The safest option is always to treat the room and then use speaker equalisation if necessary to compensate for the proximity to walls and corners or purely to adjust the sound to your personal taste.