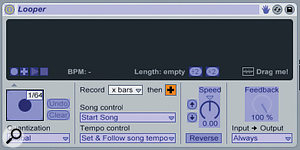
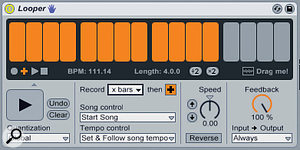
 Looper can be placed anywhere in Live's signal path to start capturing loops.
One of the more unexpected features to be introduced in Live 8 was the Looper device. This is part audio effect and part performance tool, created in the tradition of hardware live looping devices such as the Electrix Repeater, the Electro Harmonix 16 Second Delay, and many devices bearing the name Echoplex (not to mention Robert Fripp et al's dual tape machine setups). The idea of live (with a small 'L') looping is to capture and loop part of a performance in real time, then play other parts over the top. Multiple layers can be overdubbed, allowing complex polyphonic arrangements to be built up with successive passes of a single instrument.
Ironically, for many musicians who incorporate live looping in their performances, Live (with a big 'L) has already replaced the traditional looper on stage (search YouTube for Ableton enthusiast and beatboxer Kid Beyond, for example). The new Looper now lets you have the best of both worlds, and you can also use Looper as a creative effect, as well as to emulate a classic hardware looper.
Overview
 Assigning a MIDI button or footpedal to Looper's Multi‑purpose button is essential.
Looper has quite a few options, so to avoid getting stuck in the details, let's start with a traditional scenario: I want to jam along with a song live, capture and repeat a two-bar section, then layer new parts over the top. I have a new song open that is not at the same tempo as the music I'm jamming to.
I'm going to use a virtual instrument in Live, but I could just as easily be using a live input, from a guitar, for example. The screen to the left shows the simplest configuration. I've dragged an electric piano Instrument Rack patch to a MIDI track, and then dropped a Looper Device from the Browser's Audio Effects folder in after it.
Next comes the most important part: assigning a MIDI control to the Record button. Looper is much easier to use with a MIDI controller, especially a footpedal. To assign the control, choose Options / Edit MIDI Map, click on the big Record button on Looper's control panel, then press the MIDI control you want to assign (as you can see in the screen below). I've used my cheap old sustain pedal. Now, with Live not playing, I just have to start jamming until I find a two-bar riff that I want to loop. A quick tap on the footpedal starts recording, and another tap marks the end of my loop. Looper immediately starts playing back my loop, leaving me free to jam over the top. By default, Looper will automatically overdub every subsequent two bars, although this behaviour can be changed.
Tempo & Sync
 Overdubbing a four‑bar loop in Looper.
Looper's settings are important in determining what happened in the previous example, and what will happen afterwards. In the example, I had the Tempo Control at its default setting: 'Set & Follow'. This meant that Live used the length of my recording to set the tempo of the Live Set. In this case, it accurately determined that I had played two bars at around 110 bpm. If I'd started Live running first, recording would have be referenced against the song's tempo. The punch in and out points would be quantised, and the loop length would be determined by how long you recorded with respect to the song's bar/beat grid.
In the example, I used Live like a traditional, free‑form looper/delay pedal, but I could have left a lot less to chance if I'd adjusted my settings and approach. For example, I could have set the tempo in Live first and started playback so that Live could quantise my punch points to the grid (if jamming live, the Tap Tempo button can be used to conform a Live Set to other musicians). This then feels more like recording a Clip in Live, because I don't need to be deadly accurate with my pedal stomping. I could then also tell Looper how many bars I wanted to loop (from the Record pop‑up menu).
The Multi‑purpose Button
The key to Looper's power is what I've been inaccurately calling the Record button. This is in fact a multi‑purpose button whose function changes in a predetermined sequence so that you can control Looper from a single MIDI button/pedal.
The multi‑purpose button does start out as a Record button, as this the only logical first action. Once you've punched out, Looper automatically switches to Overdub mode, and proceeds to record and layer up each pass of the loop. If you'd prefer Looper to simply play your first loop (then punch in again manually), you can change the 'Record 'x' bars then...' parameter to 'Play'.
In either case, after you punch out of your first recording, you'll see that the big button's symbol has changed, indicating what its new function is. If Looper is in Overdub mode, the button becomes a Play button, and vice versa. In other words, you can record an initial loop, then flip between dub and play modes all from one control. But that's not all. The button also recognises a double tap, and a held press. In Overdub or Play, a quick double tap means Stop. In Play, holding the button for two seconds means Undo (there's also a dedicated Undo button on the Looper panel). This removes anything you recorded since you last entered Overdub mode. Holding the button while in Stop mode executes a Clear command, which removes your loop completely.
Feedback
 Looper's buffer can be converted into a regular Clip, allowing Warping/quantising and so on.
By default, the Feedback control in the rightmost section of Looper is set to 100 percent. This means that anything you record persists indefinitely as the loop cycles. As a consequence, each overdubbed cycle adds to the overall level of the loop. When using a live input from a mic or instrument, this also means that the noise floor (and monitor/headphone bleed) is getting layered up, so you risk ending up in a sea of noise or howl‑round.
On a musical level, you may also find that your layered noodlings get rather overcrowded as you add more parts. The Feedback control can address both these issues, by allowing you to limit the lifetime of each overdubbed pass. The lower the Feedback control, the faster each layer will decay from one pass to the next.
And Finally...
The phrase 'elegant solution' seems to get used way too often in this column, but I'm afraid it's needed again now. What if you want to capture a loop that you've created in Looper and use it in your song? Simply click and drag the 'Drag Me!' icon and drop it onto a slot in the Session view. The loop is instantly transformed into an audio Clip that you can use like a regular loop in Live.
This takes Looper beyond its obvious use as a Live performance tool. Even for those of us who use Live mainly as a composition environment, Looper is a great new way of quickly experimenting with and capturing ideas and melodies, which can then be turned into regular Clips.
Potted Noodle: Looper Method In Brief
Just want to plug your guitar into the new Live Looper and lose a couple of hours in self‑indulgent Frippery? No problem, here's the potted workflow without all the details.
Stick Looper on your input track. Map the big button to a MIDI foot pedal. Set Live playing at a tempo you want to record at (or hit Play if you're jamming over an existing song). Play your instrument. Click the pedal to start capturing, then again to mark the end of the part — it will immediately loop. Keep playing to layer on new parts. If you want to stop anything new being added and just play over your previous recording, press the pedal. If you want to add something to the recorded loop, press the pedal again. If you want to remove what you just added, press and hold the pedal. If you want to make what you have safe from undoing, drop into play, then back into overdub; any subsequent Undos will only affect layers from this point. To stop, double tap the foot pedal. To clear everything, stop, then hold the pedal down for two seconds.
Loopy Effects
As well as using Looper to create layered compositions in real time, there's plenty of mileage in experimenting with it as an effect. Try putting it on a return with some other effects and bussing other tracks to it, then capturing a bar here and there and riding it in and out of your mix. You can also create cool dubby effects by using Live's internal mixer routing structure to route the output of a Looper back into itself via effects on another track.
