 Arpeggiate will transform chords into arpeggios.
Transform your MIDI with Live 12’s new tools.
In the August 2024 column we covered the stimulating world of Live 12’s MIDI note generators. And now that we’ve generated all these notes, what are we going to do with them? Transform them, of course! To save you, the humble electronic music genius, from having to manipulate these notes manually, why not get the computer to do it? The new (MIDI) Transformation Tools are your new (MIDI) robots in disguise!
Live 12 came with a raft of intriguing and useful MIDI Transformations, which can manipulate notes in a MIDI clip. Some reduce the time it takes to create frequently used effects, and some can create melodic and rhythmic variations on existing material, potentially re‑stimulating the creative juices.
You will find these 12 new options in a MIDI clip’s MIDI Transformations tab. What follows is a brief overview of each and their most likely applications.
Arpeggiate
The Arpeggiate Transformer (shown in the opening screenshot) builds on the Arpeggiator device and contains a subset of its options (Styles, Steps, Distance, Rate and Gate). Given that it acts on selected notes in a MIDI clip it’s no surprise you can see the notes change in real time as you change the parameters, which is, of course, extremely handy. They can then be edited further on the grid, ensuring the results meet your needs. In keeping with Live 12’s new features, the Distance setting can be set to Chromatic or Scale Aware, a nice touch.
Something to note is that if you trigger or edit a different MIDI clip from the one you are working on the arpeggiation notes on the piano roll will become permanent, and you won’t be able to toggle back to the originating chord sequence again.
If I could request one feature here, it would be great to have Euclidean‑style rhythms available in the presets, or the ability to mute notes in the pattern to give more rhythmic variety.
Strum
As you might guess, Strum emulates the natural feel of strummed chords on a guitar or similar stringed instrument. Instead of all the notes in a chord triggering simultaneously, Strum introduces a timing offset between each note.
 Strum emulates the sound of strumming a guitar.
This is beautifully implemented and easy to use: simply drag the bottom of the ‘pendulum’ left or right, and the selected chords will shift according to that slope. The slope can be curved using the Tension control, and the top of the pendulum can also be shifted using the High control (which accordingly moves the top note of a chord around). It’s simple, fun and effective. To get the best results I would recommend taking the time to give each chord its own strum setting, which will help keep things feeling organic and varied.
Something to be aware of is that if you have a chord starting on beat one of the first bar (a pretty normal thing to have!), moving either the top or bottom of the strum start point to the left will move one or more of the chord’s notes to before the start of the bar, so you won’t hear it. A way of locking notes to not move beyond the start of a clip would be helpful here. (Or the ancient Emagic Notator feature that could trigger notes before the start of the clip could be one to revive...)
Time Warp
Time Warp applies non‑linear time stretching or compression to MIDI clips, creating rhythmic effects like accelerandos, ritardandos and tempo fluctuations. This is possibly the most fun of the bunch. The simplest use case is to take a snare roll, and apply a subtle — or not so subtle — accelerando or decelerando. It’s also easy to create the ‘ticky hats’ of grime, trap and drill.
 Time Warp applies time‑stretching to notes.
Applying the effect to a full drum part could be useful as a slowing up effect on a last repeat, but can sound a bit chaotic on a looping beat (depending on how much of a fan of Autechre you are, perhaps!). Ticking Quantize keeps notes on the grid, and in that mode can generate some interesting ideas and variations.
For more traditional film and TV scoring, or more melodic (less beat‑driven) music, the ability to gently tweak the tempo can help create a more human feel. This kind of effect can take a long time to implement manually, especially if you want to try some different options, so this definitely comes under the category of time saver as well as a time manipulator!
Ornament
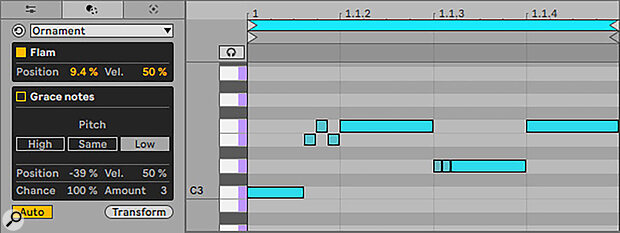
Ornament adds decorative notes or embellishments to existing MIDI notes, creating trills, flams and grace notes. And it does exactly what it says on the tin, adding a little flair to melodies, albeit in a somewhat baroque manner, which is probably due to these being actual Baroque ornamentations.
 Ornament creates flams and trills.
Adding a multi‑note trill is fine, but they are so fast most instruments just make them an indistinct blur. It’s usually necessary to slow them down by use of the Position control each time. Also, if the trills are set to occur before the start of the original note, the previous note is not shortened to accommodate, so a polyphonic sound can result in a messy overlap. Not critical issues as they are easily worked around, but maybe a couple of opportunities for tightening up the feature in future.
Recombine
Recombine rearranges the order, pitch, velocity or duration of notes in a MIDI clip, creating new melodic and rhythmic variations. I found this one to be entirely unpredictable; if one has a chord sequence the notes are arbitrarily swapped around in a most disconcerting way and a melody can have its notes ‘rotated’, which means shifting them along in relation to their starting position, which is visually intuitive when there’s only a couple of notes, but easy to lose track of with more complex progression. Useful for throwing the cards up in the air and seeing where they land, I suppose!
I dropped the Live team a line to see if I was missing anything obvious, but they acknowledged it can seem a bit complicated and have recently been making efforts to simplify it for those wanting ‘intentional outcomes’, but that yes it can just be used for ‘card shuffling’ too!
Connect
Connect will generate notes in between existing ones. I had fun creating some anchor melody notes alongside a chord sequence and then using Connect to create a ‘fill‑in’ melody between those points. It’s scale aware when Scale Mode is on, and chromatic when off. It was equally interesting when used on a standard multi‑note drum part. New drums popped up in interesting syncopated places. And using smaller grid values in the Rate setting lends itself to glitch styles. More generally, this tool seems like another very usable option for generating rhythmic variations and melodic options you might not think of otherwise.
Chop
Though simple in concept, Chop allows for some surprising variety by merely slicing a note into multiple parts. Playing with the Variation percentage is where things get interesting — the individual parts are moved away from their rigid grid locations into free‑floating non‑grid space. Could be useful for creating interesting percussion parts and other melodic interventions.
Glissando (MPE)
All Live 12 instruments are MPE capable so this rather pleasing Transformer will work on any of them, as well as the increasing number of third‑party MPE‑capable instruments. It’s more fun to play with that you think it will be!
LFO
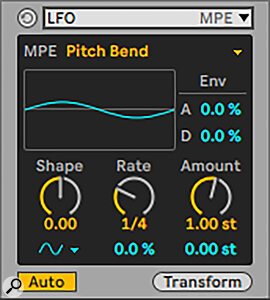
 LFO is an MPE‑generated LFO.A handy MIDI‑based LFO that can control an instrument’s pitch or the MPE parameters Slide and Pressure. (Like Glissando, this only works with MPE enabled instruments).
Span
Span focuses on the lengths of notes. It can automatically create legato notes, or uniformly short, staccato notes. The difference between tenuto and the other options (legato and staccato) can be imperceptible with some settings, but apparent with others. The Variation control is neat, re‑randomising the lengths of each note to avoid too much uniformity.
Velocity Shaper
Velocity Shaper is a quick and handy way of applying a velocity curve to a group of notes. Not only is it easy to create crescendo/diminuendo slopes, but any arbitrary shape can be applied with minimum fuss.
Transformed
In summary then, these MIDI Transformations vary between the expected and obviously useful to the novel and somewhat unpredictable. The integration of MPE and the additional ability to import your own custom or third‑party Max For Live effects is potentially very powerful too.
These new MIDI tools can embed themselves into your ways of working as their true utility reveals itself over time.
It didn’t take me long to try out each Transformation tool, get the gist of what it did, and to start thinking of how I might find it useful in the long run. And then, without even realising it, I’d started reaching unconsciously for Ornament when I wanted a drum flam — it was just quicker to use than to start duplicating and dragging round tiny, fiddly notes on the grid. I think this shows that these new MIDI tools can embed themselves into your ways of working as their true utility reveals itself over time.
