We show you how to disassemble tracks for creative reworking in Live.
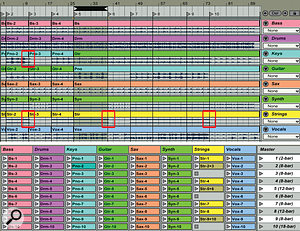
 1: The arrangement at the top has been captured in the 10 Scenes shown in the Session view at the bottom. The Scene numbers match the Arrangement view Locator numbers, and all of the clips were Consolidated from the areas between adjacent Locators. The red boxes indicate clips with tails that may pose a problem when looping. When necessary, you can merge those clips to create one-shots, as was done here with three strings clips.
Live provides an easy way to turn clips arrayed in its Session view into an arrangement: click the Global Record button and then start launching clips and Scenes. When you stop the transport, you have a full-blown arrangement recording your actions. Although there are many occasions when you might want to go the other way — from an arrangement to a session full of clips — the process is not quite so convenient. I'll start with a step-by-step account of how to do it for a full-blown arrangement. I'll follow that with an example of how to free yourself from the timeline of a plug-in or Rewired application by slicing its Live tracks into Session view clips.
Making The Scene
Suppose you have audio stems from an arrangement by a collaborator using a different DAW. Alternatively, the stems might be from an archived song of your own that used plug-ins you no longer have, or from a commercial remix project. You've imported those stems to recreate the arrangement and now want to remix, rearrange or augment the piece in some way. Although you can do this in Arrangement view by cutting and pasting along with adding and removing tracks, converting the arrangement into Session view Scenes and starting over with an empty arrangement makes the rest of the process more flexible, and the result will probably be more creative. Here is a relatively fast way to make that conversion (see also screen 1):
- Place Locators in the Arrangement view to delineate the segments from which you want to create Scenes. You don't need to limit yourself to the original compositional sections; any segment that is musically cohesive is good fodder. In particular, look for segments that loop well. Be sure to include Locators at the beginning and end of the arrangement, and if the song has time signature or tempo changes, place Locators at each of those as well.
- For each segment, right-click the Locator at its start and select 'Loop to Next Locator' from the context menu that opens up. The Arrangement view Loop Brace will now span the segment.
- Click the Loop Brace to select the part of each stem that lies within the loop.
- Choose Consolidate from the Edit menu (Command+J or Ctrl+J). This creates new cropped clips containing just the material within the loop. Alternatively, you could choose Split (Command+E or Ctrl+E) to create new full-length clips with their Start and End markers set to delineate the region between the Locators. It's more tedious to create loops from those, but easier to edit their boundaries.
- With the consolidated clips still selected, click-hold the top clip, press the Tab key and drag the clip to the leftmost track of the Session view Scene with the same number as the Locator at the beginning of the segment. All the other clips in the segment will be dragged to adjacent tracks in the Scene.
After repeating this process for each Locator, you'll have a Scene matching each segment of the song. If the song has time signature or tempo changes, you'll want to include the time signature and tempo in each Scene name (for example, "Intro 96 bpm 4/4”) so that triggering any Scene will set Live's tempo and time signature accordingly.
Loops, Tails, MIDI & Automation
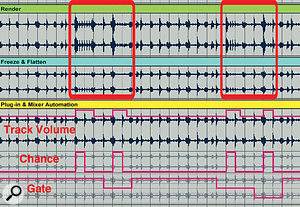
 2: The yellow track features automation for Mixer Track Volume, Beat Repeat Chance and Beat Repeat Gate. The blue track is a frozen flattened version of the yellow track — the Beat Repeat automation has been captured, but not the volume automation. The green track is a rendering of the yellow track, which captures all automation.
For auditioning and editing I prefer to work with looping Scenes, so I loop the Session view clips by selecting them all at once and then clicking the Loop Switch in the Sample section of the Clip view. (This doesn't work if you've chosen to use Split instead of Consolidate when slicing the clips. In that case, you'll need to set the loop boundaries individually for each clip.)
Because musical transitions don't always respect bar lines, you may need to make some adjustments to your loops. If a tail from one clip is noticeable at the start of the next, a simple fade-in of the second clip will generally take care of it — you can often get away with this in the context of the whole Scene even if it doesn't sound great by itself. When that doesn't work, you may want to go back to Arrangement view and Consolidate the two clips. Use the new clip to replace the first clip in the pair and delete the second. You can use the new clip as a one-shot or loop it (setting the loop length to a multiple of the first clip's length) or re-trigger it automatically using Follow Actions.
Although I've only looked at audio clips, the process works equally well with MIDI clips. But watch out for notes that spill over the Locators. If you slice these you'll get doubled notes, so it's usually best to either shorten them or move them past the slice point before slicing.
If you're starting with a Live arrangement rather than just stems, you may also have track automation to deal with. (Clip envelopes will be included in the consolidated clips.) For plug-in track automation, one option is to freeze and flatten the track, which will print the automation on to the resulting audio clips. You usually won't want to lock in mixer automation of volume and pan in Session view clips. However, when you do want to, you can substitute automation of a Utility plug-in's Gain and Panorama settings. Note that Utility's Gain range doesn't match the track volume range, so you'll need to edit it by hand if you copy and paste. Alternatively, you can render the track, which will print all mixer automation in the rendered clip as shown in screen 2.
As a last step, I usually delete the clips in Arrangement view along with all automation and any Time Signature markers. This lets me create a new arrangement or performance from scratch, adding tracks and effects as well as creating new Scenes and clips.
Timeline Conflicts
 3: Here, four bass clips have been harmonised using three different Vielklang setups. The Vielklang two-voice harmonisation is shown at the bottom left. After Consolidating, the relevant clips were moved to a single Session view audio track (right) for triggering independent of the timeline.
Because Session view triggering is not timeline-based, working with plug-ins or Rewired applications that have their own timelines is not particularly convenient. A more viable alternative is to set up and record the application's or plug-in's output on Arrangement view tracks and then slice it into clips for use in Session view. You might want to do this, for example, in order to capture automation in Propellerhead Reason, to sync to Native Instruments Maschine's Scene sequencer, or to free harmonised clips from the timeline in harmonising applications like Zplane Vielklang. For details on using Reason and Maschine with Live, check out the March and October 2012 Live Tech columns. I'll use Vielklang in this example.
Vielklang installs as a MIDI instrument and buffers audio along its own timeline, which can be independent or sync'ed to Live's. It creates up to three harmony parts based on your specifications, and plays back the original and harmony parts sync'ed to Live's timeline. The easiest way to create a number of harmonised clips for triggering from Session view Clip Slots is to create an empty MIDI clip on the Vielklang track that spans the whole time range used in Vielklang (select the time range and type Shift+Command+M or Shift+Ctrl+M), then freeze the Vielklang track. The empty MIDI clip is necessary for freezing to work. You can do this as many times as you like with different harmony settings by dragging each frozen clip to a new audio track and then unfreezing the Vielklang track and creating a new empty MIDI clip on it. When you're done, Consolidate the relevant parts of the frozen audio tracks as previously described and move the resulting clips to Clip Slots on the same audio track in Session view (see screen 3).
