 Song allows you to create multiple arrangements using sequence Chunks.
DP11 brings even more functionality to the handy Chunks feature.
Digital Performer’s Chunks feature is unique and powerful. It allows you to nest multiple sequences and virtual instrument combinations (V‑Racks) within a single Digital Performer file. You can use Chunks to create new arrangements or alternate versions of a song, or organise multiple cues for a film or video score, among other applications. With the release of DP11, MOTU added additional capabilities for managing Chunks to make its workflow even more efficient.
 In DP11, MOTU has further streamlined the Chunks workflow.Before getting into the new features, here’s a quick overview of the Chunks feature for those unfamiliar with it. A DP project can have any number of independent sequences in it. Each can be a whole song, a song section, a film cue or whatever you want it to be, with its own tracks, its own mixer and its own effects. Each sequence shows up as a separate sequence Chunk in the Chunks window.
Chunks can share resources through V‑Racks, which are containers that hold any number of virtual instruments and effects. One application for V‑Racks is for film‑scoring situations, where you’re using the same instrument palette for numerous cues.
You can also arrange your Chunks in the form of a Song. Open a Song window, and drag individual sequence Chunks into it. They will appear as icons (see opening screenshot, above). You can then freely rearrange their order.
In addition, you can designate the start and end times for Sequence and Song Chunks. The end time determines when one Chunk stops playing and the next one starts within a Song. The Chunks window, which you can open in a sidebar, is where you create, edit and organise Chunks. It’s even possible to copy and paste Chunks between DP projects or load Chunks from one file to another using the Load command.
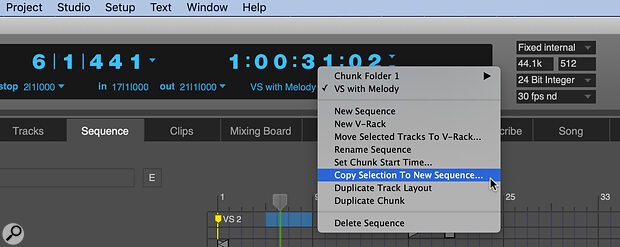
Another powerful feature allows you to make a selection from inside a sequence and turn it into a new one. Make a time‑range selection and then go up to the Control Panel Sequence menu (the drop‑down menu next to the Tempo Slider and Meter Box), and choose Copy Selection to New Sequence.
 The Control Panel Sequence menu.
  The Chunk Control buttons give you various playback options.DP also includes Chunk Control Buttons. Cue Chunks lets you trigger individual Chunks from their play buttons or via external MIDI commands. When one Chunk ends, the next one becomes active but doesn’t play until you click the play button. However, if you choose the Chain Chunk option, when one Chunk finishes the next one will start playing.
Shiny & New
All the functionality described so far was in place before DP11 dropped. The new version adds several modifications to the Chunks feature set, more specifically in the form of additional ways to organise or view your Chunks.
One of the most noteworthy is called Chunks Folders. These are folders you create in the Chunks window in which you can drop Sequence Chunks, V‑Racks and even Songs. If you’ve got a large project with many sequences, having folders to organise them is super helpful.
 Folders allow you to better organise multi‑sequence projects.To create a Folder, go to the Chunks window mini‑menu and click New Chunks Folder. Now, you’ll see a folder icon appear in the Chunks Window, and you can drag other Chunks into it. Click on the icon of the Chunk you want to move and drag it onto the folder and drop it in. Double‑click the folder to go into it (display its contents in the Chunks list); use the back button to go up one level. Like with individual Chunks, you can name and colour‑code Chunks Folders.
But that’s only part of it. MOTU added another type of Chunk container in DP11: Playlists. Designed specifically for live performance, Playlists differ from Folders in some significant ways. A Folder contains actual sequences with all of their data, but Playlists only hold aliases for sequences. The beauty of Playlists is that because they contain only aliases, they don’t make your project file significantly bigger, and you can create a lot of them. You can’t put V‑Racks in them, but a sequence Chunk in a Playlist can access V‑Racks in the Chunks list or Chunks Folder.
If you’re using DP for live performance, you can create a Playlist with the song order for your set so that each one is readily available to trigger without having to look through any folders. You can also add the same Chunk to multiple playlists, or even duplicate its alias within the same playlist.
Split & Polish
Yet another new Chunks feature in DP11 is the Chunks Split view. If you look underneath the mini‑menu in the Chunks window, you’ll see an icon that looks like a list with a divider in the middle of it. If you click on it, it opens the Split View, which adds a second Chunk pane under the first one, giving you another view of the list that scrolls independently. This allows you to view and browse two separate sections of the Chunks list at the same time. You can also drag and drop items from one pane to the other. For example, you could double‑click a folder or playlist in the bottom pane and the fill it with sequences dragged in from the top pane.
 Chunks with Split View activated to display top and bottom panes.
The Panes in the Split View don’t necessarily have to display the same ‘level’ of the Chunks list. For example, the top pane could display the top level of the Chunks list, while the bottom pane could be showing the contents of a Playlist or Folder. This gives you a great deal of flexibility and control when managing Chunks.
Zoom It Up
In DP10, MOTU added the Scale feature, which lets you resize and view the entire GUI at different zoom percentages. DP11 brought with it another helpful customisation option: the ability to scale the font size in any list window, independently from the rest of the GUI, including the text inside any of DP’s sidebar windows.
It’s straightforward to use. Go to Digital Performer / Preferences / Text Size and then adjust the slider for List Font Size. Separate sliders are provided for lists, the Project Notes window and the Lyrics window.
If you work with DP for many hours a day, this feature can be a real eye‑saver with today’s very high‑resolution displays, allowing you to enlarge DP’s list text to a comfortable viewing size. If you’re using DP in a live performance setting, you can scale the type size so that you can see the Chunks Lists better from a distance.
 You can now scale the list fonts larger to better read dense sidebar windows.
Tall & Short Faders
Yet another option for customising the view in DP is the new Dynamically Resizable Faders feature. If you change the vertical height of the Mixing Board window, you’ll notice that the throw of the faders gets longer as you make the window taller and shorter as you reduce the window’s vertical size.
One of the benefits is that as the faders get taller, their resolution increases. If you’re writing automation using faders, this means you’ll be able to move in finer increments. If you like to write automation by moving the faders, you’ll find it easier to be precise when the mixing board is taller.
Over the last few major updates, features like Themes, Scaling, font size adjustments, and dynamically resizable faders have made DP’s GUI easier to customise than ever before.
