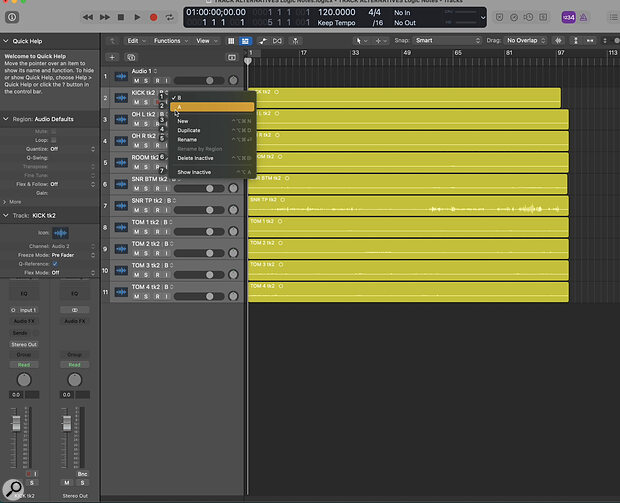
 Screen 1: Enabling Track Alternatives.
We explore Logic’s powerful new Track Alternatives.
Sure, we all love Logic Pro and take any opportunity to extol its virtues. But still, there’s always a feature or two that the competition has that’s been atop your wishlist for so long that you’ve given up hope and resigned yourself to perpetual envy.
For me, that competition was Pro Tools, and that feature was the confusingly named Playlist function. Not to be outdone and leave their users with a continuous wandering eye, Apple recently came up with an equally (if not more) powerful Logic feature called Track Alternatives.
Simply put, Track Alternatives (TAs) allow you to have multiple tracks within each track. While there is a bit of overlap between this function and that of Take Folders in practical applications, their distinctions pile up quickly — and TAs open up a range of compelling possibilities.
How Track Alternatives Work
If you don’t already know about TAs, I can’t really blame you; they’re easy to miss. That’s because they only become apparent once you make them visible. Right‑click on any track in the Main Window, scroll to Track Header Components, and then scroll to the last item: Track Alternatives. Now each track should display a pull‑down menu next to the track name (see Screen 1).
Until you are ready to take advantage of TAs, the track behaves entirely normally. Even if you don’t anticipate an immediate need to use Track Alternatives, it’s still a good idea to display them on your tracks and save them in your template.
After recording on a track, pull down the TA menu and choose New. You’ll notice that the contents of your track have vanished, and the letter B now appears next to the track name. That’s because you are currently viewing Track Alternative B. Your content from the first take is still alive, safe, and unchanged in Track Alternative A.
Now you are free to record into Track Alternative B. Continue adding TAs as needed and when you are finished, you can switch between them with the drop‑down menu (Screen 2) or with the key command Activate Next/Previous Track Alternative.
 Screen 2: You can switch between Track Alternatives using the track’s drop‑down menu.
Multitrack Alternatives
Track Alternatives shine as a way to switch between full takes of multitracked instruments like drums. By contrast, it I were recording vocals and knew I’d be comping the performance from several takes, I would surely opt for using Take Folders. They excel at allowing you to seamlessly and effortlessly choose phrases, words, breaths, and even syllables from each take to create the perfect track. I tend to use Track Alternatives when I want to audition longer performances and switch between them on the fly, and possibly make broader edits to them. That’s not to say that you can’t perform micro edits with TAs, but it’s not my first choice for that. Incidentally, it’s entirely possible to use Take Folders and Track Alternatives simultaneously, so don’t feel like you need to choose: you can use Take Folders to punch in and finesse transitions and TAs on a more macro level.
Even if you don’t anticipate an immediate need to use Track Alternatives, it’s still a good idea to display them on your tracks...
Let’s say you are recording 10 tracks of live drums into your song. Record the first take as usual. I should point out here that, even if you’re not a big Groups user, you might want to simply group the tracks and, in the group settings, tick Track Alternatives and leave everything else unticked. That way, you only have to change the TA for one track, and the others will change along with it. For a multitrack recording such as a live drum take, I would probably take the extra step and tick Editing/Quantize Locked, and Record. But this isn’t a tutorial on groups!
Now simply switch to a new TA and record your next take. I like to colour the takes as a group as I go. That way, when I cut and paste from the different TAs, I can identify what came from where.
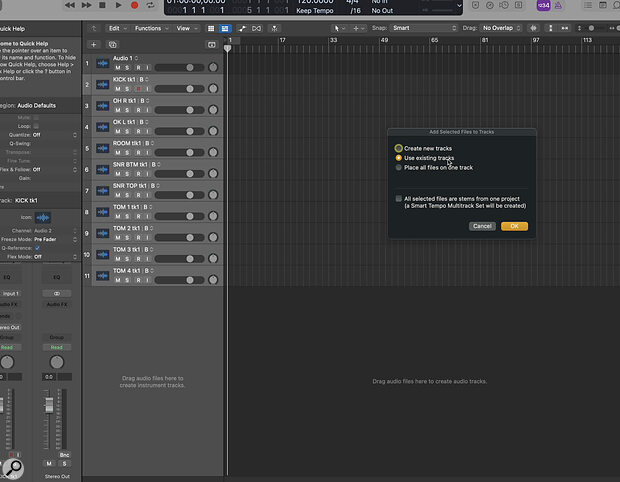
When I work with drummers on remote sessions, they usually send me folders of audio files of the different takes. An often overlooked aspect of TAs on live drums is that they work just as efficiently on imported drum takes as recorded ones. The process for creating TAs is pretty much the same as for recording. Grab all of the files from the first take and drag them onto your tracks (choose Create Tracks from the import menu). Next, switch to another TA and repeat the process with the next set of files (choose Use Existing Tracks; see Screen 3). Of course, you should ensure that you are dropping both sets of files at the same starting point and onto the corresponding tracks. (It would be wise to drag subsequent files in one at a time to ensure that they land on the correct tracks.)
 Screen 3: Importing audio to a Track Alternative.
Full Band
Another area where TAs prove invaluable is when employing the above technique for a full band. Once recorded, and ungrouped (or regrouped to their instrument family), swapping sections from different takes is a cinch. As a bonus, the aforementioned key command for switching TAs can be enacted on the fly. In fact, all of the Track Alternative options are available through key commands. I’ve seen some producers record takes one after another in the timeline. It would be painstakingly tedious to record and edit that way, especially if your song contains meter/tempo changes. With Track Alternatives, life becomes much easier!
But what if you aren’t dealing with multiple takes? Do you have any use for Track Alternatives? Absolutely! Before you get to work editing any track, select Duplicate from the drop‑down menu. Now you can always get back to the original after you realise you’ve over‑mangled your edit. So go ahead and time‑stretch, retune, and apply selection‑based processing to your track, while knowing that the original is just a click away. You can even create new TAs as you go as an incremental ‘save’ for each track. I was already doing something like this before TAs. I would copy the track and regions as a safety copy. The problem with this is that you need to have all of the plug‑ins loaded on each copy. With TAs, everything remains nested on just the one track.
Editing A Performance
Once everything is recorded onto different TAs, and you’ve auditioned the takes, it’s time to edit together a performance. First, determine which take is the most usable of the bunch — the one that you’ll be keeping the most of. Then select Duplicate from the drop‑down menu. Make sure all of the tracks are selected if they aren’t grouped. I’m generally OK with the default TA lettering system, but for my comp track, I usually pull down the menu and choose Rename.
Go to the section that you are going to replace. I like to set the locators around this section and use the command Split / Regions at Locators. At this point, I prefer to delete the unwanted regions, but it’s not mandatory. In fact, you don’t even need to cut the section you are planning on replacing. Now go to the TA you want to copy that section from, select all the regions and Split at Locators again. Copy the selection and switch back to the comp TA. Place the Playhead at the beginning of the locator and paste. If you’ve colored the regions in the TAs differently, as in Screen 4, it will be abundantly clear which sections came from which takes.
 Screen 4: Comping with Track Alternatives.
But what if your edits require a bit more detail? Maybe you just need half a measure to be swapped? What if you want to see the waveforms of more than the currently selected TA? No problem. Go to the Track Alternative menu and select Show Inactive.
Now the other takes are visible. The power button on each lane makes that TA active. So you can continue to audition the takes while viewing all of them at once. The up arrow sends that TA to the top (the ‘current’ TA). You can even reorder the TAs like they were tracks. It’s in this setup that performing micro edits between the takes is possible.
MIDI
Yes, that’s correct: Track Alternatives maintain all of their functionality when working with MIDI too. Suppose you’re fleshing out an arrangement and can’t decide on a piano part. Create a new TA for each approach. Of course, you can duplicate the track with similar results, but for me, the sizable advantage of employing TAs is that you can switch between them with a key command while the song is playing.
I’ll give you a pass if you haven’t been making Track Alternatives a part of your daily workflow: the function is somewhat hidden and it arrived in Logic without much fanfare. But now, after reading this, shouldn’t you be making Track Alternatives a part of your diet?
