 Combine Tape Delay with Space Designer and some unconventional impulse responses for some intriguing Objeq Delay‑style sounds.
We explore some creative delay treatments using only Logic’s bundled plug‑ins.
When looking for effects that are a bit outside the mainstream, it is tempting to search out third‑party plug‑ins. While many of those produce excellent results, with a little creative thought it is possible to conjure up some inspiring and unusual effects using just Logic’s own plug‑ins. This month I’m going to take a look at delay effects.
As a quick example of what is possible, you can get a really good retro, lo‑fi sound from Logic’s Tape Delay (set up in a bus as a send effect), simply by setting the frequency sliders to 130Hz/1200Hz and then adding around 45 percent of LFO modulation, at 0.7 seconds or thereabouts to add a bit of wobble. If you’d like the fi to be even lower, put the delay through Logic’s Overdrive plug‑in, set to a modest amount of drive and with its filter knob set just to take the edge off the sound. Alternatively, put the Rotor Cabinet plug‑in set to Fast after the delay, and your piano or electric piano repeats become sonar pings! You might also want to add some basic reverb to the source track so that the dry part of the sound doesn’t sound too dry.
Objeq Permanence
Those are some very basic examples, but there are more adventurous combinations of Delay and other Logic Pro plug‑ins to try. My inspiration for this next idea was Objeq Delay from Applied Acoustic Systems, which is one of my favourite delay plug‑ins for ambient music creation, especially for adding interest to rhythmic parts. While it isn’t possible to exactly recreate what Objeq Delay does using Logic’s plug‑ins, you can conjure up effects with a similar character.
Objeq Delay treats the repeats with convolution, using impulse responses (IRs) based on drum heads, metal sheets and so on, the outcome of which is that the delays take on the character of the IR rather than being straight repeats. It lets you modulate the pitch and formants of the filtering, but it’s the use of impulse responses that got me experimenting.
Logic Pro’s Space Designer reverb comes with a host of useful non‑reverb IRs in its Warped Effects / Drum Transformers section. You can also drag in any short WAV file, such as a recording of a ringing circular saw blade or a metal barrel being struck, and use that to process your delays.
The setup is straightforward enough: you put the instrument or audio file to be treated on a track with a post‑fade aux send feeding a bus with Space Designer inserted on it, which is then followed by your delay of choice. I favour Logic’s Tape Delay here as you can also add pitch modulation and filtering, but any of Logic’s delays will work, and Modulation Delay also has useful modulation features. When using convolution, something you need to be aware of is that the level of the processed signal can sometimes be quieter than you might wish due to the way the modulation process essentially multiplies the levels of both sounds, so putting a compressor between Space Designer and the delay is a good way of getting the levels back under control. I find the strongest results come about when the IR has plenty of frequencies that overlap with those of the source sound. Both Space Designer and the delay would normally be set to ‘wet only’ when used as send effects (because the dry sound comes from the original track). However, if the effect of the IR in Space Designer seems a bit too much, you can turn up the dry level in Space Designer until the effect sounds right. As with most creative endeavours, the only rule is that you have to like the sound!
The kinds of source sounds that show up these flavoured delays most strongly tend to be percussive rather than sustained pads, so things like pianos, guitar plucks, synth stabs and percussion...
The kinds of source sounds that show up these flavoured delays most strongly tend to be percussive rather than sustained pads, so things like pianos, guitar plucks, synth stabs and percussion tend to work well. Logic Library IRs that give good results on a sampled piano include Distant Air, Fragmented Clip and Glowing Strike.
If you want to get a little more adventurous, try instantiating both Space Designer and Tape Delay as dual‑mono rather than stereo plug‑ins, so that you can apply completely different settings to the left and right channels. For example, you might use the IR of an anvil strike with a quarter‑note delay on the left and something like a bottle smash IR running into a dotted eighth‑note delay on the right.
Another option that can yield interesting results is to drag an Apple Loop directly into Space Designer. You can then use the IR offset control and the envelope curves to home in on just the part of the sound you want to use. The Car Crash sound effect worked surprisingly well in this way, again using a piano as the test subject. I’ve also had good results using a sparse rhythm loop as an IR, which can add some interesting movement to the delays, in addition to tonal coloration.
Step FX
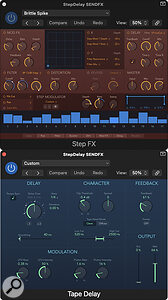
 Placing Step FX before a delay can yield some interesting rhythmic filter results.Another creative way to mutate delays is to use Logic’s Step FX plug‑in before the delay, again set up in a bus to be used as a send effect. This can add rhythm and resonant filtering to the delays. The Brittle Spike and Deep Dub presets provide a good illustration of the type of effect that can be achieved. While you can use Logic’s AutoFilter to add moving filters, Step FX makes it easier to arrive at more dramatic results as it can add stepped chorus, distortion, reverb and even delays of its own. The rhythmic nature of the effect can also add interest to sparse drum or percussion loops.
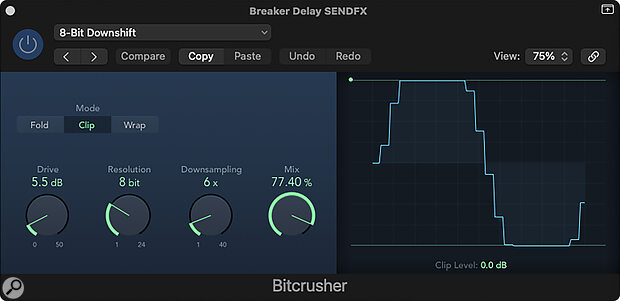
Logic’s Bitcrusher is another useful tool for colouring delays. Try setting the Fold mode to 10x Downsampling, 8‑bit Resolution and Drive to 10dB. If the delay filter is set wide open, you get a nice metallic jangle when using a piano as an input, and by closing the filter, the high end of the jangle can be tamed if it feels excessive. This same setting also works well on percussion loops. Taking this effect further, try placing Logic’s Spectral Gate (try Crunchy Bandpass and then tweak the centre frequency by ear) either after the delay or between Bitcrusher and Delay, and then play a loop of piano or percussion while skipping through the Bitcrusher presets — you’ll hear lots of usable options! You can also try switching out Spectral Gate for EVOC Filter Bank and you’ll be rewarded by even more useful treatments, many with a sense of movement or sync’ed modulation.
 Bitcrusher is great for adding colour to your delays.
Design For Life
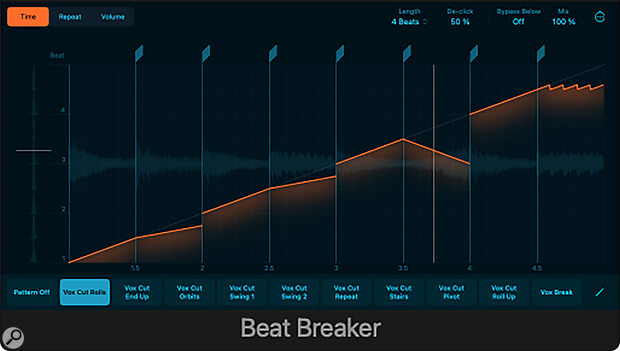
Logic’s Delay Designer plug‑in allows for unusual delay patterns, and also pitch‑shifting of the delay repeats, so can conjure some pretty unusual sounds on its own. But if you fancy a bit of enharmonic chaos, try putting Ring Shifter before it. Beat Breaker can also be put too good use to add rhythms to your delayed sounds — the Vox Cut preset is really rather good in this application, and works well either before or after the delay.
 Beat Breaker’s Vox Cut preset works well for mangling your delays, and can be placed either before or after the delay plug‑in.
Once you find a combination that gives you a useful result, it is worth saving the channel strip setting so that you can call it up again when needed. If you need to pass on your user channel strip settings to a friend or copy them to another computer, you’ll find them in Application Support / Logic / Channel Strip Setting. Sub folders hold the settings for Bus, Instrument, Master, Output and Track channel strips, so the setups discussed here will be in the Bus folder. The files are very small, so you can send the whole Bus folder as an email attachment.
