

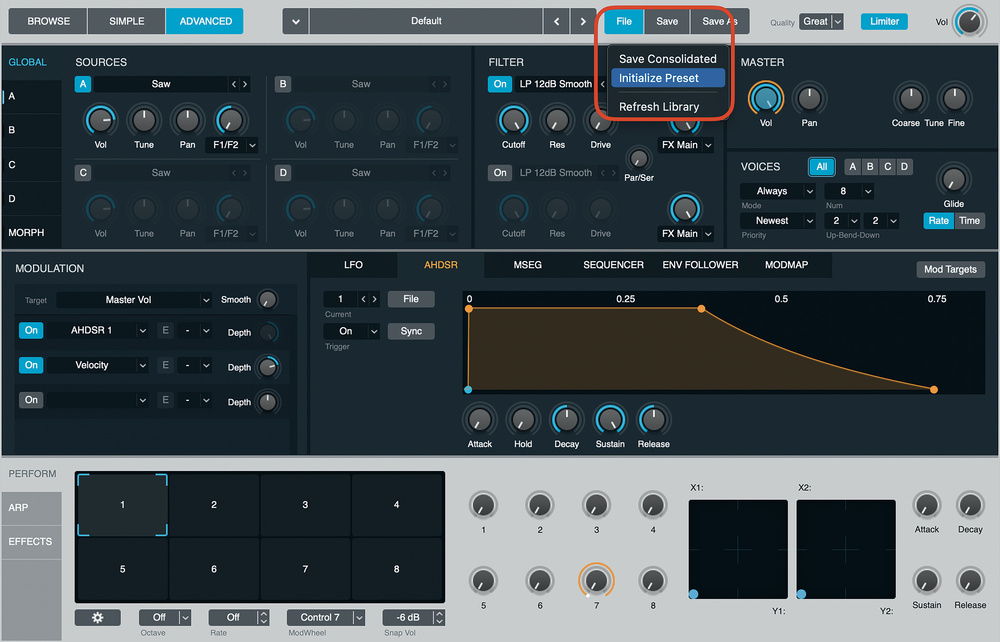
The File / Initialize Preset option will reset Alchemy and pare things down to just Source A ‑ an ideal starting point for your granular experiments.
Alchemy’s granular engine is a sonic playground with infinite possibilities!
Who needs a gaming console when sound design offers a world of immersive experiences! If you’re ever stuck for a starting point for a new composition, you could do much worse than trying granular resynthesis in Alchemy — it can transform any scrap of audio you have lying around into a goldmine of ideas in no time.
The more you play with Alchemy (I use the word ‘play’ deliberately), the more you’ll find yourself awash with project starting points. You’ll also discover endless potential for developing and manipulating your samples.
Composer Matthew Herbert once talked of how we now have the capacity to listen to the world in different ways. I remember being very inspired by his stated intent to “freeze history, press pause, wander around inside the sound”. If you are as inspired as much as I was by that idea, you’ll relish beginning that journey with Logic Pro’s Alchemy synth.
DAWs Of Perception
While Logic’s array of virtual analogue synths (ES1, ES2, ES‑M, ES‑P, ES‑E, Retro Synth) can convincingly emulate analogue technology (whilst also offering such digital luxuries as velocity sensitivity and practically unlimited polyphony), Alchemy implements a form of synthesis that can only exist in the digital realm.
Alchemy can function as a powerful standalone synthesizer or as an advanced sampler — which, incidentally, can open any of your EXS Logic Sampler patches. But perhaps it’s best to think of it as a combination of both: a sample‑manipulation synthesizer. To begin programming, you start with at least one Source (up to four). These Sources may contain either audio files as starting points or oscillators that will generate all manner of virtual analogue waveforms, from the simple sine through to more complex shapes.
For now, let’s focus on granular resynthesis, which, like any time‑stretching algorithm, works by breaking up audio into tiny fragments called grains. In Alchemy, these grains can be reordered, shaped, pitch‑shifted, repeated, layered, and spread around the stereo field, before being recombined back into an output stream to be further manipulated, modulated, and effected in a virtually infinite number of ways.
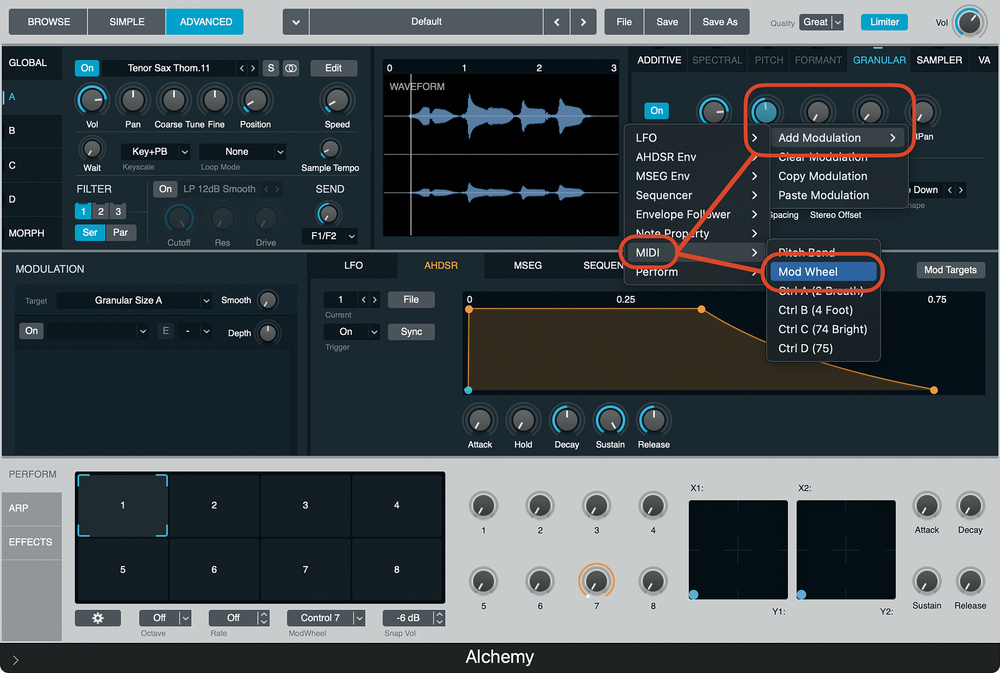
Setting up modulation is as easy as right‑clicking the destination and picking a source from the list.
Inner Source
Any sound design session should always begin with a clean slate, so click on the File button at the top of the plug‑in (next to the Preset field) and select Initialise Preset. This resets all the sources, along with their snazzy‑sounding modulations and effects. Source A will now become the sole source, and we’ll begin by replacing the default Saw wave with a sample of our choice.
Choose anything, but I’ve found that Alchemy works best with shorter sounds — around 2‑10 seconds is ideal. These can be small vocal or monophonic instrumental phrases perhaps, or snippets of field recordings. What’s more important, however, is an open mind: expect to open up a rich seam of sonic source material.
To take a snippet out of a larger audio file in the main window, make a rough cut with the marquee tool (I’ve permanently set it up as my Command‑click tool). Swipe to select the part of the audio file you want to process, then single‑click to chop it out. Finally, press W to fine‑tune the region marker start and end points in the Wave editor.
Ongoing improvements to Logic Pro continue to speed up workflow in meaningful ways; you can now drag and drop your region directly into Alchemy’s Source panel. Doing so will provide the four options of sample import: Additive, Granular, Spectral and Sampler. It’s crucial to choose the appropriate one at this stage.
You can now drag audio directly from the arrangement window into Alchemy’s granular engine.
Once you’ve dragged your edited region onto the Granular panel, click the Source A button (on the left) to access all the relevant parameters and delve into the details in Advanced view. The top third of the GUI now shows, from left to right, the Source controls, the waveform display, and what Alchemy calls the Element controls, used to manipulate the grains.
Now for the part where we get to press pause and truly wander around the sound. As you meander around, you’ll be transforming the sound in a variety of ways, and depending on your objective, you’ll find yourself with more than a soupçon of seductive starting points. Consider a trail‑of‑breadcrumbs approach: as you encounter sounds you like, save iterative presets that you can revisit later.
Consider Your Position
Before we even explore the advanced element controls, you’ll have plenty of fun just playing with the main panel. In addition to the more obvious controls such as pan and tuning, try adjusting the Position parameter while triggering your MIDI keyboard to find your starting point. Like any parameter, this can be targeted not just by standard envelopes, MIDI CCs and LFOs, but also Multi‑Stage Envelope Generators, sequencers, arpeggiators and more, to modulate and vary the attack portion of your sound.
Here, Pitch is being modulated by LFO 1, which is set to a random 16‑step sequence.
Next, there’s a Speed control, and this is where you cross the threshold of the event horizon into quantum levels of atomised time and space. Play with just these two parameters and you’ll soon open up a parallel universe of possibilities.
Also on the main panel, there are no fewer than seven options for looping, plus you can process your sound with up to three filters.
Grains Of Truth
Now, let’s dive into the Granular‑specific Element controls. The Size control has significant bearing on the output stream and is a great candidate for targeting with a source of modulation. For now, simply toggle this up and down, listening to how the grain size affects the quality of sound.
To create a rhythmical pulse, you might have the grain size at between 80 and 230 ms with Density set to 1. Modulating the Size parameter will help to vary the otherwise repetitive rhythm, should you wish to do so and, depending on the size you choose, changing the Grain Shape can have a profound impact on the stream. Try swapping from the default Tukey to Ramp Down, for example, to create a more defined, punchy, rhythmic attack.
For a more sustained, stretched sound, try increasing Density, which changes the number of overlapping grains from one (no overlap) to up to 10.
Num Taps adds up to eight retriggers of the source’s attack portion and works in combination with its partner, Tap Spacing. Set to zero, these retriggers stack up on top of each other, but set to a positive value (up to 100) and with the right combination of source file and settings, this combination can create inspiring harmonies that stagger themselves into a kind of ‘canon’, as if performed in a round.
Next, you might try RTime, which randomly varies the positions of the grain extracts to create a less uniform, more smudgy effect, and finally, try adding some RPan (top right) which adds random panning to nicely fill out the stereo spectrum.
Get In Shape
Naturally, Alchemy offers more than one envelope generator, but the main ADHSR (the ‘H’ adds Hold to the standard set of envelope parameters) has a very intuitive interface for shaping the sound, to easily switch between single, one‑shot sounds or more pad‑like, lengthy textures, for example.
By adjusting Decay in conjunction with the Speed and Position parameters, you can quickly concoct a unique, playable instrument from virtually any sound source.
To create a perfectly playable staccato instrument, set Attack and Sustain to around zero before adjusting the Decay time according to how long you want each note to last. Try 500ms for starters. Then, by adjusting Decay in conjunction with the Speed and Position parameters, you can quickly concoct a unique, playable instrument from virtually any sound source. Simply increase Sustain to create a longer sound.
To add variation, modulation is simple to implement, just right‑click any parameter you want to modulate and select the source. Then, look at the Modulation panel on the left and enable the effect by applying some depth. There are so many sources, it would require at least another entire article to even begin to scratch the surface!
Effects
As always, adding effects can help bring any sound to life. While you can use all the effects in Logic as inserts or on busses, Alchemy is great for building a more tightly integrated and flexible effect chain. You can affect each Source separately, or apply effects globally. Click on the Effects tab at the bottom, press On on the first row, and choose an effect from the drop‑down menu. Alchemy even includes a version of Space Designer. Finally, if you click on File, you can save (or load) complete effects chains.
I hope you enjoy experimenting with granular resynthesis in Logic Pro. With a little experimentation, improvisation, and an open mind, you’re sure to strike gold!
