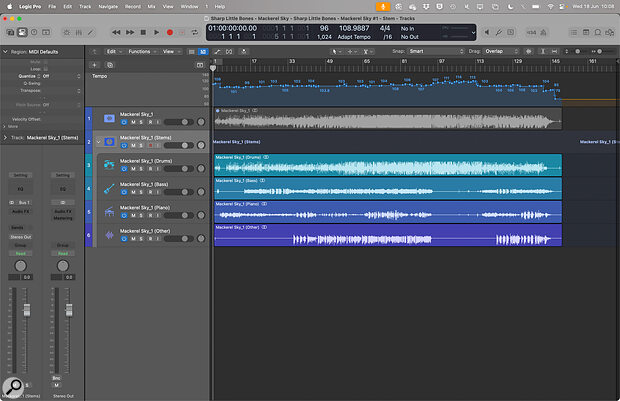
 With Adapt Tempo enabled, Logic will automatically conform the project’s tempo to the audio you import (see the tempo map at the top). Below, I’ve imported a track and then used Stem Splitter to isolate the different parts.
Logic Pro contains a multitude of tools to help you analyse and transcribe music.
The Channel EQ in Logic Pro is remarkably useful for analysing your audio’s frequency content. But what other noteworthy tools does Logic offer for analysing music?
Whether you’re a musician learning riffs and solos, a songwriter researching song structures, or a producer unravelling the mysteries of a mix, transcription is a powerful and often underused resource. It sharpens your ears, deepens your understanding of music, and can open up a rich seam of inspiration to fuel your creative journey. Transcribing music allows you to understand how it is constructed, and acquire the techniques used by others.
As a working musician, I’m often tasked with learning and arranging tunes. Invariably, that means picking out and internalising lines and melodies. Listening to the pros is a core part of my practice. But, not having spent three years shedding at a conservatoire, I’ve found my secret weapon in Logic Pro, which offers useful tools to support transcription and ear training, and which has made the process of learning music not only more efficient, but also more enjoyable and inspiring. So, whether you’re decoding a complex harmony or killer groove, or just trying to figure out what makes a track tick, transcription might just be the creative boost you’ve been looking for.
Getting Started
Before diving into transcription, it’s worth setting up Logic Pro for maximum clarity and efficiency. One of the first things I always recommend is to enable the Custom LCD display, because this gives you access to a wealth of useful information. To do this, open the Display Mode pop‑up menu (the small upside‑down triangle to the right of the LCD), select Custom, and then return to the menu to save this as your default view.
Before recording or importing the music you want to transcribe, start a new project and activate Adapt Tempo. You’ll find this option just below the Project Tempo in the LCD. This feature is crucial: it allows Logic to automatically map the tempo of your audio, which opens up a range of possibilities later on.
If your source is an audio file, simply drag it into the Main window, onto a new track. If you’re recording audio from, say, QuickTime or another app, you’ll need to enable loopback recording. Both my SSL 2+ and RME interfaces offer built‑in loopback functionality, but if yours doesn’t, and you don’t fancy cabling between your output and input, then third‑party software like Loopback (around £99) or BlackHole (free) can do the job.
Pro tip: if you’re recording via loopback and haven’t enabled Adapt Tempo, be sure to disable the metronome click during recording. Just click and hold the metronome icon and untick Click while Recording — otherwise, you’ll end up with the click track embedded in your audio.
Mapping The Tempo
With Adapt Tempo enabled, Logic will attempt to detect the tempo of the audio and align bars and beats accordingly, following even the most wayward tempo variations.
I’ve tried this with a variety of material and found that in recent versions of Logic the algorithm seems to have improved significantly, coping well with all but the most rhythmically complex material. Still, if the results aren’t quite right, you’re invited to fine‑tune them using the Smart Tempo Editor, which lets you specify downbeats to correct any tempo‑detection issues. Otherwise, press Play and listen back along with the metronome to make sure everything is locked in.
Now that the tempo is accurately mapped, you can easily and accurately cycle around any number of bars or beats while you listen and learn your part. This feature alone would have been utterly transformative for musicians in the bebop era. Moreover, with your producer hat on, it will help you to analyse an existing production, marking out the structure and noting key instrumentation, arrangement and mix techniques to create a ‘compendium of qualities’ that could form the blueprint for a new creation. But we’re not stopping there.
Varispeed
What would those earlier generations have given to not only be able to loop sections, but also slow them down — without altering pitch? Thanks to Logic Pro’s Varispeed feature, that’s now a breeze.
To enable it, head back to the Display Mode pop‑up, select Customise Control Bar and Display, and in the third column of the window, tick the box for Varispeed. This adds a new section to the LCD, and defaults to Speed Only mode. From here, you can now slow playback down to 50 percent (or speed it up to 200), all while preserving the original pitch. Used in concert with the cycle function, Varispeed becomes an incredibly effective tool for picking out even the most intricate of chromatic passages.
Consider working at higher sample rates if you envisage working at the slower end of Varispeed capabilities.
Pro tip: consider working at higher sample rates if you envisage working at the slower end of Varispeed capabilities. I’ve found that working at 96kHz — especially when slowing audio to ‑50 — yields noticeably better results than at 44.1kHz. The extra samples will help when stretching audio, resulting in more defined transients, with fewer grainy artefacts.
Split The Difference
Still, there’s more in store to help us. Logic Pro 11 introduced the excellent AI‑assisted Stem Splitter, a feature that was further improved and embellished in v11.2. You’ll find it to be an incredibly powerful tool for transcription of any kind. To use it, simply right‑click (or Control‑click) on an audio region, then navigate to Processing / Stem Splitter. Whilst you can choose to exclude certain elements, I usually let Logic separate all stems before deleting any that turn out to be empty. Even with lower‑fidelity recordings, I’ve found very little to quibble about once I’ve heard the results, which tend to be nothing short of magical!
I recently used Stem Splitter to isolate the saxophone from Cannonball Adderley’s ‘You’re A Weaver Of Dreams’. Not only was it a joy to hear the alto sax in isolation, but by adjusting the Balance knob on the channel strip, I was also able to isolate and study the iconic reverb — thanks to the early 1960s stereo mixing techniques that placed it entirely in the left channel.
What’s The Score?
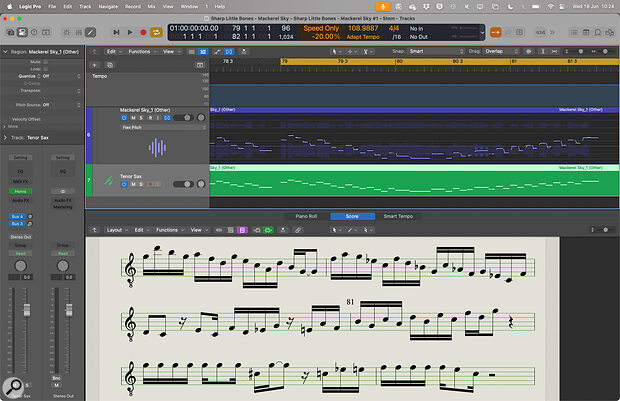
What if you wanted to generate a score from your audio? Flex Pitch will allow us to do just that. Flex Pitch is ostensibly a pitch‑correction tool that, like Melodyne, allows you to adjust individual notes and nudge them into pitch. But once Logic has detected the notes, you can easily view them in the form of standard notation in the Score Editor.
 Although primarily designed for pitch correction, Flex Pitch can also help you create MIDI data from your audio. You can then use those MIDI notes to create a score in Logic’s Score Editor.
Let’s say you want to transcribe a saxophone part. Start by clicking the Show/Hide Flex button (or press Command+F), then select Flex Pitch from the Flex Mode pop‑up in the track header. Logic will analyse the audio, detect transients, and assign MIDI notes accordingly. To view and edit this data, press E to open the Track Editor, then head to Track Editor / Edit / Create MIDI Track from Flex Pitch Data. Press N to open the Score Editor, and you can now view this part in standard notation. Head to the Style pop‑up menu at the top of the inspector to change to a lead sheet or to transpose for Eb or Bb instruments. Whilst you’re there, you can also apply visual quantisation to further help refine the score.
Recently, I used this method while arranging ‘Bernie’s Tune’ — originally by Bernie Miller but famously arranged by Gerry Mulligan. Stem Splitter only gave me one stem for both trumpet and baritone, and in the end I found the polyphonic capabilities of Melodyne better able to reveal the crunchy, close harmonies (including the passing notes of C# and G# over a Dm7!) than the otherwise excellent (but, for the time being, monophonic) Flex Pitch.
Trust Your Ears
Usually, that’s enough to just see what notes are being played. But if your intention is create an actual score, then of course no tool is perfect. You might encounter issues like excess or missing notes, depending on the nuances of the performance. A bent note, a swung phrase or a subtle rhythmic push can all confuse the algorithm.
But that’s also the point. Isn’t it exactly the phrasing and feel, the way a note or phrase is played, that we should be listening to? Miles Davis once said “The note is only 20 percent. The attitude of the [musician] who plays it is 80” — and ultimately, no matter how easy it is now to outsource transcription duties to technology, it’s our ears and our musical intuition that ultimately lead us to a deeper understanding and heightened enjoyment of music. However, whether you’re learning a solo, analysing a mix or creating a score, useful tools like Adapt Tempo, Varispeed, Stem Splitter and Flex Pitch empower us to dig deeper and attain greater insight into the work of the musical heroes and production pros who inspire us.
