Programmed classical and film music demands convincing use of sample-based instruments. But how do you achieve this? Our engineer explains, as he takes on this month's remix...
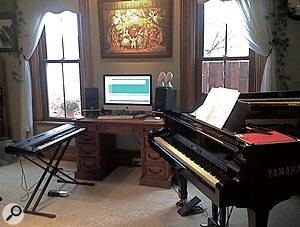 This month's Mix Rescue submission was put together by SOS reader Kayle Clements in his Apple Logic-based home studio, pictured here.
Kayle Clements is an accomplished pianist who has already gained some experience of composing for classical ensembles, and is currently trying to break into writing for film, television and games. He recently contacted me for advice because he was having difficulty in achieving the kind of sound for his own sample-based media-music productions that he could hear on favourite commercial soundtracks by Thomas Newman, Danny Elfman and the like. While realistic about his chances of competing on the level of Hollywood's A-list from a small home studio, he nonetheless felt that he should be able to get much closer to this lofty pinnacle than he had so far managed. However, he wasn't sure how best to proceed.
Listening to the mix he'd submitted, it did seem to me that its potential had yet to be fully tapped. It was not without justification that Kayle had complained of a harshness to the sonics as a whole, and I felt that the mid-range lacked 'stuffing', somehow. The choice of reverb seemed rather unsuitable too, exhibiting an early‑reflections 'slapback' that was awkward on some of the shorter, more percussive notes. On top of those points, though, I felt that Kayle hadn't taken full advantage of the orchestral forces at his disposal, and that some added layers in the arrangement might do a great deal to fill out the texture.
Preliminary Mixing
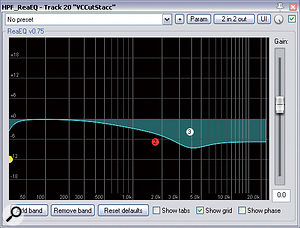
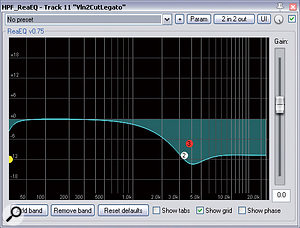 The string parts had been taken from Audiobro's LA Scoring Strings, and had a much brighter tone in general than other parts in the arrangement from Vienna Symphonic Library and Garritan Steinway. As a result some firm EQ cuts in the high-frequency region were required — as you can see from the two EQ settings windows here.
With Kayle's raw multitrack files imported into my Cockos Reaper mix system, I initially set about trying to build a balance of them as they stood. Because the classical orchestra has evolved to fit together acoustically, mixing a recording of one (whether real or sampled) should ideally involve little more than adjusting pan/fader settings and perhaps adding some reverb to bind all the instruments together. This wasn't the case here, however, because Kayle had combined instruments from different sound libraries that weren't particularly compatible. The string parts presented the biggest problem, because the timbres that Kayle had drawn from Audiobro's LA Scoring Strings were considerably more strident in the upper registers than those of the woodwind and brass parts from Native Instruments Kontakt 4's stock Vienna Symphonic Library-derived patches, or the Garritan Steinway piano.
In order to produce a more satisfactory match, I ended up digging deep with Reaper's bundled ReaEQ at around 4kHz on most of the string parts, as well as generally rolling off a few decibels above around 2kHz with shelving, in a number of cases cutting 12dB or more. However, with these cuts in place, the overall impression was now a little muted — the Garritan and VSL sounds were all quite reserved — so I used an 8dB master-buss EQ boost at 20kHz with a very gentle slope (Q = 0.25) to reinstate the air and brightness.
Having brought the raw tracks closer together from a tonal perspective, the next step towards building a preliminary balance was to apply some common reverb to all the tracks, which had been supplied free from additional effects, as requested. Although you could use just a single reverb patch in a situation like this, given that you're trying to create an illusion of everything playing together in the same room, I've found that it tends to make the exact choice and configuration of the reverb patch more taxing, so I normally prefer to split the early-reflection and reverb-tail components off into different patches instead. That way, I can mould those more freely to my ends, as well as giving more or less of each reverb component to each individual sound.
The early reflections came courtesy of Lexicon's renowned Ambience algorithm, as provided by their Pantheon II plug-in. This seemed to work pretty well as a blending agent straight out of the box, although I did end up lowering its high-end damping frequency by an octave to prevent it becoming too conspicuous in its own right. The same send level seemed to work for many of the tracks, but where a particular timbre seemed to be pushing too far forward, I increased the effect level to counteract that — as in the case of some of the legato string, flute, and trumpet lines. From a more purist perspective, I should, perhaps, have refined the individual instrument send levels to better reflect their relative front/back distance, but many soundtracks play fast and loose with the natural order in this respect, so I didn't feel I needed to worry unduly about it.
For the 'tail' element of the reverb sound, I turned to the 'Wooden Hall' preset of Universal Audio's algorithmic Realverb Pro plug-in, but although this seemed, in general, to suit the production, I did still increase the length of the reverb from 1.9s to 2.7s. to make the simulated space more expansive, as well as tweaking the room's size and balance of construction materials to massage the tone slightly. Again, I applied very similar amounts of this reverb to most of the tracks, deviating from the typical send level mostly for more percussive tracks (such as the pizzicato strings) that were less inclined to mask the effect's long decay.
MIDI Shaping After The Fact
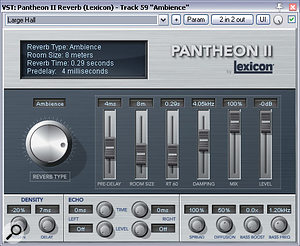 A pair of reverbs was used to blend the programmed parts together and give them a sense of inhabiting a large concert hall-style space: the first is the Ambience algorithm from Lexicon's Pantheon II, and the second a hall preset from Universal Audio's Realverb Pro.
From a pure mixing perspective, that just about wraps up what I did for this remix, but I actually did a lot more work besides, in response to various issues that became apparent once balance problems had been removed from the equation. First of all, I noticed that Kayle had shaped some of his MIDI velocity data ineffectively and, in particular, that important melodic phrases in the string and trumpet parts included unmusical lumps and bumps, in terms of both level and timbre. To be fair, the latter pitfall isn't uncommon if you're using 'lite' versions of sample libraries which have a reduced number of velocity layers, although it's still possible to work around, with care, by noting the velocity levels at which a tonal shift occurs and switching only when appropriate.
To even out and reshape the levels, a combination of compression (from Tone Booster's no-frills TB_EZCompressor) and level automation provided a good fix, although, on occasion, I had to combine that with a little automated EQ where abrupt tonal changes stuck out unpleasantly. A simpler solution for Kayle in future, of course, would simply be to adjust the source via Logic's MIDI editing window. Indeed, where the trumpet part was concerned, I did end up reprogramming the part using the VSL patches in my own previous-generation version of Kontakt, to improve the feel, although I did leave a little of the original part layered in there too, to retain some of its tonal character.
It wasn't just velocity data letting Kayle down, though, because he didn't seem to be getting the best out of his instrument articulations either. For example, there were a number of occasions (particularly the two string chords at 0:53 in the remix) where the attack or release character of an instrument's note was too abrupt for its musical context. This kind of thing is usually quite straightforward to modify with a bit of extra MIDI programming, although I had to resort to region edits and fades to coax this kind of change out of the bounced audio. Some synthetic-sounding programmed clarinet/flute trills at 1:11 could also have been replaced by dedicated trill articulations had Kayle (or I) had any to hand, but I opted to leave those on the cutting-room floor instead.
Another articulation problem concerned the horn melodies, which appeared to have been realised using Kontakt's 'standard' VSL instrument set, rather than the special 'legato' instruments. Because of this, even considerable level and tone reshaping on my part couldn't really salvage anything particularly musical-sounding, because of unnaturally stepped transitions between the different notes. This is something that mix processing is powerless to deal with, so I opted to replace Kayle's own parts with Kontakt 3's VSL legato patches. By overlapping the notes, I was able to create a much smoother performance, even without much in the way of velocity refinements, although again I left a touch of Kayle's original horn line in there for tonal reasons.
Filling Out The Texture
 The first line of attack in dealing with some less-than-refined MIDI velocity programming was to try to even out the levels after the fact, both with gentle compression from Toneboosters TB_EZCompressor and with detailed fader automation.
By this point, I felt that I'd reached the point of diminishing returns as far as improving the sonics and musicality of the supplied parts was concerned, but I still felt that the outcome was slightly underwhelming. One significant reason for this, in my view, was that Kayle hadn't imbued his ensemble texture with sufficient tonal complexity. If you're approaching full orchestration for the first time (as Kayle was in this case), it's very easy to underestimate the amount of activity going on within an orchestral tutti in particular, and what subtle layers help build the texture behind the 'shop window' of the main melodies, bass lines, and foreground figurations. In this respect, the absence from Kayle's line-up of many common film-score orchestral instruments (trombone, tuba, oboe, bassoon, harp) was quite telling. If these instruments were omitted primarily because he wasn't quite sure what to do with them, I'd suggest that he pull a few orchestral scores off the shelf to scout for ideas — any of the 'greatest hits' of Holst, Debussy, Ravel, or Stravinsky should be goldmines for anyone not sure where to start.
 Some of the instrument articulations were rather abrupt, and although it would have been better to remedy this by adjusting the MIDI data at the programming stage, Mike was able to achieve some improvement using simple audio edits and crossfades after the fact.To help take this remix to the next level, I added a variety of background layers to try to expand the sound palette and make the climactic moments more uplifting. An understated low flute line was added to enrich the harmonic backing of the first statement of the main melody in the violins and cellos at 0:28, and this part then rose to thicken the violin texture as it moved into higher registers for the tune's second iteration at 0:40 — a role it then reprised for the climatic trumpet rendition at 2:20. More low-register flute also featured during the transition section at 1:55, combining with new harp glissandi and trombone swells to intensify the mood of instability and expectation, as well as providing extra impetus into the big resolution at 2:07.
Trombones made a big impact under those final soaring theme restatements too, not only doubling the existing bass line, but also joining forces with an extra horn ensemble to emphasise the martial quality of the rhythm — an aspect of this section's character that Kayle mentioned he was keen to make more of. Harp ostinatos and a divisi cello pad contributed some more welcome backing ballast. Although none of these additions seem particularly attention-grabbing if you listen to the full remix, if you mute them it completely disembowels the overall texture — an indication of how important these kinds of subtler details can be in combination. I could have gone on to add other missing wind and brass instruments, but I felt I'd already made my point with what I'd done thus far, so I decided to turn my attention to the equally important question of percussion.
Perk Up With Percussion
 In order to generate more convincing phrasing for the main horn melodies, Mike reprogrammed them with the dedicated Vienna Symphonic Orchestra Legato patch in Native Instruments Kontakt. As long as the MIDI notes were overlapped, this meant that the transitions between notes were rendered much more smoothly and musically.
Listen to the score of almost any Hollywood blockbuster and you'll find it groaning under the weight of multiple percussion parts — especially if, like Kayle, you're a fan of Danny Elfman's scores, which use an enormous range of percussion for musical stresses and general atmospherics. The original mix sorely missed such supplements, so I decided to really roll my sleeves up and try to demonstrate some of the possibilities they might afford for the remix.
My first port of call were a couple of true stalwarts: timpani and cymbals, both from VIR2's extensive Elite Orchestral Percussion library, running in Kontakt. What's so good about these instruments is not only that they can provide simple hits for accenting specific sections/beats, but that you can also use mallet-roll swells to highlight more medium-term musical ebb and flow. If these sounds are to perform at their best, though, it's important to pay close attention to tuning. For timpani, you should try to match the pitch of the notes you use to the harmony, otherwise the drum won't blend well enough to deliver its characteristic 'stealth mode' underpinning. Although exact pitching is rarely as relevant to cymbals, given their wealth of harmonically unrelated overtones, I find that tuning still has an important role to play in adjusting the tone of the cymbal to its context — even a semitone either way can make a surprisingly substantial difference.
 Here you can see the MIDI trigger data for the rhythmic trombone/horn stabs part that Mike added under the final climactic statements of Kayle's main theme. Notice the velocity shaping here: although all the notes have high velocity values, to provide a suitably assertive tone, there's nonetheless a certain amount of variation to reflect the music's metre and phrasing.For the march-like section at 2:07, I rummaged around again in Kontakt for an orchestral bass drum and a couple of marching snares, gluing these together using a similarly themed loop from Big Fish Audio's Symphonic Manoeuvres 2. I figured that something more like a troop than a lone drummer was appropriate here! I was careful not to completely duplicate the rhythms of any of the other rhythmic parts in the texture (such as the string or trombone/horn stabs, or the clarinet/flute filigree), to avoid moving too far into Imperial Stormtrooper territory, and also tried not to be too repetitive in the rhythmic patterns, as I felt that anything too four-square prevented the main melody from getting properly airborne.
A sprinkling of high-end 'fairy dust' during the final melodic iteration at 2:20 came courtesy of a rhythmic glockenspiel counterpoint, while the more diaphanous third statement at 0:59 was embellished with a more understated triangle roll. At that point, I figured that I'd showcased a good selection of fairly simple general-purpose techniques, so I called it a day. However, there would still be plenty of scope for further addition if it took Kayle's fancy.
Fix It Before The Mix
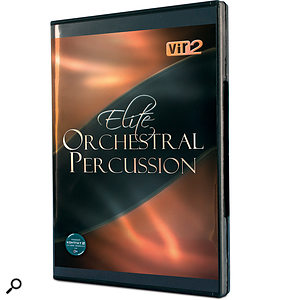 VIR2's Elite Orchestral Percussion and Big Fish Audio's Symphonic Manoeuvres 2 both provided additional percussion layers which made a big difference to the drama and excitement of the final production.
Although mixing skills definitely played a part in creating this month's remix, most of the problems I ended up grappling with could actually have been headed off in advance by fairly simple adjustments to the sound choices, MIDI programming, and general arrangement. In the first instance, it's sensible to choose sample libraries that complement each other tonally, but it's also vital to finesse MIDI trigger data to take full advantage of the available instrument articulation patches if you're going to stand a chance of conjuring up a reasonable illusion of live performance. Beyond this, the effectiveness of an orchestral score is very dependent on the internal rhythmic details and varied tonal shading of its arrangement, so it doesn't pay to skimp on these aspects of the task.
Oh, and if in doubt, add more percussion!
Rescued This Month
This month's Rescuee is Kayle Clements, an experienced professional pianist and composer for choir, stage, and television, with five albums of media music already under his belt. His track 'Marty's Song' was written as a 'thank you' for a friend and supporter, and was put together entirely by Kayle in his Apple Logic-based home studio using a variety of virtual instruments, including LA Scoring Strings Lite, Garritan Steinway, and Native Instruments Kontakt 4's bundled Vienna Symphonic Library patches.
Editing Fixes
 Shifting the flute figurations an eighth note out of sync with the clarinet part offered a simple way of generating more internal rhythmic interest in the orchestral backing texture.I've already mentioned that editing played a role in adjusting some note attack/release envelopes in this track, but Reaper's editing tools helped in other ways too. The timing at various points benefited from some tightening up, not because of any particular carelessness in the MIDI programming, I suspect, but because different sampled sounds often take different amounts of time to 'speak'. Even if the MIDI notes triggering two instruments are exactly aligned, if one of the sounds has a slower attack it may still apparently arrive late, subjectively, and you sometimes need to compensate for this while programming if you want your sampled orchestra to come across as impeccably rehearsed!
Some other copy-and-paste edits ironed out the odd harmonic clash (such as the uncomfortable horn/trumpet juxtaposition at 2:21 in the original mix) as well as simplifying a few bass-line moments. For instance, the original mix's return to the tonic note at 2:17 and 2:29 felt as if it undermined the momentum towards the subsequent resolution (at 2:22 and 2:34 respectively), so I pasted in a note to keep those chords in first inversion and better maintain the harmonic tension.
While I had the editing tools to hand, I also took a few other liberties, by shifting around existing parts into new situations. I missed the opening figurations of the first violin part once it took up the melody at 0:28 in the remix, so I decided to simulate a divisi here by continuing the rhythmic part underneath. Later on, I decided to offset the flute part's timing against the piano from 0:59 to increase the rhythmic interest at that point in the arrangement, and a similar stunt worked equally well later on, against the clarinet rhythms during the grand tutti section at 2:08.
Harmony In All Things
Although I was able to develop Kayle's mix and arrangement considerably during the remix process, I had one underlying dissatisfaction with the production that it wasn't really practical to address, because it would have meant a great deal of reprogramming of the music: all five statements of the main theme are in the same key and follow the same chord progression. Although I have nothing against the chord progression as such, I think it would have improved the emotional impact of the music no end to have a bit more modulation in there, and it could have provided a greater sense of harmonic momentum, too. It's a whole lot easier to create the sense of a musical journey happening if you are actually presenting your melodies in varying chordal contexts and moving through different keys. To be fair, the middle section (1:24-2:07) is a lot better in this respect, but elsewhere I think under-use of the harmonic palette means that the production has to rely rather too heavily on its orchestral arrangement to generate long-term dynamics and generally engage the listener. I've always felt that John Williams' classic scores are a good reference point in this respect, so they would be worth investigating by anyone wanting more help in this area.
Remix Reactions
 SOS reader Kayle Clements.Kayle Clements: "I think it sounds fantastic — a huge improvement — and I am thrilled by your results! The presence I was striving for is there, the whole track just seems to breathe more, and I think the changes in the arrangement add to the overall clarity and life — the new percussion helps add some shimmer and moving the woodwinds off a beat really cleaned up the middle section. I now realise that there's a lot more to achieving definition than just panning, and that arrangement, EQ and reverb can all be used to bring out the various sections and instruments. There's still so much to learn about mixing! Thanks so much for taking this on.”
Listen & Learn!
There are a number of audio files on the SOS web site to illustrate the changes Mike made to this track, including full 'before' and 'after' mixes, which you can download and audition in your DAW.
