 With an attractive user interface, easy-to-understand instructions and a host of useful display readouts, the freeware Room EQ Wizard is a must for every studio owner who wants to improve room acoustics, or hi-fi users who would like to tweak their room's sound with a parametric EQ.
The subject of studio acoustics can seem like black magic — but don't let it scare you off. You can make easy changes, that could vastly improve your recording and mixing environment, with the help of free or cheap PC software utilities, as we discover this month.
While it would be wonderful if you could just connect your audio interface to your PC, amp and speakers and get on with recording great music that sounds exactly as you want it to, often it's not quite that easy, as the room you work in also significantly affects what you hear. I and other Sound On Sound writers regularly talk about the benefits of acoustic treatment, but we remain surprised at how many musicians do nothing to treat their rooms, and don't even consider acoustic issues before piling the gear in and connecting it up.
If you want a sobering experience after installing your expensive new monitor speakers, try moving them to several different positions in your room and playing back the same CD tracks. Even if you listen from the same spot in the room each time, the bass end will probably sound hugely different with each speaker location, while if you walk around the room listening you'll probably notice even bigger variations, with huge amounts of bass at some spots and almost none in others.
This sort of variation makes a mockery of critical mixing decisions, and explains why so many mixes don't 'travel' (don't sound good on lots of different playback systems), yet many musicians still avoid acoustic treatment because they think it's too complicated. Fortunately, there are various PC utilities that can help you decide what to install and where to put it, and you needn't wait until your gear is in place before you consider acoustic issues, either, since other utilities can help you decide whether or not a particular room will be a good shape acoustically or will be a pig to work with. Even if you're considering building a studio from scratch, you can benefit from such utilities, since they can suggest slight changes in dimensions that will benefit you in the end.
Evaluating Studio Spaces
A good goal for the 'in situ' frequency response of your monitoring loudspeakers is +/-3dB over the range 50Hz to 16kHz. However, there are probably some professional studios that don't meet this spec, while, without suitable acoustic treatment, speaker systems in home studios could exhibit peaks and troughs as large as 30dB.
The reason for this is that each of the room dimensions (width, depth and height) will encourage certain frequencies whose wavelengths are related to them. For instance, if your room is 8 feet in length you'll get a set of 'modes' at 70Hz and the harmonics of 70Hz (140Hz, 210Hz, 280Hz and so on), a second set for the room width, and yet another for its height. To stand a reasonable chance of achieving good acoustics, you should try to choose a room whose combined modes are reasonably well spaced across the frequency range, particularly below about 300Hz (above this it's comparatively easy to deal with them using acoustic tiles).
You can calculate your room modes by hand (each lowest Mode Frequency = 6720/Dimension in inches), but why bother, when Ethan Winer has written the freeware PC Modecalc utility (www.ethanwiner.com/Modecalc.exe), which displays the first 10 modes for each dimension of your room and then plots their frequencies across the bottom of the window?
 If you're evaluating several rooms to find the best one for your new studio, or want to build a new one within certain dimensional constraints, RPG's Room Sizer utility can tell you which option will produce the flattest acoustic.The single-dimension 'axial' modes displayed by Modecalc are the strongest ones, but you also get tangential modes that involve two dimensions at half the energy, and oblique modes that involve three dimensions at one quarter of the energy. If you're interested in exploring these too, you'll find another handy Room Mode Calculator that uses Javascript at McSquared (www.mcsquared.com/modecalc.htm).
When you use either of these utilities, just look for any areas where several modes pile up at similar frequencies. That's a recipe for a particularly bad 'honk' that will be more difficult to treat. The very worst room you can choose for your studio is a cube, since all three sets of modes are identical, resulting in an extremely lumpy frequency response. So if you're lucky enough to have a choice of rooms for your studio, or are in the fortunate position of being about to build a studio from the ground up, it's well worth doing some preliminary checks to find the one with the most suitable dimensions — after all, while you can install loads of acoustic treatment to tame most problems after the fact, choosing a room that's as acoustically neutral as possible in the first place should make your life a lot easier.
There are various 'Golden Ratios' of width, depth, and height for rooms, that space the modes more uniformly and therefore sound better, and Modecalc displays some of these. However, RPG's Room Sizer utility (www.rpg-europe.co.uk/Products/software/software.htm), which runs on Windows 95/98/2000/NT/XP, offers a rather more sophisticated approach with more accurate predictions. After you enter the smallest and largest dimensions available for your room, it will search for the best room within these limits and then display the frequency response results between 20Hz and 300Hz for the best and worst dimensions in your range. If you're choosing between several existing rooms, you simply input identical smallest/largest dimensions for each room in turn and Room Sizer will predict how they will perform, so that you can decide which is going to be easier to work with. Obviously, modal pile-ups are bad, but this utility cleverly tells you how much they will affect frequency response.
Siting Monitors
Once you're happy that your room isn't going to be terrible to treat, you need to find the best position for both you and your loudspeakers. As mentioned earlier, the room modes will result in various frequency peaks and troughs at different positions around the room, so what you hear from your speakers will depend to a large extent on where they are placed (unless you've already installed lots of bass trapping to damp down the modes and flatten the response of the room — more details later).
To complicate matters, the speaker/boundary and listener/boundary distances also produce comb filtering. For instance, if your speakers are spaced two feet from the front wall, there will be a 'null' at 141Hz (the frequency at which this distance is a quarter wavelength, and the direct sound and reflected sound bouncing back from the wall therefore end up exactly out of phase). There are further nulls, for example at three-quarters of a wavelength.
This 'boundary interference' is responsible for many frequency-response dips between 50Hz and 200Hz in smaller rooms, but once again Ethan Winer has a handy PC utility you can download (www.realtraps.com/sbirlbir.htm). The DIY-er can use SBIRLBIR.EXE to find out whether a particular dip in room response is due to boundary problems. You can enter a problem frequency and the utility will tell you what distances it relates to, or enter a particular distance (between your head and the rear wall, for instance) and it will give you the series of related frequencies. Once you've found a correlation with your room's response (most easily measured by playing a vanilla sine-wave synth patch from a keyboard and listening for those notes that are significantly louder or quieter than the others) you can try moving your speakers or changing your listening position to reduce the problem.
The height of your speakers from the floor needs to be such that the tweeters are pointing at your ears for the best high-frequency response, so this depends to some extent on whether you're sitting on a sofa or at a mixing desk. Meanwhile, the horizontal spacing of the speakers should be symmetrical about an imaginary line drawn down the middle of your room from front to back. Their spacing will also depend to some extent on how far away from them you're sitting. Most experts recommend an equilateral triangle arrangement, with the speaker distance from your ears the same as the distance between the speakers.
 RPG's Room Optimizer can help you avoid lots of 'equipment shuffling' by telling you the best locations for your loudspeakers and listening position.As you can see, just plonking your ears and your speakers at the most convenient spot in your studio can seriously affect what you hear, and therefore your mixing decisions. Even once you understand all the rules it's still difficult to decide on the best positions for everything. Good rules of thumb are to place your ears 38 percent of the distance from the front or back walls, since this avoids the major modal null points, and to place your speakers either several metres into the room or very close to the front wall, to avoid the worst boundary effects.
Room Optimizer
Having said all this, there's a much easier and more thorough way to determine the best position for you and your loudspeakers, and that's RPG's Room Optimizer utility. Like its Room Sizer partner, Room Optimizer runs on all Windows versions, is designed for rectangular (cuboid) rooms, and can cope with stereo, surround and more complex setups with up to 20 loudspeakers, including subwoofers. When you've entered your room dimensions and user preferences, it carries out the number-crunching for loads of different positions for you and your loudspeakers, shows you the best and worst results, and suggests what additional acoustic treatment would benefit the room and where to place it.
Room Optimizer calculates both speaker-boundary interference and the modal response (both of which are available in graph form for further study), aims for the smoothest and flattest low-frequency response between 20Hz and 300Hz, and can help with decisions about the correct height for speaker stands and seating, as well as speaker positioning. It's an extremely clever utility that should prove very useful to anyone who owns a project studio, or for 'home theatre' users who simply want to find out the best place to site everything without getting involved in lots of practical measurements. This is particularly true of surround setups, where the possibilities multiply alarmingly. However, the software could also save more serious studio owners a lot of time!
You can download demos of both Room Sizer and Room Optimizer from RPG's web site. RPG Europe (www.rpg-europe.co.uk) told me that they are happy to sell both of the utilities on a single CD-ROM for just £60 plus VAT and delivery, which seems very reasonable to me.
ETF5
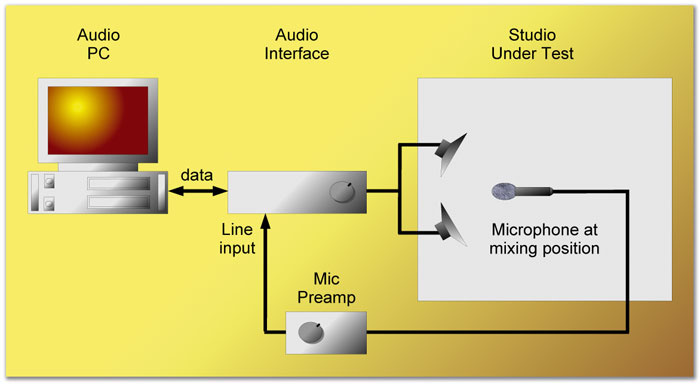
While prediction software is extremely useful, when it comes to the crunch there's nothing better than actually measuring the acoustic response of your room — and, contrary to what many people think, it's not terribly difficult. Essentially all you need are your loudspeakers, an audio interface, a suitable microphone (see box below)/preamp and suitable software, connected as shown in the diagrams.
Doug Plumb's $150 ETF (Energy Time Frequency) utility, which you can find at www.etfacoustic.com, has been extremely popular with PC users over the last few years, because it lets you see your acoustic problems and how they benefit from bass trapping, diffusion, and other treatment, using almost any PC soundcard with a stereo line input and output. When you're running ETF, the left output is always connected to the left input, both to synchronise the test signals and to correct for any tone-control or other frequency-response anomalies in the audio interface, while the right output goes to your loudspeakers and the right input is connected to the test microphone/preamp.
, you can dispense with the mic preamp.") By playing back a suitable test signal through your loudspeakers, and placing an omnidirectional microphone where your head normally is when mixing, you can capture and analyse the sound of your room. If an SPL meter is used instead of a microphone (lower diagram), you can dispense with the mic preamp.
By playing back a suitable test signal through your loudspeakers, and placing an omnidirectional microphone where your head normally is when mixing, you can capture and analyse the sound of your room. If an SPL meter is used instead of a microphone (lower diagram), you can dispense with the mic preamp.
Once you've run a level check and then the actual test signal (which lasts just a couple of seconds), an Impulse Response measurement appears in the main window. It's tempting (particularly for the novice) to leap straight into the various frequency-response views, but the Impulse Response display can tell you a lot about what's happening in your room: the main spike is the initial direct signal from the loudspeakers, while any other (hopefully much lower-level) spikes that arrive later on are reflections arriving after the sound has bounced off your walls, ceiling, mixing desk and so on.
The speed of sound is approximately 1000 feet per second, so if, for instance, there's a secondary spike on the impulse response display at 5ms, the reflected sound that caused this has travelled an extra five feet, so you should be able to guess at the reflection point. (It will probably be one of the so-called 'mirror points' on the side walls and ceiling, where, if a friend holds up a mirror, you can see a reflection of one of your loudspeakers). When you've found the causes of any IR spikes you can fit some acoustic tiles at those points to remove the reflections, which will tighten up your stereo imaging no end.
 Already very popular with many studio owners, ETF5 has a rather utilitarian interface but provides several unique and really handy features.
When you do start examining the frequency response of your room, you'll probably be shocked by how lumpy it is, particularly the low-frequency response between about 20Hz and 300Hz. However, the low-frequency 3D waterfall response displaying the same information over time will be even more of a shock: you'll see how the various room modes 'ring' like organ pipes, the worst ones possibly ringing for several hundred milliseconds. Any bass notes that use these frequencies will not only sound louder than the rest, but also boom like crazy!
Now you can start adding bass traps in the corners of the room to see how much they 'dry up' the ringing and smooth the low-end response by damping peaks and raising troughs. For me, one of ETF 's best features is its 'Sequential Data Acquisition'. Any of its displays can be updated in real time every couple of seconds, so you can move your bass traps around the room while watching the frequency response of your room change, to find their most effective position, or shift your speakers or listening position a little to see if the response becomes flatter.
RPlusD
From the same developer as ETF, there's a new utility called RPlusD (Response Plus Distortion) that is more comprehensive and easier to learn and use. It's a direct replacement for ETF5, although not all of the latter's features are yet in place. Existing ETF5 users can request free registration details for this new product and it costs $150 for newcomers, so if you're interested in either ETF5 or RPlusD, I would suggest you buy ETF5 and then get RPlusD free as well.
RPlusD makes taking measurements a lot easier than ETF5 does, using a completely different test signal that provides a readout of input signal level, its signal-to-noise ratio and the distance between mic and loudspeaker. The beauty of the S/N readout is that you can make the test signals coming from your loudspeakers a lot quieter and still be sure that you're not compromising your results. Only if your studio has a high background noise level will you need louder test signals. The mic/speaker distance readout is handy if you need to measure the combined output from left/right or surround speakers, because if your mic isn't exactly the same distance from each speaker there will be anomalies in the measured high-frequency response.
Once you've captured one or more room responses, you can start to experience the benefits of the sophisticated click-and-drag zoomable display of this software. It's possible to continue taking extra measurements and get them overlaid on the same display, which makes comparisons a lot easier than with ETF5, and you can also average up to 32 measurements, so you can move the microphone around to get more of a feel for room trends. Like ETF5, RPlusD has various smoothing options that modify its graphs to be closer to what the human ear hears, as well as an intriguing new psychoacoustic option, which takes that idea even further.
The 'R' of RPlusD stands for 'Response', and this part of the utility is designed to emulate various DSP hardware EQ units, such as Behringer's DSP1124P, with the aim of helping you set them up to flatten your room response. It does this by identifying response peaks and then performing some clever calculations to generate a set of parametric filter curves, for frequency, Q and level, that should flatten the peaks. These can then be fed into your equaliser. Unfortunately, equalising the direct signal instead of installing suitable acoustic treatment is rarely a good idea in the studio, as it causes both direct and reflected sounds to end up with skewed frequency responses. However, I take author Doug's point that hi-fi and home-theatre users, who may find that extensive bass trapping isn't practical in their listening environment for aesthetic reasons, can achieve cost-effective improvements by carefully positioning their loudspeakers and using a little corrective EQ.
Also new in RPlusD are three-band Energy Time Curves that enable you to separate out the reflections from different drivers (woofer and tweeter, for instance) in your loudspeaker. RPlusD is useful for loudspeaker designers, since its filter response features can be used in the design and optimising of DSP crossover filters. Loudspeaker distortion can also be measured, using a special test signal and a microphone.
Overall, RPlusD is an extremely capable utility with plenty of new features, and there's no denying its power in experienced hands. However, it's still complex for the novice, so you can download an ongoing series of short SWF (Shockwave Flash Format) movies that cover specific aspects of the utility and demonstrate how to get the best from it.
Microphones For Acoustic Tests
You'll need a suitable microphone to capture the 'sound' of your room for acoustic tests. While you can obtain rough-and-ready acoustic measurements using a typical cardioid model as your test mic, the well-known bass proximity effect will skew the low-frequency results. More accurate results require a mic with an omnidirectional response that captures the sound coming from all around the listening position. However, you don't need an expensive one — as long as its frequency response is relatively flat compared with the huge peaks and troughs of most rooms, it will be accurate enough for acoustic measurements. One popular model is Behringer's £35 ECM8000 measurement mic, which apparently also works well for recording acoustic guitar and vocals!
You'll also need to amplify the output of your mic to line level, in order to use it with your audio interface and PC software. If your audio interface already has a mic input, plug it into that; if not, you'll need to pass it through an external mic preamp first.
If you're intending to buy an omnidirectional mic primarily for acoustic measurements, consider instead buying a cheap portable battery-powered SPL (Sound Pressure Level) meter, which is also useful for other tasks in the studio. This includes an integral omni mic that's quite flat enough for acoustic purposes, as well as a built-in preamp whose output you can connect directly to a line-level input in your audio interface. The most popular model by far is the analogue version of the Tandy/Radio Shack SPL meter. Although Tandy no longer have shops in the UK, you can still buy their products from companies such as BK Electronics (www.bkelec.com), who sell the analogue version for just £26.
The advantage of buying one of these is that you can also use it to balance the levels from the various speakers in a surround system, check sound levels at gigs, and calibrate the level of your monitors. If you mix at low levels, you'll be tempted to add more bass, while if you listen very loud you're likely to end up with a bass-light mix at more normal listening levels, so adopting a standardised volume will help you.
Film mixers adopt a calibrated level of 85dB SPL with a -20dBFS test signal, but in the smaller confines of home or most professional recording studios this is likely to be too loud, so a more practical reference is 79dB SPL. To calibrate your speaker levels to this standard you simply need to play back a pink-noise test signal whose RMS level is -20dBFS. You can get one of these from the download page of mastering engineer Bob Katz's web site (www.digido.com). Place your SPL meter where your head normally is at the mixing position, and if you have weighting and ballistic controls on the meter you need to set them to 'C' weighting and Slow response. Then adjust your speaker levels one at a time so that each one measures 79dB SPL.
Room EQ Wizard
RPlusD 's main competitor was also primarily designed to set up room equalisers. Room EQ Wizard (see screen at start of article) started life as a Java application written by the Technical Director of TAG McLaren Audio, to assist users of their room-equalisation filters, but then evolved into a more comprehensive acoustic-testing utility. It runs on Windows, Mac OS X and Linux and is a free download from the Home Theater Shack forum (www.hometheatershack.com/forums), which you'll need to register with first.
The help file is easier to follow than those of ETF and RPlusD, and it guides the newcomer through setting up audio inputs and outputs, the test signal level through your speakers, your interface's input sensitivity, matching the software's SPL meter reading with that of your hardware SPL meter, and then calibrating the audio interface itself so that you can compensate for any frequency-response failings in your acoustic measurements. It also includes compensation curves for the various Radio Shack SPL meters (see 'Microphones For Acoustic Tests' box).
 RPlusD picks up where ETF leaves off, with more sophisticated yet easier-to-use features that will appeal to studio owners, home-theatre users and loudspeaker designers.Once you've captured a measurement, you can study the Impulse Response, Low-Frequency Spectral Decay and Waterfall responses, just as you can with ETF5 and RPlusD. I found such measurements taken in my studio very consistent across all three utilities, which is encouraging. While REW doesn't let you load multiple measurements in different windows, like ETF5 does, or overlay dozens of measurements and average them in the same window, like RPlusD does, I soon found a way around this: REW does cater for up to eight channels of surround speakers, so you can, if you wish, store sequential results from the same speaker in these various channels and rename them, to make before-treatment and after-treatment comparisons easier.
Room EQ Wizard may lack a few of the more sophisticated features of ETF and RPlusD, but its user interface is far easier and more rewarding to use (in particular, the flexible zooming capabilities of the main display windows and the 3D rotation of the waterfall plots). As with RPlusD, you can (and probably should) simply ignore its filter-matching features for studio purposes and concentrate on measuring the benefits of fitting bass traps and acoustic tiles, although if you do have a 31-band parametric EQ available I'm sure you'll be tempted to try the EQ features.
Although I've already used ETF5 for several years, the more experienced I got with Room EQ Wizard, the more I found myself liking its approach. I did miss ETF5 's looped real-time capture mode, which is so useful when you're marching round the room holding a bass trap in different positions, but if you want a free utility that can help you improve your studio's acoustics, Room EQ Wizard is pretty much unmissable.
Conclusion
Overall, this collection of PC utilities can help a great deal with a variety of studio acoustic problems. Although you'll need to be patient to get the best from them, and you'll probably have to spend some money on acoustic treatment, the reward is that your speakers and sound sources will all sound more expensive, while you'll be able to hear details in your mixes that you've never noticed before, and be more confident that they will sound just as good whatever the playback system. Sounds good to me!