 The Project Bay, with media selected and ready to be copied to the project directory.
Here’s how to ensure your Reaper projects will still be accessible a year from now — or even a decade.
All of us need to revisit old projects from time to time — and nothing makes the heart sink quite like clicking on an archived file to be greeted by a tangled web of unlinked media and missing plug-ins. However, much of this grief can be avoided by appropriately preparing and archiving your Reaper projects.
Media Management
Let’s suppose we want to open an archived Reaper project that is a few months old, by copying it back onto the same machine that was used to create it. Cockos have always been very good about backwards compatibility, so even if Reaper has been through a couple of version increments in the meantime, there should be no issues with the program or any plug-ins used. In this scenario, the main risk is that media have gone missing in the archiving process.
By default, Reaper records audio in the same folder as the project file, but there are instances where items might be lurking elsewhere, and be missed when you archive the project. If you started recording takes before you saved the project, for example, those early recordings will be in Reaper’s default recording path (usually in your Home folder, under Documents\Reaper Media). Any loops or sound effects you dragged into your project from external drives or other folders will most likely still reference those original locations, too. If anything has happened to those folders/drives between the original recording and loading the archive, those audio files will be lost.
Before putting a project on the shelf, it’s thus good practice to ensure that all media are in the project folder, and Reaper provides a couple of simple ways to consolidate all your project media into one place. One method uses the Project Bay. Bring up this window by pressing Command+B (Mac) or Ctrl+B (Windows), and select the Source Media tab at the top. This will list all media files referenced in the project, with columns displaying information about each file. If you can’t already see the Path column, scroll right to reveal it. Now we can scan the list for files residing anywhere other than our project directory. It can be helpful to click on the Path heading at the top of the column, which re-sorts the list according to location. Once you’ve identified the media that you need to wrangle, select (using Command/Ctrl-click, or Shift-click for multiples) and then Command- or right-click to bring up the contextual menu. From here, select ‘Move/Copy file’, and then ‘Copy file to project media directory’.
You may also notice some Move commands — use these with caution! If you’re relocating files from Reaper’s temporary recording folder, they’re probably OK, but if you’re relocating files from an external loop or sample library, you can accidentally blow a bunch of holes in your library, as the files will be deleted from their original location! If in doubt, use the Copy command and clean up any duplicates later if you feel the need.
You can also consolidate files by creating a brand new archival copy of the project and all its media. To do this, select ‘Save Project As...’ from the File menu, and navigate to the location where you’d like to archive the project. Near the bottom of the Save dialogue, tick the ‘Copy all media into project directory’ box. At this point you can also elect to convert all the archived project media to another format. To do this, check ‘Convert media’ and choose your desired settings by clicking on the ‘Format...’ box. If hard drive space is at a premium, for example, you might like to use a lossless compression format like FLAC or WavPack. You can also check the ‘Trim media’ box, which will remove leftover media that doesn’t appear on the timeline (with optional ‘tails’ to allow a bit of editing after the fact). Personally I tend not to use these options: hard drive space is relatively cheap these days, and I prefer my archived projects to be as complete as possible. With your options in place, hit Save, and a new copy of your project, complete with all its media, will be created in the new location.
Freezy Like Sunday Morning
The more time passes between archiving a project and trying to open it again, the more likely it is that your system won’t be able to open that project exactly as it was. Perhaps you ditched some old samples, or an OS update rendered one of your plug-ins unusable. Loading up the project file triggers an array of ‘missing plug-in’ warnings, and several virtual instruments make no sound because their sample data isn’t present.
Keeping this scenario in mind when making archival copies, I suggest a ‘Hope for the best, prepare for the worst’ strategy. Your current plug-ins might still be available when you need to access the project again, but in case they aren’t, we’ll store the audio resulting from these plug-ins as audio files, so we can still bring up the core elements of the project.
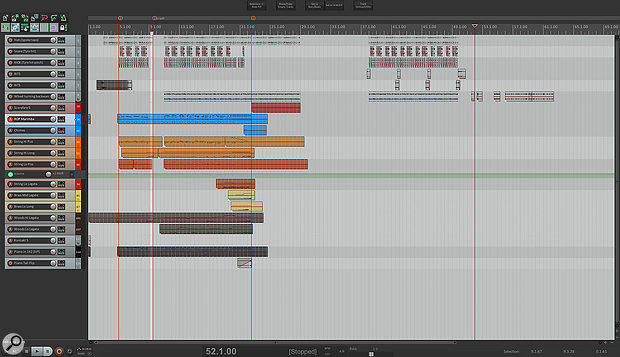
 These two screens show a Reaper project before and after freezing.
To do this, we’ll use Reaper’s Freeze command. Freezing performs a pre-fade render of the selected tracks, then ‘offlines’ the track’s effects. It will also render any track returns, so you can use it for things like your reverb return channels. So, although more commonly used to save processing power, Freeze is a handy archival tool.
 The project with all tracks frozen will open and play correctly on any Reaper system, even if key plug-ins are missing.
Freezing tracks is easy. Select a track with virtual instruments and/or processing plug-ins, then either select ‘Track’ from the menu bar, or right- or Command- click on the TCP to bring up the context menu. From here go to ‘Render/Freeze tracks’, and then ‘Freeze tracks to multichannel (render pre-fader, save/remove items and online FX)’. There are mono and stereo variations, but the multi-channel option will automatically use the appropriate Freeze type for your track configuration, so it’s simplest to use that. You’ll see a render dialogue, and then your track media will be replaced by locked items. Repeat for all your tracks (or multi-select and do it all in one), and you’re done.
Once all tracks are frozen, you’ll be able to open the project in a completely vanilla installation of Reaper and have all of your tracks sounding exactly like they should. Reaper will still flash up dialogues warning of missing plug-ins, but the audio will play from the frozen tracks just fine. If you do manage to track down the appropriate plug-ins, simply unfreeze the tracks (using ‘Unfreeze Tracks’ from the same menu as for freezing) and return to the original media.
Ready For Anything
I realise a future where you can’t access Reaper seems pretty outlandish, especially as Reaper’s Portable Installation capability (see SOS November 2015 for more on this) lets you store a full Reaper installation alongside your project archive, as added insurance. However, there are times when you might want to archive a project in a ‘DAW-neutral’ format, perhaps for instance if you’re giving it to someone else to mix, or thinking of trying another DAW yourself.
A Reaper project consists of an RPP file and a bunch of WAV files. Whichever software you’re using will almost certainly know what to do with the WAVs, but it has no idea how to read the RPP file, so it won’t know which one belongs on which track, or where they sit in relation to one another. Even if you can get them all lined up, you’ll have no plug-ins, no automation and no virtual instruments.
It’s unlikely there’s an archival method that could prepare you to completely recreate a complex Reaper project in another DAW. However, we could at least facilitate a restoration of the mix by rendering all of the original tracks as stems. This gives you a collection of equal-length audio files corresponding to your project tracks, and provided your target system can read WAVs (or whatever format you export in) you should be able to reassemble a perfect facsimile of your original mix, minus any bus processing.
Name Academy
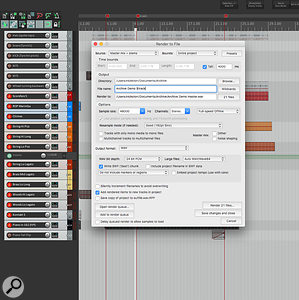
 The Render dialogue setup to export stems.Reaper makes stem rendering simple. Click on a track panel in your project, and press Command+A (Mac) or Ctrl+A (Windows) to select all tracks. Open the Render dialogue (File/Render), and from the Source drop-down menu select either ‘Stems (selected tracks)’, or ‘Master mix + stems’. I tend to use the latter, as it can be handy to have a full mix for reference. Set your file location and output format as you would for a normal Render, but take a moment to add some filename wildcards, so we get sensibly named files (otherwise they’ll just be sequentially numbered, which can be annoying!). In the File Name dialogue, type ‘[PROJECT NAME] $track’ (Where [PROJECT NAME] is the name of the project you’re rendering). The relevant track name will be appended to each exported file, making them vastly easier to identify. (Click on the Wildcards box and you’ll see a host of other fields you can use.) Hit the Render button, and all your files will export.
Those few archival approaches can prepare you for most eventualities. I use a combination of them — when I’ve finished a project, I’ll freeze all my tracks, render stems, and consolidate everything into a new project on my archival drive. Overkill? Probably. But it’s better to be safe than sorry.
I’ve also created a quick video tutorial (http://sosm.ag/reaper-0517), which takes you through these archival strategies.
