 A simple audio editor like Audacity is all you need to make the most of samples in Reason 4.
Reason's sample replay devices — Redrum, NN19-and NNXT — are screaming out to be used for creative sample manipulation, and yet so often we just use them for loading up patches from commercial Refill libraries.
Reason 5 promises to make doing your own sampling even easier — see last month's Reason column for more on that. But it's hardly difficult in Reason 4, or in earlier versions, as long as you have an appropriate audio editing application. The idea is this: you record into the audio editor, tweak your sample as appropriate, save it as a WAV or AIFF file, and then import it into Reason to use as you wish. We'll look at the whole process here.
Sampling
First of all, then, what about audio-editing applications? Many users will doubtless already have their own favourite audio editor, the likes of Sound Forge for Windows, or BIAS Peak for the Mac. As well as opening up pre‑existing audio files, these will record new ones from a mic or line‑level input. The open source Audacity is also great for this, and that's what I've used in the screen shot above to record, trim and normalise a simple vocal sample.
The next step is to save your sample — choose WAV or AIFF for this, but don't worry too much about sample rate and bit depth, as Reason can handle pretty much anything you throw at it. As usual, 44.1kHz and 16‑bit or 24‑bit is a pretty good option.
As to where you save it, it's not a bad idea to create a new folder for the purpose, and you can put your Reason song file in there too, to create a 'project folder'. Keeping songs and any special samples they use together in this way is always a smart move.
Replay
 Samples can be loaded into Redrum and NN19 via the Browse Sample button, which carries a little folder icon.
Now you can switch to Reason and choose the best sample replayer for your purpose. Redrum is great for individual drum hits, of course. NN19 is a good choice to load a sample you want to 'play' as a melody or bass line, say. NNXT is more sophisticated still, but overkill for simple sampling needs, so we'll just look at the first two.
Loading a sample in Redrum could hardly be easier. After creating the device, you notice that every one of the 10 drum 'channels' has a Browse Sample button beneath its red LED readout — it looks like a folder icon. Click one to open up the Sample Browser dialogue box, navigate to your sample, select it, and click OK. Then you can tweak pitch and length to your heart's content. Not all the channels are the same though: channels 1, 2 and 10 have tone controls that can be modulated by velocity. Channels 6 and 7 have pitch envelopes for tom‑style bends. See what works best for your individual sounds.
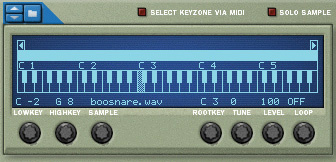
Now for NN19. After creating one in the rack, right‑click an empty area of its front panel and choose Initialise Patch — we're starting from scratch here. Click the Browse Sample 'folder' button above the central display, navigate to your sample, and load it as you did for Redrum. NN19 loads this sample into a keyzone that spans the entire pitch range, so you can immediately play it from your keyboard. It also assumes that the original pitch of the sample is C3 (check out the 'Rootkey' parameter in the display). That's all very well if it was C3, but if not, your sample is going to be out of tune with the rest of your sequence if you play it melodically. To fix this, if necessary, adjust the Rootkey knob, and maybe the nearby Tune parameter too, until playing the sample gives you the notes you expect. You may want to quickly refer to a basic synth sound as a reference as you do this.
To take it further with NN19, try right‑clicking the central display, and choosing Split Key Zone. Now you'll see the keyzone bar above the keyboard display has split in two. Click one side and you'll see your sample named. Click the other, and you'll see '** no sample **', so this new keyzone can now accept another sample loaded via the Browse sample button, as before. Voila — multisampling! You can also keep splitting keyzones and loading new samples in this way, if you want to. It goes without saying, too, that NN19 has a fully‑featured synth engine, so envelopes, LFOs and filters are available to sculpt your sample if you need them.
Resampling
The gist of resampling is that you 'bounce' a small section of an entire Reason mix as an audio file, then load it back into an NN19, say, to give yourself even more creative options. We'll have a look at the basic procedure, and then how you might achieve three common 'resampling' style treatments: grungy, down‑tempo loops, the 'vinyl brake', and repetition or stutter effects.
The key to this technique is Reason's ability to export a portion of a song as an audio file. To try it, load up a Song, and set your 'L' and 'R' loop markers in the sequencer to surround just a small section — maybe a single bar, or a few beats. Remember that the movement of the loop markers is subject to any current Snap To Grid setting, so you might need to adjust that or turn it off to be really precise. Mute any tracks you don't want included, then choose 'Export Loop as Audio File' from the File menu. Reason asks where you want to save it (in a folder with your Song file is a good idea, as I mentioned before). You should also get the choice of saving the sample in WAV or AIFF format. Either is good, so go with your personal preference here. After clicking 'Save', there's one more dialogue box, asking for sample rate and bit depth — go with 44.1kHz and 24-bit and click 'Export'.
Now, just as if you were loading a 'normal' sample, create an NN19 sampler in your rack, right‑click it and choose Initialise Patch. Click the Browse Sample button above the central display, navigate to the sample you just saved, and load it.
If it's just slowed‑down (or sped up) playback you're after, it could hardly be easier. NN19 assigns your sample a root key of C3, so if you play C2 on your keyboard the sample will come out half speed. Try C4 and it'll be double‑speed. All other pitches are possible too, of course, but they may not be rhythmically useful, depending on the nature of your sample.
 Reason's Song Self‑Contain Settings dialogue box can save your samples directly into the Song file.What about that 'vinyl brake' effect, which seems to have been trendy for about the last 20 years? The quickest and easiest approach is to set NN19's bend‑range parameter to the maximum of 24 semitones using the 'LED' display above its pitch-bend wheel at far left. Then, after you trigger the sample at its original pitch from your MIDI keyboard, by playing the key C3, simply pull down your pitch‑bend wheel...
Finally, what about those repetition or 'stutter' effects? These can range from short‑lived 'ear candy' to the repetitious build‑ups that are still so much a part of many dance styles — where you repeat two bars, then one, a couple of beats, then a single beat, and then sub-divisions of the beat, in the run-up to a monumental return of the chorus. Just bounce the bars you need and trigger them repeatedly. You'll probably need to draw notes at C3 directly into the NN19's track lane with the pencil tool, for the necessary rhythmic precision.
 Here, a two-bar song section is being 'bounced' prior, to loading back into an NN19.In all these cases, you're using NN19 to replace existing sequence material with something tricksy, so don't forget to actually 'clear a space' in your song, ready for the resampling effect to step into. This could be easily done by literally deleting note data for the region, or in a more time‑consuming way, by automating mixer mutes for tracks other than NN19. Reason 5 and Record 1.5 users also have the option of using the Mute tool, which they can click and drag over track data to silence it without deleting it — the best of both worlds.
Lost & Found
One slight risk when using your own samples in a Reason Song is getting them and your Song file split up, perhaps when archiving your project, or sharing it with a collaborator. If that happens, the song won't open properly next time, and your samples will be missing from playback. But this awful fate is easily avoided: go to the File menu and choose 'Song Self‑Contain Settings...' A dialogue box opens that may be chock-full of samples from any Refills you're using. But lurking somewhere will be your individual samples. Tick them one by one, or click 'Check All', and from then on they'll be included within the Song file.