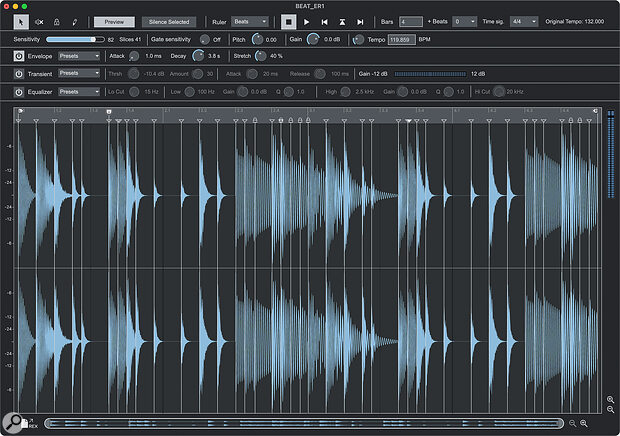
 Screen 1: The free release of ReCycle has updated graphics and a dark mode option.
Reason Studios have reintroduced their classic beat‑slicing software — and it’s free!
Reason Studios have given their legendary beat‑chopping tool ReCycle a fresh lick of paint and made it available for free. Thank you! While many DAWs and hardware workstations, including Reason itself, can do some of the things ReCycle does, it still has unique features and is an essential tool for sound designers and soundpack/Refill creators.
ReCycle was actually Propellerhead’s first commercial app, although it was initially marketed as a Steinberg product. The primary use case was for editing and chopping loops and sending them directly to supported hardware samplers like the Akai S1000 and Digidesign SampleCell. However Steinberg saw it as a complementary product to Cubase, clearly predicting that most sampling and loop‑based production would move into DAWs.
The Importance Of ReCycling
ReCycle is a simple stereo audio editor designed to prep samples (typically loops or phrases rather than one‑shots) for use in another sampler or DAW track. It can do basic editing jobs but its primary purpose is to break a sample into smaller slices, which can then be re‑timed or triggered individually via different MIDI notes.
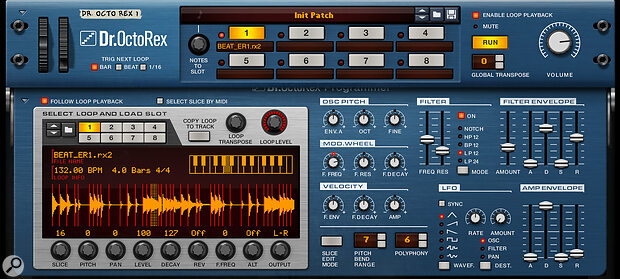
 Screen 2: Our loop imported into the Reason REX player device.
There are three main reasons why you might want to do this. The one which ReCycle has been used for the most is to have a rhythmic loop play in time with a project without time stretching. Any sampler or DAW that can understand ReCycle’s file export format (REX2) can load a ReCycled loop and play it back at any tempo. The file metadata timestamps each slice at a particular bar/beat position, so your sampler can trigger each slice in time, or your DAW can place them in the right positions on a track. Change the tempo of your project and all the chopped components slide further apart or closer together (see Screen 4), and the overall loop or phrase stays in time with no warping artefacts.
 Screen 4: At a significantly slower tempo here in a Pro Tools audio track, you can see how the slices become spaced out.
Having the sample chopped into parts presents other creative possibilities, giving us reasons two and three for ReCycling. A REX‑aware sampler or workstation will typically extract a MIDI sequence that reconstructs the original loop. By the simple expedient of shuffling those notes around you can create new patterns and variations. You can also play and capture new musical phrases and ideas by triggering the slices manually: the foundational hip‑hop chopping technique. There’s no reason why slice triggering should be constrained to monophonic playback. A ReCycled drum loop or break instantly turns into a drum kit when played polyphonically from a MIDI source.
First Steps
ReCycle 2.5 is a standalone app for both Mac and Windows. To get started you’ll need a free account at reasonstudios.com to grab the installer. At launch you’ll be prompted to open an audio file. This can be a WAV or AIFF, or of course a native RX2 file.
When opening an audio file you’re required to enter the length of the sample in bars. Don’t worry if you don’t know this because you can change it afterwards. Once open you’ll see the Bars value at the top right, along with Beats, Time Signature and Original Tempo. This tempo value is calculated by simply comparing the length of the sample with the Bars value you provided, and assuming that the sample is a neatly trimmed loop. Hit Space to listen to your sample, then use the time fields to accurately tag the length and time signature. If you need to trim off any padding from the start or end, move the left and right locators in the time ruler to mark what you want to keep, then choose Crop Loop from the Process menu.
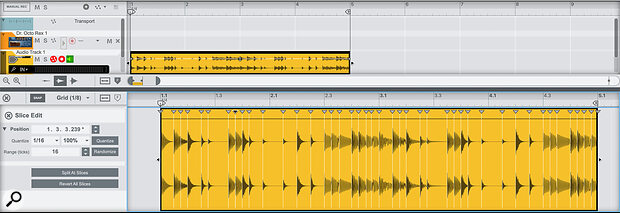
 Screen 3: Dropped into a Reason audio track, the REX loop conforms to the project tempo and you can see the slice markers become warp markers.
Slice of Life
Now you’re ready to chop. First I’d switch the Ruler view to Beats (it defaults to seconds) so that the visual grid is way more useful. The quickest and most common approach is to use transient detection to generate a slice marker. This is the way to go if you want to prep a drum loop for tempo‑matched playback. If you’re looking to re‑sequence a longer musical passage or breakbeat, it’s sometimes more useful to leave longer slices containing multiple transients, in which case you’re better off working manually.
Push the Sensitivity slider up and you’ll see slice markers begin to appear. No doubt you’ve done this before in other apps or workstations: aim for the sweet spot where all the hits in the loop get marked and you don’t get any false triggers. With clean drum loops or clear rhythmic sequences this automatic detection may be all you’ll need.
At the top left of the toolbar you have four editing tools. With the second one you can audition individual slices by clicking. The other two tools give you complementary ways to interact with slice marking. The Lock tool lets you click on any marker to lock it. (You can also right‑click slices to do this without switching tools.) When you can’t detect all the hits you need without also picking up false positives, you can lock markers that you want to keep then back off the Sensitivity.
The Pencil tool is for creating slice markers manually. Hover over the waveform not the ruler, and you’ll see a vertical guide to help you get an accurate selection. Holding Command (Mac) or Ctrl (Windows) reveals a zoom option to get a clearer view. Again, this could be in addition to your automatically generated markers, or you could work from scratch.
Preview & Process
To check the results make sure Preview is active and start playback. Adjust the tempo dial to hear how your loop will sound at different speeds. With a drum loop with short, clearly separated hits it should sound like the same loop performed at different tempi. If the timing sounds like it’s gone off anywhere, you’ve likely got one or more slices containing more than one transient. You’ll need to separate these.
If the loop sounds gappy, with sound cutting off between chops, the problem is that the decay of hits overlapped each other in the original and have now been pulled apart. Recycle has a trick here, which is the Stretch parameter. This extends the tail of each slice to try to fill the gap. This is quite a crude stretch so might sound weird if overdone.
Beyond chopping, Recycle has a few bonus sound design tools that you can use to creatively change loops.
Beyond chopping, Recycle has a few bonus sound design tools that you can use to creatively change loops. The Envelope section gives you a simple attack/decay volume envelope that is triggered with each slice. Reducing the decay time is a great way to mitigate gappy playback on loops with slices that run together. I’ve often had fun creating pulsing synth loops by opening a drone sample, slicing it into regular intervals (there’s an ‘add slices at 16ths’ menu option) then adding an envelope.
The Transient section has some overlap, but operates like a traditional transient designer dynamics processor on transients in the audio rather than slices, offering a bit of extra punch. Below this is an EQ section, which you’re probably not going to need if you’re using your loops in a DAW. Lastly there’s a Pitch knob that provides a simple varispeed repitching of your sample. Sadly this is the closest thing ReCycle has to a true time‑stretch. If you’re using longer chops with multiple hits or notes, you’re essentially limited to working at the sample’s original tempo unless your DAW can stretch the individual slices after import. (Maschine can do this, for example).
The internal ReCycle processes, including the tail stretching, are baked into the file on export. This is useful for sound designers prepping loops for a library, or when you’re going to use the loop directly in an audio track. However, if you’re going to use a REX‑aware sampler like Reason’s Dr OctoRex, many of the features like envelopes and pitch‑shifting will be available as real‑time playback operations.
To export your creation you can simply save it, and it will produce a REX format file. Alternatively there’s a REX file icon at the bottom left of the window, which you can drag directly to any other app that supports drag‑and‑drop sample import. Finally, if you simply want to export an edited and re‑timed loop as a regular audio file choose Process / Export as One Sample. And finally finally, File / Export gives you more audio export options and the chance to generate a MIDI file that will play back your loop if you’re dabbling with ’90s samplers.
