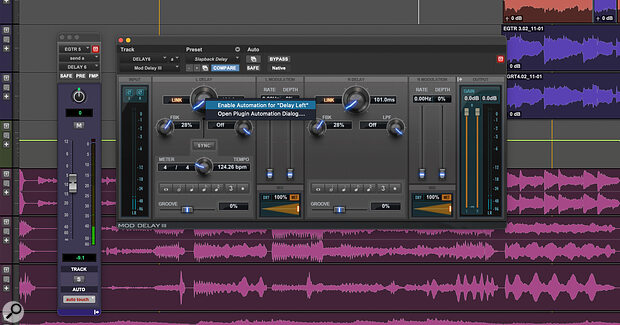
 You can automate almost everything in Pro Tools, but for plug‑ins, you’ll need to enable those parameters first.
Could the humble mouse be the only Pro Tools controller you need?
Automation can really make a difference to your mixes — and Pro Tools has a particularly deep and sophisticated automation system. But how you control that automation system makes a difference too.
The obvious choice is a hardware control surface. People who successfully incorporate a control surface into their workflow usually have nothing but praise for the benefits. However, not every experiment with a control surface is successful. To make a difference, a control surface has to work better than the already familiar keyboard and mouse, and for many tasks it’s just too easy to keep using what you already know.
The best control surfaces represent a significant expense, and take time to learn properly. If your first experience of a control surface is slower and more difficult than the point‑and‑click simplicity of the mouse, it’s not surprising if it doesn’t stay part of your studio for long. With practice though, you might eventually reach the mix nirvana of the dedicated EuCon devotee who can mix with console‑like speed, bringing parameters and tracks up using custom layouts and ultimately being so comfortable on the surface that the screensaver kicks in on Pro Tools without them even noticing. It happens!
However, the majority of Pro Tools users rely solely on drawing in automation. For editing existing automation, it is the most accurate and detailed method available. But for writing a first pass of automation it’s less effective. It’s ideal for certain tasks such as controlling switched parameters like plug‑in bypass or mute, but it’s slow for the majority of mixing tasks compared to either using a controller or a mouse to input automation in real time. Drawing directly into the automation playlist is often the first way new users interact with automation, and many users stay with it exclusively.
Point & Click
Clicking automation data into a playlist can be very efficient if you know exactly what you want to do, but it has a down side: you can only audition the adjusted values after you’ve released the Edit tool. This leads to time‑consuming auditioning of material in a tweak, play, re‑tweak, replay cycle.
That said, getting to know the available Edit tools really helps speed things up. The Pencil tool is obviously the one to use for freehand drawing, but the Line pencil is useful too, and don’t overlook the Triangle and Square tools for grid‑based panning and tremolo/gating effects (try automating a filter with the Random tool for instant synthesizer‑like sample & hold sounds). The Trim tool is excellent for adjusting selections, and the Grab tool is the go‑to choice for creating and manipulating breakpoints.
A great tip is to hold Command+Option (Control+Alt on Windows) and click with the Grab tool to create a new breakpoint at the same level as the previous breakpoint. Swap Command (Control on Windows) for Shift to do the same at the next breakpoint value.
There’s lots of good things to say about drawing automation, but it’s not the best choice for everything.
Keeping It Real
Between the two methods of clicking automation in and using a control surface lies using your mouse or trackpad to input automation in real time. While far from a secret, it does seem to be overlooked by many! This real‑time workflow can be done using the on‑screen faders, knobs and plug‑in user interfaces in Pro Tools.
Pro Tools allows almost everything to be automated. Writing automation is different from recording audio or MIDI to the timeline, most notably in that it is done with the transport in Play. You’ll need to known how to enable parameters that aren’t enabled by default (plug‑in parameters need to be enabled, for example), and the simplest way to do this is to click on the control you want to automate while holding Cmd+Opt+Ctrl (Ctrl+Alt+Start on Windows) and selecting Enable Automation for “[your parameter]”. You’ll also need to be in an automation mode that permits data to be created. Write mode is best treated with caution, as it will overwrite existing automation, so the usual choice is between Touch or Latch modes. Familiarity with the contents of the Automation Window, found in the Window menu, will cover all you need for basic use.
For a Studio or Ultimate user, the next step would be to learn the Manual Write and Write On Stop commands so that you can, for example, find the most comfortable level for a vocal while playing and have Pro Tools write that level back to the beginning of the selection when you hit Stop. These will do most of what you need, and the advanced features such as Capture and Preview, Trim, Auto‑Join and Latch Prime On Stop, to name a few, are all there to solve specific problems or make particular tasks easier. It’s good to learn what they are for in case you encounter situations where you need them.
Floating Faders
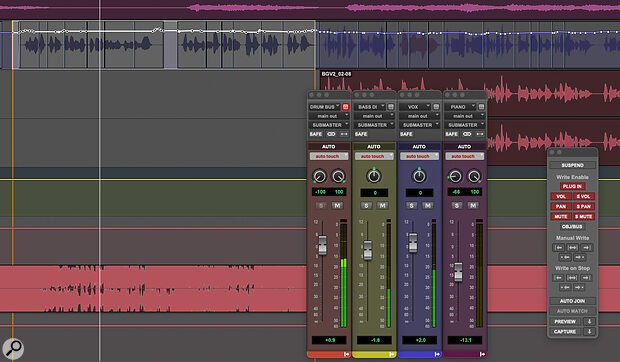
Many people would rightly point out that there’s nothing like a finger on a fader, but we’re all pretty adept at using a mouse. There are helpful workflow tweaks which can make this even more comfortable. I’ve always been a heavy user of the Mix window and, as the name implies, this is intended for mixing. Many people favour exclusive use of the Edit window, though, and if that’s you, you can make use of the floating faders, more correctly referred to as Output Windows, which can be accessed by clicking on the little fader icon on the right of the track’s output tile. You’ll need to show I/O in the track headers in the Edit window. These floating faders are indispensable when writing volume automation with a mouse.
 You can open multiple Output Windows, with each set to target a different track, to give you as many ‘floating faders’ as you need to write your automation.
There are two approaches you can take. If you open a floating fader and later click on the Output Window button on another track, that Output Window’s contents will update to that new track. In this way you can navigate a session using a single floating Output Window. The alternative — and you can use these two approaches in combination — is to Shift‑click when opening multiple Output Windows; they will open with the target button deselected and you can keep several faders accessible at once. You can arrange them to your liking and save them as a Window Configuration for easy recall, too.
If you find your screen is cluttered with floating faders, hide them all at once using Cmd+Opt+Ctrl+W on a Mac or Ctrl+Alt+Start+W on Windows. This is a toggle command, so hitting it again brings them all back. Very useful indeed.
The Write Stuff
When it comes to the business of actually writing your automation, there are a few tricks you can use to add some extra control to your on‑screen faders. The first is to hold Cmd on a Mac or Ctrl on Windows for extra‑fine movement. This works on any control, not just faders.
If you’re using Mix groups, the faders will typically be linked and will move together when the group is active. If you only want to write automation to one grouped track you can of course deactivate the group or temporarily suspend all groups using Shift+Cmd+G on a Mac or Shift+Ctrl+G on Windows. Alternatively, you can do the equivalent of ‘clutching’ the faders as you would a control surface, by touching more than one fader cap. To do this hold Ctrl on a Mac or Start on Windows to momentarily ungroup the fader.
If you’re working with automation in Pro Tools you simply must know the shortcut to quickly display an automation parameter. Hold Ctrl+Cmd on a Mac or Start+Ctrl on Windows and click on the parameter’s control to display its automation playlist.
I mention this frequently but if you’re working with automation in Pro Tools you simply must know the shortcut to quickly display an automation parameter. Hold Ctrl+Cmd on a Mac or Start+Ctrl on Windows and click on the parameter’s control to display its automation playlist. Hold those modifiers and click the track name to go back to the main clips playlist.
You can definitely improve your confidence amd speed at writing automation by getting comfortable on a control surface, but you can absolutely work without one too, and the two approaches of editing automation playlists for fine work and using on‑screen controls in real time for a more fluid, ‘bigger picture’ perspective work well together. If you overlook riding your faders in real time in favour of diving straight into the automation playlist then you might be working too hard. You might find fader moves easier and faster, and that usually results in better mixes.
