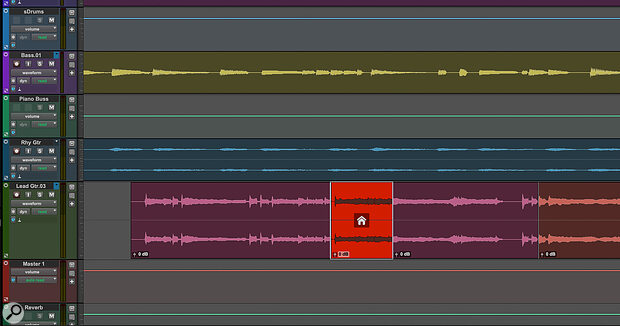
 A guitar solo, comped using playlists. The pink track has been ‘promoted’ to be the main playlist (which you hear when the track plays back), and a section from playlist 04 has been inserted into it.
Playlists are the key to managing takes, comping, and much more! Let's explore...
In Pro Tools, many of the most useful features aren’t recent additions, but quietly solid tools that have been there for years. Playlists are a perfect example. They’re not new. They’re not exclusive to Pro Tools. But if you record or edit in Pro Tools and you’re not using them properly, you’re almost certainly making your life harder than it needs to be.
Pro Tools playlists allow you to manage multiple takes or alternative versions on a single track, without any unnecessary duplicating. It’s the feature that underpins everything from vocal comping to ADR to guitar solos and multi‑mic drum sessions. Recent updates have added support for MIDI playlists too — a long‑requested feature that finally brings parity between audio and MIDI workflows in this area.
In this article, we’ll look at what playlists are, how they’re used, and why they’re still one of the most valuable tools in Pro Tools for producers, engineers and editors.
A playlist in Pro Tools is basically a version of a track’s contents. Each track has a main playlist, which is what you see and hear by default, but you can also create as many alternate playlists as you like. Each one is a full version of the track’s timeline, complete with clips, edits and fades.
Playlists are most commonly used to manage alternate takes, whether captured during recording or created as part of an editing process. Instead of duplicating tracks or muting clips, you can simply create a new playlist for each take and switch between them as needed.
The beauty of playlists is that they live within the track. There’s no clutter in your session. No duplicated inserts or sends. No reassigning outputs. Just clean, contained organisation...
The beauty of playlists is that they live within the track. There’s no clutter in your session. No duplicated inserts or sends. No reassigning outputs. Just clean, contained organisation that scales well whether you’re working with a single vocal or 20 tracks of layered guitars.
Creating & Managing Playlists
One scenario where playlists can be invaluable is when you want to try out an edit to see whether it works. Rather than relying on the Undo feature, or saving an alternate version of your session, you can just duplicate the content of your main playlist to a new playlist and edit it there. If it turns out to be a bad decision, you can simply revert back to the original playlist.
To create a new playlist, click the Playlist selector in the track header (that’s the drop‑down that shows the track name by default) and choose ‘New’. Alternatively, you can use the shortcut Control+\ (Mac) or Start+\ (Windows).
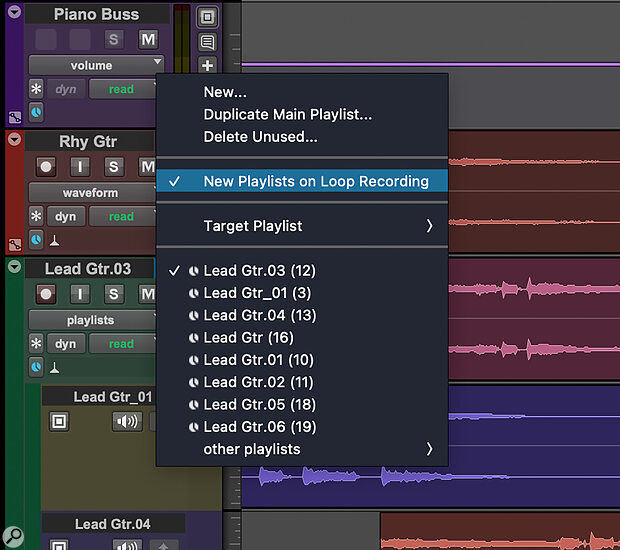
 With this option enabled, a new playlist will be created for each take when using the Loop Record feature.
You can duplicate, rename or delete playlists from the track header. And if you’re unsure whether there are alternate playlists on a track, look out for the playlist selector next to the track name. If it’s blue, there are alternate playlists on that track.
Loop Recording
One of the best ways to use playlists is in combination with Loop Record. Please note that Loop Record is a dedicated record mode, accessed by right‑clicking the Record button. Recording while Loop Playback is engaged is not the same thing. With Loop Record enabled, Pro Tools can be configured to automatically create a new playlist for each loop pass. You simply let the track roll and every pass is captured in its own clean lane.
To make this work, make sure the preference is enabled: go to Setup / Preferences / Operation, and under Record, enable Automatically Create New Playlists When Loop Recording. Alternatively, you can access this preference from the track header by clicking the Playlist selector. Once it’s on, a new playlist is created every time the loop cycles. This is ideal for capturing multiple takes quickly without breaking the flow of a session.
Once recording is done, it’s time to switch to...
Playlist View
Playlist view is where the power of playlists really becomes apparent. From the track header (where it normally says Waveform or Clips), choose Playlist. This view stacks all the track’s playlists vertically, so you can see every take in one place.
Each lane shows the waveform for a different playlist, with a solo button that lets you audition that playlist instead of the main playlist. You can solo any lane using the Shift+S shortcut, or by clicking the solo button directly.
Once you’ve found the part of a take you want to use, just select it and use the shortcut Option+Shift+up (Mac) or Alt+Shift+up (Windows), or click the upward‑pointing arrow in the lane header. That moves the selected audio to the main playlist — the one you’ll hear in your mix. You can also drag clips from any playlist lane into the main track if you prefer working with the mouse. Playlists support crossfades, clip gain, clip effects, and all the normal editing tools, so once your comp is built, you can fine‑tune transitions, timing and dynamics exactly as you would on any other track.
Keyboard Shortcuts
Comping together the best bits from your alternative playlists is faster and more intuitive once you know a few key shortcuts:
- Control+\ (Mac) or Start+\ (Windows): Creates a new playlist. Fantastic for quickly capturing another take without the singer having to wait for you.
- Shift+S: Solos the selected playlist lane, great for auditioning takes. You can rate them out of 5 from the right‑click menu.
- Opt+Cmd+Shift+up/down: Cycles the clip selection through available playlists, making it easy to audition alternative takes in context.
Once these are second nature, playlist comping becomes a quick and fluid part of your workflow — not something that slows you down or interrupts your creative decisions.
 Using the shortcut Opt+Cmd+Shift+up/down, you can cycle through different playlist versions of the same clip, to hear and evaluate them in context.
MIDI Playlist Comping Workflow
Until recently, playlists were exclusive to audio tracks. That changed with the introduction of MIDI Playlists in Pro Tools 2024.10, which finally brought the same comping workflow to instrument and MIDI tracks.
The concept is exactly the same. Record multiple takes (with or without Loop Record), and each pass can be stored in its own playlist. Switch to Playlist view and you can solo, audition and promote MIDI clips just as you would with audio.
This is a big deal for people working with performance‑based MIDI parts, and it’s especially useful for anything involving multiple passes. It also means that users who work heavily with MIDI no longer need to adopt a different approach just because they’re not recording audio.
Like the audio version, MIDI playlists support all the editing tools you’d expect, including quantisation, clip gain, and Real‑Time Properties.
Your Number’s Up
Pro Tools’ playlist naming and numbering system is particularly useful when recording multiple instruments simultaneously, keeping different takes organised and avoiding chaos.
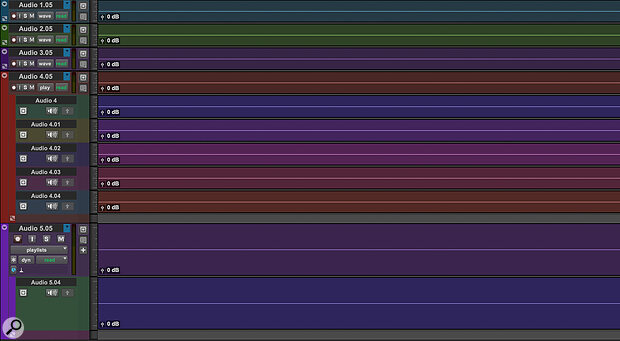
Each new playlist is automatically named with a numbered suffix (.01, .02, .03 and so on), which Pro Tools handles intelligently. If you’re working with grouped tracks (for example, a multi‑mic drum setup), Pro Tools will apply consistent numbering across all tracks. Even better, if you add a new track later, its first new playlist will pick up in sync with the others. So, for example, if you create playlists on a group of five tracks, then later add a sixth track to the group and continue creating playlists, it picks up the numbering right where the others left off. You won’t end up with track six starting at 01 when the other tracks are on 04, for example.
 Pro Tools will automatically number your playlists in order — and will maintain the correct naming scheme even if you add tracks to a group that already has playlists.
This kind of consistency makes session management easier, especially when comping across multiple mics or instruments. You’re never stuck trying to remember which version of ‘Take 3’ is the one that was actually used.
You can rename playlists if needed, of course, but for most users the default behaviour is more than enough. It’s just another way Pro Tools lets you get on with the work rather than spending time on admin.
Why Playlists Still Matter
Playlists have been around in Pro Tools for a long time and, like many of the best features, they help with the unexciting details and free you up to do the creative stuff. They let you manage multiple takes cleanly and non‑destructively — all within the track you’re already working on. For vocal producers, they’re invaluable. For anyone recording multiple passes, they’re the right way to keep things tidy.
Now that MIDI playlists are supported too, playlists have become even more central to everyday Pro Tools work — whether you’re recording vocals, layering synths, or managing multiple takes in post.
Automation Playlists?
Automation for mix and plug‑in parameters is stored on separate playlists, but unlike audio or MIDI clips, you can only have one playlist per automation parameter on each track. You can’t, for example, have multiple alternative takes of volume automation.
This means that you can’t use this playlist‑based approach to experimenting with alternative automation. There is a way to compare alternative automation passes if you use Pro Tools Ultimate or Studio, though. To do this you need to use Preview mode, which is part of the advanced automation features. That’s beyond the scope of this article but well worth knowing about.
