

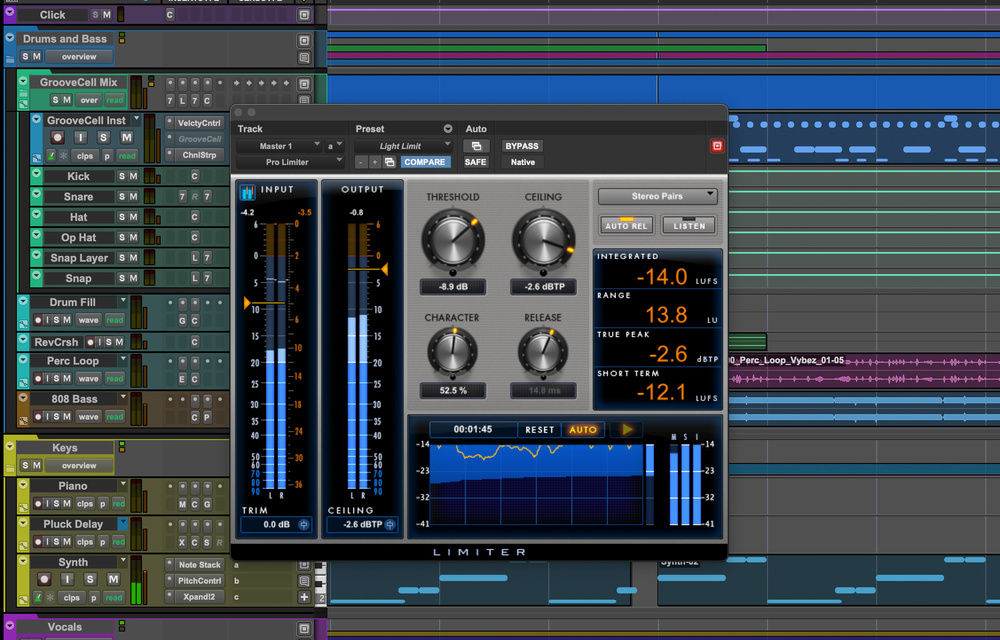
Avid’s Pro Limiter has loudness and true peak metering, and is best placed on a Master Fader where the inserts are post‑fader.
Master Faders offer much more than just level control!
Master Faders in Pro Tools aren’t created by default in a session, and things seem to work fine without them, so you might wonder why they exist at all. The reason is that they solve problems. They monitor and trim signal paths, and their inserts and metering work slightly different to those in other track types. This is great for tackling that often talked about and sometimes misunderstood aspect of audio production: gain management.
You might never move the fader that gives a Master Fader its name, but having one across, for example, the output bus of your session, is very useful. The meter in a Master Fader is often more important than the fader itself, and can be reason enough on its own to use Master Faders throughout your session.
Master Faders aren’t just for the main output. Place them on stems, effect sends, or cue mixes, and you instantly gain reliable metering and level control.
Meter Reading
If you see that you’re not managing headroom effectively, the Master Fader is all you need to correct the situation without disturbing your existing automation and balances. Master Faders control paths, whether outputs or internal busses. They consume no additional system resources and are available for all track formats. While many people only think of placing them across the main output, in practice you’ll often find uses for them across stems, submixes, and even headphone sends.
The scaling of the faders in Pro Tools does mean it’s easier to make fine adjustments towards the top of the range, but beyond that, there’s no sonic change created by adjusting levels using a Master Fader, unless you deliberately introduce non‑linearities by using analogue‑modelled plug‑ins. For this reason, some longstanding rules of thumb from the analogue world don’t apply inside Pro Tools, and Master Faders provide a good example.
I think a Master Fader is best thought of as a meter with an associated trim control. It targets a specific output or bus path, and while they can be used to control the level of multiple tracks together, there are other, often better ways to do that. The meter shows the level of that output or bus path at the summing point in the Pro Tools mixer.
Meters on Master Faders always show the post‑fader level, so any adjustment you make with the fader is reflected regardless of other metering settings. You can even choose a different metering type for Master Faders from the rest of your tracks — a valuable option when you want finer resolution for monitoring headroom.
There are only five insert slots on a Master Fader, but as they operate differently to inserts on tracks, you’re unlikely to need more than five. More on this difference later.
Level Management
As mentioned, Master Faders are one way to control the level of groups of tracks in Pro Tools, but there are others and it’s important to understand how they differ:
- VCA faders are the simplest way. They act like a remote control for the channel faders of tracks in a Mix Group, and don’t pass audio.
- Auxiliary inputs and routing folders sum the audio outputs of the tracks feeding them. They’re often used for group processing, much like a subgroup on an analogue console.
- Master Faders don’t have audio inputs at all. They directly control the level of a path.
Because of this, Master Faders complement rather than replace VCAs or auxes. You might use a VCA for automation moves, an aux for bus compression, and a Master Fader for accurate post‑fader metering and headroom management. Thinking of them as different tools for different jobs is a good way to avoid overlap or misuse.
So why bother with Master Faders at all? For one, they offer fast headroom management.
A Master Fader lets you pull back a path that’s clipping in a single move. Whether it’s your main mix, a cue send, an effects path or a stem output, it’s far quicker than adjusting multiple faders, which can upset balances, automation or timbre. Trimming the overall level at the Master Fader avoids these issues. This makes Master Faders the quickest, cleanest way to apply a global fix.
They also offer accurate path metering: because the meters are post‑fader, you always see the level actually hitting the bus or hardware output. This makes them invaluable for preventing clipping.
Certain types of plug‑in are also best placed on a Master Fader — loudness meters and dither plug‑ins, for example. This is because Master Fader inserts sit post‑fader, where they recieve the true signal leaving the system. By contrast, bus compressors are better off sitting on auxes, where their behaviour won’t be affected by fader moves. One classic mistake, though, is to place a bus compressor on a Master Fader and then attempt a fade‑out. The compressor threshold shifts relative to the signal as the fader drops, and the sound changes in undesirable ways.
Master Faders aren’t just for the main output. Place them on stems, effect sends, or cue mixes, and you instantly gain reliable metering and level control.
Faders & Auxes
A very common workflow is to combine an auxiliary input (or routing folder) with a Master Fader, using each for what it does best.
In this screenshot, the mix bus processing is carried out on an aux input fed by an internal bus (labelled Mix Bus), which in turn is routed to Out 1‑2 and controlled by a Master Fader.Rather than routing everything to the main output, create an internal bus named Mix Bus. Instantiate an aux input called Mixbus and use this for bus compression or analogue‑modelled plug‑ins. Route this aux to the main output, then create a Master Fader on that output.
This gives you a pre‑fader insert point for mix processing and a post‑fader insert point for utilities, along with accurate metering and level trim at the end of the chain. The same approach works well with stems. For example, a dialogue stem might be routed to an aux for EQ or dynamics, then to a dedicated Master Fader for headroom management and metering before printing.
If you’re working with stems — common in post‑production for dialogue, music, and effects, but also useful in music sessions for groups such as drums or guitars — you can create Master Faders for each. These work just like a main output master, giving you post‑fader metering and trim on the stem. Combined with an aux or routing folder for pre‑fader inserts, this provides the same two‑stage approach: processing on the aux, and reliable metering and level control on the master.
VCAs can also be used alongside this setup for fader control, but bear in mind that VCA metering behaves differently and doesn’t provide the same accurate sum as a Master Fader.
Max Headroom
Because you can use different metering types on tracks and Master Faders, you can keep something like a VU‑style meter on source tracks to reflect musical balance, but set your Master Fader to Linear for detailed peak resolution at the top of the scale.
The expanded output window (shown here on aux 4) features the same type of metering as a Master Fader.When it comes to level targets, it’s important to remember that 24‑bit converters offer generous headroom. Unless you’re driving analogue‑modelled plug‑ins or HEAT, there’s no sonic benefit to running hot, but there is a real risk of clipping. When tracking, I aim for peaks averaging around ‑18dBFS, which leaves plenty of headroom. Also keep in mind the distinction between indicated clips and true peaks. For streaming delivery in particular, make sure your chosen limiter or meter warns you of true peaks, not just sample peaks.
Master Faders aren’t as uninteresting as they might at first appear. They are path controllers with post‑fader inserts and post‑fader meters, and they achieve essential tasks in the cleanest, most effective way possible. If I were introducing them to someone new, I’d call them Master Meters. The meter is their most important feature, with the fader and post‑fader inserts acting as tools attached to that meter. Wherever you have a bus or an output path, there may be a strong reason to display a master meter on it.
One alternative worth knowing is the hidden meter in the floating output window. On any track routed to a hardware output or internal bus, click the output window button next to the output selector. Expand it with the disclosure arrow at the bottom right, and you’ll see a second meter showing the level of that bus or output. This is another excellent way to keep an eye on headroom, much like using a Master Fader.
Master Faders & EuCon
If you use a EuCon control surface such as the Avid Dock, there’s a neat shortcut for tying Master Faders into your monitoring workflow. Right‑click any Master Fader and assign it as the EuCon Monitor. This lets you control that fader from a hardware pot on your EuCon surface — for example, the Monitor knob on the Avid Dock. Because it’s so quick to assign, you can easily switch the monitor control to a different Master Fader when needed, and switch it back just as fast.
