In this new column, engineers share their experiences of real-world recording sessions, explaining the decisions they made, and what went right and wrong along the way. First up, we record an indie-rock band on location...
 The main picture here gives an overview of the recording setup for the first song.Photo: Janine Stengel
We regularly publish extensive features comparing different recording techniques and discussing their applications. Examples that spring to mind are Sam Inglis's treatise on recording singing acoustic guitarists (/sos/jul12/articles/rsg.htm) and Mark Mynett's insider guide to producing metal bands (/sos/nov09/articles/metal.htm). Useful as such articles are, they tend not to address the unique challenges that arise in real-world sessions, and you need to understand much more than where to point a mic to get the best out of living, breathing musicians! That's why we decided to launch this new column.
 Each Session Notes article will explore the technical and creative decision-making process underpinning a real-world recording session, providing 'direct from the coal-face' tips and tricks, and backing these up with audio illustrations where possible. In contrast with our features on commercial productions, we'll try to focus on situations which have taken place under budgetary or other constraints, outside the controlled environment of a purpose-designed professional studio. With that in mind, allow me to start the ball rolling...
Band-recording On Location
 Indie band Dunning Kruger, the subject of this first Session Notes feature.
At the heart of any band-recording session lies a fundamental trade-off. On the one hand, a great performance is patently the most important goal, so you need to do everything you can to make people comfortable and keep them in a creative frame of mind. On the other hand, you're responsible for making everything sound as good as you can, and few musicians will remain inspired if their exciting first take comes back sounding like the Shaggs!
When working with seasoned session veterans, there's often room for manoeuvre: they understand that chasing enhanced sonics may involve them twiddling their thumbs for a while, and they'll have learnt to perform well even when shut in a glorified cupboard with a dodgy headphone mix! For bands without a couple of albums behind them, though, there's a lot to be said for making the recording process as 'transparent' as possible, mimicking their normal rehearsal or performance setup, and recording them all at once, so they can interact with each other fairly naturally. This is exactly the approach I decided to take when recently asked to record a three-song EP for talented local band Dunning Kruger.
In rehearsal, they were clearly a tight enough unit to make the 'all at once' recording method feasible, and when I floated the idea it was enthusiastically received. They had the opportunity to use some downtime at a small and well-deadened local studio, but I felt that a less cramped domestic environment could put the band more at ease and would probably provide a better drum sound — so it was great news when drummer Peter Zimre managed to secure the use of the converted loft at his parents' house for a long weekend. It was a surprisingly large, airy living space with plenty of natural light (and the prospect of home cooking!).
 This diagram shows roughly how the main instruments and mics were positioned for the recording session.Preparation is paramount if you want to make best use of your session time and avoid mood-shattering hold-ups, so despite the layout of the room being slightly unclear (no pictures were available in advance) I was determined to plan as much of the setup as I could. The lack of on-site recording gear presented no obstacle, because I have a 16-track location rig, but there were plenty of unknowns. For example, I'd be walking into an unfamiliar acoustic that hadn't been used as a recording space, so I figured I'd better pack the car full of baffles to tackle any spill concerns (I stockpile old carpets, blankets and curtains for precisely that purpose!), as well as plenty of spare stands, bungee cords, and gaffer tape to rig them up with. A bit of redundancy in the kit list also seemed desirable, so I packed a few more cables and mics than I'd need, as well as a small uninterruptible power supply and some isolation transformers to head off the more common mains-related setbacks.
The Best Use Of 16 Tracks
 with a closer off-axis Shure SM57 dynamic.") Here you can see how the two guitar amps were set up, tilted using K&M 28130 amp stands so that they were more audible to the guitarists playing them. Notice also the dual-miking setup, combining a more distant Samson C02 small-diaphragm condenser mic (supported via the amp stand's integrated boom arm) with a closer off-axis Shure SM57 dynamic.Photo: Kevin Fellows
Here you can see how the two guitar amps were set up, tilted using K&M 28130 amp stands so that they were more audible to the guitarists playing them. Notice also the dual-miking setup, combining a more distant Samson C02 small-diaphragm condenser mic (supported via the amp stand's integrated boom arm) with a closer off-axis Shure SM57 dynamic.Photo: Kevin Fellows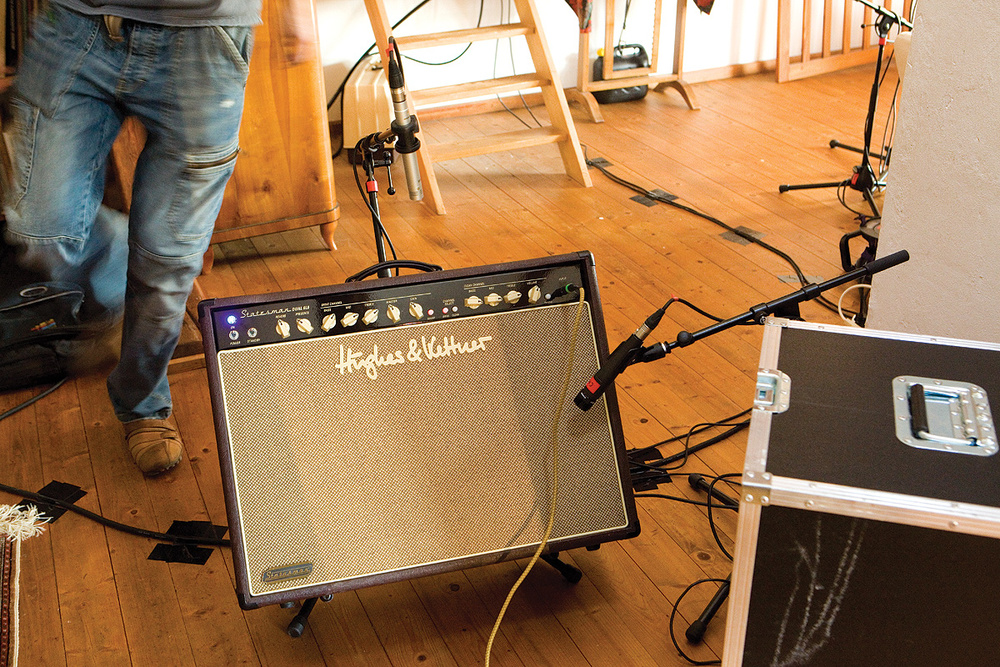
Before deciding how best to allocate my 16 tracks, I listened to the band's rehearsal-room demos and some commercial releases they'd provided for reference. Mics for kick, snare, toms, and stereo overheads were essential for the modern indie-rock sound they sought, and I wanted separate tracks for the bass/guitar amps and a scratch vocal mic. Setting aside a couple of tracks for guitar/percussion overdubs, that left me four tracks for discretionary extras. Topping the list to use these tracks was a bass DI signal, because it's such a valuable safety net when not working in a purpose-designed space. A lot of smaller bass amps roll off significantly at the low end, and even if they don't, untamed room/floor resonances often render the recording uneven in this region. In both cases, a clean DI signal can supplement the amp, or be re-amped. I also wanted to have the option to turn down the bass amp a little if its leakage onto other instruments became problematic (low frequencies aren't much hindered by typical budget-friendly baffling) and a DI might save my bacon if the quieter bass amp's close mic itself ended up swathed in spill.
In addition to the DI, I gave over two tracks to a stereo ambience signal, because I love the way a real room sound can blend a live multitrack together. The final track was reserved for recording the live-running click (from a drum machine) which the drummer had requested to help keep himself in tempo — this would give me an easy visual guide for editing takes together later on.
Setup In Theory & Practice
Given the band's limited studio experience, I decided to use their rehearsal-room setup as a starting point for my recording layout, with all three guitarists standing with their amps behind them, facing Peter across the drum kit. Putting everyone in fairly close proximity ensured uninterrupted sight-lines and good timing integrity between the players, although at the expense of considerable spill between the mics. That didn't worry me much, because bleed's more often friend than foe in my experience, as long as you're comfortable with the idea of committing to a final arrangement at the tracking stage. If serious sound leakage is on the menu, though, you need to factor it in while setting up, and in this case, we agreed to rearrange their rehearsal-room amp positions slightly, so that the spill from each would roughly match its anticipated position in the stereo image: bass in the centre, guitars left and right...
 The first playback for the band is usually the biggest 'make or break' moment when working with any band for the first time.Photo: Janine StengelWell, that was the theory! Here's how it panned out in reality. Seeing the loft for the first time, I realised the potential of a pair of floor-to-ceiling flues on either side of the room, each two feet wide. By moving an enormous 10-foot-wide sofa from the main area of open floor such that it bridged the gap between these flues, not only did we find ourselves with a good clear space to set up the drums, but we also earned ourselves a very convenient free baffle for the amps. The bass amp was concealed from the drum overheads, behind the sofa, while lead singer Kevin Fellows' guitar amp nestled between the side of the sofa (obstructing its spill into the bass amp's close mic) and one of the flues (which reflected its direct sound away from the drums). The other guitarist, Blake Lewis, could then place his amp so that the sofa gave it some separation from the bass amp, while an upended mattress and the bass amp's flightcase baffled it from the drums.
Having implemented that basic layout, my primary concern was whether the performers could hear each other well enough to perform easily. Having the amps so close by helped, as did the fact that the players were standing up, given the restricted height of the baffling separating each player from their amp. However, I'd also brought along a couple of K&M 28130 amp stands, which allowed me to tilt the guitar amps about 20 degrees upwards, thus firing the speaker cone's more directional high frequencies towards the players' ears. This improved their ability to hear themselves, as well as discouraging them from pushing their drive settings too far — a surprisingly easy trap to fall into if your amp's sitting on the floor firing all its HF at your knees!
Headphone-free Utopia
 This picture was taken just before the recording of 'EnDance', from just behind the room mics. You can see the duvet/blanket tent I'd set up behind the drummer to close down the room sound, as well as the 'tunnel' I constructed to isolate the kick mic, using two armchairs and a bunch of blankets.Photo: Janine Stengel
My ideal tracking scenario is one where no-one needs a headphone foldback at all, because I always feel that headphone monitoring creates a psychological barrier between all but the most experienced studio performers, often undermining their commitment and the quality of the performance. With this in mind, I made a point of working with each guitarist to adjust their standing positions and amp angles. Initially, this worked a treat, but as I began to home in on a rough mix in the 'control room' (an adjoining bedroom), the bass amp's spill seemed to be dominating the room sound. When I pulled down the bass amp's master volume in response, this prevented bassist Paddy Goold from hearing the rhythmic details of his own playing. Rather than setting up a full headphone mix for him from the recording console, though, I just plugged some cans into the front of the Line 6 Bass Pod XT I was using to catch his DI signal, which meant that he could arrange just the right amount of 'more me' monitoring.
Drummer Peter had no problems performing without cans, but he wanted to hear a click track, so he had no choice but to wear them. The closed-back models which stopped the click from leaking into the drum overheads made it harder for him to hear the guitars and bass, though, so I suggested feeding the click to one side of his headphones, so that he could slip the other earcup off to hear unencumbered. In practice, this destabilised the headset's grip enough that it risked falling off mid-take! In the end, therefore, I gave him a little guitars/bass foldback along with the click.
Battling Boredom
 A pair of K&M 238 mic-mounting brackets were very useful on this session to fix the room mics to both microphone and lighting stands.
Clearly, I couldn't afford to bore the band to death simply getting a sound together, and I did my best to take the sting out of it. I arranged to work with Peter on his drum setup during the first afternoon, before the rest of the band arrived that evening, so I was able to set up all the mic stands, line-test all the connections, and construct a reasonable balance of the seven drum mics without anyone else having to hang around. When Kevin and Paddy rolled up, Peter could then chill out and jam with them, giving me the opportunity to scurry around comparatively unnoticed sorting out preliminary guitar and bass tones. Following Blake's arrival the next morning, it took only an hour or so to complete the setup, so everyone was still feeling reasonably fresh when we hit record.
Doing the majority of sound-shaping work in the live room acted in my favour, because it put me in amongst the musicians more of the time, allowing me to explain what I was doing at any given moment — something which seems to help most musicians feel less intimidated by the recording process. This 'running commentary' also led naturally to discussions about the kinds of sounds each band member was looking for, information which is like gold dust from an engineering perspective. Furthermore, once a performer understands what you're trying to catch with your mics, they'll frequently have helpful tricks up their sleeve, as, for example, when I was struggling to capture enough high-frequency overtones from Peter's snare drum and he was able to deliver the goods by quickly removing an internal damping ring from the instrument.
First Playback
 For the song 'Sascha', I repurposed the big lighting stand to hold the cardioid room mics, positioning them only a little higher than the omnidirectional overheads so that they subtly filled out the overall drum sound without adding too much additional reverb tail. The chandelier positioning was also crucial, naturally...Photo: Kevin Fellows
With a total of 15 mics live on the studio floor (some of which I was submixing 'to tape'), I knew that positioning them and building a good rough balance would take several hours, not least because of the need to carefully manage the phase interactions and spill contributions of each mic — and I was convinced that cutting corners to save time here would be a false economy.
The first reason for this was purely practical: the closer I could get the rough mix to sounding like a finished record, the more confident I'd be that I'd captured the necessary raw material on the multitrack. The second was that I'd never worked with Dunning Kruger before, so it was vital that my playback of their first full take make a favourable impression. In the event, the benefits of a (thankfully!) good reception at this point were manifold.
Firstly, the band headed back to the live room excited about the sound they were laying down, and so immediately upped their game for the next take, making the next playback even stronger: a classic virtuous cycle. Another noticeable effect was that, whether consciously or not, each band member began adjusting their playing to fit better within the overall sonics as the takes progressed, effectively doing some of my mixing work for me! And once the full-band takes were done, the buzz of listening back to what they'd done encouraged everyone to remain in the control room, egging on the two guitarists to burn their way through their overdubs.
Room To Manoeuvre
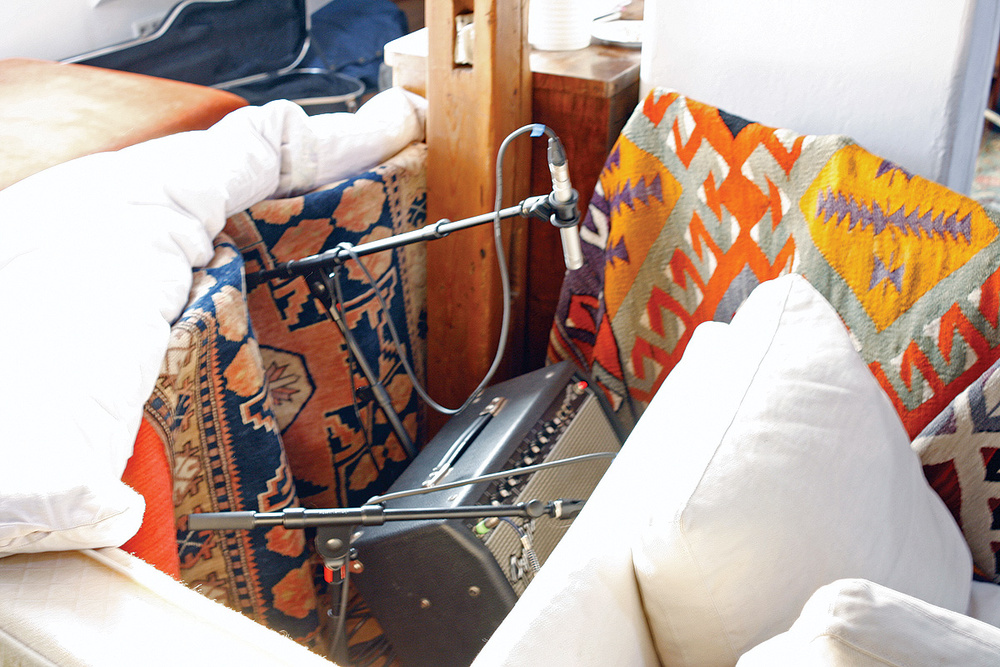 Photo: Kevin Fellows
.") Other setup adjustments for Sascha included adding additional baffling around the kick drum and guitars to leave more scope for heavy compression of the kick drum at mixdown; and switching in the LF lift on the kick-drum's close mic (a Blue Mics Kickball).
Other setup adjustments for Sascha included adding additional baffling around the kick drum and guitars to leave more scope for heavy compression of the kick drum at mixdown; and switching in the LF lift on the kick-drum's close mic (a Blue Mics Kickball).
With three songs to capture in a weekend, pragmatism dictated that the instruments and players all kept their initial locations, and a lot of the mics were left where they were once I'd built the first song's rough mix. However, I was also aware that the band were keen to aim for slightly different sounds on each song, so I was careful to leave a certain degree of 'wiggle room'.
The band's reference tracks suggested that one of the biggest variables between songs would be the amount of room sound on the drums, and while I knew that some of this could be achieved by repositioning the overheads (a pair of borrowed DPA omni condensers), I wanted more options, and this is where the big lighting stand I'd brought along came up trumps. On the first song, 'EnDance', a tighter sound was called for, so I extended its three arms over the drummer and built a kind of tent over and behind the drums, using duvets and drapes. For the other songs ('Japan Song' and 'Sascha') I removed this edifice, repurposing the stand (via a couple of K&M's nifty little 238 screw-on mic holders) to bring the room mics high up over the kit, well beyond the reach of a normal mic stand.
I reckoned on the room mics being an important part of the equation too and I deliberately put those on the ends of my longest mic cables, so that I'd easily be able to drag them anywhere in the room I wanted. I chose a pair of switchable-pattern Shure KSM141s for the role, so I could adjust the directional pick-up characteristics of the mics at the drop of a hat. For 'EnDance' I had the room mics round behind the big sofa in order to bias the room balance away from the drums, while directing the cardioid nulls to reduce the level of the nearby bass amp. On 'Japan Song' (a more traditional indie rock-out) I pulled the overheads higher and transferred the room mics to the lighting stand, using a couple of tricks to expand the apparent size of the room. Firstly, I spaced the mics a good 10 feet apart, deliberately incurring a bit of a 'hole' in the middle of the panorama so that the signal would function as a kind of stereo widener for the drums. Secondly, I used a little dodge I learnt from producer Tony Visconti, leaving both mics in cardioid mode and pointing them upwards and away from the kit, to catch more reflected sound from the ceiling.
The third song, 'Sascha', needed a more compact, denser room, with a view to generating a heavily compressed, almost breakbeat-style sound. Moving the overheads back in and closer together took us in the right direction, and then I rigged the room mics only a few feet above them. Initially I chose their omni pattern, but switching them back to cardioid worked better, adding a subtle body and width to the overheads without overburdening the drumkit with ambience.
Adjusting The Kick, Snare & Guitar
These were by no means the only adjustments I made between songs. For 'Sascha', for instance, I was pretty sure nuclear-grade kick-drum compression would be the order of the day in the mix, and this made me more concerned about spill. I'd already built a makeshift 'tunnel' in front of the drums as a general low-end damage-limitation exercise, but I wasn't convinced that it would be effective enough for this application, so I piled every spare bit of padding I could find into reinforcing the shelter for that number, as well as rigging up a few spare chairs with carpets over them to provide extra barriers around the guitars. I also removed some internal damping from the drum itself and switched in the bass boost on the Blue Kickball mic we were using, which yielded the kind of fantastic low-end woof that I normally associate with devices such as Yamaha's SubKick.
The snare was another big variable. Given the stylistic leanings of 'EnDance', I suggested the old disco trick of sticking a tea-towel over the drum. Although this didn't give us quite what we were looking for, switching it for a few sheets of paper worked really well, as far as the sound in the room was concerned. Capturing that sound on the snare close mic proved trickier, though, via my normal first-call mic (an AKG C414 around nine inches to the side of the drum) even after a certain amount of experimentation with the mic's positioning and internal high-pass filter setting, so I swapped that out for a Shure KSM137 which gave me the thinner, brighter result I was hoping for. The trade-off was an increase in the hi-hat spill, so I used a little experiment of mine — half a plastic bucket with acoustic foam glued inside — to block out some of this. Peter changed his snare for the other two songs, as well as adjusting the degree of damping applied to the drum, but both sounds were handled fine by my original C414 configuration, which can usually be relied upon to provide a good mixture of over- and under-snare elements without overstating any specific resonances.
Although the guitar sounds also changed between songs, I didn't feel the need to adjust the miking at all. This was partly because Kevin and Blake were willing to contemplate EQ adjustments on their amps, but also owed something to the dual-miking strategy I'd chosen for these sources in the first place: a combination of a Shure SM57 close mic on one of the speaker cones, and a Samson C02 supercardioid pencil mic off axis around two feet away. The Samson provided a fairly naturalistic presentation that I relied upon primarily, since the guitar sounds in the room were pretty much on target, while the SM57 could be mixed in to provide just enough close-mic bite for each track. However, if you have access to polarity reversal on your recording system, the capabilities of dual-miking setups like these extend even further, because flipping the polarity of one mic relative to the other gives rise to a whole different set of timbres. Indeed, this was a boon on the Dunning Kruger session, because the slightly smoother tone derived by inverting the SM57's signal on Blake's amp helped it fit more neatly with Kevin's on one occasion.
Grasp The Nettle!
Recording a whole band a once can be a bit of a juggling act, so a lot of home recordists cling to the idea of building up productions one instrument at a time — but this is usually a lot less fun for the musicians, and frequently leads to uninspired performances. If you're considering grasping this nettle, hopefully this article has provided some tips which will smooth things along.
Hear The Results For Yourself!
Why should you care how I recorded this band? Well, either you like the way the recording sounds and want to know how to get those kinds of results for yourself; or you think it's a load of rubbish and you want to guarantee you never make those same mistakes yourself! Either way, you need to hear the results of the session, so I've provided a variety of audio files for this purpose — they're on the SOS web site at /sos/oct12/articles/sessionnotesmedia.htm. On this page you'll find a variety of demonstration files taken from the multitrack sessions, with detailed captions; the rough mixes from the sessions, to show how much of the production was already completed by the end of the main tracking date; and my final mixes of the three tracks, so you can hear how the spirit of the live session translated into the eventual release version. You'll also find links where you can download all three of the full multitrack sessions as unprocessed 24-bit/44.1kHz WAV files, should you wish to scrutinise the raw recordings more closely or experiment with remixing them yourself.
Overdubbing Decisions
Although I was keen to catch as much as possible of the band's live sound in one go, we left some parts out of the live takes for practical reasons. An awkward high guitar line during one chorus/outro section proved very tricky to keep in time, for instance, and there was no possibility of muting it out of the backing track after the fact, because of its spill on other mics. Substituting it with the simple rhythm strumming from the previous choruses instead allowed us to nail a good general rhythm take quickly, after which we could punch in the high line as often as necessary to make sure it really locked down into the main groove. (This same approach usually works well for guitar solos, preventing any ill-advised improvisatory flourishes from ruining an otherwise solid backing take!) We also decided against recording a lead vocal as part of the main band take, even though it would have been easily replaceable later because the vocal spill on the other mics was negligible — Kevin just felt that he'd rather concentrate all his attention on his guitar parts for recording purposes.
The majority of the overdubs, though, were guitar doublings layered alongside the live parts in order to emphasise the power of the heavier sections. Although both guitarists had already used stomp switches to adjust their amp tones for these moments on the full-band takes, it was clear that this didn't go far enough in terms of creating the thick chorus textures that I'd heard on some of the commercial reference tracks the band had supplied. On 'EnDance', however, we deliberately wanted to dry out certain sections of the mix by heavily gating the drum mics and replacing the kick and snare with samples. In this context, we couldn't afford to have drum spill breaking through from the guitar tracks, so that provided an impetus to re-record those sections in leakage-free form.
Occupational Hazards
, and the lighter-weight rubber-palmed gloves that have since proved more suitable (right).") The heavy leather 'rigger' gloves Mike tried out to protect his hands while setting up the session (left), and the lighter-weight rubber-palmed gloves that have since proved more suitable (right).
The heavy leather 'rigger' gloves Mike tried out to protect his hands while setting up the session (left), and the lighter-weight rubber-palmed gloves that have since proved more suitable (right).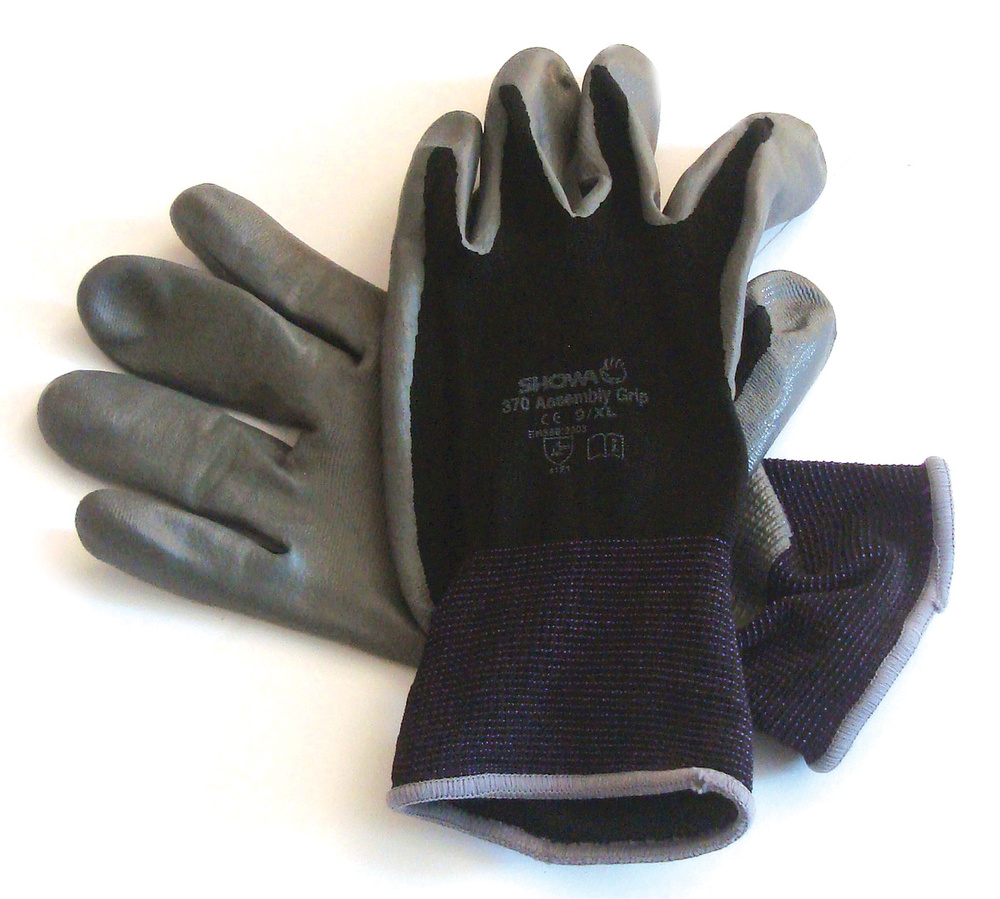
 The control room was set up in an adjoining bedroom — notice the low beam encroaching on the top of this picture, and the scarf Mike wrapped round it to reduce the risk of head injuries!Photo: Janine Stengel
When you're single-handedly recording a band, one of the biggest challenges is keeping your ears fresh enough to make any worthwhile sonic decisions. Most rock bands put out a lot of volume, and if you subject your ears to that kind of onslaught for more than about five minutes you'll completely skew your hearing for the rest of the day. It's for this reason that you can see me wandering around wearing ear defenders in some of the pictures, and even when I wasn't wearing them I usually had them round my neck so I could swiftly pop them on again as required.
Even with the best will in the world, you'll need to listen without ear-defenders some of the time simply to gauge what's actually happening in the room. Setting up drum sounds can be particularly fatiguing in this respect, not just because the instrument itself is so loud acoustically, but also because it's tricky to judge the low end balance of a kick drum without turning up the control-room monitoring reasonably high — another reason to put a night's sleep between this process and the task of finalising your overall rough balance if possible.
My ears weren't my only concern on this session, though, because I've been growing increasingly fed up of pinching my fingers in mic-stand hardware, and of generally filing down my knuckle joints while tightening and re-tightening dozens of knurled bolts. So I packed some heavy leather 'rigger' gloves (usually reserved for DIY chores) into my kit bag. In the event, though, these weren't ideal because I had to keep taking them off for finer tasks, so I've since migrated to a thinner rubber-palmed cloth variety.
An additional hazard on this session was that there was an exposed wooden beam running right across my 'control room' at roughly eye level, separating the monitoring sweet spot from the access doorway — a perfect recipe for slapstick, given the frequency with which I was rushing in and out of the live room! There was no way I could remove the beam, obviously, so I used a little trick that has saved me braining myself on low door frames in the past: affixing one end of a two-foot length of ribbon or cloth to the beam. The hanging fabric 'tail' breaks into your peripheral vision even if you're looking downwards, but is easily brushed aside as you pass by. Fortunately, Blake's scarf wasn't essential to his performance...
The Wisdom Of Hindsight
No matter how long you've been recording, there's always something about every job that doesn't go to plan. There's no shame in that, because mistakes are a crucial part of learning about anything, and audio engineering is as much about avoiding previously encountered pitfalls as it is about experimenting with bold new techniques. With this in mind, as a regular part of these Session Notes articles we'll make a point of considering what we might have done differently with the benefit of hindsight.
My main regret in this instance was not putting up a dedicated hi-hat mic, which caused me difficulties with the disco-influenced sections at mixdown. While I was easily able to dry up the kick and snare by gating their close mics, I couldn't pull the hat as far forward in the mix as I'd hoped because its sound in the overheads was inevitably more diffuse. It would have been easy to find a spare multicore line and recorder track for a hi-hat close mic too, given that the scratch vocal mic had been rendered redundant, although that unfortunately didn't occur to me in the heat of the moment.
I also wish I hadn't skipped over my normal procedure of checking the control-room monitoring using my own reference CD. The room itself had a sloping ceiling and we were also using a pair of Samson Rubicon speakers I wasn't familiar with, so I really should have known better! As a result, the overall tonality of the rough mix (and, by extension, the multitrack recordings as a whole) ended up being a bit boxy, especially on the first song. Fortunately, though, the relative frequency balances between the different instruments still stacked up alright, so a bit of overall master-bus EQ at mixdown fixed this quickly enough.