Not everyone finds drum programming easy, and if you're one of the rhythmically challenged, Logic's Ultrabeat drum synth could be your ticket to more interesting and sophisticated percussive parts.
 Introduced with version 7, and further developed with version 8, Ultrabeat is a software instrument specially designed with drum and percussion sounds in mind. It has 25 voices, each having access to a fully-featured step sequencer, and is described as a drum synth, but it's handy for other sounds as well, and it also has some neat hidden features. Included with the factory installation are over 800Mb of sampled sounds, along with more than 80 preset kits that can be loaded in the usual way from the preset menu in the plug-in window header. I recommend that you explore these presets: they all come with drum and percussion patterns pre-programmed and they offer a wide range of voices and styles.
All Kitted Out
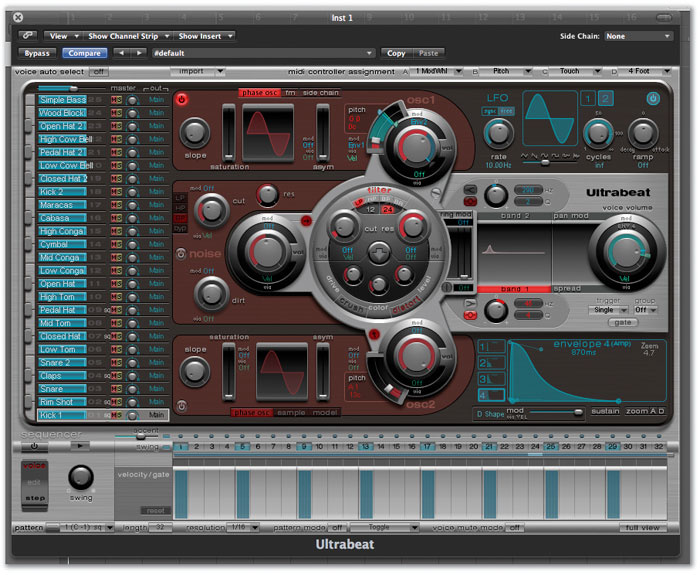
Ultrabeat's layout can be broken down into three areas: the Assignment section; the Synthesizer section; and the Step Sequencer (see the screen below). We'll start with the Assignment section.
You can audition sounds by playing your MIDI keyboard or by clicking on the small keys on the left-hand side of the Assignment section. Clicking on the blue name selects that sound and highlights it with a white box. With the 'Voice Auto Select' function enabled at the top of the Assignment section, a played voice is automatically highlighted.
Each kit preset has 25 voices in it, 24 of which play fixed-pitch sounds (assigned to MIDI notes C1-B2), while the 25th voice can be played chromatically above C3. This would allow you, for example, to include a single pitched sound in a drum pattern (perhaps for a bass line), which might save you having to load another soft synth if you were short on CPU power. The built-in mixer allows you to adjust the volume, panning and outputs for each sound (multi-output operation is explained later), and there are Mute and Solo buttons for each, plus a Master Volume slider for the whole instrument, right at the top. Various copy and swap functions are available to let you set up things the way you'd like them, and we'll come to those in due course.
Having selected your preset, you can simply program or record your drum parts in Logic's Arrange window, as you would with any other software instrument, or you could use Ultrabeat's built-in step sequencer, which is covered later in this article.
Copying & Pasting Voices & Sequences
 Copy and paste options for voice and sequence data.In the Assignment Section, dragging and dropping has four functions:
- Drag and drop alone swaps voices; sequences are not affected.
- Drag and drop with the Option key copies the voice; sequences are not copied.
- Drag and drop with the Command key swaps the voices and the sequence data.
- Drag and drop with Option and Command copies the voice and the sequence.
If you prefer to use the Control-click (right-click) contextual menu, you must first copy the voice and sequence data to the clipboard. You can then paste the voice or sequence data. When pasting the sequence data, you can either paste the sequence for a particular pattern or for all of them. (Note that you must select the correct pattern.) This also works when importing voices and sequences from the Import menu.
Organising & Importing
Logic comes with many kit presets for Ultrabeat, as well as a library of individual snares, kicks and so on. It's likely that you'll want to mix and match the sounds to make your own presets, and this is quite straightforward. Within a preset, sounds can be moved, copied or swapped, with or without copying or replacing of any step sequence data that goes with them. This is done in the Assignment section using two basic methods: drag and drop, or the Control-click (right-click) contextual menu.
 Import mode.It's also possible to import individual sounds from other Ultrabeat presets (again, with or without their sequences), either by dragging and dropping or via the Control-click (right-click) contextual menu. Click the Import button to summon the file dialogue, then choose which preset to open (see screen, right). You can then audition the voices (in version 8.0.2 this feature actually works!), and either drag and drop to import one or use the contextual menu. If the imported voice includes sequence data, holding Command while dragging and dropping will import the sequence data as well.
The range of sounds available to Ultrabeat is further enhanced by the ability to import EXS sampler instruments. If the .exs instrument file is selected from the Import menu, the EXS instrument zones appear in the import box (if there are more than 25 zones, a scroll triangle gives access to the rest), allowing you to add all sorts of sounds to the Ultrabeat preset. You can also import a complete EXS instrument by dragging and dropping, though this method will only import the first 25 sounds.
It should be noted that the Ultrabeat sample file format (.ubs) can contain velocity-switched samples, but without using Redmatica's Keymap utility (www.redmatica.com), there is no way to make your own .ubs files. One way around this limitation is making a velocity-switched EXS instrument and then importing that.
Step Length & Resolution
The interaction between the length and resolution of the steps in the sequencer needs some consideration. As an example, when sequence length is set to 32 steps with a resolution of 1/16, we have a total of 32 1/16th notes, making a two-bar pattern. Changing the resolution to eighth notes gives a four-bar pattern. Changing the resolution to 1/12th notes produces an eighth-note triplet, and with a length of 24 steps a two-bar pattern would result.
The length and resolution parameters are set for each pattern within a preset, so you can mix and match if you need to. For those interested in polyrhythmic material, it is possible to get Ultrabeat to play a 15/8 pattern across a 4/4 time project (set the length to 30 steps, with a resolution of 1/16)!
The Step Sequencer
Each voice in an Ultrabeat preset kit has its own step sequencer, and all 25 sequences are combined to make a drum pattern. Up to 32 steps per pattern are available, and they can have resolutions of between an eighth note and a 32nd note (see the 'Step Length & Resolution' box).
Before you can use the Step Sequencer, you have to enable it using its on/off switch. When this switch is on, Ultrabeat will play whenever Logic itself is in playback, and will be synchronised to the main Logic tempo. There's also a Play button in this area, which starts the sequencer without starting the main Logic playback. You can thus audition Ultrabeat when Logic isn't playing back. Ultrabeat does always run at the tempo of the Logic project, as just mentioned, but there are issues when time-signature changes are involved, because Ultrabeat doesn't take them into account!
 The velocity/gate contextual menu.
 The trigger row contextual menu.Simply click on the numbers in the trigger row to switch a given step on or off ; clicking and dragging across the trigger row buttons will also turn them on or off. Alternatively, you can click in the velocity/gate row beneath to switch steps on. Here you can also adjust the velocity of individual hits, and (if the Gate parameter in the Synthesizer section is enabled) the length of each hit. A glance at the Assignment Section for each sound reveals a small 'sq' light, which indicates that there are events in the sequencer for that particular voice.
Accents can be added to individual hits by clicking on the buttons above the numbers in the trigger row. An accent applied on a given step applies to that step every time it occurs in the pattern: an accent on Step 1, for example, will accent every voice in the pattern that plays on Step 1. The amount of accent applied is adjusted by the slider to the left (and it actually turns up the volume, which can produce a different result to increasing velocity). Accents can be disabled per voice by clicking on the button just to the right of this slider, allowing you to have accents just on the kick drum or congas, for example (see screen below). In a similar way, the Swing function applies to the whole pattern but can be disabled for individual sounds: you could, for example, have a slight swing on just the hi-hats, although it should be noted that swing only applies when the step resolution is set to 1/8 or 1/16.
A couple of very handy contextual menus are available in the Step Sequencer. For example, you can quickly alter, randomise or reset the velocity or gate parameters by Control-clicking (or right-clicking) on one of the blue bars in the velocity/gate area (see screen at top of page). Doing the same in the trigger row or in the Full View area (see below) opens a second contextual menu offering all sorts of cool and quick functions including copy, paste and several 'Create and Replace' options (see screen above).
New to Logic 8 is the Full View mode, which allows you to quickly work on the trigger rows for the whole pattern. Steps can be switched on or off for all the sounds in one window, although you still have to adjust velocity and gate settings in the main Step Sequencer area below.
A Pattern Emerges
Ultrabeat can have up to 24 complete patterns of sequences, accessible from the pattern menu on the lower left hand side of the plug-in window. Once again, an 'sq' indicates that the pattern does contain sequences. The patterns are assigned to low notes ranging from C-1 to B0, allowing you to call them up using your MIDI keyboard (see 'Pattern Mode' box). Patterns can be copied, pasted and cleared using the contextual menu, which is opened up with a Control-click or right-click.
 Accent buttons are found above the step numbers.The basic MIDI data of the pattern can be dragged into the Arrange window to create a MIDI region, which can then be used in the normal way. It's important to remember to turn off Ultrabeat's 'on' button after you do this, because otherwise the Step Sequencer will continue to operate when you play the Logic project, and you'll have the same thing playing back simultaneously from Ultrabeat and from the Arrange page. You'll notice that if voices are muted in Ultrabeat, the note data is transferred to the MIDI region as muted notes, which appear greyed out in the Piano Roll and Score editors, or with a black spot in the Event List. Conversely, if you've soloed a voice in Ultrabeat, all the other notes will be muted when you drag the pattern data into the Arrange window. Accent information is transferred to the region as polyphonic aftertouch data.
Multi-Output Operation
 Above: Ultrabeat Multi Output plug-in selection in the I/O box of the instrument channel strip.As well as being available as a basic stereo plug-in, Ultrabeat has a multi-output version, with eight stereo and eight mono output channels (24 outputs in total). Routing individual voices to separate outputs allows you to add effect insert plug-ins to particular sounds — such as reverb on the snare or compression on the kick.
First, select the Multi-Output Ultrabeat in the I/O box of the instrument channel strip (see the screen below left). In Logic's Mixer, click on the '+' button of that channel strip to create as many Aux channels as you need. These will automatically be assigned sequentially to the Ultrabeat output channels. If you need to alter this assignment, click and hold on the I/O box on the Aux channel, and select the required instrument and channel. Finally, in the Assignment Section of Ultrabeat, choose which voices are routed to which outputs.
Ultrabeat is an amazing tool offering loads of scope for creativity and fun. We've only addressed the basics here, so in part two, next month, we'll go further, investigating the Synthesis section of Ultrabeat, explaining the new Step Edit mode and uncovering some secrets. In the meantime, as you work with and explore Ultrabeat, please remember that all its data (voices, sequences and patterns) is saved within the plug-in preset. Don't forget to save your work!
Pattern Mode
 A MIDI region in the Piano Roll editor, showing control notes for Ultrabeat's pattern mode, plus some extra notes I added to trigger individual sounds for a drum fill.Ultrabeat's Pattern Mode can be used to start and stop patterns, and change which pattern is playing, using the low keyboard notes assigned to each pattern, as mentioned in the main body of this article. (You may need to transpose your controller keyboard to get to these low notes.) Once Pattern Mode is enabled, there are four types of operation available to you, set from a menu.
- Toggle modes allow you to start and stop the pattern playing, or change patterns, either immediately or the next time step 1 comes around.
- One-Shot Trig will simply trigger and play the pattern once.
- In Sustain mode, the pattern will only play as long as you hold the note down.
These modes are great for live work and for jamming, but you can also record or program the trigger notes into a region in the Arrange page to create your rhythm parts. Sustain mode works well for this, because you can control how long Ultrabeat runs by using the length of each note. Don't forget that you can also add extra note events for additional crash cymbals and fills, for example (see accompanying screen). There's also a Voice mute mode that allows you to mute and unmute individual Ultrabeat voices, using MIDI notes, while the pattern is running, adding even more flexibility for live performance. Once again, this can be programmed into Arrange regions.