These compact speakers punch well above their weight — and you can build them yourself!
Back in the deep, dim and distant past, loudspeaker kits were a big(ish) thing. British hi‑fi speaker brand KEF (Kent Engineering & Foundry, if you ever wondered) in particular did pretty good business with their KEFKIT 1, 2 and 3 and Constructor Series. The kits included drivers, passive crossover assemblies, internal foam, cables and connectors, and all the various specialist hardware items required. All the customer had to do was build a couple of cabinets and they’d have a pair of high‑performance KEF speakers for somewhat less than the equivalent finished retail price. But as time moved on, intense competition pushed the price of high‑performance speakers inexorably downwards, and speaker kits faded away. So, when I came across the Little British Monitor (LBM for short), a compact active monitor that’s available in both finished and kit form, I couldn’t resist having a go at the latter.
The LBM comes courtesy of a company called AudioSmile, founded by audio designer Simon Ashton. Simon has a track record in a variety of audio engineering contexts and the LBM is by no means his first loudspeaker design. Simon’s experience with speakers is clearly apparent from the genuinely unusual and interesting electro‑acoustic engineering that can be found within the extremely compact dimensions of the LBM.
Although Simon describes the LBM as ‘little’, ‘tiny’ might have been more appropriate, because the LBM truly is minuscule. This will mean that while the LBM offers great benefits should you be looking for something easily portable or to fit on a small desk, its compact dimensions and very small bass driver will also have significant implications for the low‑frequency bandwidth and maximum volume levels achievable.
My decision to build and review the kit version of the LBM added some complexity to the review process. In particular, it was important that the finished speaker I listened to and tested was built to the appropriate standards, so along with submitting a kit for review Simon also kindly supplied a finished pair of monitors. This arrangement also meant I had to build just one monitor, and while generally it’s the case that building one LBM makes building a second one more straightforward, pairs of LBMs are configured as an active primary (in which all the electronics and amplification are installed) and a passive secondary. These are connected by a 2m cable that terminates in a locking multiway connector. And rather than clutter the guts of the review with stories of speaker building, I’ve covered that in a separate box.
Little Boxes
An LBM is 208 x 123 x 137mm (HxWxD), which puts its internal volume somewhere around 2 litres. By way of comparison, a Neumann KH120 MkII nearfield monitor (which I’d consider compact) has an internal volume of around 6 litres. The LBM cabinet is predominantly constructed of 12mm thick, CNC‑machined birch plywood, and it incorporates some steel bracing bars that both tie the two side panels together and provide some extra rigidity in the bass/mid driver attachment. The finished cabinets feel very solidly put together. The pre‑made version of the LBM is finished in a black textured metallic paint with exposed plywood edges on its front panel and bass/mid driver rebate. It looks pretty smart, in a slightly homespun sort of way.
The drivers employed in the LBM are a nominally 75mm (3‑inch) diameter bass/mid unit and a nominally 25mm waveguide‑loaded tweeter. The bass/mid driver is an OEM component from US company Dayton, manufactured in China. It’s a genuinely interesting driver featuring a neodymium‑iron‑boron magnet motor system with, very unusually, an underhung voice coil and copper shorting ring. The driver diaphragm is aluminium. For its compact dimensions the driver offers an impressive ±4.6mm linear diaphragm excursion.
The tweeter is one of the “unusual and interesting” elements I mentioned earlier. This is because, while the world of OEM drivers isn’t remotely short of cost‑effective high‑frequency driver solutions, Simon chose not to go down that route. Instead, for the LBM, he engineered a composite tweeter using an OEM full‑range inverted‑dome driver of the kind that might be found in a computer or ultra‑compact desktop speaker, and combined it with a custom waveguide and ‘lens’. The reason for doing so was primarily to create a driver able to operate with a high‑pass crossover filter around an octave lower than the 3kHz typically necessary with a conventional low‑cost tweeter. To operate down to 1.5kHz, as the LBM tweeter does, both a very low fundamental resonance frequency and extended diaphragm excursion are necessary, and those characteristics simply aren’t available from any compact and inexpensive OEM tweeter.
Simon’s need for the LBM tweeter to have extended bandwidth and a low crossover frequency arises from his desire for the system to offer well‑controlled vertical dispersion through the crossover region. At higher crossover frequencies, off‑axis path length differences from the two drivers to the listener (or indeed a measuring microphone) constitute a greater proportion of the radiated wavelength, so phase errors will increase, resulting in destructive interference between the drivers and a ‘hole’ in the frequency response. A lower crossover frequency will reduce the effect of path‑length differences because the radiated wavelength is longer. When I get to presenting some acoustic measurements I’ll take a look at the LBM’s vertical dispersion.
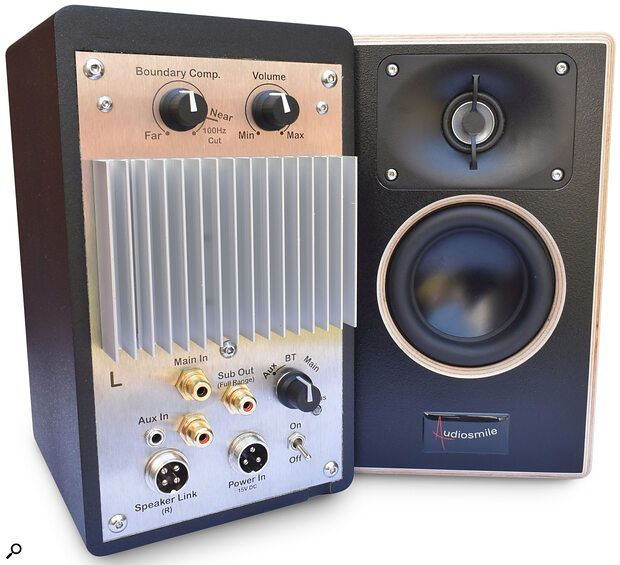 Whether bought pre‑made or as a kit, the LBM comes in pairs: the ‘primary’ speaker houses all the electronics, and feeds the secondary speaker via a locking connector.
Pass The Port
A second interesting design element of the LBM is its reflex port. With such tiny dimensions and so little bass driver diaphragm area available, reflex loading was pretty much the only viable option, and Simon has clearly worked hard to optimise the reflex port and overcome some of the potential pitfalls of the technique. The LBM port vents from a slot in the top panel, and is created by two full‑width panels spaced generally around a centimetre apart that extend down into the cabinet. The two panels are, however, gently curved over their length, and more tightly curved at either end to create generous port entrance and exit flaring. The combination of curving and flaring not only helps ensure airflow remains laminar to higher volume levels but also helps suppress the likelihood of port organ‑pipe resonances. The port panels are engineered from laminated materials that offer a degree of constrained layer damping to suppress resonance still further. There is an interesting technical paper describing the design processes and principles of the LBM port on the AudioSmile website.
Somewhat unexpectedly, the amplification topology of the LBM is traditional Class A/B rather than contemporary Class D. The reason for this is that Simon believes Class A/B generally offers a subjectively kinder distortion profile. Similarly surprising is its generous amplifier power rating of 50 Watts for each driver, so 200 Watts in total. It’s no surprise, then, that the primary monitor has a not insubstantial aluminium heatsink attached to its rear panel. There’s also a power supply input (the LBM has an external PSU), unbalanced analogue 3.5mm and RCA phono inputs (the LBM has no balanced inputs), a mono RCA phono subwoofer output, a four‑way locking connector for connection of the secondary speaker, a rotary volume control knob, a rotary boundary compensation EQ knob and an input selection knob. The input selection switch includes a Bluetooth option, and it can play audio wirelessly from Bluetooth‑enabled transmitters. It is compatible with the latest Bluetooth aptX HD standard.
Measuring Up
I took the pre‑built LBM to my usual measurement venue (a large church space) and performed a few basic acoustic measurements.
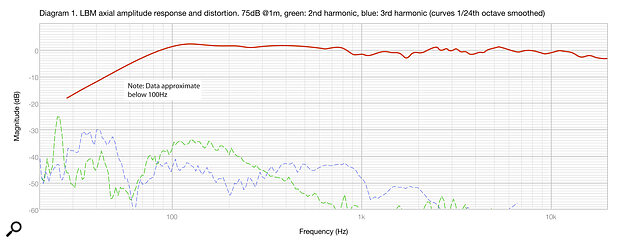 Diagram 1: The on‑axis response of the LBM, measured at a distance of 2m (playing at 75dB SPL at 1m). The green and blue traces show second and third‑harmonic distortion, respectively.
Diagram 1 shows the axial frequency response measured at 2m at a level (at 1m) of 75dB SPL (it’s a very small speaker, remember, so it’d be unfair to drive it too hard). The overall frequency response is impressively flat, but the limited low‑frequency bandwidth that’s pretty much unavoidable with just a 75mm bass driver and a 2L enclosure volume is obviously apparent. Taking into account the sub‑100Hz approximation that is unavoidable with my measuring technique, I’d put the ‑3dB point at around 70Hz, which ties in well with the specified ‑6dB at 58Hz. Also shown on Diagram 1 are the second and third‑harmonic distortion. The distortion levels aren’t quite as low as might be hoped for a truly high‑performance monitor, especially in the upper bass/low midrange (100Hz to 300Hz), but the situation is better than it looks because the predominant distortion products in that frequency range are second‑order, so relatively benign. There is no escaping the fact that small driver diaphragms, like that fitted to the LBM, have to move significant distances to generate volume at bass and low‑midrange frequencies, and in the absence of extremely sophisticated and expensive driver engineering, some distortion is unavoidable.
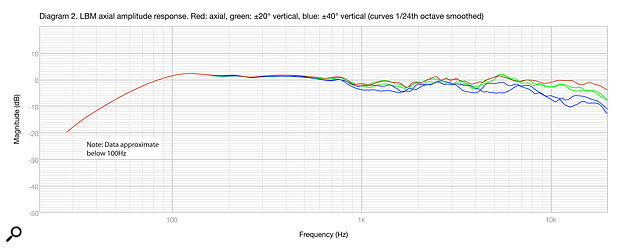 Diagram 2: Comparing the on‑axis response (red trace) with measurements taken ±20 degrees (blue traces) and ±40 degrees (green traces) vertically off‑axis.
Diagram 2 investigates the vertical dispersion to see if Simon’s efforts to minimise vertical off‑axis response flaws has paid off. And they very definitely have. The diagram shows frequency response data comprising the axial response overlaid with those measured at ±20 and ±40 degrees vertically off axis. The LBM exhibits just about the tightest such group of response curves I’ve ever seen from a speaker with separate, spaced drivers. There’s little sign of the usual sharp suck‑out in the frequency response either side of the crossover. There’s two things going on here: firstly the LBM’s composite tweeter and the low crossover frequency it enables definitely make a difference, but secondly, the small diameter of the bass/midrange driver means that physical space between it and the tweeter is minimal. This also has the effect of reducing path length differences away from the perpendicular axis from the two drivers to the measuring microphone. The result of such well‑controlled vertical dispersion ought to be a monitor that’s relatively insensitive, in subjective balance terms, to vertical listening position. It’s potentially a very useful characteristic for a monitor that’s likely to be located on a desk at a position below head height.
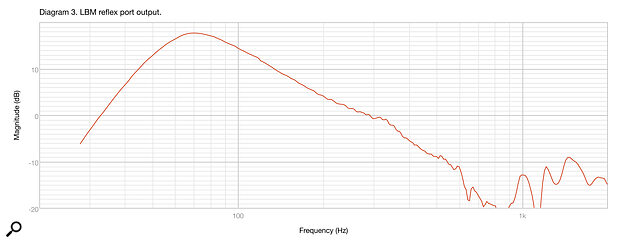 Diagram 3: A close‑mic measurement of the port output, showing the 70Hz tuning frequency... and not much else!
Diagram 3 illustrates a measurement made with the microphone positioned close to the exit of the LBM port. It provides an approximate indication of a 70Hz port tuning frequency but more significantly, in terms of Simon’s aims with the LBM port design, it shows that he’s been very successful in terms of minimising port organ‑pipe resonance. The port output above its 70Hz peak is very clean down into the noise floor (the noise being predominantly ‘crosstalk’ from the bass/midrange driver). Bearing in mind the number of ‘big name’ monitors I’ve found to have a port organ‑pipe issue, this is genuinely impressive.
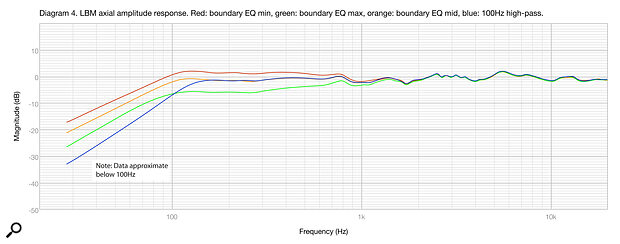 Diagram 4: The Boundary EQ set to minimum (red trace), maximum (green) and in the middle (orange). The blue trace shows the effect of the 100Hz high‑pass filter.
Finally, Diagram 4 illustrates the effect of the LBM Boundary Compensation EQ. The Boundary Compensation EQ knob is a variable control and I measured it at its maximum and minimum positions plus a couple of locations in between. However, the maximum attenuation position of the Boundary Compensation knob actually engages a 100Hz high‑pass filter (with mid‑level boundary compensation) that enables the LBM to be used with a subwoofer. The Boundary Compensation EQ generally is a sensibly configured and useful facility — again, especially considering that the monitor is likely to be located on a desk and close to room boundaries.
The LBM doesn’t just measure like a well‑engineered monitor, it sounds like one too.
All The Small Things
So, the LBM appears to be a very competently designed and engineered little monitor. But how does it sound? I set up the pair of pre‑built LBMs both on a secondary desk in our studio room and on our DAW workstation monitor shelf, and in both locations it was pretty obvious from the off that the measurements don’t lie. The LBM doesn’t just measure like a well‑engineered monitor, it sounds like one too. Its fundamental tonal balance is reasonably neutral, if, to my ears, a little restrained in the upper midband, and the LBM demonstrates no major flaws in terms of significant coloration. Having identified the slight midband reticence, I found that along with compensating for room position, the EQ was very useful for tweaking the general tonal balance more to my liking. A dB or two of EQ did wonders for the overall balance. LBM bass is capable and usable as far as it goes, but unfortunately the pesky laws of physics mean it doesn’t go very far in terms of either bandwidth or volume level.
The stereo imaging quality is strong, with good focus to central images, and the LBM’s well‑managed vertical dispersion is clearly audible, in that its tonal balance changes little with listening head height. I suspect the well‑integrated drivers also help with imaging quality. I also really admired the character of the LBM’s unique composite tweeter — it reveals good levels of high‑frequency detail but does so with a satisfyingly natural and unforced style.
However, no monitor as small as the LBM can disguise the limitations that come with such compact dimensions, and, to my ears, the genuinely good performance of the LBM is only really available at relatively modest volume levels — the kind of levels suitable for restrained solo monitoring at very nearfield listening distances: at a temporary desk, or in a hotel room or Airbnb, that kind of thing. Push the LBM a little vigorously and the performance begins to degrade noticeably as the bass/mid driver diaphragm is required to work harder. In particular, the bass character takes on a degree of dynamic softness and pitch uncertainty, and the lower midrange becomes thicker and less revealing of the source quality. You can still dance and sing along with the LBMs playing loud, but you probably wouldn’t want to make important mix decisions. But then, the LBM is far from alone in this respect. Pretty much all really compact monitors out there do their best work at modest volume levels. Keep them working in their comfort zone and they’re perfectly viable, portable professional monitors.
As discussed in the box, building the LBM is not an insignificant undertaking. There’s a surprisingly large number of components involved, and assembling them into a pair of working monitors isn’t entirely straightforward. It’s occasionally a little fiddly and you need patience, a good uncluttered workspace and some decent tools. But if you do choose to go the LBM kit route, you’ll end up with a pair of genuinely capable compact monitors along with the satisfaction of knowing you built them with your own hands.
Build It Yourself
Building a pair of LBMs actually turned out to be somewhat trickier than I initially imagined, but with some planning and patience, it is not beyond the capabilities of the majority of those people who may be interested. The only potentially new skill required is soldering, so if you’ve never done that before, a bit of research and practice is perhaps advisable. Those new to soldering might also need to budget for a soldering iron.
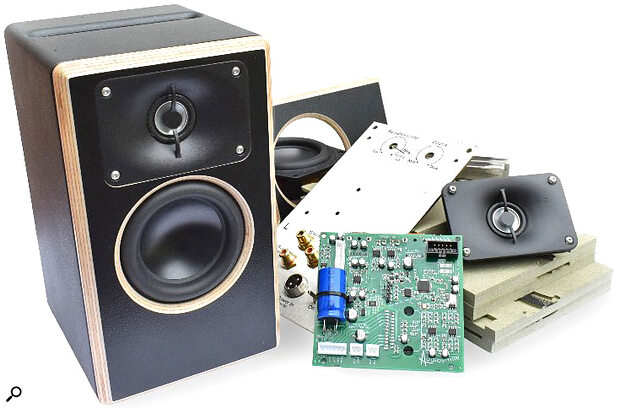 The kit version of the LBM requires some DIY materials and soldering.
While I’m on the subject of buying things, the LBM kit doesn’t include the adhesives and sealant required, so be prepared for a trip to your local DIY store. And also be prepared then to factor in a not insignificant sum at the checkout. I spent over £40 on adhesives and sealant.
The construction documentation provided by AudioSmile is a 50‑page A4 PDF that, for the most part, works well. It majors on explanatory photos rather than text, and leaves little doubt over what’s intended at each stage. At this point I’ll admit that it wasn’t actually me who did the LBM assembly. My wife, sound designer Helen Skiera (www.helenskiera.com), volunteered, and I was very happy for her to take the glory (and get covered in glue).
Alternatives
In terms of self‑build active monitors, the LBM has the market pretty much to itself. However, for roughly the same price as the LBM kit, monitors such as the ADAM Audio D3V, IK Multimedia iLoud Micro, Kali Audio LP‑UNF and PreSonus Eris E5 come into play.
Pros
- Compact monitoring in kit form.
- Good fundamental performance.
- Great dispersion characteristics.
- Well engineered reflex port.
Cons
- Modest volume levels only.
- Restricted low‑frequency bandwidth.
- Kit needs time and patience.
Summary
The Little British Monitor is a unique and quirky product that combines highly capable basic performance with a hugely satisfying option of self‑build.
Information
Pre‑made £634.80, kit version £418.80. Prices are per pair, including VAT.
AudioSmile +44 (0)7952 478 193.
Pre‑made £634.80 (approx $800), kit version £418.80 ($528). Prices are per pair, excluding tax & shipping.

