Cockos' affordable DAW is now more customisable than ever, and there are valuable new features for media management, MIDI editing and surround mixing too.
I last reviewed Reaper back in August 2009, when it hit v3, exploring the unusual Cockos company ethos and assessing the merits of their powerful and cost‑effective DAW system against the established market heavyweights. Since thenm Cockos have continued to add new features to the program via a steady flow of 3.x updates, and have now released v4, another large‑scale overhaul of the software's look and feel. That said, Reaper's fundamental approach to Audio + MIDI sequencing remains thoroughly recognisable, so if you're completely new to the platform, let me refer you to the v3 review at /sos/aug09/articles/reaper3.htm in the first instance, so that I can concentrate this review on what's transpired since then.
Hot WALTER
At first sight, the new default GUI Theme impressed me with its slick and businesslike redesign, but what's even better is how much you can adjust it if you'd prefer something different. Existing Reaper users will already be aware that it's long been possible to substitute your own graphical resources and colour schemes in place of Reaper's own, and many examples of such personalised Themes can be downloaded from the resources 'stash' on the Cockos site if you don't fancy creating your own. Indeed, trying out new Themes has got easier, because you can now just drag the files into the Reaper window. What really sets v4's Themes implementation apart, though, is the Windows Arrangement Logic Template Engine for Reaper — or WALTER, to its mates.  and Track Control Panel (top right). You can also see a couple of my own customised TCP Track Layouts there, generated by customising the default Track Layouts' WALTER code (bottom) — not an activity to undertake if you're squeamish about computer programming!") Here you can see a variety of Reaper's default Track Layouts for the Mixer Control Panel (top left) and Track Control Panel (top right). You can also see a couple of my own customised TCP Track Layouts there, generated by customising the default Track Layouts' WALTER code (bottom) — not an activity to undertake if you're squeamish about computer programming!
Here you can see a variety of Reaper's default Track Layouts for the Mixer Control Panel (top left) and Track Control Panel (top right). You can also see a couple of my own customised TCP Track Layouts there, generated by customising the default Track Layouts' WALTER code (bottom) — not an activity to undertake if you're squeamish about computer programming!

With WALTER, you can decide which controls are visible on the Track Control Panel (TCP) or Mixer Control Panel (MCP), how large they are, and how they respond as you zoom/scale the track or arm it for recording. Furthermore, you can program a set of different GUI presets (or 'Track Layouts') for any given Theme, which can be switched via dedicated Actions on a per‑track basis, leaving you free to select the most suitable for each different production task. So, for example, you might want to use a narrow MCP strip with tall meters while overdubbing to keep a watchful eye on your levels, but a wider MCP strip at mixdown, with more emphasis on faders, pan pots and effect/routing controls. Want input settings visible only when a track is armed for recording? TCP level meters switched from horizontal to vertical? A massive mute button specially for banjo tracks? It's all possible!
While this stuff will surely keep tweak‑heads perspiring feverishly into the small hours, the less technically minded will be relieved to find a selection of factory preset Track Layouts that offer a few sensibly designed alternatives. This is just as well, because creating or adjusting Track Layouts using the WALTER system currently involves scripting in a bespoke programming language. It's logical enough that those with programming experience should be able to make headway reasonably quickly, but anyone who abandoned their 'Teach Yourself BASIC' book somewhere in the middle of chapter three need not apply! Personally, I think some kind of graphical editing application for generating WALTER code would be a very good idea for the future, if this innovative facility is ever going to be made truly accessible to the rank and file of computer musicians.
Various other little visual nips and tucks are also worth pointing out. I'm delighted that there's now the option to have little ghosted‑in waveforms on automation lanes, so you can see how the automation data lines up with the audio, and there's a similar feature available on folder tracks too, overlaying a faint waveform of any contained track onto the folder lane. Also useful where folders are concerned is that the meters in many of the default TCP Track Layouts are still visible in miniature for compacted tracks within a folder (so you always know which tracks are passing audio), and that you can compact TCP and MCP folders independently — in fact, you can completely separate the MCP and TCP track ordering as well, if you want.
Colouring options continue to get more sophisticated, something that always wins my vote, because it helps so much with making sense of some of the large and complicated mix projects I receive. We already had per‑track and per‑Item colour choices available, but now you can colour individual Takes within an Item (very useful when comping stacked Takes in a single track), as well as tinting Marker and Region flags within the time ruler. Per‑Take colouring has arrived since v3, and comping from multiple takes on a single track has also been improved, maintaining a consistent number of take lanes even where some takes don't go all the way through the song — notice the greyed‑out sections that achieve this here, for example.
Items On The Agenda
It's clear that a lot of work has been going on behind the scenes since version three to improve the way Items can be edited in Reaper's main Arrange view. Standard copy/paste edits respect time selections more consistently, for a start, and fades are easier to use too, with dedicated Actions to select each fade type, ganged adjustment of crossfade type, and independent default settings for fades and crossfades for imported and edited Items. There's a great new version of the Dual Trim function, too, which moves the boundary between two items by time‑stretching them. Unassuming as this may seem at first glance, it's actually enormously useful if you're trying to fit the timing of a freely played part to the metric grid — just snip the Item at the start of each rhythmic event in the audio (perhaps detecting these using Reaper's automatic transient detection, which has also improved for v4) and then snap the edits to the grid. It's ridiculously quick to do, and Reaper's built‑in Elastique 2 time‑stretch algorithm delivers a very respectable sound to boot. This is something I can see myself using a great deal.
The Media Item Properties window is something I find myself opening up frequently, so I was delighted to discover that if you leave it open while changing Item selections it now updates accordingly, however many Items you select at once. This is especially handy in the light of another new feature: the facility to store the current Item selection state, independently of any Item Groups you set up. So if, say, you wanted to be able to continually re‑evaluate the fade‑out length of the final slice of a repeated REX loop as you built up your arrangment, you'd only have to go through the rigmarole of selecting all those non‑contiguous slices once. After that, you can just save the selection for future reloading as required.
Per‑Take envelopes for level, pan and mute were already available in v3, but their effects are now visible on the Item's waveform, and they're joined by something I've been wishing for pretty much ever since I migrated to Reaper from Cubase: a per‑Take pitch envelope. You can set the shift range in semitones both globally and on a per‑Item basis, and snap your settings to a semitone grid too, if you wish. I can see this function assisting tremendously with things like vocal comping, allowing you to quickly adjust problematic pitch‑drifts between different Takes without the faff of loading up real‑time correction plug‑ins. There's still no sign of envelopes for Take‑based FX, though, which I'd also find useful, personally.
Speaking of Takes, there has been important progress here in terms of the way Items respond when you're using the Show All Takes In Lanes display mode. Whereas previously a session involving multiple passes and drop‑ins on the same track would have left you with a motley collection of Items with different numbers of Take lanes, Reaper now inserts empty, greyed‑out lanes where necessary, so that each recording pass or drop‑in consistently gets its own lane. Comping has also been enhanced with the option to save the Take status of any selection of Items for instant recall, so it's now quick and easy to switch between 'clean' and 'dirty' lyric versions across all lead‑ and backing‑vocal tracks at once, for instance. You can also force all active Takes into the top Item lane or (if you've downloaded the latest SWS extension set from www.standingwaterstudios.com/reaper) re-order the available Takes with complete freedom. All these good things notwithstanding, I did experience quite a few unexpected results when trying to implode Items across different tracks into Takes on a single track, but the developers have informed me that a fix for this is already in the works.
MIDI Refinements
There's been no slouching on the MIDI side of things either, with numerous subtle improvements to the way in which messages are displayed and edited. I particularly like the new section of the Filter window that gives an overview of all Items currently under scrutiny in the MIDI Editor and lets you adjust the mute, solo, visibility and colour settings for each of them, to help isolate exactly what you want to see and hear while you're editing. The Project Sync'ed Timebase is also a welcome addition, locking the scroll and zoom functions of the MIDI Editor and the main Arrange window so that they always line up visually.
A number of musical scale‑based functions have been introduced too, most obviously via the Scale selection fields in the MIDI Editor. If you select, say, a C-major scale here, you can restrict all note-editing operations to only the white notes — shifting notes upwards/downwards, for example, will perform tonal transposition, adjusting the intervals between the notes automatically to avoid any notes shifting out of key. Switch the Scale selection to a D-dominant-seventh chord, on the other hand, and you can quickly paint in consonant arpeggios with a single drag of the mouse. In a similar vein, the ReaControlMIDI plug‑in's Note Transpose facility has a Snap To Scale tick-box too. Not sure what chord or scale your part belongs to? Fire up the Scale Finder window and either type in the note names or play them in over MIDI. The new scale‑based MIDI editing in action: by selecting 'F# Harmonic Minor' in the Scale fields at the bottom of the editor window, the intervals between a sequence of dragged notes automatically adjust to fit the overall tonality.
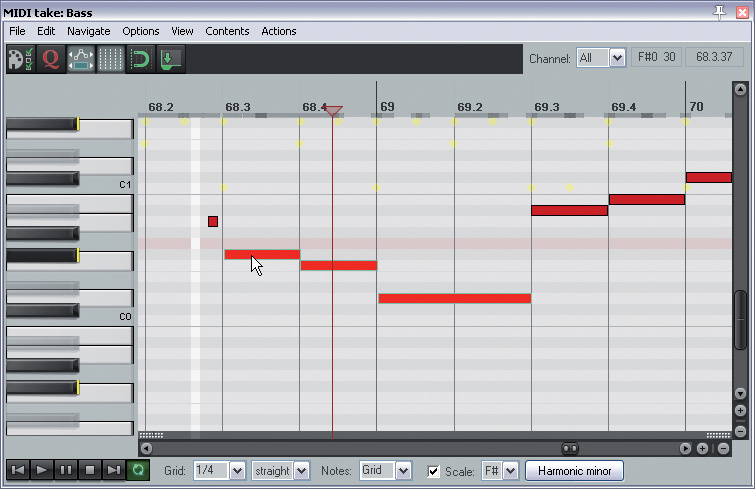
A couple of other arrivals were long overdue, in my view. The first is the option to send MIDI Continuous controllers for Volume and Pan directly from Reaper's faders, and the second is the facility to create Pooled MIDI Items, the Cockos equivalent of the 'ghost' copies implemented in most other DAW packages. If you create a series of copies of a MIDI Item that all reference the same pooled MIDI data, edits you perform on that data in any one of the copies will be duplicated across all the others. You can choose to dissociate any of the copies from the pooled data if you wish, though, thereby turning that 'ghost' copy into a new and independent MIDI Item for separate editing.
While Reaper still lags behind some more established MIDI sequencers in terms of groove quantising, there has been some progress on this front with the introduction of a dedicated Swing quantise option, both in the MIDI Editor's display grid and in the dedicated Quantize Events window. These settings aren't available for the main Arrange view's display grid, though, which doesn't make much sense to me.
Customised Mouse Modifiers
One of the big features in v4 that promises to add to Reaper's reputation for streamlining workflow is the added Mouse Modifiers page in the application's Preferences. The new Mouse Modifiers section in Reaper's Preferences gives you unprecedented control over what your mouse clicks and drags do in a variety of contexts, depending on which modifier keys you're holding down at the time. This lets you customise how various things in Reaper (Items, tracks, the time Ruler, Envelope points, MIDI events and so forth) respond when you click, double‑click or drag them with any combination of modifier keys engaged. To set this up, you first select a Context using two drop‑down menus (for example, 'Media Item Edge Double Click' defines what happens when you double‑click on the edge of a Media Item in the Arrange view) and then select a Behaviour for any modifier‑key combination you wish. You get quick access to suitable Context‑specific mouse Behaviours, but you can alternatively trigger any Action or Action chain instead, which makes a whole variety of nifty, time‑saving dodges possible.
To give just one example, I like to colour suspect audio regions in my mixing projects light blue so that I don't forget to deal with them. (It keeps my computer monitor from getting covered in highlighter pen...) I can now do this in a single step by assigning the 'Set Selected Items To Custom Color 7' Action to Shift‑Alt‑click. While more casual users may see little need to personalise the software's operation to this extent, power users will be in heaven! My only real gripe is that I'd have liked a similar degree of control over the operation of the scroll wheel, especially when editing MIDI data, but scroll-wheel operations aren't yet supported as a Mouse Modifiers Context. (Admittedly, they are supported within the existing Actions system, but less comprehensively.) It would also have been nice if you could choose (or design) an appropriate cursor icon for customised Behaviors.
Meet The Dockers
Another new ergonomics function introduced in v4 is the facility to create up to 16 different dockers/toolbars, which can be positioned at will around the edges of the main Arrange view or floated as separate windows. What you choose to do with this function will depend a great deal on how you like to use Reaper, but there are a tremendous number of possibilities in this area. A couple of examples of how you might use the new multiple‑Dockers facility in Reaper to customise your workspace. One provides masses of extra buttons for triggering actions without recourse to the keyboard, while the other splits the screen between Arrange and MIDI Editor views, with a sidebar for the useful new MIDI Filter window.
If you like using on‑screen buttons rather than keyboard shortcuts, for instance, you can quickly populate the edges of the screen with dozens of them, or else just pop them up as a floating window under the mouse cursor as required, using a keyboard shortcut — although in this situation it would have been nice to have a Mouse Modifier option to close the window automatically once you'd clicked the desired button. If you're working with multiple Items simultaneously in the MIDI Editor, you might want to have the new‑style Filter window on permanent display. You might stick the Navigator window above the main Arrange view, or the master‑channel MCP strip to the right‑hand side, while the Item Properties or a slim Mixer window to the left‑hand side could serve a similar purpose to the Inspectors in Logic or Cubase.
Mixing Blessings
What I most appreciate Reaper for is its enormously flexible mixing and effects‑processing environment, and while this area of the program hasn't changed in any fundamental way, it has continued to evolve and mature by virtue of numerous smaller renovations. My favourites include:
- Per‑channel 'solo defeat'.
- New panning modes, including a dual‑panner mode for stereo sources.
 A welcome addition for many Reaper users: a dual‑pan option for stereo tracks, one of several new panning modes introduced for v4.
 - The ability to assign a mixer channel's main outputs to Track Channels other than 1+2.
- An Input FX chain for processing a track's audio or MIDI data (or even converting between them!) during recording.
- Bulk drag‑and‑drop creation of sends from a selection of channels to a single destination channel — useful for setting up global reverbs, for example.
- The option to gang the operation of any set of plug‑in controls — even between different plug‑ins on the same track — via the existing Parameter Modulation system.

Envelope editing has been refined in a number of ways too, especially as regards the use of mouse dragging. Alt‑dragging any automation line adjusts its Bezier curve; Shift‑Ctrl‑dragging the Envelope adjusts its overall level within the current time selection, using Preference‑defined transition times at each boundary; and Shift‑Ctrl‑Alt‑dragging creates a copy of the selected points. While none of these updates are exactly earth‑shattering, in combination with the new Mouse Modifiers facility (within Envelope‑related Contexts), they significantly enhance the experience of working with automation. That said, I'm still pining for a proper 'relative trim' automation mode, whereby fader moves are applied as offsets to any existing automation data. (Pretty please?) As it is, any detailed automation, such as the typical lead-vocal rides on most mixes, still has to be drawn in with the mouse.
The Project Bay
Once you start using Reaper in anger, it's easy to end up with dozens of tracks and hundreds of Items, Item Groups and plug‑in instances. In recognition of this, Cockos have brought a number of different project‑management tools on board. Chief amongst these is the Project Bay, which features a series of tabbed pages. The first lists all source media files accessed by the project, shows their format details and storage location, and tells you where in the project they are used. The related Media Items tab lists all the Media Items within the project, with details of their length, pitch/rate/volume properties, fade‑in/out length, number of Takes, and source file. The Project Bay and the Track Manager, two of the powerful new project‑management windows now available in Reaper 4.
You can audition and rename files and Takes from the Project Bay, reorganise them in folders, and focus on specific groups of entries using the Filter field. Dragging source files or Items out into the Arrange view creates new Items, and it's also easy to substitute one source file for another, updating any dependent Items accordingly. As with the Cubase Pool window, files and Items can appear in the Project Bay without actually being used in the current project, and you can save selections of source files and Items for merging into other projects.
If you're wondering how this last function might be useful, here's an example. Let's say I want quick access to my whole drum-sample collection whenever I need to do some drum replacement at mixdown. First of all I'd load all the drum samples from their different stored locations into an empty Project Bay, put them into a Project Bay folder, and save that setup for future use. Then when I next encountered a hopeless snare‑drum 'donk' at mixdown, I wouldn't need to go hunting around for all the individual samples again, because I could just open the saved Project Bay (you can have several open at once, if you like, in addition to that of the current project). The sounds could then be auditioned from there (or from the Media Explorer) and the appropriate sample dragged into the Arrange view or into the plug‑in window of a software sampler.
Separate Project Bay tabs for Item Groups and Take Comps allow you to examine, rename and modify these in detail, while the FX tab lists all plug‑ins used in the project, specifies their formats and file locations, and gives a run‑down of which tracks they've been used on. It's easy to toggle the bypass or switch presets on any or all instances, or indeed to substitute one plug‑in for another when you're opening an existing project on a system with a different effects line‑up.
Complementing the Project Bay is a new Track Manager window, which lists all your tracks, providing an overview of the track folder structure, TCP/MCP visibility, plug‑in count and delay compensation, and record/mute/solo status. Again, a Filter field is provided to narrow down the list, and you can adjust most of the listed track attributes directly from the Track Manager itself. This is all great stuff, although it does rather trespass on the functionality of the existing Performance Meter window, and I wouldn't be at all surprised if Cockos merged the two in due course.
A Region Manager is also now available, showing the number, position, length, and colour of each Region in your project. A final column sets the Region's render status, allowing you to render each activated region separately with a single command — a time‑saving feature for mastering jobs in particular.
Have It Your Way!
All in all, Reaper v4 is another confident step forward for Cockos, enhancing and expanding the feature set of an already competitive package. I experienced a few small display bugs during the review, but (as I've come to expect with this company) a number of them were fixed within a week of my flagging them up, and past experience leaves me in little doubt that the remainder will swiftly follow. Beyond those, I had no stability problems at all during the review period, despite repeatedly feeding the WALTER system with my own ham‑fisted scripting efforts! Some refugees from other platforms may miss the odd specific feature (such as groove quantisation or relative trim automation) and you still don't get scoring facilities, suites of high‑spec virtual instruments, or Gigabytes of bundled audio content, but there's no arguing with Reaper's phenomenal price/performance ratio, especially if you're eligible for the $60 discounted licence.
For all the new features, what most impresses me about this latest release is the way the developers continue to offer more in‑depth ways of moulding both the software's operation and its visual interface to suit your individual way of working. The WALTER system, the Mouse Modifiers Preferences, and the configurable toolbars/dockers are all trail‑blazers in this respect, particularly when taken in the context of the existing Theme, Action and menu‑customisation facilities, resulting in a software environment so instinctively responsive that the mechanics of the studio process recede into the background, leaving you to concentrate on making music.
What hasn't changed since version three, though, is that you need to invest some time and energy in setting Reaper up to suit the way you work if you really want to get the best out of it. Get over that hurdle, and you may find you never look back.
ReaSurround
 The batch converter not only allows you to adjust the file format, channel width and resolution of a group of files, it also lets you apply a user‑defined plug‑in chain to them too.
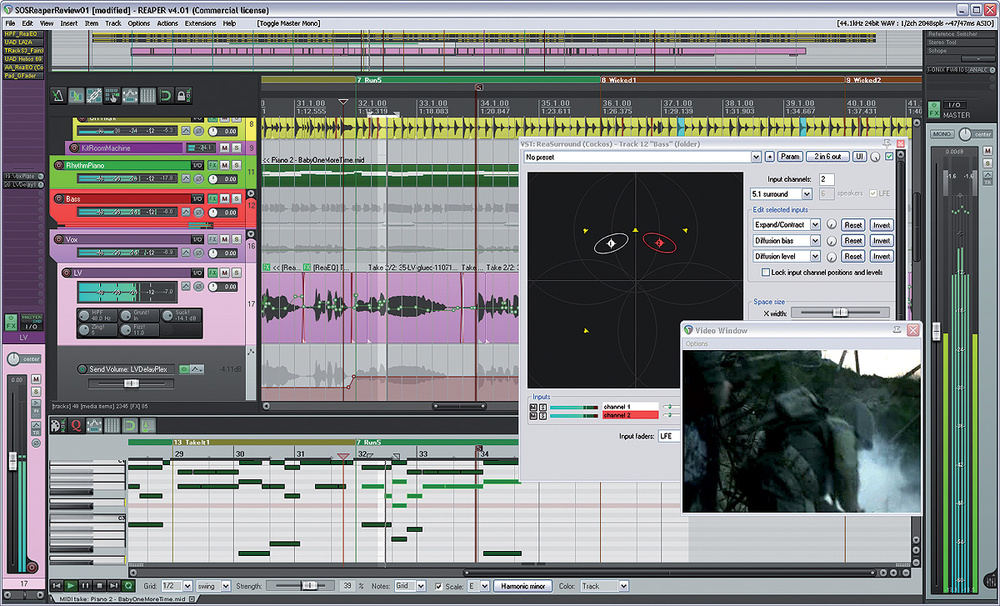
 Reaper can now record, monitor, meter and output in multi‑channel formats, and the addition of the fully featured ReaSurround plug‑in finally makes it a realistic proposition to mix in surround without third‑party assistance.
In a sense, Reaper's ability to output large numbers of audio streams through a single mixer channel has always made it seem well suited for surround work, but until now, dedicated facilities for working in surround formats have been a bit thin on the ground. As of v4, however, you can record, meter and monitor multi‑channel surround files, as well as creating multi‑channel audio renders. Connecting that all together is a new ReaSurround multi‑channel panner plug‑in, which you can use to locate and move any number of audio signals within a surround sound-stage comprising multiple speakers. Ten speaker‑configuration presets are provided, including quadrophonic, octophonic, 5.1, 7.1 and 9.1, or you can create your own elaborate custom setups by positioning any number of speakers in three‑dimensional space and adjusting the Gain and Influence parameters for each.
Whatever surround output format you're using, there are two basic ways you can use ReaSurround. The first is to use one plug‑in instance for the whole mix, assigning each channel of audio in your mix to its own ReaSurround input channel using Reaper's Track Channels system. This has the benefit of one‑window operation, but if your mix has anything more than about 16 channels, the GUI will quickly begin to get cluttered. For more in‑depth surround mixes, a 'one plug‑in per channel' approach (feeding a multi‑channel master output) therefore makes more sense.
Whichever method you go for, you control the positioning of input channels in the same way: select the required channel (or channels) by clicking in the graphic display or Inputs list; select the required editing type in one of the three fields in the Edit Selected Inputs section (there are 10 options available, including three Diffusion settings); and make adjustments from the adjacent rotary control. LFE levels are set separately from sliders in the Inputs list. Even with my comparatively rudimentary knowledge of surround methodology, ReaSurround appears to provide a pretty comprehensive set of tools, although I did miss the option to rotate input sources around a non‑central axis, as you can in Cubase. The endless rotary controls used in the Edit Selected Inputs were also a bit disconcerting, although they did the job well enough nonetheless.
Media Explorer Tweaks
The Media Explorer has been souped up considerably since v3, most noticeably by the inclusion of tempo‑matching and pitch‑adjustment controls. In conjunction with a Start On Bar tickbox, these make browsing potential loops alongside an existing arrangement a lot more intuitive. I'd have liked an auditioning FX chain too, though, to allow auditioning of high‑pass filtered break loops as percussion layers, for instance. At the moment, all you get is a level control.
Another development is that you can now zoom, scroll and make selections in the Media Explorer's waveform display. Selections can be dragged straight into the Arrange view to create new cropped or bounced‑down Media Items or into Reaper's FX window to load them into a software sampler plug‑in.
Batch File Conversion & Rendering Updates

One of the big features added to Reaper during the 3.x incremental updates was the Batch File Converter, which lets you process a queue of different audio files with common settings to generate a set of new files. The output file format, sample rate, bit depth and number of audio channels can all be set via drop‑down menus, and this is probably all most people will need to do. However, if you have more specialised demands, you'll be pleased to know that you can also pass all the files through a user‑definable chain of plug‑ins as part of the batch‑processing routine.
The rendering functions of Reaper also continue to become more expansive, and v4 heralds several significant additions. My favourite is the option to save Presets of Render settings. I'm forever changing these, depending on whether I'm rendering a final mix from Reaper at 24‑bit resolution with dither or a mastered file at 16‑bit without dither (because I'm dithering via a dedicated plug‑in), so this simple function will undoubtedly ease my workload. (A similar preset system is available in the Batch File Converter too.) Other highlights include DDP‑format export for mastering purposes, and file-name wild-cards that can automatically add text such as the project title, time and date to the names of rendered files.
Pros
- The WALTER scripting system allows extensive customisation of on‑screen control layout, while the flexible window/toolbar‑docking system helps you make the best use of your screen space.
- The way in which modifier keys affect mouse actions in numerous different contexts can now be user‑defined.
- The Project Bay, Track Manager and Batch File Converter take the sting out of large‑scale project and file management chores.
- The new ReaSurround plug‑in makes mixing for multi‑channel formats a much more realistic proposition.
- Numerous small but worthwhile operational refinements when editing audio, MIDI and automation.
- The full licence is excellent value for money; the discounted licence is simply ridiculous!
Cons
- If you've not had any previous programming experience, attempting to use the WALTER system may cause smoke to issue from your ears.
- Groove quantise and 'relative trim' automation are still both missing in action.
Summary
This latest version sees Reaper continue to lead the pack in terms of interface/workflow customisation and sheer value for money. As with v3, though, you need to spend some time and effort adapting the numerous configurable options to suit your own preferred working methods if you're going to get the best out of this software.
information
Test Spec
- Cockos Reaper v4.02.
- Rain Recording Solstice O3 PC with AMD Phenom II X4 810 quad‑core 2.61GHz processor and 4GB DDR2 RAM, running Windows XP Pro with Service Pack 3.