With clever new tempo-mapping features and low-level Melodyne integration, time and pitch are now putty in the hands of Samplitude users!
As well as being one of the longest-established DAW packages, Magix’s Samplitude is also one of the most fully featured. I came on board with Samplitude v8 in 2005, impressed by the newly implemented MIDI drum editor, which remains one of my favourite features along with the still unrivalled Object Editor. Since then the program has developed steadily over the years whilst retaining the amazing audio engine that is its core strength. Yet even now, the developers are still finding ways to improve it, and the latest Pro X3 version incorporates plenty that’s new. We’ll focus here on these new features: for a more comprehensive overview of the program, refer back to our reviews of Pro X (April 2012) and Pro X2 (June 2015).
Start The Day Right
One small enhancement will be apparent straight away: the start dialogue window has been given a graphical makeover and adds improved coherence when starting a new project. This dialogue will open by default when you launch Samplitude. You can access your templates and last-opened projects from this window, also create new multitrack projects and pre-name the takes for this new project. You can also open existing projects or load wave files. Clicking on the ‘audio setup’ button will open a smaller window from where you can change your driver and audio engine settings. There is also a drop-down menu at the bottom left where you can switch between different saved UI settings. If the project is already open, you can launch this start dialogue from Help / Start Selection.
Warp Speed
Something I felt was lacking in previous versions of Samplitude was the ability to detect and adapt the tempo of audio beyond the base tempo of the project. This was particularly noticeable if you were utilising tempo changes within an arrangement. MIDI objects would recognise and follow tempo markers, but the audio was left unaffected, therefore making these tempo-changing features less than useful. Mercifully, this has now been addressed, and Magix have designed their own version of Flextime/Audio Warp/Bend, called Musical Tempo Adjustment (MTA). Like many others, it is based around zPlane’s Elastique Pro time-stretching algorithm.
Here’s how it works in Pro X3. As soon as you import any audio into a project, transient detection is carried out in the background. Audio can be imported in two ways, method one being to use the File menu’s Import command. Once the audio has been imported to the desired position on the timeline, open the Object Editor and switch to the Pitchshift/Timestretch section, and you will notice a new tickbox named Use Musical Tempo Adjustment. Enable this setting and the audio clip will adapt to the tempo of the song. You will now see ‘PS/TS/TA’ on the object, plus a ‘TA’ label in the object editor, indicating that MTA is now active.
Alternatively, you can import audio clips using the File Manager; if BPM Sync is enabled from within the manager the audio clip will automatically adapt to the tempo of the project it’s added to, and Musical Tempo Adjustment will be switched on automatically. Crucially, MTA-enabled audio will now recognise multiple tempo changes. Say, for example, a song starts with 16 bars at 100bpm, then changes to 110bpm at bar 17. Importing an audio clip into the 100bpm section will adapt it to that tempo automatically, but if you import it to the 110bpm section, it will adapt to that tempo instead — something which was not possible in previous versions. Even better, if you import an audio clip at bar one and then duplicate it by pressing Ctrl+D, as soon as the audio reaches beyond bar 17 you will see it adapt to that new tempo. Any future tempo changes will be detected and applied to existing MTA-enabled objects, as well. Marvellous!
Incidentally, what happens when you’re importing loops from the file browser into an empty project depends on the metronome setting. If the metronome is enabled, the loop will adjust to the project tempo. If the metronome is off, the project will adjust to the loop tempo. For this to work, you need to have BPM enabled in the file browser.
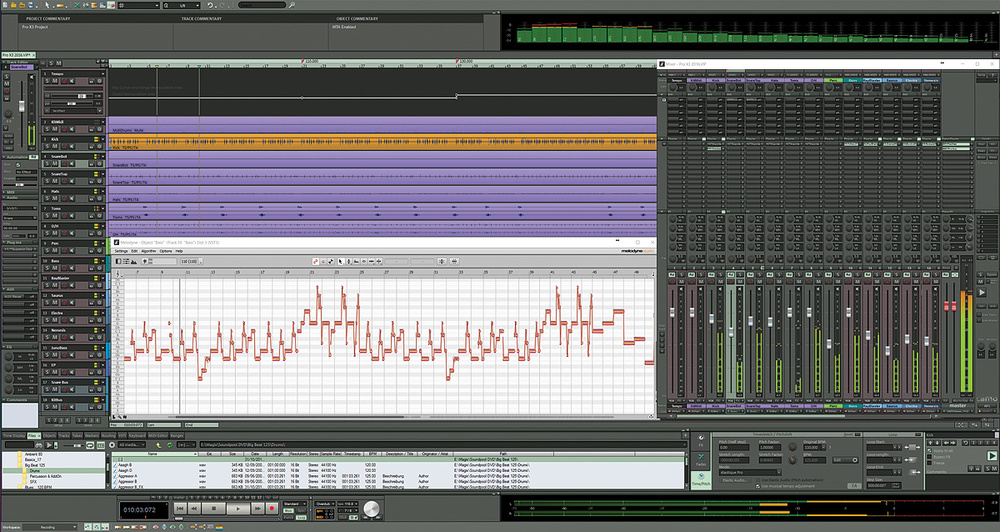
 An audio object with Musical Tempo Adjustment enabled. Markers and automation curve show tempo interpolation from Bar 4 at 100bpm to Bar 6 at 120bpm, followed by a tempo jump to 130bpm at Bar 8. Note that ‘Use musical tempo adjustment’ is ticked in the Object Editor.
MTA isn’t only about importing audio objects. Suppose you have an existing project containing both audio and MIDI, and you decide to add an accelerando at bar 17 for four bars. Begin by selecting all the audio objects, double-click to open the Object Editor and tick the Musical Tempo Adjustment box to prime the audio for tempo changes. Now, to add tempo changes to the project, you need to have the tempo map set to BPM mode, a setting which is found in the Edit menu under Tempo. From the same menu, you can then choose Set BPM Marker to insert a red tempo marker at the current play cursor position (if you use this feature a lot, it’s worth assigning a keyboard shortcut for this). Place this where you want the accelerando to begin, set the source tempo in the ‘Tempo and Signature’ dialogue box and then add a second tempo marker where you want the accelerando to end. Then enter the target tempo for this marker, and tick the box labelled ‘Interpolate from previous marker’. As soon as you close the dialogue box, you will see the VIP timeline adapting to the new tempo — and now, in Pro X3, the tempo interpolation will be applied to audio as well as MIDI, keeping everything in sync with the metronome. So, now you can finally edit your 20-minute prog-rock opus and flexibly incorporate multiple tempos and time signatures, with everything staying together.
BPM Markers are red, and will always show the assigned tempo for that marker. But Samplitude Pro X3 has another trick up its sleeve. If you switch these markers from BPM Mode to Grid Fit Mode, they will turn into green Grid Position Markers. Now, try grabbing one of these markers and dragging it left or right and you will notice that the audio is stretched or compressed either side of the marker. So, in essence, Pro X3 finally has its own Flextime/Audio Warp/Bend-type feature. Also, if you enable a tempo track, you will see the project tempo map displayed as an automation curve. You can edit this curve with the mouse automation tools, drawing in any tempo changes you wish to add. When automation nodes are added, tempo markers will be automatically placed at these points. In my opinion, Musical Tempo Adjustment is a huge and long-awaited improvement to what is already an impressive DAW.
Pocket Calculator
Another new addition in Pro X3 is the ability to detect tempo within imported audio. If you import an audio loop and need to work out its tempo, open the object editor Time/Pitch section and at the top centre you will see a label saying Original BPM. If the tempo hasn’t been detected, there will be a question mark to the right, meaning that the object tempo hasn’t yet been defined and a default value is set (which is usually 120bpm). To calculate the tempo, left-click on the downward arrow and choose Analyse Tempo from Audio Material.
In my test, I imported a two-bar drum loop which I knew was at 67bpm. The calculation showed it as 133.987bpm, which if rounded up to 134 would be twice the original tempo. So, in this case one would need to manually correct the tempo by typing in 67bpm — and, although the detected tempo was only 13 ticks out, it would make sense to round these calculations up or down. Once you’ve detected the tempo you can enable ‘Use musical tempo adjustment’ and the object will then be stretched to match the project tempo.
 The BPM detection menu. Notice the question mark, indicating that the tempo of the object has yet to be analysed.
Melodyne ARA
Samplitude already supported almost every conceivable plug-in format, and Pro X3 adds yet another one: ARA, which stands for Audio Random Access and has so far been implemented in Cakewalk’s Sonar and PreSonus’s Studio One. ARA allows compatible plug-ins to be integrated into a DAW’s project window at a much deeper level than is possible with other protocols, and the chief beneficiary of this is Celemony’s Melodyne pitch- and time-editing package. The Samplitude Pro X3 package comes with a free copy of Melodyne Essential to get you up and running, but if you already have Melodyne 4 on your system, it will automatically utilise that version.
Previously, you could only use Melodyne as a VST plug-in in Samplitude, which could be a cumbersome process: you needed to transfer audio into the Melodyne editor in real time by pressing the transfer button and pressing Play in your DAW. ARA makes the whole process considerably faster and more user-friendly: all you have to do is select the audio object, right-click and choose ‘Edit in Melodyne’ from the contextual menu. Melodyne then scans the audio file faster than real time, with no transfer needed; once scanned, the Melodyne window will then open giving you access to its innovative editing and pitch-correction features. Right-click on object to edit the audio in Melodyne or convert the audio to MIDI.
If you then look at the Object Editor, you will notice that Melodyne has been automatically inserted into the effect insert slot. This object can be duplicated or copied to any part of the arrangement whilst retaining the Melodyne settings of the original, so in this respect, Melodyne ARA is ideally suited for Samplitude’s object editing paradigm (with the disappointing exception that the Melodyne window can’t be docked like Samplitude’s own windows). One of the big advantages of ARA integration is that you can now position the play cursor anywhere along the Melodyne editor timeline, making it much easier to start playback in the right place when editing. Also, when you draw a range in Samplitude’s VIP (arrange) window, this will be reflected on the Melodyne timeline and vice versa.
But it doesn’t end there. Once Melodyne is active on an object, you can right-click it and choose ‘Audio to MIDI’ from the contextual menu. A MIDI object will then be added to the track below, containing the melodic MIDI information that Melodyne has gleaned from the original audio file. You can then insert a virtual instrument on that track and double up the original audio with a synth sound of your choice. In fact, if you only need to do an audio-to-MIDI conversion you don’t even need to go through the intermediate step of choosing ‘Edit in Melodyne’: simply select ‘Audio to MIDI’ and Melodyne will be inserted in the background and the MIDI object will be created.
If you decide you don’t want to use Melodyne on an object any more, open the Object Editor and choose ‘no effect’ from the effects insert slot. I would have liked to have seen a ‘Remove Melodyne’ entry in the contextual menu, too, as this would save several clicks, but hopefully that will be implemented in the future.
Skin Enhancements
Samplitude Pro X3 comes bundled with a set of ‘skins’ called the Birdline Platinum Pack v6, developed independently by Spyros Chatzinikolaou of Birdline Software and originally available as a separate product. The skin suite comes in seven different colours: Black and White, Classic, Dark Blue, Default, Elegant, Flexi and Dark Green. You can choose different skin variations, including the length of faders and nine mixer sizes to use with different screen resolutions. There is also a choice of three sizes of transport and four different arranger/track editor looks. Spyros has been creating Samplitude skins independently for many years, so it’s great to see his creations are finally bundled with Samplitude. He has also created a skin editor utility for enhanced customisation. This isn’t part of the package and will need to be purchased from his web site (http://skins.birdline.gr) for €25.
The native Samplitude mixer skins Camo, Canis and Carbon have also received some Spyros treatment in Pro X3, and there is now a choice of four different-height mixer skins with different fader lengths, including a slim version. One improvement I noticed is that previously, if you tried to make the mixer smaller by resizing, Samplitude tended to pixelate the graphics. This has finally been fixed and resizing no longer causes corruption of the GUI. Also in previous versions, when you added tracks to a project you needed to manually resize the mixer to see the extra tracks. This no longer happens and the mixer is resized automatically — a small but important fix that resolves what was something of a bugbear for me in the past.
Micro Management
If you like keeping notes about your project, X3’s new Info Manager is for you. Accessed from the View menu, it will open in the Docker and can also be undocked and used as a resizable ‘always on top’ floating window. The Info Manager is divided into three sections. Project Commentary can be used for typing in notes about the project and is always visible, while Track Commentary works on a per-track basis: select a track and type in your info for that track in the text area — select another track, and the text area will be blank, ready for typing in info for the newly selected track. Track Commentary thus gives you individual notepads for every track in the project. Object Commentary works in a similarly dynamic way, allowing you to type in notes for the currently selected object. When you select another object, the notepad will be blank and you can add a commentary for that object.
As an example, if you have a project containing 180 tracks you will have individual Track Commentary notepads for all those tracks — and if that project contains, say, 500 audio and MIDI objects, the info manager will give you 500 individual Object Commentary notepads, one for each of the 500 objects. Info Manager notes are saved with the project. Bearing in mind there is already a comments section at the bottom of the Track Editor and in the Object Editor, you should never be short of places to make notes! It’s also worth noting that Samplitude has a Project Information window with more specific areas for information related to the entire project including name, artist, engineer, technician and copyright details. If you activate the Show on Start tickbox, this window will pop up every time you open the project. The Info Manager seems to interact with these other comments sections, which is good. The phrase “belt and braces” comes to mind! 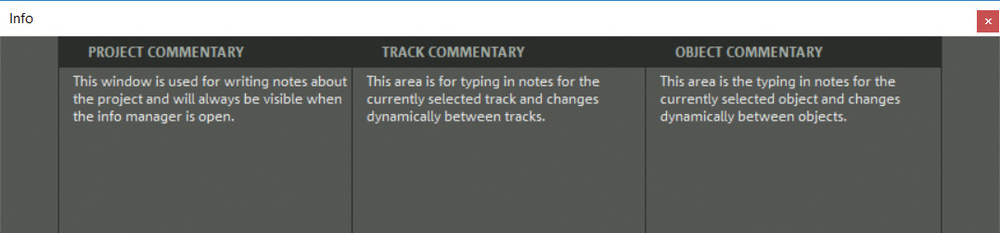
Sound Forge Pro 11
In May 2016, Magix acquired the majority of the Sony Creative Software product line, including Vegas Pro, Movie Studio, Sound Forge Pro, SpectraLayers Pro and Acid Pro — and Sound Forge Pro 11 is now bundled with Samplitude Pro X3. Sound Forge Pro is a fully featured audio editor that has been around for many years and retails for £299$399.95 if bought separately, so this is good value, and I noticed the beginnings of integration of Sound Forge with Samplitude: if you open a wave file in the Samplitude wave editor, you can export the audio into Sound Forge for further editing. To add even greater value, iZotope’s Mastering and Repair Suite is included. This will only work within Sound Forge rather than in Samplitude, but a free licence for iZotope’s Nectar Elements is included for use with Samplitude. The Sony acquisition also included the current software development team, so it will be interesting to see what the future brings for these products.
All In All
Samplitude Pro X is a very mature application, and in my experience, stability has always been one of the program’s strong suits. During the review period I don’t recall having one single crash or freeze. In my previous Sound On Sound review of Samplitude Pro X2 I bemoaned the lack of audio warping features; Magix have finally addressed this in Pro X3 and, along with the implementation of Melodyne ARA, I feel this alone is worth the upgrade price, although there are plenty of other attractive new additions. Samplitude Pro X3 feels like a very well-rounded release, and I look forward to future developments from the talented team in Dresden, Germany.
From MP3 To DDP
 The Suite version of Samplitude Pro X3 includes a number of handy mastering add-ons that were previously only available in the very expensive Sequoia 13. Two of these are the MP3 and AAC Encoder Preview plug-ins, which can be accessed by clicking on the master plug-ins insert slot under ‘Encoder Preview’. The idea is that these allow you to preview how your mix will sound once encoded, in real time and without having to bounce the project. The MP3 Preview plug-in gives you a selection of quality settings, from 48kbps at 22050Hz up to 320kbps at 44.1 or 48 kHz. The encoder quality can be set to fast or high, with the option to enable Variable Bit Rate (VBR). The AAC Preview plug-in has five different encoder types and four quality settings, and can encode bit rates from 128kbps up to 480kbps. There are eight different transport formats including RAW, LOAS (low overhead audio stream) and LATM (low overhead transport multiplex) to name just three. This plug-in meets the necessary criteria for audio to be certified as ‘Mastered for iTunes’.
 Once you have chosen your preferred encoder quality, whether it be MP3 or AAC, you have two choices when it comes to making your final lossy master. One is to do a ‘Mix to File’ — which is a real-time mixdown, where the audio material will be converted into the chosen format. The other option is the much faster offline bounce, but in this situation you would need to bypass the Encoder Preview plug-in and replicate your encoder choices in the Format Settings of the bounce dialogue window. This is not ideal from a workflow point of view, so perhaps in a future version it would be good to have an option to transfer the encoder settings from the Preview plug-in to the Bounce dialogue. All in all, though, this is a very useful addition, although you will need to upgrade to or buy Pro X3 Suite to benefit from it.
The same is true of the DDP export feature, previously only available in Sequoia but now included in Pro X3 Suite due to popular demand. DDP stands for ‘Disc Description Protocol’ and is the preferred format for delivering CDs for replication. I won’t go into a long-winded description about how DDP works as a quick search on the Internet will yield much information about this protocol. The biggest advantage is that you can directly upload your Mastered DDP project to the CD plant’s server, without having to send in error-prone CD-Rs. You can access DDP export from the menu item CD/DVD/Make CD. You can also import existing DDP projects from the File menu.
The Suite Sound Of Success
 Twenty of the 24 Magix instruments that come with Samplitude Pro X3 Suite.The expanded Suite version of Samplitude Pro X3 adds four more ‘Vita’ instruments to the already burgeoning collection of Magix VST Instruments: Pop Drums, a set of electronic and acoustic drum kits; a Concert Grand piano recorded in an international concert hall; a collection of atmospheric background pads and textures called Cinematic Soundscapes; and Church Organ, apparently based on a sampled Venetian instrument. In total, the Suite version of Samplitude now comes with a total of 24 virtual instruments including the full Independence Pro 70GB sample library. The non-Suite version of Samplitude comes with 20 virtual instruments which includes the Independence sampler but with just a 12GB library. There is even an accordion VSTi so you can finally compose your Volksmusik concept album.
What do these Vita instruments sound like? Pretty decent, I would say. They may not replace some of your favourite third-party VSTis, but they certainly have their own character and flavour which will add colour to any composition. I do have a couple of criticisms about the Magix virtual instruments, though. For one, you can’t use the mouse wheel to adjust the controls in the GUI. Mouse wheel control is something Magix have always implemented very well in Samplitude, so it’s a shame it can’t be carried through to work with their own virtual instruments. The other slight oversight is that although you can automate the instruments, individual parameters are not named and show up as the generic ‘1: #1 Vita’, ‘2: #2 Vita’ and so on, which makes parameter automation less than comfortable. Quibbles aside, though, you get a pretty impressive collection of virtual instruments regardless of which version you buy, giving you an extensive set of tools for composition and production right out of the box.
Bundled with all versions of Pro X3 is the venerable Orange Vocoder VST plug-in, now under the Zynaptiq name. It comes with a good selection of presets, but initially, you can only use the first eight of these. If you try to open any of the other presets, you are taken to the Magix web site and required to pay €9.99 to activate them. A rather strange scheme, but if vocoders are your thing, it’s probably worth the outlay — though Samplitude has had its own vocoder for many years.
Pros
- Musical Tempo Adjustment.
- Melodyne ARA support.
- DDP export and MP3/AAC Preview in Suite version.
- Skin enhancements.
- Bundled extras represent good value.
Cons
- Lack of mouse wheel control and automation parameter naming for Magix Instruments.
- Melodyne ARA docking not implemented.
Summary
The Pro X3 update comprehensively fills one of the few holes in Samplitude’s massive feature set, making an already impressive DAW package even better.
information
DACS Audio +44 (0)191 438 2500
Magix USA +1 512 914 9191.