You might be surprised at just how much you can discover about the mix of a hit record if you use a structured approach to listening, learn to interpret your meters, and try a few technical tricks...

There's a lot you can learn from making your own music and reading about music production, but wouldn't it be great if you could learn directly from the established greats? You know... George Martin, Quincy Jones, Mutt Lange — or whoever's responsible for your personal desert‑island playlist. How selfish it is for them to have more important things to do than tutoring, especially after you broke open a fresh pack of Jaffa Cakes for the occasion...
All is not lost, though. For a start, you can scoff all the Jaffa Cakes yourself — and once you've cleared the crumbs away, there's still at least one great way to glean production pointers from your idols: analysing the records they've produced. Indeed, this activity is one of the best training aids available to those working on a budget, and probably the most powerful means of narrowing the quality gap between home‑brew productions and the commercial competition.
However, there's more to this than just vegetating with your record collection — you have to put in a bit of work yourself if you're going to unearth all the hidden nuggets of information. What do I mean by 'work'? Well, that's what this article is all about: the tools and techniques you can apply to enable more critical listening, and thereby speed up your own learning process.
Separation Anxiety
Clearly, commercial record releases make up the largest body of material for listening education, but the big problem is that everything's mixed together, so it's often difficult to distinguish one thing from another and home in precisely on what most interests you. However, if you pay attention, you'll often be able to spot little 'windows' in any given arrangement where the texture thins out, allowing you to hear certain things more clearly. There'll often be little drops or fills that momentarily feature fewer instruments, for instance. Lead vocals, in particular, are often featured practically on their own at some point in many commercial mixes, because that's a good way of getting the listener's attention.
 Eminem's 'Love The Way You Lie' is a good example of a track where a capella sections make it relatively easy to guess at the vocal treatments used elsewhere in the track.A good recent example of this is Eminem's 'Love The Way You Lie', where you can clearly hear his vocal effects when he briefly starts his verse a capella at 0:25, and also Rihanna's effects, where she hogs the spotlight briefly before the first and second choruses (at 1:09 and 2:26). These treatments are pretty well hidden while the beat is going, but once you've heard them in solo like this, you take a pretty good guess that they're still doing their job in the background even if you can't actually pick them out consciously.
Another good place to look for effects tails, of course, is the end of a track. You get great ones on the Ting Tings 'Hands' and on Plan B's 'Stay Too Long', for instance, both of which highlight the characteristic classic reverb effects being used on the vocals. However, you do need to bear in mind that special effects 'spins' are often added just to create an interesting fade‑out on many tracks, so don't necessarily assume that every effect you're hearing is being used all the way through the track.
Stereo Master
Getting some technology involved can further separate out elements of the track for careful auditioning. The first technique you can use is simply listening to the left and right channels of the stereo signal individually. On the old stereo Beatles records, you could use this to listen to two separate groups of instruments, by virtue of the unsophisticated panning approach used, but even within the modern stereo panorama you may find that hard‑panned instruments become easier to pick out in this manner.
However, what's even more useful is listening to what happens when the right and left channels are added or subtracted. Adding them together (ie. mixing the left and right channels at equal levels) gives a balance of the mix biased towards things happening in the middle of the stereo image; whereas subtracting them (ie. inverting the polarity of one channel before mixing both channels together) presents you with a balance biased towards things happening at the edges of the stereo image. These two signals are often referred to as the 'Middle', or 'Mid', and 'Sides' components of a stereo signal, and provide a handy alternative method of encoding stereo signals for many studio purposes.
 In this screenshot, you can see how to solo the Sides component of a stereo signal by inverting the left channel of a stereo file and mixing it with the right channel. As a more elegant freeware plug‑in solution, however, Brainworx's Bx_solo comes highly recommended. So what can they teach you about a track? Well, the Middle signal is effectively a mono version of the mix, and as such reveals how the mono compatibility of a mix stacks up. So, to cite a couple of recent examples, it highlights how the synths in Rihanna's 'Umbrella' and the piano in Shontelle's 'Impossible' suffer in mono, in terms of level and tone, compared to the stereo mix. The Sides signal, on the other hand, is great for focusing on things like reverb and delay treatments. Listen to the Sides signal of that Rihanna track, for example, and you can much more clearly hear the lead vocal's delay pattern, whereas in B.o.B's recent 'Airplanes' you'll discover that the dry‑sounding lead raps both appear to have a dusting of reverb and some kind of modulation effect. By way of contrast, however, the absence of the lead‑vocal's plate reverb from the Sides signal of Plan B's 'She Said' highlights its mono nature.
Although you can easily audition left, right, Middle and Sides signals by manipulating the stereo file manually in your DAW, that's a bit of a clumsy approach if you're planning on listening to lots of different tracks in this way. In the long term, it's much better to get hold of a dedicated Middle and Sides control/auditioning tool, such as Brainworx' elegant freeware  Bx_solo (available from www.brainworx‑music.de), a cross‑platform plug‑in that offers simple buttons for auditioning each of these components of a stereo signal.
Equalise Your Hearing
Adjusting a commercial mix's frequency response with EQ is another useful way of helping you listen more critically. Steep high‑pass and low‑pass filters are particularly handy here, as they can quickly demonstrate to your ears how much of a certain instrument's energy resides in different spectral regions. So you'll find that, for example, the deep bass in Katy B's 'Katy On A Mission' or Pendulum's 'Watercolour' is practically non‑existent above 100Hz, whereas the bass lines in Edward Maya's 'Stereo Love' or Kings Of Leon's 'Radioactive' can still be quite clearly heard — an attribute that allows them to translate more readily to typical small consumer speaker systems.
Similarly, high‑pass filtering highlights that the bass on Katy Perry's 'California Gurls' is pretty much all mid-range, which leaves room for the kick‑drum to dominate the low end. Low‑pass filtering the same track, on the other hand, reveals that there's also considerable contribution from the kick‑drum above 1kHz. If your own sequencer doesn't offer particularly steep filters, you can work around this by stacking several on top of each other — three chained 12dB/octave filters at 100Hz will effectively produce 36dB/octave filtering at that frequency, for instance. .") If you don't have access to a very steep high‑pass filter, then you can effectively build one by stacking several filters at the same frequency. For example, the 12dB/octave filter in the left‑hand screenshot can be steepened by piling two more filter instances on top of it (right‑hand screenshot).
If you don't have access to a very steep high‑pass filter, then you can effectively build one by stacking several filters at the same frequency. For example, the 12dB/octave filter in the left‑hand screenshot can be steepened by piling two more filter instances on top of it (right‑hand screenshot).
Playing around with frequency peaks can also be instructive for identifying the characteristic frequency ranges of certain sounds. Just push up the gain on your EQ's peaking filter, reduce the bandwidth (or increase the Resonance/Q value), and then sweep the frequency control around to home in on different areas of the spectrum.
Editing & Cancellation Techniques
If you're listening to commercial tracks on a DAW system, the built‑in audio‑editing facilities can reveal further insights. First of all, it's easy to see where the drum hits are in most rhythm‑led tracks, which makes it pretty straightforward to edit the audio into musical sections by eye. You can then compare the lengths of the phrases to get some idea of tempo profile of the track. Many programmed tracks (or those performed to a click) will have roughly even lengths, but where free‑running takes were used, or where subtle tempo shifts have been programmed in to support the music, you'll see more variance.
So, for example, in the Kings Of Leon track I mentioned earlier, the tempo shifts up a couple of beats per minute for the chorus sections — not enough to sound like the tempo's changing, but enough to add some extra feeling of momentum at those points. On the other hand, although I'd long suspected that Eminem's 2002 hit 'Without You' was using a similar trick (because it felt as if the choruses sped up), when I chopped up the audio to check the phrase lengths, I discovered that there is no tempo change at all — the illusion has been created through clever arrangement and programming. If you want to get more involved than this in your detection of tempo variations, most MIDI + Audio sequencers now offer the option of creating a complete tempo map of any track, but you don't actually need to get in that deep to obtain useful insights.
Another thing that can sometimes be useful in analysing tracks is phase cancellation. If you can isolate any element of a given mixed track, you can potentially remove them from the full mix by inverting their polarity and mixing them in. The most common application for this is where you have access to an instrumental version of a commercial track. (An instrumental will almost always be provided as a matter of course by the mix engineer to the record company, and it sometimes makes its way onto a single release as a kind of Karaoke version.)  If you can get hold of an instrumental version of a commercial mix, you may be able to use it to isolate the vocal parts. I have here, using an instrumental that was included on the original single release of Britney Spears' 'Baby One More Time'.
 If you invert the polarity of that, it cancels out the backing track, leaving you with an a capella mix, which can reveal a lot of vocal production detail — subtle effects balances, harmony lines, bad edits... In practice, the cancellation isn't usually perfect, but as long as you get rid of a good deal of the backing track, you can still find out a lot.
Compare & Contrast
A crucial part of learning to create competitive‑sounding masters is the process of comparing commercial mixes with your own work, as well as with each other. Although the mechanics of this process might seem rather self‑evident, there are a few things to bear in mind if you want to get the best out of it.
The first thing to realise is that your ear is incredibly good at adapting to what it's hearing, so it'll instinctively try to hide the differences between any tracks you're comparing. The way to get around this is to make sure you switch instantaneously between the tracks you're comparing, so that you can hear the real contrast between them before your hearing system 'catches up' and has the chance to hide things from you. It's also vitally important that you try to defeat what's often referred to as the 'loudness bias', whereby anything that is louder tends to be perceived as sounding better in a comparative situation.  A good way of increasing your objectivity is to compare commercial tracks with your own work within a dedicated DAW project, switching between tracks using the solo buttons and matching subjective loudness using the track faders.
You can deal with both of these issues using a well‑specified hardware monitor controller or small mixer, but I normally prefer instead to set up a special DAW project for comparison purposes, with each reference mix on a different track. That way, you can switch between them using the track solo buttons, and match their subjective loudnesses using your channel faders. If you're comparing an unmastered mix of your own with loudness‑enhanced commercial releases, this setup also lets you apply some mastering‑style processing to the unmastered track to allow more meaningful comparisons.
It can also be very revealing to compare different sections of the same track side by side. For example, if you A/B all the choruses of a given song, you'll often hear much more clearly the differences between them that are responsible for giving the mix a sense of build‑up through its full duration. Take Kesha's 'Tik Tok', for instance. Although the enormous first chorus doesn't leave a huge amount of room in the texture for additional parts, each subsequent iteration manages to subtly slip in a little extra synth interest, cleverly filling out the sound and increasing the overall energy of the track by a surprising amount by the time the final choruses hit. Want to hear those additions better? If you phase‑cancel the first chorus against the second, it almost completely eliminates the bass, drums, and lead synths from the mix, laying bare all sorts of hidden synth and vocal details.
Seeing Is Believing
There's a lot your eyes can do to help your ears out too, because there's now software that can display a wide range of different information about the audio in support of what you're hearing. Level metering is probably the most unassuming of these tools, but it can play several important roles. Digital peak‑metering can confirm the digital level ceiling of a mastered release, while 'averaged' RMS metering will give a better idea of its subjective musical loudness. Indeed, the difference between these two meter readings often indicates how heavily a track's dynamics have been squished at the mastering stage, in the pursuit of overall loudness. (If you're investigating the subject of loudness processing, the freeware, cross‑platform TT Dynamic Range meter, available from www.brainworx‑music.de, is great at showing this difference in real time.) Tischmeyer Technologies TT Dynamic Range meter plug‑in not only has excellent peak and RMS metering, but also a very useful real‑time dynamic‑range read‑out.
More specialised level‑metering tools may also be useful if you're particularly interested in loudness‑enhancement techniques. One of these is a clip counter, which aggregates the number of samples of digital clipping within an audio segment — there's one in Voxengo's cross‑platform freeware SPAN plug‑in (www.voxengo.com), if you don't already have this facility available in your own DAW, although I personally still use RN Digital's discontinued freeware Inspector plug‑in myself, as it not only counts the total number of clipped samples that go by, but also keeps a tally of the largest number of consecutive clipped samples. Clip counters can be useful when assessing the loudness processing of commercial masters — RN Digital's classic freeware Inspector plug‑in is great for this, as it has not only has a rolling counter for the total number of clipped samples, but also keeps a tally of the largest number of consecutive clipped samples. Bear in mind, though, when using a clip counter, that it will only count true 0dBFS samples, whereas many heavily clipped commercial tracks have their digital ceiling set fractionally below this, so that they don't appear to be clipping. In this case, you'll need to normalise the audio file's level in your DAW to get an accurate clip‑counter read‑out.
Another meter that can help when assessing loudness issues is an intersample peak detector. Intersample peak detectors appear to be growing in popularity, and the freeware SSL X‑ISM and Schwa Bitter plug‑ins are a good way to dip your toe in the water if you've yet to experiment with one.
 Although a mastered digital signal can reach no higher than 0dBFS, the playback circuitry of many consumer playback devices will sometimes generate analogue signal peaks above the level you'd expect, because of the way the digital‑to‑analogue conversion circuitry reacts to the digital signal, and this is particularly likely when the digital signal has been clipped (as in a lot of loudness‑maximised commercial releases). The reason why intersample peaks can be a problem is that they can distort the internal circuitry of the end‑user's playback machine, especially if it's a cheap mass‑market model with very little headroom above the 0dBFS level. An intersample peak detector simulates the digital‑to‑analogue conversion anomalies that cause the offending peaks, allowing you to pre‑empt them by adjusting your mastering processing in the digital domain. If you're looking for one of these detectors, check out Solid State Logic's X‑ISM (www.solidstatelogic.com) or Schwa's Bitter (www.stillwellaudio.com), both of which are cross‑platform freeware and feature traditional clip detection and a bit‑scope display as well.
Raise Vectorscope!
 can reveal a lot of useful information about a stereo mix. For example, the top display shows a fairly unproblematic stereo picture, the left-hand one suggests a mix suffering from mono‑compatibility problems, and the right‑hand one indicates that the level of the mix's left channel may be too high.") A stereo vectorscope display (such as the one in the excellent freeware Flux Stereo Tool plug‑in shown here) can reveal a lot of useful information about a stereo mix. For example, the top display shows a fairly unproblematic stereo picture, the left-hand one suggests a mix suffering from mono‑compatibility problems, and the right‑hand one indicates that the level of the mix's left channel may be too high.
A stereo vectorscope display (such as the one in the excellent freeware Flux Stereo Tool plug‑in shown here) can reveal a lot of useful information about a stereo mix. For example, the top display shows a fairly unproblematic stereo picture, the left-hand one suggests a mix suffering from mono‑compatibility problems, and the right‑hand one indicates that the level of the mix's left channel may be too high.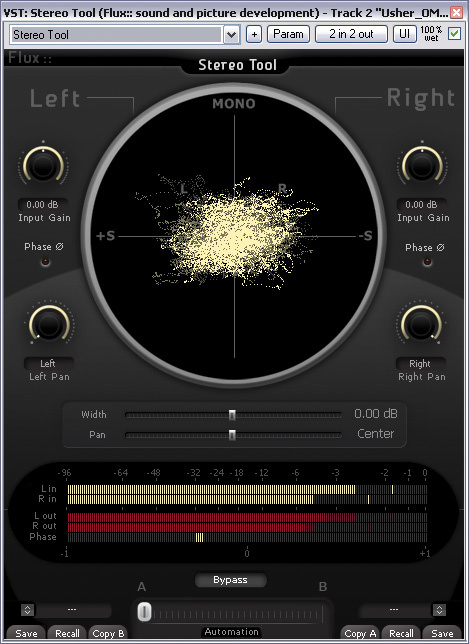
 There are various meters that can assist your stereo judgements, the most useful of which, in my opinion, is the vectorscope display, which traces the left and right audio waveform levels simultaneously by means of a 'tracer' dot moving on a two‑dimensional display. A left‑channel signal will move the dot in a straight line from the display's top‑left corner to its bottom‑right corner, while a right‑channel signal will move the dot from top right to bottom left. This means that a mono mix will show as a straight vertical line in the vectorscope. If it's slightly off‑vertical, the left and right channel levels aren't matched, and if it's horizontal, it indicates that the signal polarity of one of the channels has been inverted.
It's when you look at true stereo files that a vectorscope really becomes interesting, though, as the resulting amorphous, cloud‑like shape that undulates in the middle of the display clearly identifies many important stereo issues. For example, if the cloud is wider than it is tall, it's a tip‑off that there may be mono‑compatibility problems lurking, while a lopsided cloud can highlight an overall level imbalance between left and right channels. In a comparative context, the vectorscope also helps in assessing the relative stereo width of different commercial mixes, and where they stand in relation to your own work. In recognition of its value as an analytical tool, a lot of DAWs and mastering software suites now have a vectorscope display built in, but even if yours does, it's still well worth checking out Flux Audio's excellent cross‑platform freeware Stereo Tool plug‑in (available from www.fluxhome.com), which sports one of the best vectorscope displays I've seen anywhere, and also includes some useful stereo-processing utilities.
Spectrum Analysers
 High‑resolution spectrum analysis is now widely available to computer musicians, for example in the form of the Melda MAnaylser and Voxengo SPAN freeware plug‑ins. As you can see from the screenshots, however, different analysers can generate quite different displays of the same sound, so you need to get to know how your own model responds before you can really learn from it.
 Real‑time spectrum analysis is another way to probe the inner workings of professional productions, and there are now many excellent high‑resolution meters available, not least Voxengo's SPAN and Melda's MAnalyzer freeware plug‑ins. These meters are particularly useful because few home‑studio users have reliable low‑frequency monitoring, however good their speakers, because of the acoustics problems associated with small domestic rooms. A spectrum analyser can provide a reality check, especially with regard to the evenness of bass lines and the frequency ranges of instruments. For example, it's clearly visible on a spectrum analyser that the kick‑drum in Kesha's 'Take It Off' has its main low‑frequency energy at around 60Hz, while the Db‑Eb‑F bass-line's fundamental and first harmonic neatly sail the clearer waters to either side of it (35Hz‑44Hz and 70Hz‑88Hz respectively) — not something that would be immediately apparent from listening to the track, except by virtue of the two lines sounding nice and distinct against each other.
Real‑time spectrum analysers can help identify overall frequency‑balance differences between different tracks too, although I personally prefer to use one of the increasing number of software tools that can generate a single spectral curve averaged across the whole track — things like Logic's Match EQ, TC Electronic's Assimilator, and Voxengo's Curve EQ plug‑ins , or the Har-Bal 'visual mastering' software.
 Software that can extract the long‑term average frequency spectrum of a mix, such as the off‑line Har-Bal software or Voxengo's Curve EQ plug‑in, can be particularly handy when investigating issues of overall mix tonality. While it's important to understand that two different bits of music shouldn't have exactly the same spectral profile, analysis tools like these can nonetheless give useful pointers as to which frequencies are the culprits if you discover that the tone of your mix isn't close enough to target commercial productions.
Whatever visual analysis software you use, there's one vital thing to remember: you need to give yourself time to get used to how a range of commercial tracks look in the software before it begins to become really useful. Every metering plug‑in I've tried always seems to respond in a slightly different way to a given piece of audio, so it's only after a fair few 'pilot hours' that you can tell when something looks good or bad on the display.
Final Analysis
In this article, I've suggested numerous ways to improve the effectiveness of your listening, but what I can't tell you is what sounds 'right' and what sounds 'wrong', because everyone has a different opinion. The important thing is to use the available tools to help your own ears decide what sounds good, so that you can make more informed decisions about how you work — and, indeed, to which audio pundits you lend credence. If you'd like to see some of these skills in action, we've kicked off a new series elsewhere in this issue, in which we review chart hits from a production and arrangement perspective.
The Music Comes First
 Transcribing the musical elements of your favourite productions — whether on manuscript as shown here, as a chord chart, or in a sequencer — is excellent ear‑training, and also serves as an excellent source of ideas.
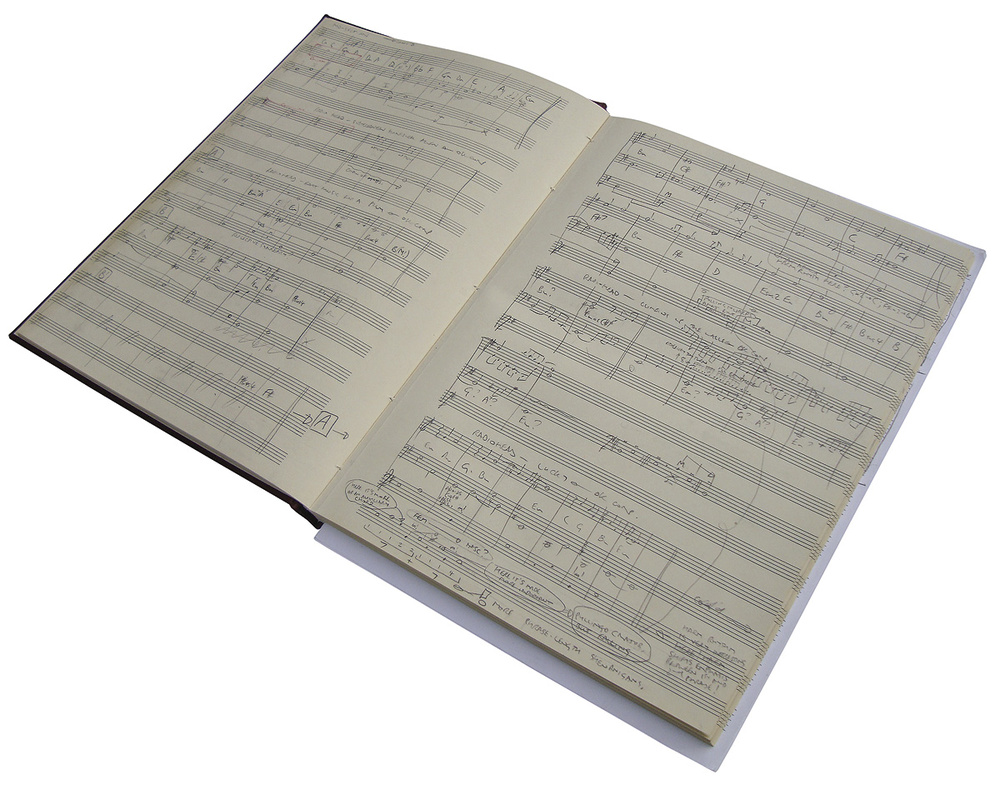
 Clearly, a lot of the success of any record comes from the musical material within it, and there's much to be learnt from classic productions in this respect. After all, many of the most successful producers take as active a role in sculpting the music itself as they do in moulding the recorded sound. To quote legendary producer Andy Johns, for example: "If the bass part is wrong, how can you hold up the bottom end? So you learn how to make the bass player play the right part so you can actually mix.”
My main tip is to try transcribing a few of your favourite tracks by ear — whether you want to create your transcription with chord symbols, in a sequencer's piano‑roll display, or using traditional musical notation. This is fantastic ear‑training, because it forces you to practice mentally disentangling the interwoven parts within the arrangement — a priceless skill when it comes to mixing. In addition, transcription puts musical attributes into a visual form, allowing you to use your instinctive visual pattern‑recognition skills to deconstruct subconsciously appreciated musical patterns more consciously, improving the likelihood that you'll learn to apply them in your own work. For example, few listeners consciously notice the surreptitious use of seven‑bar phrases in the Beatles' 'Yesterday', but once you do spot this, there's a lot to learn from it in terms of making any non‑four‑square phrase sound more fluid and natural‑sounding.
It's worthwhile keeping your transcriptions on file for comparison purposes, because it can alert you to applications of a particular technique in different styles. You might spot the harmonic similarity between Pachelbel's Canon and Ralph McTell's 'Streets Of London', say, or between The Eagles' 'Hotel California' and David Guetta's 'One Love' — and in the process perhaps discover some other harmonic trick in one style of music with as‑yet‑untapped potential for a different genre.
The main work needs to be done by your ears, although technology can sometimes make things a little easier. Most modern DAW systems now have good built‑in time‑stretching algorithms that can slow down uptempo productions so that you can pick apart any unidentifiably swift flurries of notes. You may also be able to hear the part you want more clearly by applying some of the stereo production‑analysis methods mentioned in the main text — perhaps listening only to the left channel to concentrate better on a left‑panned piano part or backing‑vocal harmony line.
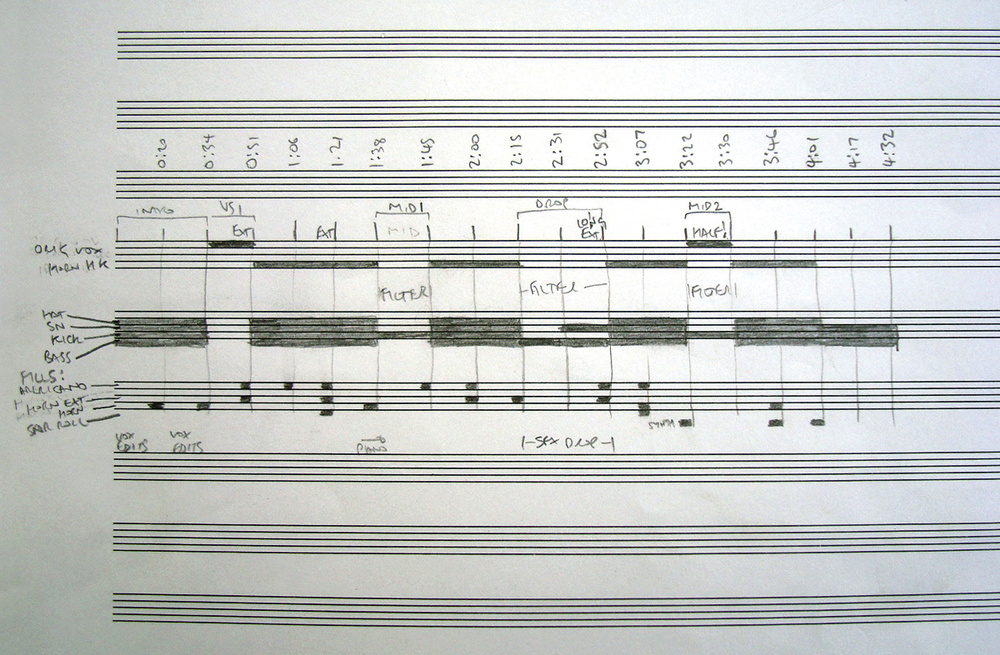
In addition to musical transcription, there's a lot to be said for 'arrangement transcription', whereby you draw a timeline on paper and then map out the instrumentation and performance techniques along it. This is very simple to do, and it can be surprisingly revealing, even for apparently simple‑sounding songs.
Data‑compressed Audio
Many people are now happy listening to their music in data‑compressed formats such as MP3 and AAC. While the loss of quality is immaterial to most consumers, it's serious enough that I'd advise against using such formats for serious comparative listening in the studio: if you make your quality benchmarks easier to hit, you'll not work as hard in trying to rival them, and you'll therefore improve your production skills less quickly. That said, data‑compressed formats are undeniably important as a means of music delivery, so it does make sense to check that your own mixes compare favourably with commercial ones at this quality level — especially in the case of MP3, where extreme high frequencies tend to suffer disproportionately.
More Detail Please!
Despite all the analysis tools mentioned in the main text, there's a limit to how much you can learn from a mixed stereo commercial release, so it's worth keeping your eyes peeled for alternative versions of your favourite tracks that might offer additional insights. I've already mentioned isolating a track's vocals by using a polarity‑inverted instrumental track, but there are other options too.
Probably the best is when the artist chooses to post submixed 'stems' of different groups of instruments in a mix for some kind of remix competition — Nine Inch Nails and Radiohead are just a couple of the bands that have done this in recent years. If you can get hold of the surround‑sound version of a music mix, that may also afford greater opportunities for hearing individual sounds with less masking — although be aware that some surround music mixes are just 'upmixed' from the stereo version using effects, rather than being reconstructed from the original multitracks.
Video games sometimes have alternative versions of commercial tracks within them, which can be informative. In the wake of Metallica's controversial use of extreme loudness processing for their album Death Magnetic, for example, it was discovered that there was an unsmashed version as part of Guitar Hero III, allowing for an interesting side‑by‑side comparison.
Critical Monitoring
In the studio, your ability to listen critically is only as good as your monitoring, so it's vital that you get the best out of it. The SOS web site's back‑issues archive is full of loudspeaker reviews, as well as lots of advice about monitor setup and acoustic treatment, so there's little excuse for not making good use out of whatever budget you have available. Irrespective of the amount of studio 'bling' you can afford, it's also important to understand a few basic principles of practical monitoring technique.
The first thing to say is that you're most likely to make objective and reliable decisions about what you're listening to if you compare the sound on a range of different listening systems: your main studio monitors, obviously, but also (at the very least) good‑quality headphones and some lesser‑quality consumer systems. Listening in mono via a single speaker is also very useful for assessing mix balance. Make sure to listen at a range of volumes as well, because your playback level affects the frequency balance of your hearing, the degree to which background noise conceals mix details, and the amount of distortion (and other undesirable artifacts) produced by cheaper speaker systems.
More SOS Listening Resources
A quick hunt through the Sound On Sound article archives will throw up a number of additional listening resources which are worth checking out. The first is the Inside Track series, which gives masses of insider information about how high‑profile commercial tracks are put together. Past Mix Rescue articles are also well worth a scour, as they usually include audio examples which illustrate the inner workings of a production job more clearly than a simple final mix can on its own. But that's not all: as of next month we'll be starting a brand‑new article series dedicated to exploring the production values of the most current hit singles, so stay tuned!