Modern production techniques can have a place in traditional acoustic music genres: we even sneaked a triggered synth part into this Morris‑dance tune...
 and sent in by SOS reader James Rycroft (centre, with guitar).") This month's Mix Rescue track is a recording of the Wolf's Head & Vixen Morris Band, taken from the sessions for their album Unearthed (inset) and sent in by SOS reader James Rycroft (centre, with guitar).
This month's Mix Rescue track is a recording of the Wolf's Head & Vixen Morris Band, taken from the sessions for their album Unearthed (inset) and sent in by SOS reader James Rycroft (centre, with guitar).
When SOS reader James Rycroft asked me to remix a recording he'd made of his Morris band, I jumped at the chance. (Excuse the pun.) We get a lot of heavily produced electric and electronic music sent in for this column, but that doesn't mean that acoustic productions don't present significant challenges too.
 In this case, the way that the production had been built up one instrument at a time over a click track had left James struggling to recreate the sense of fullness and ensemble that characterised the band's live performances. This was in no small part down to the difficulties the players had encountered with their timing and tuning, presumably on account of a lack of familiarity with the rather unnatural process of overdubbing — once you're used to studio work, it's very easy to forget just how disconcerting it is at first just to play with cans on, for instance, or to perform to a click.
James was by no means unaware of the timing and tuning issues, but his attempts to fix them with audio editing had borne frustratingly little fruit, and in the end all he could do was try to conceal the clashes by muting the dodgiest snippets and separating any remaining conflicting instruments with wide panning. Pulling up the faders on James's multitracks within my Reaper‑based mix system, though, I was convinced that it would be well‑nigh impossible to blend the parts into something more cohesive without first making a better stab at improving the performance accuracy.
Tempo‑matching The Drums
 Here you see one bar of the kick‑drum pattern, sliced up into its main hits and quantised to provide more consistent timing. Notice, though, that the second hit has been moved fractionally behind the beat to remain true to the original natural groove.
My initial instinct was to use the drummer as a timing reference around which to edit the other parts, a tactic that almost always retains more of the live feel of a performance than simply quantising things to the DAW's grid. However, no matter how carefully I shifted segments of different guitars around in relation to the drum hits, the whole groove remained stubbornly lumpy‑sounding, but the drum part needed to be more internally consistent before I stood a chance of convincingly meshing the guitars with it — so I took the road less travelled (for me, at least!), and set about quantising the drum part. Although I knew this would make it less natural‑sounding, I felt that it was worth it in return for a more solid rhythmic momentum for the production as a whole.
That said, I did take some precautions to avoid too mechanical a result. Firstly, rather than simply locking all the hits to the 160bpm grid of the original click track, I chose instead to follow the drummer's own longer‑term speed fluctuations, by first slicing the audio into four‑bar sections, and then creating my tempo grid according to those. (I described how to do this in SOS March 2011's Reaper Notes column, if you're interested in the mechanics.) Only after generating that tempo map did I then use Reaper's 'tab to transient' function to quickly slice up the whole part for quantising to a 16th‑note grid.
As I expected, rigid, grid‑based quantising substantially altered the rhythmic feel, because the drummer's pattern relied on a slightly lazy second hit for its characteristic lilt. My next step, therefore, was to move the three different hits of the drum pattern to different tracks, so that I could adjust their relative timings and recreate something of the original musical swing, even within the context of the unnaturally rock‑solid timing consistency.
Timing & Tuning Tweaks
 The top track here shows a few bars of the main 'Guitar 2' part in the remix, heavily edited to lock the instrument's groove in with the drum part. However, other tracks, such as the other multi‑miked acoustic guitar part shown below 'Guitar 2', were deliberately edited less tightly to avoid over‑'regimenting' the sound.
There's a strong temptation to push things too far when attempting to correct timing inconsistencies, thereby sucking all the life out of the production — especially if you're working in relation to quantised drum parts, as in this case. One of the best ways of avoiding this, in my experience, is to make the more prominent parts in your mix tighter, while giving the less prominent parts a freer rein. There was no bass in this project, which is often the recipient of the tightest timing control in my mixes, so instead I listened to each of the rhythm‑section instruments (two guitars, mandolin, and bouzouki), chose the one that provided the most low end and/or rhythmic power, and then took my time to match that quite tightly with the drum in the first instance.
It took me more than an hour of concentrated editing, crossfading and auditioning (with a couple of all‑important tea breaks along the way!), but the reward was a rhythmic backbone around which I felt I could confidently hang the rest of the parts. I brought up the tin‑whistle track next (it felt like the most critical melodic part) and tried to lock that in pretty well too, but only as far as required to maintain a respectable rhythmic flow; it wasn't a case of stapling every little note right onto a guitar strum. The remaining timing edits went much quicker, partly because the 'Guitar 2' and tin-whistle waveforms now provided a rough‑and‑ready visual guide for editing purposes, but also because deliberately leaving the other parts looser reintroduced a worthwhile illusion of natural human variation.
For the tuning adjustments I also followed a very similar 'fine to coarse' scheme. First of all, I concentrated on carefully matching up the tin whistle to 'Guitar 2', using Celemony's Melodyne Editor plug‑in. I had to tune things slightly sharp to match the guitar's intonation, but otherwise this was just a question of careful listening and adjustment of note pitch‑centres. I consciously held off tampering with the internal pitch variations of individual notes if at all possible, though, because I didn't want the ensemble sounding too homogenised — it would've been out of place in this style of music.
; and Antares Auto‑Tune 7's automatic real‑time facilities for the accompanying recorder parts (lower screen).") Mike used different pitch‑correction tools for different parts, including Melodyne Editor's monophonic mode on the lead whistle; the Melodyne DNA‑powered polyphonic mode on the mandolin introduction (upper screen); and Antares Auto‑Tune 7's automatic real‑time facilities for the accompanying recorder parts (lower screen).
Mike used different pitch‑correction tools for different parts, including Melodyne Editor's monophonic mode on the lead whistle; the Melodyne DNA‑powered polyphonic mode on the mandolin introduction (upper screen); and Antares Auto‑Tune 7's automatic real‑time facilities for the accompanying recorder parts (lower screen). Against this, the rest of the parts were allowed more tuning freedom. The hurdy‑gurdy, guitar, mandolin and bouzouki parts, for instance, were left unchanged in this regard, because their tuning discrepancies contributed to what I felt was a pleasingly realistic ensemble sound. (All except for the introductory mandolin section, which needed the specialised attentions of Melodyne Editor's Polyphonic correction mode before it would sit comfortably with the tin whistle's line.) For the three other melody parts (all recorders), I still corrected the low octave quite closely, because I always think such doublings really highlight sour tuning), while allowing myself to be rather more cavalier with the other two parts: an instance of completely automatic correction on each, which is something I'd never normally countenance. Admittedly, I did tweak the Tracking, Retune Speed, and Humanise controls in Antares Auto‑Tune 7 to avoid the algorithm taking too firm a hold over the short‑term pitch envelope, and also offset the plug‑in reference pitches 15 cents either side of the 443Hz figure I'd used for the tin whistle, all in order to prevent the combined ensemble from sounding too much like it was having a chorus effect added to it — which is always a danger if you pitch‑match several similar instruments too closely.
While all such editing chores are inevitably a bit tedious, it's worth stressing that they actually have a big impact on the mix itself. Both tuning and timing affect how your tracks fit into the mix, so you can have trouble getting everything to blend together if you don't sort out these technical issues first. Some engineers tut about tampering with the authenticity of live performances, but as far as I'm concerned, mixing is usually about trying to make the music as enjoyable as possible for the listener, regardless of the methods used. Of course, the proof of the pudding has to be in the eating, so do make a point of checking out this month's audio comparison files (see the 'Audio Examples' box) to judge the effectiveness of my changes for yourself!
Morris Synth?!
Mixdown time at last! First up was the drum part, which needed to command attention, and especially so at the low end. The instrument had been multi‑miked with a Shure SM57 close to the beater (for attack) and a Shure Beta 52 underneath (for low‑end body), but unfortunately the latter signal was inadvertently misdirected during tracking, and never saved to the hard disk — something James had discovered, to his dismay, only after the sessions were complete. His salvage plan had been to copy the SM57 channel in Pro Tools and then EQ the duplicate, to try to simulate the missing Beta 52's sound. This wasn't actually a bad bit of lateral thinking, because even though most people don't think of the SM57 as a mic for picking up low end, it had actually caught enough of the drum's 65Hz fundamental frequency that drastic EQ could still just about restore its thunder. What I found in practice, though, was that the side‑effects of such aggressive boosting on the sound as a whole (woolliness further up the spectrum and/or uncontrolled LF resonance) seemed too high a price to pay.
 Because of a mistake during tracking, the track's main drum part was captured only with an SM57 pointing at the beater's strike point. This caused problems at mixdown, on account of the mic's underwhelming bass pickup and an undue emphasis on the instrument's HF attack transient.At that point, I had to decide whether to bring more serious processing firepower to bear, or reinstate the low end synthetically. Triggering samples in this role is commonplace, but I chose on this occasion to use a synth note instead, the main reason being that I only really wanted to bolster the instrument's pitched low frequencies, rather than altering the essential timbre further up the spectrum. In this regard, a simple synth tone with very few harmonics fitted the bill perfectly. (And while I was at it, I couldn't resist sliding the new 'fake fundamental' 20Hz further down, just to get the furniture rattling a bit more!)
Sub‑bass aside, the main thing that bothered me as far as the instrument's general tone was concerned was that the beater was clicking very aggressively in the upper part of its spectrum, overshadowing the warmer low mid‑range frequencies, and making the drum sound rather gutless. A couple of decibels of high shelving cut from 1.7kHz and a narrow 8dB peaking dip at 1.3Hz improved matters a little, and I followed those with some fast‑release limiting from Georg Yohng's W1 plug‑in. Limiters are particularly useful for smoothing off excessive transients, because of their fast attack times, and a beneficial side effect on this occasion was that W1 also restrained some slightly over‑enthusiastic performance dynamics. However, pumping and distortion artifacts reached undesirable levels before I was able to tame the transient enough in that manner, so I also followed the limiter with 3dB of attack reduction from SPL's Transient Designer plug‑in to finish the job.
The SPL also proved useful in enhancing the instrument's sustain, as did an instance of Christian Budde's Lightweight Multiband Compressor, the low band of which independently squeezed the dynamics of the sub‑200Hz region more firmly. You can't get away with a big, rumbling drum decay at the low end of most mixes, because of the need to make room for other, more melodic, bass instruments, but in a mix where the drum has the lower octaves completely to itself, there's no reason not to take full advantage — so I did!
The Purpose Of Mix EQ
 with the EQ settings for similar channels on the original mix (drum, multi‑miked guitar, mandolin — 'Guitar 2' was muted). Notice how fairly similar EQ was applied to the different tracks in the original mix, which meant that all the tracks were fighting for the same spectral ranges, whereas in the remix the instruments are more clearly differentiated in the frequency domain, to avoid frequency‑masking problems.") Here you can compare some of Mike's rhythm‑section EQ settings (left: drum, 'Guitar 2', multi‑miked guitar, mandolin) with the EQ settings for similar channels on the original mix (drum, multi‑miked guitar, mandolin — 'Guitar 2' was muted). Notice how fairly similar EQ was applied to the different tracks in the original mix, which meant that all the tracks were fighting for the same spectral ranges, whereas in the remix the instruments are more clearly differentiated in the frequency domain, to avoid frequency‑masking problems.
Here you can compare some of Mike's rhythm‑section EQ settings (left: drum, 'Guitar 2', multi‑miked guitar, mandolin) with the EQ settings for similar channels on the original mix (drum, multi‑miked guitar, mandolin — 'Guitar 2' was muted). Notice how fairly similar EQ was applied to the different tracks in the original mix, which meant that all the tracks were fighting for the same spectral ranges, whereas in the remix the instruments are more clearly differentiated in the frequency domain, to avoid frequency‑masking problems.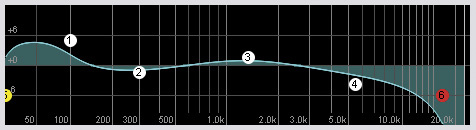


On a fundamental level, creating a balance of the two guitars, mandolin, and bouzouki on top of the drummer's foundation was actually pretty simple. I'd already decided that the track labelled 'Guitar 2' (which had been muted in the original mix) was going to be primarily responsible for the low end, while the 1kHz region seemed to be the most interesting portion of the mandolin and bouzouki parts, and the remaining guitar part seemed to contain lots of useful spectral energy to fill the gap between them in the lower mid‑range. My EQ settings were therefore just geared towards focusing each part more into its allotted space, to reduce frequency masking between them — as you can see from the screenshots in this article. For similar reasons, I also cut out some 140Hz from the drum part to make space for the low end of 'Guitar 2', and boosted the 10kHz region of the lead whistle part to allow it to dominate over the guitars there.
Comparing my settings with those James used on his original mix, I suspect that, like a lot of people mixing in home studios, he may be undervaluing the importance of the masking‑reduction role of EQ. For example, the drum, mandolin and acoustic guitar parts in James's mix all had cuts in the 400‑800Hz octave and boosts at around 5kHz. Assuming that these settings reflect his personal sonic preferences (everyone has different frequencies they're partial to), they indicate to me that he's trying to mix by making each part sound as good as possible on its own terms, with the result that everything's then fighting for the same regions of the spectrum. By contrast, sensible mix EQ will often make some instruments sound worse in isolation, so that all the most important aspects of the production can be heard clearly when mixed together.
Dynamics: For Troubleshooting & Balancing
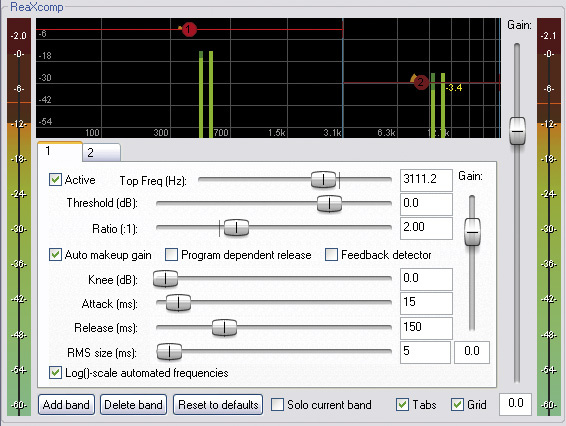
Although I said that the basic balancing of the guitars was easy, what I should add is that I did, nonetheless, have to take strong measures against over‑obtrusive pick noise on all of them before I could get them to sit together. For the two acoustics, low‑pass filtering at around 10kHz took some of the edge off it, but that was only a step in the right direction. Further applications of SPL's Transient Designer helped shift emphasis away from the attack of each note, too, but for the acoustic guitar parts, even this wasn't a sufficient remedy, not least because fret squeaks were also coming through fairly savagely — transient processing doesn't catch those. Only once I'd applied heavy limiting to the upper octaves of the spectrum with Reaper's ReaXcomp multi‑band dynamics plug‑in did I feel I'd managed to achieve a satisfactory degree of smoothing.
James told me that he'd recorded the multi‑miked guitar part with one of the mics pointing directly at the instrument's soundhole, and my suspicion is that he may have followed a similar approach for the other rhythm‑section parts too, as this would account for the pick‑heavy sound. Further evidence for my guess was audible on the 'Guitar 2' part as well, where a low 165Hz body resonance sporadically boomed out, presenting me with another tricky processing challenge. I didn't want to filter out the problem, because the low end of that part in particular was important to the production, so I reached once again for spectral dynamics processing to tame the level inconsistency at that frequency. A dynamic EQ band within my stalwart Platinumears IQ4 plug‑in was able to compress the resonance very efficiently without unduly affecting the rest of the instrument's timbre, but I'd suggest that a slightly more distant mic position off‑axis to the soundhole might prove more appropriate for the band's future recordings.
Beyond these applications, my use of compression for general‑purpose dynamic‑range control was fairly moderate. For the mandolin, I applied some soft‑knee 1.6:1 compression to even out the medium‑term performance dynamics a little, because its position felt a bit unstable in the mix otherwise, although I deliberately kept the attack and release settings quite long (50ms and 250ms respectively), to leave the shorter‑term dynamics more or less intact. I limited the tin‑whistle part with another instance of W1, just to contain the loudest notes by 3‑4dB, while the recorders and hurdy‑gurdy all used medium‑release, soft‑knee compression at 2:1 or 3:1 ratios, to squeeze the entire dynamic range of each more gradually, making their levels more dependable in the mix.
Global Mix Glue
, the mic positioning presented some thorny problems at mixdown. Excessive pick and fret noise had to be dealt with using SPL Transient Designer and Cockos ReaXcomp, while a band of dynamic EQ from Platinumears IQ4 was required to tame a strong but sporadic 165Hz guitar-body resonance.") While James had cleverly chosen his guitar‑recording venue to add flattering early reflections to the sound (mind that foot!), the mic positioning presented some thorny problems at mixdown. Excessive pick and fret noise had to be dealt with using SPL Transient Designer and Cockos ReaXcomp, while a band of dynamic EQ from Platinumears IQ4 was required to tame a strong but sporadic 165Hz guitar-body resonance.
While James had cleverly chosen his guitar‑recording venue to add flattering early reflections to the sound (mind that foot!), the mic positioning presented some thorny problems at mixdown. Excessive pick and fret noise had to be dealt with using SPL Transient Designer and Cockos ReaXcomp, while a band of dynamic EQ from Platinumears IQ4 was required to tame a strong but sporadic 165Hz guitar-body resonance.

The easiest way to glue a collection of close‑miked overdubs into something resembling an ensemble performance is to use global send‑return reverb effects fed from multiple tracks, because this helps fool the ear into thinking that all the instruments were recorded in the same acoustic space at the same time. You can achieve this effect with a single well‑chosen reverb if you're careful, but I normally find that using a combination of two more specialised reverbs actually makes mixing quicker and easier for most people, because the operation and setup of each becomes a little less critical.
The first of these is a very short ambience‑style reverb with only a dozen milliseconds of pre-delay, which mostly just makes things 'stick together' in the mix, and which also tends to define how close or far away an instrument seems; whereas the second provides a more expansive reverb tail with a longer pre-delay, and can add sustain and an illusion of physical size to any instrument, as well as generating a sense of a real venue or auditorium surrounding the group as a whole. Applying different levels of each of these two effects to different channels gives you a great deal of scope for defining the blend, scale, and front/back position of each instrument, so they are a good general‑purpose starting point for a lot of mixing applications. (For more on creating and using two reverbs like this, check out SOS July 2008's cover feature on the subject.)
In this mix, I chose to use a combination of Smartelectronix Ambience for the short patch and Universal Audio RealVerb Pro for the tail, although in practice the specific plug‑in you use isn't tremendously important, as long as it can do a reasonably natural‑sounding room simulation — which puts loads of different plug‑ins in the frame these days. If the short reverb has a 'size' control, this usually repays some close attention, so that the slight suggestion of physical room dimensions feels suitable to the production, whereas the longer reverb's decay time tends to be the most crucial setting to get right. In both cases, though, judicious EQ in the return channel usually makes sense to carve away at any frequency regions of the effect that feel as if they're clouding the overall sonics — most commonly a concern in the lower octaves.
The Ambience effect was applied to everything to some extent (with the exception of the hurdy‑gurdy, which seemed to blend alright on its own), but the lead whistle and 'Guitar 2' parts both sent several decibels less signal, so that they stayed a step forward from the general throng. RealVerb Pro was also applied across the board, adding sustain and a definable acoustic signature, but the hurdy‑gurdy and drum parts used higher levels to help them seem a bit larger than life.
 and gentle low‑ratio master‑buss compression from Universal Audio's emulated Neve 33609 compressor.") Mix 'glue' for bringing all the individual overdubs together into a cohesive ensemble was provided primarily by a couple of different global reverbs (Smarteletronix Ambience and Universal Audio RealVerb Pro) and gentle low‑ratio master‑buss compression from Universal Audio's emulated Neve 33609 compressor.
Mix 'glue' for bringing all the individual overdubs together into a cohesive ensemble was provided primarily by a couple of different global reverbs (Smarteletronix Ambience and Universal Audio RealVerb Pro) and gentle low‑ratio master‑buss compression from Universal Audio's emulated Neve 33609 compressor.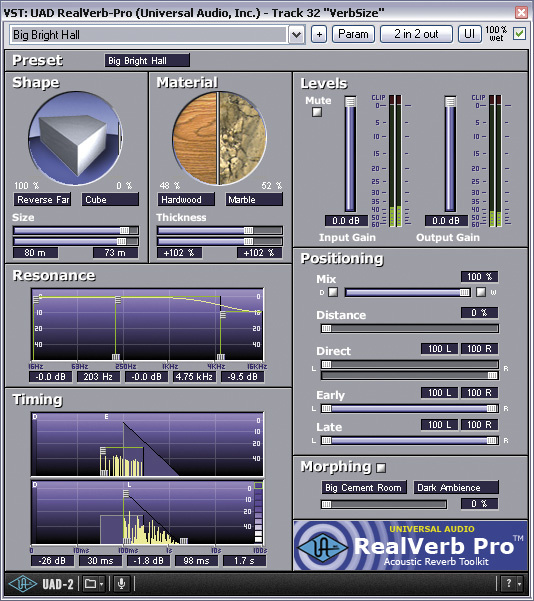
 In addition to these general‑purpose effects, I used two more closely targeted effects for some specific instruments. The first was a simple stereo tempo delay to increase the fullness and resonance of the two acoustic guitar parts beyond what was possible using the RealVerb Pro instance. After a certain point, turning up the reverb tail effect for those instruments just washed out the mix and became unnatural‑sounding, which is something that delays don't do nearly as readily, because of their lack of a strong spatial dimension in stereo. The second effect was my old friend, the Harmonizer‑style stereo‑widening treatment that I'm forever mentioning in this column, which just spread the mono lead whistle and 'Guitar 2' recordings across the stereo picture a little.
The final touches were a couple of decibels of smooth low‑ratio 'glue' from Universal Audio's emulated Neve 33609 bus compressor, and a good dose of fader automation, stabilising the lead instrument levels, pulling out nice little details in the 'Guitar 2' track, and reinforcing the sense of gradual build‑up through the tune.
It Should Be Easy
 was feeding each effect.") Only four send effects were used in the remix, and this screen shows the relative level at which each instrument (or group of instruments) was feeding each effect.
Only four send effects were used in the remix, and this screen shows the relative level at which each instrument (or group of instruments) was feeding each effect.
If I'd not had to do any corrective editing, and hadn't had to compensate for lost signals or the less‑than‑ideal mic placement, this would have been rather a straightforward morning's work. The fact that it took more like a day and half underlines how much these issues can slow down progress towards achieving a decent final mix. However, even with flawlessly performed and recorded raw material, you may still have to sacrifice some fidelity on individual tracks in order to maximise the impact of the finished product.
Audio Examples
You can listen to the original and remixed versions of the track at /sos/aug11/articles/mixrescuemedia.htm.
Rescued This Month
This month's track is called 'Lament', as performed by the Wolf's Head and Vixen Morris band on their album Unearthed. Founded in Kent 15 years ago by Philip Kane, the band and the dancers of Wolf's Head and Vixen Morris have worked their way through a number of line‑ups, steadily growing in number. SOS reader James Rycroft joined them a couple of years ago, after completing a Music Technology degree at the London College of Music and Media, so it was perhaps natural that recording and mixing duties should fall to him for their most recent work. For 'Lament', the band consisted of Danny Graham (mandolin, bouzouki), James Rycroft (acoustic guitar), Joel Goss (acoustic guitar), Keith Yardey (drum), John Whittaker (hurdy‑gurdy), Lisa Watson (tin whistle), Didi Bergman (tenor recorder), Diane Goss (descant recorder), and Debby Bishop (descant recorder).
All the recordings were captured via a Digidesign M‑Box into Pro Tools 7 LE running on a dual 1.8GHz G5 Mac, and a small, underpowered laptop of Japanese descent. Sessions were split between several different venues, including band‑leader Danny Graham's sound‑proofed basement room, James's flat, and the gents toilets of a pub called 'The Good Intent'! The last is where the band rehearse, and they discovered that the reflective, tiled‑room acoustics happened to particularly suit the mandolin and bouzouki parts. Let's hope they didn't cause too much of a queue...
Remix Reaction

James Rycroft: "This track was the 'sore thumb' of the album before, and didn't sound as professional as the other tracks, but now it almost sounds too good!
"The mix begins with the hurdy‑gurdy drone as before, but has a more effective crescendo leading into the first verse and then builds even more, to really kick in on the chorus. You can almost imagine a cymbal crash! Each instrument has its own space, and this creates a more solid overall mix. The drum sits well and has a more natural sound compared with the original. The guitars work excellently together and seem to have more bottom end, but do not sound muddy in the slightest. Before, there was an issue with the wind instruments seeming to be slightly out of tune with each other (through no fault of the performers, I might add, but rather of the manufacturers), but Mike has resolved this, to improve the ensemble sound.”