

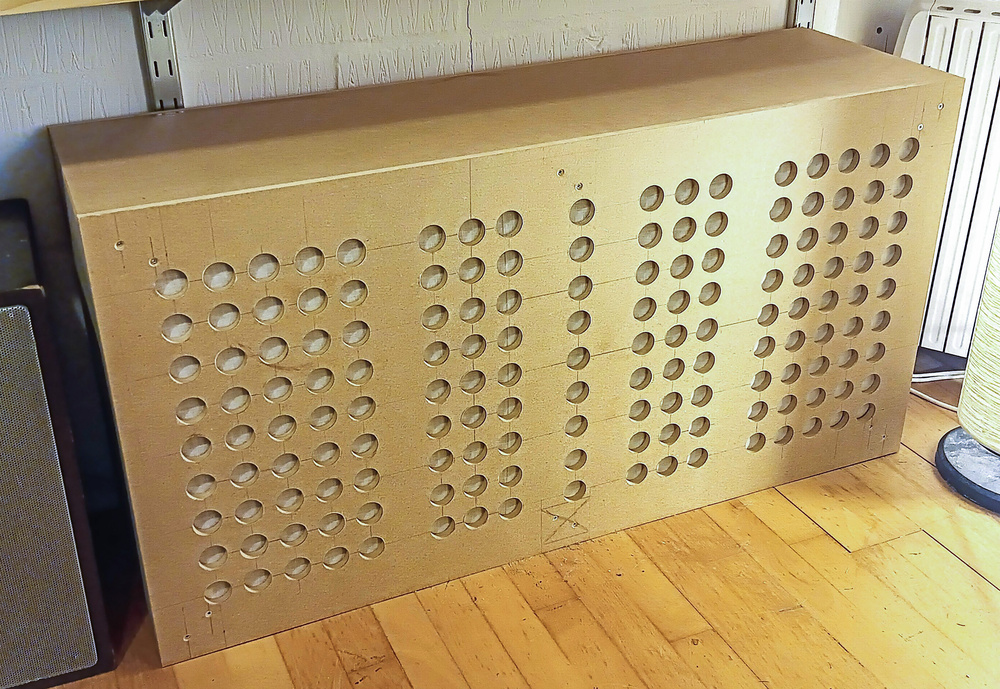
Mike’s £40/$50 perforated‑panel Helmholtz resonator. All it needs now is a lick of paint...
Affordable and effective, broadband absorbers are the first port of call for acoustic treatment with good reason. But sometimes you’ll hit on an acoustics challenge that requires greater precision...
When you’re acoustically treating a project studio for mixing purposes, there are lots of straightforward acoustics fixes you can try. It doesn’t take more than a few strategically placed patches of acoustic foam, for instance, to scotch flutter echoes at high frequencies or to stop early reflections off nearby hard surfaces from comb‑filtering your midrange monitoring. And judicious broadband bass trapping, typically in the form of large fabric‑covered mineral‑fibre slabs near the room boundaries, is usually pretty effective at damping most low‑frequency room resonances. Furthermore, all these tactics can be very cost‑effective, since acoustic foam is fairly inexpensive and you can build broadband bass traps for yourself at a fraction of the cost of off‑the‑shelf products.
Occasionally, though, there may be an acoustics problem that’s just too challenging for general‑purpose absorptive treatments, especially if inconvenient realities such as doors, windows, and furniture restrict your placement options. In smaller mix rooms in particular, it’s not uncommon for one or two troublesome low‑frequency room resonances to survive even quite a lot of broadband bass trapping. That’s when it’s useful to have a bass trap that can be ‘tuned’ to target more specific frequency ranges. One of the simplest such designs is the perforated‑panel Helmholtz absorber, and in this article I’d like to explain how you can build one of these for yourself.
Ready To DIY
Everyone’s heard someone blowing over the top of an empty bottle to create a musical note — a note that results from the inherent resonance of the bottle’s contained body of air. If you placed that bottle in your mix room while playing back music, it would also resonate in sympathy with the soundwaves hitting it and, crucially, would therefore remove some of that frequency energy from the room. It’s this fundamental principle that Helmholtz absorbers take advantage of, the idea being that you tune them to match your troublesome room mode, and they then absorb some of that frequency — or, to be more accurate, a narrow band of frequencies centred on the absorber’s resonant frequency. In practice, though, a Helmholtz trap is usually a lot larger than a bottle, so that it absorbs more energy, and it usually has some damping material added to its resonant cavity to make its resonant peak broader, and therefore widen the band of frequencies it absorbs.
You can build Helmholtz absorbers in several different ways, but the perforated‑panel variant is tempting for the DIY‑minded home‑studio owner, simply because it’s so easy and cheap to construct. Basically, it’s just a large, sealed wooden box with holes drilled in the front, the box typically being half‑filled with low‑density mineral‑wool loft insulation. For example, I put together the one pictured in this article in a single morning, with just a cordless drill, a staple gun, and maybe $50 £40 worth of materials from my local hardware shop. (For detailed instructions, see the ‘Building The Trap: Step By Step’ box.) The biggest potential pitfall, in fact, isn’t the construction itself: it’s making sure that you’ve tuned the trap to the correct resonant frequency. I say this because, as I discovered while researching my own build, there appears to be a flaw in the widespread received wisdom on this subject amongst online home‑studio pundits. Let me explain...
Lies, Damn Lies & Equations
One of the best‑known reference works on acoustics, F Alton Everest’s Master Handbook Of Acoustics has a dedicated section on perforated‑panel Helmholtz resonators, including an equation for calculating their resonant frequency based on their dimensions.One of the best‑known academic texts on acoustics is F Alton Everest’s Master Handbook Of Acoustics, which is now in its seventh edition. So it’s understandable that a lot of recording musicians draw inspiration from it when designing their own acoustic treatment. Conveniently, there’s also a two‑page section specifically dedicated to perforated‑panel Helmholtz absorbers, complete with a handy equation you can use to predict the resonant frequency of the empty box, based on its depth, the front‑panel thickness, the diameter of the drilled holes, and the percentage of the front panel’s area you’ve drilled out (the ‘perforation percentage’).
I won’t bore you with the details of that equation, though, because there’s actually no need to tangle with it directly — there’s a little Excel calculator spreadsheet at https://docs.cambridge-mt.com/MSFTSS/HelmholtzCalculator_260207.xls that’ll do all the maths for you, so you can easily experiment with different construction parameters to see how they affect the resultant resonant frequency. There are a couple of important general principles you can draw from the equation, however:
- The greater the number of holes you drill in the front panel, and the bigger they are, the higher the resonant frequency.
- The deeper the box (ie. the greater the distance between front and rear panels), the lower the resonant frequency.
There’s one more basic concept too of course: larger traps absorb more energy. Beyond that, though, one of the great things about this design is that you can build useful perforated‑panel absorbers of pretty much whatever size you want, and that allows you to design them specifically to fill otherwise unused spaces in your studio — behind your desk, perhaps, or under a bench, or up at ceiling level. I’ve even heard of some people using these kinds of traps as speaker stands!
Adding mineral wool to your mathematically predicted box doesn’t just broaden its resonant peak; it also lowers it considerably.
But here’s the hitch: unfortunately, most project‑studio owners using F Alton Everest’s equation overlook one crucial bit of small print that’s tucked away in a graph caption: “The presence of the mineral wool shifts the frequency of resonance considerably from the theoretical values.” You see, it turns out that adding mineral wool to your mathematically predicted box doesn’t just broaden its resonant peak; it also lowers it considerably. For example, I recently wanted to design a trap for my own studio to resonate around 100Hz so, based on Everest’s equation, I constructed a 116 x 35 x 60cm box and drilled 35 3.5cm‑diameter holes into the front panel. With the box empty, it responded exactly as I’d hoped, resonating most strongly around 100Hz; not only could I hear the resonance peak if I listened with my head close to the front of the panel, but I could also feel the box physically vibrating most strongly at that frequency. When I half‑filled my box with loft‑insulation, however, its resonant frequency seemed to drop to around 70Hz, which is way off the intended mark!
The crucial sentence in F Alton Everest’s Master Handbook Of Acoustics that most project‑studio DIY enthusiasts overlook: “The presence of the mineral wool shifts the frequency of resonance considerably from the theoretical values.”
By the way, it’s also easy to miss that Everest’s equation is for “the frequency of resonance of perforated panel absorbers with circular holes backed by a subdivided airspace”, or, in other words, for a trap with an internal lattice separating the airspaces behind each front‑panel hole. I have no idea what difference this makes, but that wording provides another reason to actively test your trap’s resonant frequency, rather than just blindly trusting the maths
Back In The Real World
So my biggest piece of practical advice if you’re designing a perforated‑panel Helmholtz resonator is to leave yourself plenty of spare front‑panel space. That way, when the internal damping lowers the cavity’s resonant frequency, you can raise it back to your target value by drilling more and/or bigger holes. In my specific case, for instance, once I’d realised the limitations of F Alton Everest’s equation, I just reverted to my usual suck‑it‑and‑see DIY mentality — by which I mean I just kept drilling new holes, and then listening for the desired resonant frequency while playing back my trusty LFSineTones test file. (This file is just a semitone scale of low‑frequency sine‑wave tones at the same volume level, and you can download it here if you need it: https://cambridge-mt.com/ms3/ch1/#audio-files.) What really surprised me was that I needed four times as many holes as the original design before it felt like the trap’s resonant frequency was actually reaching the zone I was after!
Long‑winded as this process was, it did alert me to a really cool up side of this particular design: it’s very elegantly repurposable to different rooms. By simply sliding another bit of board over the front panel to cover different numbers of holes, you can experiment very quickly and intuitively with the trap’s resonant characteristics, effectively tuning it by ear in real time. And once you find the appropriate resonant frequency for your purposes, you can screw a panel to the inside of the box to block the required number of holes more permanently without ever changing the trap’s external appearance! This is great if you need to move your studio from time to time to new rooms.
Building The Trap: Step By Step
I built my own perforated‑panel Helmholtz resonator out of 12mm MDF. While you could cut the six panels required to make the box yourself, many DIY shops now have in‑store woodcutting services that will do the job so cheaply and accurately that it’s hardly worth it! In my case, the wood and the cutting service cost me just £25(about $35), and while I was there I also bought a £$5 bottle of wood glue and a $50£40 roll of mineral‑fibre loft insulation. As it happened, I already had a bucketful of small metal angle‑brackets, so I used those to join the panels together from the inside, but if I hadn’t, then I’d have just bought a few metres of 3x3cm square‑cross‑section timber to run along all the corner joints internally, and would have then screwed through the MDF into those from the outside. (Just screwing the ends of such thin MDF together would have been way too flimsy.)
Step 1 (left): Start by constructing the MDF backing box, and sealing the joints with wood glue. Step 2 (right): Add blocks of wood onto which you can screw the top panel.
When I got home, I constructed the backing box first, sealing all the joins with generous beads of wood glue. Then I fixed in some small blocks of scrap wood a half‑centimetre below the lip of the box so I could then screw the top panel into those to seal it good and tight against the top of the box. Next, I marked out my top panel to create a lattice pattern for my initial 35 drill holes... but only drilled 32 of them in the first instance, to provide for any margin of error in my maths!
Step 3 (left): Marking out the top panel. Step 4 (right): The drilled top panel, with some holes left undrilled as insurance against calculation errors!
At this point I half‑filled the box with loft insulation (which only used maybe a quarter of the package), screwed down the lid, and moved the box into my studio room to do some tests — and, as discussed in the main text of this article, quickly discovered that I needed to drill a lot more holes to compensate for the resonance‑lowering side‑effects of the internal damping material! Finally, I stapled a bit of thin acoustic fabric to the back of the front panel to cover all the drilled holes, so as to avoid irritating mineral fibres escaping into the room. You can see the finished box in position at the top of the article.
