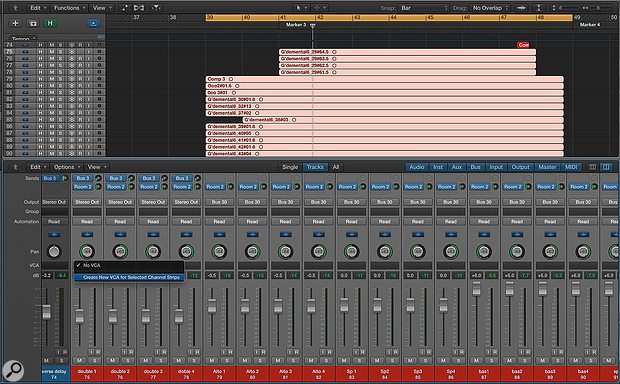
 Screen 1: You can assign a collection of channels to a VCA group by first selecting them and then Ctrl-clicking on one of their channel strips over the VCA drop-down menu. From here choose the ‘Create New VCA for Selected Channel Strips’ option. You can now use the newly created VCA fader to control their level.
Take control with Logic 10.1’s new mix tools: VCA faders, region automation, and Relative and Trim modes.
In this month’s Logic workshop we continue looking at the new features in Logic 10.1, including VCAs to control the level of tracks with post-fader sends, Region and Track automation, and Trim and Relative automation modes.
VCA Faders
If you are used to using live-sound consoles you will no doubt be familiar with mixing using VCAs or DCAs, and know how useful they are for simplifying large mixes down to a few faders. It has taken the world of DAWs a while to catch up and include them, and now with the 10.1 update Logic has joined the party. In Logic a VCA fader is one that can be assigned to control the relative level of other faders. Like an audio sub-bus, it is possible to assign any number of channel and bus faders to it but, unlike a sub-bus, it has no audio path.
One of the key advantages of VCAs over conventional sub-bus grouping occurs when using tracks with post-fader sends to effects such as reverb. For example, say you had 10 backing vocal tracks and on each one you used Bus 1 to add a bit of reverb. If you route their track outputs to a sub-bus and then turn down the bus fader, you end up changing the ratio of dry sound to reverb. The tracks running through the sub-bus would be attenuated but the reverb level would remain unchanged. However, if you use a VCA-style group, reducing the level with the VCA fader reduces the individual level of each channel and, therefore, the signal being sent through each post-fader send is also proportionally reduced. Essentially, grouping by VCAs lets you preserve your post-fader effect balance.
Let’s have a look at how to use VCAs with an existing Logic project. I am going to use a project I have been working on that has a lot of backing vocal tracks. Find a similar project and follow along.
First, we have to make sure that VCAs are visible in the Mixer channel strip. Open the Mixer, then from the ‘View’ drop-down menu, navigate to Channel Strip Components and ensure the ‘VCA’ box is ticked.
To assign a group of channels to a VCA fader, select the channels you want to assign in the mixer. In my example, I’m using 16 backing vocal tracks. Now Ctrl-click on the VCA field on one of the selected channels, and from the pop-up menu choose ‘Create New VCA for Selected Channel Strips’ (see Screen 1). Logic fills in the VCA row of the selected channels telling you they are assigned to VCA 1 and adds a VCA fader to the far right-hand side of the Mixer. You can now use the VCA fader to control the level of all the backing vocals assigned to that VCA group. If your backing vocals use post-fader effect sends to a reverb plug-in, notice how the level sent to the reverb reduces as you turn down the VCA group fader. Another advantage of VCA-style grouping is that it requires no changes to your existing channel outputs, and a single VCA group can control a series of channels that are all directed to different outputs.
Having VCAs also gives you room for experimentation with automation. Route all your backing vocals to a conventional bus and set their channel-strip output to Bus 1. Leaving the VCA in place, now put a compressor across Bus 1 so it’s compressing all of the backing vocals together. We can now use the VCA group to control the level of our backing vocals flowing into that compressor. This allows us to control how hard the backing vocals are hitting that compressor. This is useful to automate in cases where there is a loud word or phrase that is causing the compressor to react in an unpleasant way. To record VCA rides as automation, go to the right-hand end of the mixer and Ctrl-click on the VCA channel strip. From the pop-up menu choose Create Track. Logic puts a track lane onto the Arrange page for our VCA fader, allowing you to draw or record automation into that lane in the same way as a normal track. As a shortcut, setting a VCA fader’s Automation mode to Write or Touch will achieve the same outcome.
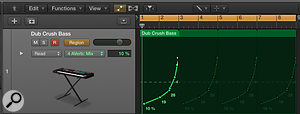
 Screen 2: With the track header set to show region automation, drawing automation into a looped region produces looped automation.
Regions Versus Tracks
Logic 10.1 makes using automation with Regions or Tracks a lot easier than in previous versions. In a new Logic project create a software instrument track and from the Library load the Synthesizer / EDM Bass / Dub Crush Bass preset. Record a simple two-bar phrase and loop it so that there are four repetitions. Now, at the top of the Arrange page to the right of the View menu, click the Show/Hide Automation button to show the automation lane (by default, the shortcut key for this is A). In the Track header there is a yellow button with ‘Track’ written on it. This is a toggle button and it switches the Automation display to show either Track or Region automation. Switch it to ‘Region’ by clicking it, and from the Automation parameter combo box navigate to 4 Averb / Mix. Now use the pencil tool to draw in some automation to alter the Wet/Dry balance of the Averb plug-in (see Screen 2). Notice that as you are drawing in automation, it appears in each of the looped regions as well.
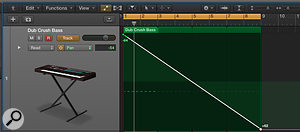
 Screen 3: Changing the track header to show ‘Track’ automation allows you to draw automation across the looped regions. Here I have used pan automation to move the synthesizer part from the left to the right speaker over an eight-bar period.
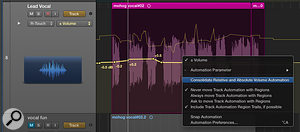
Now, switch the Automation display to Track and from the Automation parameter combo box choose Main / Pan / Absolute. Draw a slow pan sweep from left to right that’s eight bars long (see Screen 3). The result is a reverb automation that loops with our region and Track automation running across the entire eight-bar length. On a personal level I like to use Region automation for any repetitive automation, and Track-based automation for broader brush strokes that work across different regions. Screen 4: If you have a lead vocal part with detailed fader rides that needs some further balancing, then you can use the ‘Relative’ automation mode to nudge the vocal up and down in volume whilst preserving your existing rides.
Relativism
Another excellent addition to Logic’s automation facilities is the ability to input automation in Trim or Relative mode. These modes address the problem of massaging the overall level of a vocal track which already contains detailed rides, allowing you to easily turn it up in certain sections and down in others, whilst still preserving the existing automation. Load up a project with a lead vocal part that already has automated level rides written (see Screen 4). On the lead vocal move across to the channel strip and set the Automation mode combo box to Touch, and from the same menu make sure it is set to Trim. Now hit Play and move the fader, then hit Stop. Observe that the automation you just recorded has completely replaced all your careful level rides. Undo that! With the Automation mode still set to Touch, switch the behaviour from Trim to Relative. Once again, hit Play and move the Fader to add some overall volume rides. See how your previous detailed volume rides remain unscathed and you have a new +/- volume automation lane that works in tandem with your existing automation. Lastly, Ctrl-click on the automation and choose the ‘Consolidate Relative and Absolute Volume Automation’ option to merge your volume automation together (see Screen 5). Continue this refinement process, recording more relative automation, and merging it with the existing automation until you are satisfied you have the perfect level throughout your whole track.
 Screen 5: Once you have recorded further volume automation in Relative mode, you can merge that with your existing volume automation by Ctrl-clicking on the automation lane and choosing the ‘Consolidate Relative and Absolute Volume Automation’ option.
Relative and Trim modes are very welcome additions to Logic 10.1. Along with the other automation improvements, they give you much greater control over your mixes.
