If you're new to Reaper's channel‑splitting abilities, here's a neat exercise to get you started.
One of Reaper's greatest strengths lies in its routing and channel‑splitting capabilities. This article will show how you can use these to experiment and be creative when working with even the simplest of synthesizers. The examples used here (and the accompanying project files) employ only plug‑ins that are supplied with Reaper, including ReaSynth. but you can substitute ReaSynth with any VSTi or DXi of your choice. Download the four sample project files from /sos/jun11/articles/reaperaudio.htm.
The original tune ('Last Night') used in these examples is a simple one with a four‑part arrangement. (If you open and play the file LastNight.RPP you'll see what I mean.) The exact settings of the various ReaSynth parameters are not important, by the way.
Now have a look at (and a listen to) LastNightA.RPP. A second instance of ReaSynth has been added, with different parameter settings. This certainly produced a fuller and richer sound, but it's one over which we have little control. What, for example, if we wish to pan the two synths differently? That's where channel splitting comes in.
Going Separate Ways
By default, Reaper's tracks each consist of two channels. Apart from anything else, this is what makes left‑right panning possible. Open the effects window for track one (in the file LastNightA.RPP) and save the file with a new name of your own choosing. Select, in turn, each of the two ReaSynths and click on the button labelled '2 out'. You'll see that both synths are directed to outputs 1 and 2. By changing this so that each goes to a separate channel, then adding a mixer to enable us to mix the two channels back together again, we open up a whole new world of opportunities. Try this:
- Select the first synthesizer. Click on its '2 out' button to display the plug‑in pin connector and disable the output to channel 2.
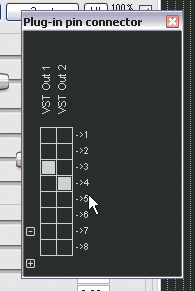
 You can easily direct synths to different outputs by clicking on the relevant parts of the routing matrix. To do this, you'll need to disable different outputs in each instance of ReaSynth. This picture shows the output to channel 2 being disabled on the first synthesizer.
 - Select the second synthesizer. Click on its '2 out' button and disable the output to channel 1.
- Play the track. The two synths have been split so that the first synth now comes from the left speaker only and the other from the right speaker only. That's why you need a mixer.
- Insert at the end of the effects chain the JS:Utility/chanmix2 plug-in. By moving the left pan control somewhat to the right and the right pan control to the left, you can mix back the two signals to create a stereo blend. Each channel's volume can be adjusted as you wish.
 By inserting JS:Utility/chanmix2 at the end of the effects chain, you can adjust the pan control on each channel, creating a more exciting stereo image.


The provided file LastNightB.RPP contains this completed example. So far, so good, but this is just the beginning. For example, what if you want to use more than two synths? And what if you want to use different audio effects for each synth?
Long Division
This is where Reaper's true channel‑splitting capabilities come in. You can add as many more channels as you like (up to a maximum of 64!) and do with them as you wish. You can use either a track's IO (routing) window, or its effects window to do this. In this case, it's easier and quicker to use the effects window. Using the same project file as before, try this:
- With the first synth selected, click on the '2 out' button, then click the small '+' button three times. Each time you do this, two more channels are added.
, you can create an even more sophisticated (and complicated) sound. However — as shown in screen two — the inputs and outputs of each channel have to be correctly selected for each channel.") By clicking on the '+' symbol and creating multiple channels (shown in the first screen), you can create an even more sophisticated (and complicated) sound. However — as shown in screen two — the inputs and outputs of each channel have to be correctly selected for each channel.
By clicking on the '+' symbol and creating multiple channels (shown in the first screen), you can create an even more sophisticated (and complicated) sound. However — as shown in screen two — the inputs and outputs of each channel have to be correctly selected for each channel.
- We're going to create a more sophisticated mix this time. Change the output of the first synth so that VST out 1 goes to channel 3 and VST out 2 goes to channel 4. Similarly, change the output from your second synth from channel 2 to channels 5 and 6. If you wanted to, you could add a third synth to this effects chain and direct its output to channels 7 and 8. Try this later if you like.
- This has become too big a job for our simple channel mixer. Remove it from the effects chain and replace it with the JS: IX/Mixer 8xM‑1xS. Fade the volume down completely on channels 1, 2, 7 and 8 (as these are not used) and adjust the levels on the other channels, and their respective pan settings, as you play the tune. Each synth now has two separate pan controls of its own: this gives you more precision control over your panning. You'll find an example in the file LastNightC.RPP.
- We're not done yet! In your effects chain, insert an instance of ReaVerbate between the two synths. Display its plug‑in pin connector and set both its inputs and outputs to 3 and 4 only: the same channels as used for the output from your first synth.
 Once you've added an instance of ReaVerbate between your two synths, you need to set the plug‑in's inputs and outputs to channels 3 and 4. These are the same as for your first synth, and selecting them will ensure that reverb is applied only to your first synth. This will ensure that the reverb is added to the first synth only. Adjust its parameters as desired.
 - Similarly, immediately after the second synth, add an instance of ReaDelay and set its inputs and outputs both to channels 5 and 6 only: the same channels as used for the output from your second synth. This will ensure that this effect is added only to the second synth. Adjust its parameters to taste.
- The output of your channel mixer will go to channels 1 and 2. If you wish, you can add effects (such as EQ or a compressor) after the channel mixer. These effects will be applied to the synth mix rather than to individual synths.
, you can create an even more sophisticated (and complicated) sound. However — as shown in screen two — the inputs and outputs of each channel have to be correctly selected for each channel.")

Identity Crisis
You're probably thinking that this effects chain is getting rather complicated. When you come back to the project in a few weeks time, how are you going to figure out what's going on here? One way is to use the 'Rename FX Instance' command. This is a really useful little tool that is often overlooked.
- Right-click over the first instance of ReaSynth and choose the 'Rename FX Instance' command. A shortcut for this is to press F2.
- The Rename FX Instance prompt is displayed. Type 'ReaSynth 3/4' and press Enter.
- Repeat this technique for your other plug‑ins, renaming them respectively as Reverb 3/4, ReaSynth 5/6, Chorus 5/6, Channel Mixer, and so on.
MIDI, Steady, Go!
Until now, we've been splitting only audio channels. That is to say, it's the audio output of the various synthesizers that has been split along different paths and later joined up again in our channel mixer. Now we're going to change that by introducing an example of how you can also split MIDI channels.
If you open the MIDI item on track 1 with Reaper's MIDI editor, you can see that notes and events exist on four of the 16 available MIDI channels: channels 2, 3, 4 and 5, in fact. You can confirm this in a number of ways: one is to use the Filter Events window in conjunction with the piano-roll view.
Let's now suppose that we want to add another synth, this time just for notes and events on one of the channels — say channel 3. You can do this by sending just this one channel to an extra track of its own.
- Create a new track.
- Display the IO window for this track and add a receive from the track that contains the MIDI item.
- To make sure that you don't also receive the audio output from this track, display the audio drop‑down list for this receive and select None.
- Use the 'MIDI from' setting to specify which channel you wish to receive from the source track. In this example, that would be channel 3. You can set the channel on the destination track to anything you wish, but in this case it keeps things simple just to use channel 3 again.
- You can now insert your synth and plug‑ins into the effects chain for this track as you wish.
The project file LastNightD.RPP contains the completed example. In particular, open the IO window on track 2 to see what has been done.
Hopefully, this article will have opened a few doors for you and given you a few ideas. How you use and apply them is up to you!