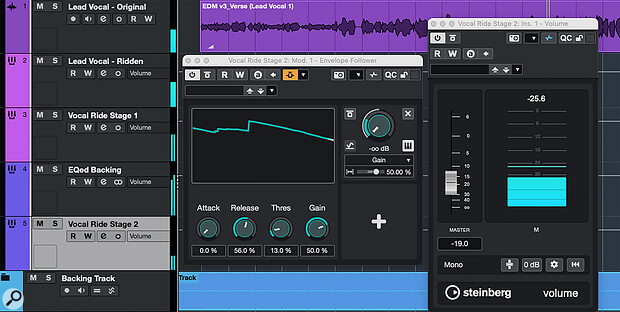
 In the first stage of our DIY vocal riding, the combination of the Envelope Follower Modulator and Volume plug‑in lets us reduce the dynamic range of the original vocal.
Cubase’s new Modulator has many superpowers — it can even ride your vocal levels for you!
Waves Audio’s Vocal Rider plug‑in has proven enduringly popular (it was introduced some 15 years ago!) with good reason — it can automate, or semi‑automate, what was once a time‑consuming task: riding a channel fader to ensure the vocal isn’t ‘lost’ at different points in a busy and dynamic mix. In this article, I’ll take you through how you can use Cubase 14’s new Modulators to achieve similar results to Vocal Rider.
Rider Essentials
Under the hood, Vocal Rider does a number of things. First, like a combination of compression and expansion, it can be used to make the overall dynamic range of vocals, dialogue or solo instruments (despite the name, it works well on various sources) more consistent. Second, as it can accept a side‑chain signal (such as a vocal‑free backing track, or specific elements from the mix) and track that source’s dynamics, it can be used to adjust how the vocal level is balanced against that mix, so that the lyrics remain clearly audible even as the arrangement changes. Third, all of its automatic level adjustments can be written as automation data to your DAW. So you’re able to finesse the result with targeted manual edits — something that’s much harder to do with a compressor.
It’s possible in most DAWs to achieve similar ends using the built in tools, but generally speaking it can be more fiddly to set up. For instance, Mike Senior outlined one such approach in a Cubase workshop back in SOS June 2010 (https://sosm.ag/cubase-0610), shortly after Vocal Rider came out. With the introduction in Cubase 14 of the new Modulator facility, though, Cubase Pro users now have another option...
On The Level
First, we’ll use Cubase’s Envelope Follower Modulator and the new Volume plug‑in (shown in the opening screenshot) in combination to reign in the dynamic range of a spoken or sung vocal. A suitable configuration is shown in the first screenshot. Next to my main lead vocal channel is a mono Group Track set to receive a pre‑fader send from the main vocal. The processing (courtesy of the Envelope Shaper Modulator and an instance of the Volume plug‑in) is done to this Group Track, before both tracks are sent to and blended on a further Group Track.
As the name suggests, the Envelope Follower creates a control signal based on the level (amplitude) of the incoming audio signal. By adjusting the Attack, Release, Threshold and Gain knobs, you can modulate the amplitude curve displayed in the Modulator’s main panel. This curve can then be used to drive changes in any of the Modulator’s target parameters. In this case, that’s Volume’s Gain parameter. Note that the Modulation Depth has been set to a negative value (‑50%) — this way, as the incoming audio gets louder, the Modulator will turn down Volume’s Gain, thus reducing the signal level at the track’s output.
 The Envelope Follower modulates the Volume control on the Vocal Ride Stage 2 track, increasing the track’s volume when the level of the backing track gets louder.
Clearly, with Attack, Release and Threshold all present, this is not a million miles away from being a regular compressor’s control set. Meanwhile, the Envelope Follower’s Gain control acts as an input level control, equivalent to pushing a compressor’s input harder. Adjusting the negative Modulation Depth then lets you control how much gain reduction is applied once the input signal passes the threshold. You can also adjust the blend of these two vocal channels (one unprocessed and one processed), which makes it easy to dial back the overall impact of the gain reduction to taste. You might also have noticed that in this example, this blend is then sent to a further Group Track that I named ‘Vocal Ride Stage 1’ — I’ll come back to this in a minute!
Before I do though, it should also be noted that Vocal Rider, while letting you reduce volume peaks in a similar fashion, also raises the levels of quieter sections. I suspect you could configure an additional Modulator stage to simulate this, but I’ve kept things simple here and, in most cases, you can achieve a perfectly adequate reduction in overall dynamic range by attacking the problem from one direction (top down, so to speak) rather than two (top down and bottom up).
A Bit On The Side
The second stage of vocal riding involves getting the overall vocal level to ride along with changes in the dynamics of the instrumental backing in which it sits. As shown in the first screenshot, the approach I’ve employed (which leans on Mike’s article that I mentioned above) requires two further mono Group Tracks, that I’ve named ‘EQed Backing’ and ‘Vocal Ride Stage 2’).
Drum elements can be amongst the loudest parts of any mix, so best not to let them drive the automatic vocal levelling too much.
The EQed Backing channel receives post‑fader sends from any of the backing instrumentation tracks you want your vocal to ride its volume against. In this case, I’ve used two such feeds. One comes from an ‘all instruments’ track, and the other, with a much lower send level, from an ‘all drums’ track. Drum elements can be amongst the loudest parts of any mix, so best not to let them drive the automatic vocal levelling too much — otherwise we can easily end up with a vocal that pumps in time with the kick and/or snare!
Two further points need noting. First, the EQed Backing track’s main output is set to No Bus, so no matter how much signal is sent here it won’t be heard in the main stereo mix. Second, this channel has a steep high‑pass filter applied, so that the kick/bass elements in the backing track can be controlled. This will let the midrange frequencies in the backing track, which are the most likely to mask our vocal frequencies, dominate the second stage of vocal riding.
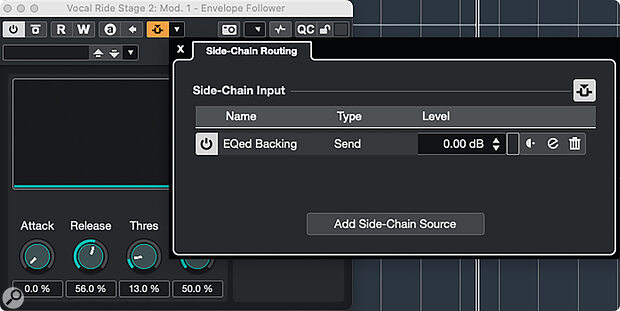
The Vocal Ride Stage 2 track is set to receive a send from Vocal Ride Stage 1, and is then routed to the main vocal bus. It also has both an Envelope Follower Modulator and a Volume plug‑in inserted on it. In this case, though, the Envelope Follower uses a side‑chain input signal from the EQed Backing track, and changes in the level of this signal therefore dictate the envelope shape in the Modulator’s display. This envelope is then used as the modulation source to target the Gain control in the Volume plug‑in. But in this case, the Modulation Depth is positive so, as the level of the side‑chain signal from the EQed Backing signal increases, so too will the level of the Vocal Ride Stage 2 track.
 For the second stage of the process, this instance of the Envelope Follower uses its side‑chain input to let it track the volume of key elements in the backing track.
You can set the Attack, Release (both set to act more slowly, for a smoother response), Threshold, Gain and Depth of the Envelope Follower to adjust the degree of volume control, so that the vocal signal on this track follows the dynamics of the backing track. The main vocal bus then sums this Vocal Ride Stage 2 signal with that of Vocal Ride Stage 1. Finally, you can just use these two tracks’ faders to set how the overall vocal levels ride the dynamic changes in the overall mix level and remain audible. Hey presto! Two stages of vocal riding that help to prevent your vocal getting lost.
Can’t Catch Me?
I found this approach very effective on the whole, but there’s one caveat that some might find significant. As I said above, Waves’ Vocal Rider can record its volume automation data to your DAW, and that’s useful because, as with most automated processes, although it takes a lot of the hard work out of vocal level automation, there can still be sections you wish to adjust. Unless I’ve missed something (quite possible, so please do feel free to put me right if you know something I don’t!), then it doesn’t seem possible to ‘catch’ the Modulator‑driven changes to the Volume plug‑in’s Gain control, and record them as standard automation data. That’s a shame as the option for a final ‘tweak it manually’ stage would be great to have. Of course, this is the first iteration of the Modulator feature set and I’m sure Steinberg will be keen to expand upon what is a mighty impressive start. Let’s keep our fingers crossed that a means to record Modulator‑driven automation data is on the development team’s ‘to do’ list.
