Navigating complex arrangements can often be frustrating, but by taking advantage of Cubase's Marker Track, you can easily define a structure to simplify the process.
Although graphic arrange windows, such as the one found in Cubase, make it easy to see what's going on in arrangement with a just casual glance, users have always found it convenient to add labels to the arrange window in order to indicate the structure of the song, such as 'exposition' and 'recapitulation', or maybe just 'verse' and 'chorus', for example. In early versions of Cubase, the way of adding these labels was to create a Track filled with empty Parts containing the names of the sections, but from version 4 and 5 of Cubase VST, Steinberg implemented a dedicated Marker Track that could be displayed just above the Ruler, as discussed in January 2002's Cubase Notes.
In SX/SL, Cubase users once again find themselves creating Markers on a Track, since the Marker Track is now a special Track type that's placed in the Track List with all the other Tracks in a Project, rather than appearing next to the Ruler. And so here we're going to be looking at how you can make the most of Markers in Cubase SX/SL.
Marker Madness
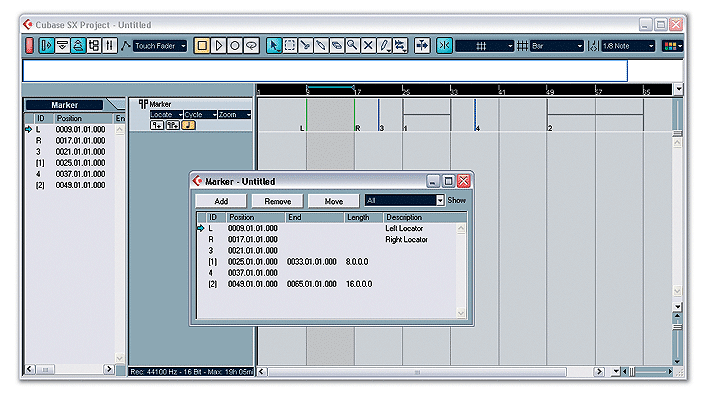
In order to start using Markers, you need to first create a Marker Track on the Project window by selecting Project / Add Track / Marker (or via any of the other methods you can use for creating Tracks) — and note that there can only be one Marker Track per project. Once you've created a Marker Track, you'll notice that even if you haven't created any Markers, the Marker track already contains two Markers: our old friends the Left and Right Locators, which are always reserved as the first two Markers.
 Cubase's Add Marker button.There are many ways to create a Marker, and the first is to set the Project Cursor to the position where you want to create a Marker and click the Add Marker button on the Marker Track itself in the Track List, although you may need to resize the Marker Track first so you can access the Add Marker button. Since the Left and Right Locators are the first two Markers, you'll notice that the first Marker you add yourself is assigned the numerical ID 3 — the Left and Right Locators are assigned with the numerical IDs 1 and 2.
You can also create a specific Marker (or reassign it if it already exists) to the current position of the Project Cursor by pressing Control/Apple and the number of the Marker you want to add or move from '1' to '9' on the main part of the keyboard (not the numeric keypad). For example, to add or move the Marker with the ID number 3, you'd press Control/Apple+3. Incidentally, this is why pressing Control/Apple+1 or Control/Apple+2 sets the position of the Left or Right Locator to the position of the Project Cursor.
You can move the position of a Marker in the Marker Track by simply dragging it, or delete it by selecting it and pressing Backspace, or clicking it with the Erase tool. The final way to create a Marker in the Marker Track is to Alt/Option-click with the Object Selection (arrow) tool, or just click with the Draw tool, at the location you want to create a Marker.
Once you've created some Markers, you can set the Project Cursor to the position of a Marker by simply double-clicking the relevant Marker. However, if you can't see the required Marker in the Event Display, you can also select the Marker by clicking Locate on the Marker Track itself in the Track List and choosing the Marker you want to set the Project Cursor to in the pop-up menu. Again, you might need to resize the Marker Track to see the Locate button.
Alternatively, you can set the Project Cursor to the position of a Marker with an ID number between one and nine by pressing a key numbered between one and nine on the numeric keypad. And yes, as most Cubase users already know, pressing either '1' or '2' on the numeric keypad, for example, sets the position of the Project Cursor to either the Left or Right Locator. It's possible to change the ID numbers of the Markers so you can reassign the Markers available via the numeric keypad — see the Marker Window box for more information.
Creating And Using Cycle Markers
In addition to the standard Markers described in the previous section, Cubase also provides what's known as a Cycle Marker, which is basically a Marker that defines a region (as opposed to a single time location) using both a start and an end point.
 Creating a Cycle Marker.To create a Cycle Marker, set the Left and Right Locators to define the area you want the Cycle Marker to cover, and click the Add Cycle Marker button on the actual Marker Track in the Track List. Alternatively, you can also create a Cycle Marker by Control/Apple-dragging in the Marker Track over the points you'd like the Cycle Marker to start and end.
While you can edit the position of the Cycle Marker graphically in the Marker window, as described in the next section, you can also move a Cycle Marker visually by dragging it, or adjust the start or end points by dragging their handles. And, like a normal Marker, a Cycle Marker can be deleted by selecting it and pressing Backspace, or clicking it with the Erase tool selected Interestingly, you can even split a Cycle Marker into two separate Cycle Markers by using the Split tool in the same way as you would to split an Event or Part.
 Cubase's Marker window.
Once you've create your Cycle Markers, you can set the position of the Left and Right Locators to the start and end points of a Cycle Marker by either double-clicking the relevant Cycle Marker, or by clicking Cycle on the Marker Track and selecting it from the pop-up menu. Another interesting application for Cycle Markers is to set the horizontal zoom factor, which you can do by either clicking Zoom on the Marker Track, or selecting from the Horizontal Scale pop-up menu at the bottom of the Project window.
You can also select all the objects between two Markers or a single Cycle Marker on the Project window: double-click with the Object Selection tool in between the two Markers, or the start and end points of the Cycle Marker, on the Marker Track. Alternatively, to make a Range selection between two Markers or a single Cycle Marker, double-click with the Range Selection tool between the two Markers, or the start and end points of the Cycle Marker, again, on the Marker Track.
|